# About Züs

Introduction to Züs

Züs is a leading privacy and secure AI data platform that provides users full ownership and control of their data, with powerful AI agents on Vult.network to accelerate productivity. It is also ideal for on-prem, high speed S3 storage as well as backup and disaster recovery to prevent outage, breach, and ransomware issues.

It has an unparalleled data integrity layer on the blockchain and a zero knowledge network, with data and key distributed so that its almost impossible to breach. Another standout feature is that it allows users to share encrypted data easily, even on a public link.

We’ve built the first **S3-compatible storage platform** that is both **ACID-compliant** and runs on a **zero-knowledge network** — eliminating the need for additional services like AWS Athena or GuardDuty to secure or query your data.

<figure><img src="/files/WecbsiZk8o5uLdFrfc87" alt=""><figcaption><p>Zus Performance Metrics</p></figcaption></figure>

#### Our Promise: 10x Value to Customers

* **5x better performance** – Real-world tests showed up to 5x gains versus AWS.
* **2x lower costs** – Thanks to zero egress and zero API fees, you save more as your usage scales.
* **2x lower carbon footprint** – Our [erasure-coded architecture](https://www.blimp.software/) minimizes redundancy-related overhead.
* **Bulletproof security** – Split-key security, zero-knowledge design, and erasure coding ensure unmatched internal breach resistance.
* **No vendor lock-in** – Easily add, remove, or swap providers with no disruption or central dependency.

One of our enterprise customers benchmarked Züs against AWS using [s3compare.io](https://s3compare.io) and saw **5x performance improvements** across common S3 operations — validating our edge in real-time workloads and data transfer scenarios.

We also fill security and vendor neutrality gaps that MinIO and AWS have in their solution. Check the table below for comparison.

Beyond backup and datalake storage, our platform is ideal for storing AI data, where integrity and verifiability matter such as for MCP workflows.

<table><thead><tr><th width="225">Feature</th><th>AWS S3</th><th>MinIO</th><th>Züs</th></tr></thead><tbody><tr><td><strong>Managed Infrastructure</strong></td><td>Fully managed with strong global uptime</td><td>Self-hosted; requires manual setup and scaling</td><td>Fully managed decentralized infrastructure with flexible scaling</td></tr><tr><td><strong>Split-key Internal Breach Security</strong></td><td>Not available; single-party access control</td><td>Not available</td><td>Built-in split-key security prevents internal breaches by decentralizing key control</td></tr><tr><td><strong>Zero Egress Fees</strong></td><td>Charges apply for all outbound data</td><td>No egress fees</td><td>No egress fees on outbound traffic across providers</td></tr><tr><td><strong>Zero API Fees</strong></td><td>Charges per API call</td><td>Free API access</td><td>Free unlimited API requests; ideal for high-frequency apps</td></tr><tr><td><strong>Encrypted Data Sharing</strong></td><td>Requires external tools or complex configuration</td><td>Not supported natively</td><td>Native proxy re-encryption enables secure, private sharing of encrypted files</td></tr><tr><td><strong>Zero Knowledge Network</strong></td><td>Not supported</td><td>Not supported</td><td>Zero-knowledge architecture ensures providers can't access file contents or user identity</td></tr><tr><td><strong>ACID Compliant (Data Integrity)</strong></td><td>Eventual consistency; not ACID compliant</td><td>No built-in ACID guarantees</td><td>Fully ACID compliant to ensure consistent reads/writes and verifiable storage behavior</td></tr><tr><td><strong>Add/Swap Infrastructure (No Lock-in)</strong></td><td>Vendor lock-in with no real-time provider switching</td><td>Tied to fixed infrastructure</td><td>Add, remove, or swap storage providers dynamically with no lock-in</td></tr></tbody></table>


# System

A High-level look into the Züs System

Züs is a **blockchain-based, decentralized storage system** designed to offer high performance, security, and data integrity through a combination of **blockchain validation and storage decentralization.**

Unlike traditional decentralized storage solutions, Züs is structured as a **Blockchain-Observed Storage System (BOSS)**, ensuring data correctness, availability, and incentivization through an integrated architecture that includes **miners, sharders, blobbers, and validators**.

The system consists of **two primary subsystems** that work in tandem:

* **The Blockchain Subsystem** – Manages transactions, data integrity, and consensus through miners and sharders.
* **The Storage Subsystem** – Ensures the reliability and availability of stored data via blobbers and validators.

Beyond these core components, the system incorporates various supporting nodes and services to facilitate integration with external applications, APIs, and tokenized incentives.

<figure><img src="/files/zpkogUZ4cmUGDECz7M0l" alt=""><figcaption><p>A Diagram of the High-Level Architecture of the Züs System that makes all the features possible.</p></figcaption></figure>

### **1. Blockchain Subsystem**

The Blockchain Subsystem is the backbone of the Züs network, responsible for ensuring data integrity, security, and decentralized validation. It records transactions, manages consensus, and enables smart contract execution.

The key responsibilites include:

* **Block Generation & Validation:** Ensures that transactions are processed securely and stored immutably.
* **Data Model Management:** Maintains the structure of transactions and their impact on the network.
* **Storage Observation & Incentivization:** Oversees the Storage Subsystem and distributes rewards based on performance.

#### **Node Types:**

* **Miners:**
  * Generate, validate, and notarize blocks in the blockchain.
  * Implement consensus algorithms to ensure data integrity.
  * Active miners participating in block production are referred to as the **Active Set**.
* **Sharders:**
  * Store finalized blocks and maintain the data model of the blockchain.
  * Provide historical access to the blockchain's state.

By separating block generation and storage, Züs enables high scalability and efficiency, reducing transaction processing delays while maintaining high security.

### **2. Storage Subsystem**

The Storage Subsystem manages decentralized data storage, ensuring continuous availability and correctness of user data. Unlike traditional blockchain-based storage solutions, Züs separates storage providers from transaction validators, allowing for improved scalability and enhanced security.

The key responsibilites include:

* **Data Storage & Management:** Provides reliable decentralized storage for users' data.
* **Challenge-Based Validation:** Ensures blobbers provide accurate and untampered storage.
* **Incentivization Model:** Rewards storage providers for uptime and penalizes errors.

#### **Node Types:**

* **Blobbers:**
  * Store user-uploaded data on their local file systems.
  * Organize files into an accessible storage structure.
  * Provide APIs for interacting with stored files.
* **Validators:**
  * Verify blobbers' claims of stored data by conducting challenges issued by the network.
  * Provide digital signatures to confirm correct storage, allowing blobbers to earn rewards.

The separation between blockchain operations and storage operations enables the system to function efficiently and securely.

The Blockchain Subsystem observes and validates the Storage Subsystem without interfering with storage operations, reducing overhead and improving scalability.

### **Supporting Nodes and Helper Systems**

The core blockchain and storage systems are supported by additional nodes that provide **network services, authentication, and external integrations**.

#### **The Blockchain Network**

This is the set of nodes that cooperate to generate and persist blocks of the blockchain. It consists of Miners and Sharders, which both will be explained in more deeper details in the next sections.

#### **DNS Resolver (0DNS)**

A node used by off-chain services (any service that is not a miner or a sharder) to locate the miners and the sharders deployed on the system. This node is responsible for keeping a directory index for the addresses of the miners/sharders based on the Magic Block.

#### **Blobbers**

Those are the nodes responsible for storing users' data.

#### **Validators**

Those are the nodes responsible for validating the correction of blobbers' claims about the data they store, as part of the Challenge Flow, explained further on.

#### **Authorizers**

Those are the nodes responsible for authorizing Burn Events, which compensates for the minted ZCN tokens in the Züs Network or the ERC-20 WZCN tokens in the Ethereum Network. This is the core node of the Bridge Protocol, which is how the DEX (Decentralized Exchange) flow between Züs Network and the Ethereum Network happens.

#### **ZCN DEX Smart Contracts**

Those are the smart contracts deployed on the EVM enabling the Bridge Protocol between the Züs Network and the Ethereum Network.

#### **0Box**

This is the Explorer Node of the network. It provides endpoints to explore the data of the network and its change over time. It also does a crucial task in users' profile management and some functionality provided by the Webapps.

#### **Event Message Queue**

This is a messge queue node to persist and provide the events published by the network. Those events represents change of date in the network.

#### **Clients**

This is a general term used for all the consumers of the APIs of all the system nodes. Those include:

* Lower level clients
  * SDKs
* Higher level clients
  * CLIs
  * Webapps
  * Mobile apps

#### ZS3 Server

An S3 Gateway deployment, provides a no-code s3-compatible decentralized storage server. It enables users to access their data using an S3-like object storage interface.

#### DEX Subgraph <a href="#id-5.-dex-subgraph" id="id-5.-dex-subgraph"></a>

A subgraph used to index the Ethereum smart contracts used in DEX flow. More about that in the [Bridge Protocol](https://docs.zus.network/zus-docs/concepts/bridge-protocol) page.

### **Smart Contracts**

Smart contracts are the actual code that is executed by the transactions to perform changes on the data of the network.

Any transaction that you run against the network will eventually execute a function/procedure in the smart contract, called a *handler,* applying the changes intended by the transactions. In Züs system, we have 3 core SCs:

#### Miner SC <a href="#id-1.-miner-sc" id="id-1.-miner-sc"></a>

A smart contract of handlers that control the network view of available Miners and Sharders, along with other operations like paying transaction fees, and collecting rewards.

#### Storage SC <a href="#id-2.-storage-sc" id="id-2.-storage-sc"></a>

A smart contracts of handlers that control the network view of the blobbers and validators, but most importantly, users' data. It contains handlers responsible for :

* Managing users' *Allocations,* which are contracts of storage of some data between the client and the system (specifically blobbers).
* Observing the validity of the data on Blobbers by generating and validating *Challenges*
* Payment of storage fees to blobbers by redeeming storage *read and write markers.*

More on all the storage-related concepts in [Storage System Features](https://docs.zus.network/zus-docs/concepts/storage) page

#### ZCN SC <a href="#id-3.-zcn-sc" id="id-3.-zcn-sc"></a>

A smart contract mainly used for Bridge Protocol (connection between native Züs token and ERC-20 Züs token (WZCN).

It consists of handlers that controls network view of the authorizers as well as *Mint* and *Burn* functions. More on these concepts in [Bridge Protocol](https://docs.zus.network/zus-docs/concepts/bridge-protocol) page.

### **SDKs, APIs, and CLIs**

#### **Züs SDKs**

To support creating awesome applications on top our robust system, we offer SDK support for all the major platforms:

* General Purpose SDK in Go.
* JS on the browser (and other supported platforms) using WASM.
* Android Native.
* iOS Native.
* macOS.
* Windows.

Plug in our SDK and start building awesome applications and gaining rewards! Check the documentation of our SDKs [here](https://docs.zus.network/zus-docs/sdks).

#### **Züs APIs**

We also offer HTTP APIs to extend our support beyond the platforms supported by our SDKs, with enhanced security using your wallet public/private keys. Our APIs provide major functionality, including but not limited to:

* Viewing data about nodes/services/addresses.
* Issuing transactions to our Smart Contracts.
* Interacting with the files (upload/download/move/...)
* Managing your resources (allocations/staking/wallets/...)

Those APIs include:

* **Miner/Sharder APIs:** Provide endpoints to retrieve data about the blockchain progress, also to issue transactions.
* **Smart Contract APIs:** Provide endpoints to retrieve data about the system entities (nodes, transactions, allocations, rewards, ...).
* **Blobber API:** Provide endpoint to interact with your files stored on the blobbers (storage servers), including upload, download, move, etc...
* **0DNS API:** Provide location information about the blockchain network nodes (Miners/Sharders).

Check the full documentation of these APIs [here](https://docs.zus.network/zus-docs/http-apis).

#### **Züs CLI Tools**

For a higher level no-code interaction with Züs System, we offer 2 main CLI tools:

* **Wallet CLI:** Interacts with the client's wallet, support staking and an interface for token swap with Ethereum-based tokens.
* **Storage CLI:** Interacts with the client's storage spaces (allocations) and their files.

Check the full documentation of these CLIs [here](https://docs.zus.network/zus-docs/clis).

### **Ecosystem Applications**

Züs provides five major applications that interact with its blockchain and storage system.

1. **Vult:**
   * A personal secure cloud storage service.
   * Offers privacy-focused file storage with end-to-end encryption.
2. **Blimp:**
   * A full-featured storage management system.
   * Provides ransomware protection, blockchain-backed transparency, and user-controlled data security.
3. **Chimney:**
   * Allows users to monetize excess storage space.
   * Provides decentralized storage leasing for businesses and individuals.
4. **Atlus:**
   * A block scanner for monitoring network transactions.
   * Provides real-time blockchain analytics.
5. **Bolt:**
   * Enables staking and rewards based on decentralized storage contributions.

### **System Communication**

The Züs network employs multiple communication layers to facilitate seamless interactions between its components.

| **Connection**                           | **Description**                                                                                                                                                                                                                               |
| ---------------------------------------- | --------------------------------------------------------------------------------------------------------------------------------------------------------------------------------------------------------------------------------------------- |
| **Blobber ↔ 0DNS**                       | Blobber communicates with 0DNS through the 0DNS API to get the addresses of the miners/sharders.                                                                                                                                              |
| **Validator ↔ 0DNS**                     | Validator communicates with 0DNS through the 0DNS API to get the addresses of the miners/sharders.                                                                                                                                            |
| **Blobber ↔ Network**                    | Blobber communicates with the network through the Transaction API & Sharder API to submit transactions like challenge\_response, sync its allocations, and send heartbeats.                                                                   |
| **Validator ↔ Network**                  | Validator communicates with the network through the Transaction API & Sharder API to send heartbeats.                                                                                                                                         |
| **Blobber ↔ Validator**                  | Blobber communicates with the validator through the Validator API to request validation of challenges and get their results. The blobber finds the validator using the validator URL assigned to the challenge by the Storage Smart Contract. |
| **Authorizer ↔ Network**                 | Authorizer communicates with the Network through the Transaction API to check for Burn ZCN events to mint WZCN in the Ethereum Network, as well as sending heartbeats.                                                                        |
| **Authorizer ↔ 0DNS**                    | Authorizer communicates with 0DNS to get the addresses of the miners/sharders to be able to communicate with the Network.                                                                                                                     |
| **Authorizer ↔ ZCN DEX Smart Contracts** | Authorizer communicates with the ZCN DEX smart contracts deployed to the EVM to verify Burn WZCN Events to be able to mint ZCN in the Züs Network.                                                                                            |
| **ZCN DEX Smart Contract ↔ EVM**         | WZCN smart contracts are deployed on the EVM (Ethereum Network) to enable the DEX (Decentralized Exchange) flow between ZCN tokens inside the Züs Network and other ERC-20 tokens in the Ethereum Network.                                    |
| **Network ↔ Events Message Queue**       | The Network communicates with the Message Queue to publish events representing mutations of data after processing transactions.                                                                                                               |
| **0Box ↔ 0DNS**                          | 0Box communicates with 0DNS to get the addresses of miners/sharders to be able to communicate with the network.                                                                                                                               |
| **0Box ↔ Events Message Queue**          | 0Box communicates with the Event Message Queue as a Subscriber for events published by the Network. 0Box reads and processes the events to get in sync with the data model at the Network, providing information to clients.                  |
| **0Box ↔ Network**                       | 0Box communicates with the network to read changes in the data model of the network and submit some transactions. *This should be deprecated gradually until removed in a future fork.*                                                       |
| **Clients ↔ 0DNS**                       | Clients communicate with 0DNS to get the addresses of miners/sharders to be able to communicate with the network.                                                                                                                             |
| **Clients ↔ Network**                    | Clients communicate with the Network to submit transactions to the Transaction API and retrieve data from the Sharder API.                                                                                                                    |
| **Clients ↔ Blobbers**                   | Clients communicate with the Blobbers to perform file operations on the allocations.                                                                                                                                                          |
| **Clients ↔ ZCN DEX Smart Contracts**    | Clients communicate with ZCN DEX Smart Contracts to submit transactions related to the DEX (Decentralized Exchange) flow.                                                                                                                     |
| **Clients ↔ Authorizers**                | Clients communicate with the Authorizers to authorize ZCN mint/burn tasks within the DEX flow.                                                                                                                                                |
| **Clients ↔ 0Box**                       | Clients communicate with 0Box through the 0Box API to get information about the network and its entities, as well as reading historical data of values tracked over time.                                                                     |

Züs provides a decentralized, blockchain-secured storage network with robust smart contracts, SDKs, APIs, and a thriving ecosystem of applications.

By combining blockchain validation and storage decentralization, Züs offers a scalable, secure, and efficient data management solution. In the subsections, we will dive deeper into system architecture and its components.


# Providers and Services

Details on the components of Züs Subsystems

The **Züs Subsystems** consist of various providers and services that ensure the **decentralization, security, and efficiency** of the network.

This section details the key providers responsible for blockchain operations and storage, along with helper subsystems that support the network infrastructure.

### **Core Subsystems Providers**

These are the fundamental providers that play a role in maintaining the blockchain and storage infrastructure:

* **Miner :** Miners are responsible for **maintaining the blockchain** and implementing the **consensus protocol**.
* **Sharder:** Sharders are responsible for **persisting blockchain data** and providing network insights through APIs.
* **Blobber :** Blobbers are the **primary storage providers** in the Züs network.
* **Validator:** Validators play a key role in **verifying Blobber storage claims**.
* **Authorizer:** The **Authorizer** facilitates the **ZCN↔WZCN Bridge Protocol**.

Check out more details in each section below:

{% content-ref url="/pages/8SmiuiNQjSHFzpFCjIYb" %}
[Miner](/zus-docs/system-overview/providers-and-services/miner)
{% endcontent-ref %}

{% content-ref url="/pages/bDX8CiDKVeVK80ehJFai" %}
[Sharder](/zus-docs/system-overview/providers-and-services/sharder)
{% endcontent-ref %}

{% content-ref url="/pages/o8CLuAb5HGP3QcgNEjFN" %}
[Blobber](/zus-docs/system-overview/providers-and-services/blobber)
{% endcontent-ref %}

{% content-ref url="/pages/fhOsB4wBKr8yoPczSSlt" %}
[Validator](/zus-docs/system-overview/providers-and-services/validator)
{% endcontent-ref %}

{% content-ref url="/pages/IS6jenixwlx6K07RQoid" %}
[Authorizer](/zus-docs/system-overview/providers-and-services/authorizer)
{% endcontent-ref %}

### Helper Subsystems Providers/Services

These additional services support network functionality and integration:

* **Node Locator (0DNS):** 0DNS helps external services and clients discover active network nodes.

Check out more details in each section below:

{% content-ref url="/pages/Qq75DsmjkdfR5fo4Ud2I" %}
[Node Locator (0DNS)](/zus-docs/system-overview/providers-and-services/node-locator-0dns)
{% endcontent-ref %}


# Miner

Details on the Miner, the block generator and consensus participant

<figure><img src="/files/fXBeRc9DR4jQ4yhZslZe" alt=""><figcaption><p>Miner docker-compose-based deployment breakdown</p></figcaption></figure>

Miners are the main providers that maintain the blockchain and implement the consensus protocol.

### Core responsibilities of the Miner

* Generation of blocks to extend the blockchain so that the network rounds keep progressing.
* Participation in the consensus algorithm, verifying the generated blocks by other participants.
* Mutation of the in-memory version of the network data model. Since this in-memory version is stored in a Merkle-Patricia Tree data structure, we usually just call it "The MPT".

### Logical components of the Miner Process

The Miner Process consists of multiple workers (technically, lightweight execution threads or [goroutines](https://go.dev/doc/effective_go#goroutines) in the Go literature). Following are the most important workers running the miner operations

#### Block Generation/Verification Workers

Workers responsible for generating blocks, handling block messages, verifying blocks, voting in the consensus, ...

#### Block Finalization Workers

Workers responsible for finalizing blocks and updating the MPT state by executing the transactions.

#### Communication Workers (handlers)

Those are handlers of **Node-to-Node (N2N)** communication endpoint among miners and sharders. Those are responsible for sending/receiving different kinds of messages to and from the miner.

#### Health check worker

A worker responsible for the heartbeats of the miner which are signs of the miner liveness. It works by generating a health check transaction periodically and communicate it with the other Active Set providers.

### The Miner HTTP API

The miner exposes a minimal API with a couple of endpoints to view its diagnostics and health check, as well as an endpoint to submit transactions. These will be discussed in details in the [Miner API](/zus-docs/http-apis#miner-node-api) page.

### Data stored by the Miner

The Miner is not supposed to store the whole blockchain, as this is the job of the Sharder. However, the Miner still needs to store some data for fast-access. For this data, the Miner uses 2 main storage solutions: Redis and Rocksdb. The miner stores the following **data:**

1. **Latest unfinalized transaction (Transaction Pool):** Transactions that are not still in a finalized block are stored in a separate Redis container for faster access.
2. **The MPT:** Based on the tree structure of the MPT, the miner uses rocksdb to store it as rocksdb is built on top of LevelDB which is efficient for tree-like data structure.
3. Some data about the blockchain: Stores some recent blocks, the **Latest Finalized Magic Block** along with some other entities representing the chain for fast access.

### Requirements libraries for the Miner process environment

The Miner process requires the following libraries to exist in any environment it runs on:

* [Rocksdb](https://github.com/facebook/rocksdb): It's the embedded in-memory key-value store used by the Miner to store the MPT.
* [BLS and MCL](https://github.com/herumi/bls): Two libraries used for cryptographic tasks.


# Sharder

Details on the Sharder, the block persistence manager

<figure><img src="/files/LVxAC54h9XxTpxCsk0RH" alt=""><figcaption><p>Sharder docker-compose-based deployment breakdown</p></figcaption></figure>

Sharders are the providers responsible for persisting the blocks of the blockchain in the their local filesystem as well as the data model, they also provide APIs to access some data from the network data model.

### Core responsibilities of the Sharder

* Store the blocks of the blockchain persistently.
* Store and update the network data model in a relational database (currently Postgres).
* Generation and persistence of historical data of some relations of the network data model, which is used in graphing the change of some data with time.
* Expose an HTTP API for external clients to get information about the network, especially statuses of the transactions.

### Logical components of the Sharder Process

The Sharder Process consists of multiple workers (technically, lightweight execution threads or [goroutines](https://go.dev/doc/effective_go#goroutines) in the Go literature). Following are the most important workers running the miner operations

#### Block Finalization Workers

Workers responsible for finalizing blocks by executing the transactions, and generating events that will be used to update EventDB. They also run those events and update the network data model in EventDB.

#### Communication Workers (handlers)

Those are handlers of **Node-to-Node (N2N)** communication endpoint among miners and sharders. Those are responsible for sending/receiving different kinds of messages to and from the sharder among the Active Set.

#### Health check worker

A worker responsible for the heartbeats of the sharder which are signs of the sharder liveness. It works by generating a health check transaction periodically and communicate it with the other Active Set providers.

### The Sharder HTTP API

The sharder exposes an API with endpoints used to view data from the network data model. This API is very useful for many clients that use the network. It will be discussed in more details in the [Sharder API](/zus-docs/http-apis) page.

### Data stored by the Sharder

1. **Network Data Model:** These are all the data related to and changed by executing users' transactions against the smart contracts. It's persisted in a relational database often referred to as "EventDB", as its data depends on the events generated while executing the smart contracts.
2. **Blocks of the blockchain:** It's the sharders' main task to store and persist all the blocks generated by the network since the genesis. They're stored efficiently in the local filesystem of the sharders, and distributed among the different sharders of the system.
3. Some data is cached for fast access using rocksdb.

### Requirements libraries for the Sharder process environment

The Sharder process requires the following libraries to exist in any environment it runs on:

* [Rocksdb](https://github.com/facebook/rocksdb): It's the embedded in-memory key-value store used by the sharder to store some cached data for fast access.
* [BLS and MCL](https://github.com/herumi/bls): Two libraries used for cryptographic tasks.


# Blobber

Details on the blobber, the actual storage provider for user data

<figure><img src="/files/Ji9MVYIKv90xWsy60Xmw" alt=""><figcaption><p>blobber docker-compose-based deployment example</p></figcaption></figure>

The blobber is the most important provider when it comes to hosting users' data. It provides actual storage space to host this data on its file system and gets rewards in return. Users can host their own blobber on premises or on our dedicated servers through the [Chimney](https://chimney.software/) Webapp.

### Core responsibilities of the Blobber

* Host users' data on its file system
* Maintain the correctness and availability of the users data on-demand.
* Provide a highly-available interface (currently an HTTP API) for the users to access or modify their data.
* Answer the challenges so it can get rewards

### Logical component of the Blobber's Process

The Sharder Process consists of multiple workers (technically, lightweight execution threads or [goroutines](https://go.dev/doc/effective_go#goroutines) in the Go literature). Following are the most important workers running the miner operations

#### Allocation Sync Worker

*An Allocation* is like a contract between the user and Züs network about some data the user need to host on the Network. One of the terms that the user choose during creating the allocation is the blobbers that will host their data based on this allocation. Since this coordination occurs between the user and the blockchain network (miners and sharders to simplify), the blobber knows nothing about the allocation unless it requests this data from the network using one of the endpoints of the Sharder API. This worker periodically polls this endpoint for updates and persists the information of the new allocations

#### Challenge Workers

*Challenges* is how the blobbers get time-based rewards for storage. In simple words, a challenge is a validation inquiry of a portion of the data that should be hosted by some blobber i.e. trying to check if the blobber is really hosting this portion of data or not. They're generated by the network using a special type of transactions called *Built-in Transactions* that are autogenerated by the network on each block generation. A challenge is generated:

* For a specific Blobber
* Asking about a specific Allocation
* And a specific *Block* of data in this allocation

Similar to Allocations, Challenges are generated and kept in the blockchain network and the blobber knows nothing about it until it requests this data from the network also using one of the endpoints of the [Sharder API](/zus-docs/http-apis#sharder-node-api). It then answers those challenges and send its response back to the network, which in turn validates the answer and either rewards or penalizes the blobber, based on the answer. These tasks: polling the network for new challenges, answering the challenges and sending the answers to the network, are the responsibility of these workers. More about challenges are to come in the [Challenges](/zus-docs/system-overview/storage/protocol/challenges)[ ](/zus-docs/system-overview/storage/protocol/challenges)page.

#### Read/Write Markers Workers

*Read Markers* are chique-like structures sent by the blobbers to the network in order to get fees of read operations from the client's wallet, same for *Write Markers* for write operations. Both will be discussed in more details in the [Read/Write Markers](/zus-docs/system-overview/storage/protocol/read-write-markers) page. Those workers handle the markers flow until the marker is fulfilled and redeemed.

#### Health Check Worker

A worker responsible for the heartbeats of the blobber which are signs of the blobber liveness. It works by generating a health check transaction periodically and communicating it with the network.

#### Update Settings Worker

The owner of the blobber - the user who created the blobber on Chimney - can update the settings of the blobber. However, they will not be communicating with the blobber directly, this settings update operation is submitted as a transaction to the network, thus unseen by the blobber unless it requests this data from the network using the [Sharder API](/zus-docs/http-apis#sharder-node-api). So the responsibility of this worker is to sync blobber settings with the network periodically.

### The Blobber HTTP API

The blobber exposes an HTTP API as an interface of the file operations the users need to execute on their data. It's discussed in more detail in the [Blobber API](/zus-docs/http-apis#blobber-api) page.

### Blobber Settings

These are the settings that the owners can change about their blobbers.

> Those settings can only be changed by the owner's wallet.

#### Capacity (Bytes)

This is the maximum capacity that the blobber offers to use for hosting users' data.

#### Read Price (SAS/GB/Time Unit)

> SAS is the smallest countable unit of the ZCN token. One ZCN is 10^10 SAS

This is how much the user pays for read operations against this blobber, it's calculates per GB per *Time Unit* where *Time Unit* is one of the storage configuration elements.

#### Write Price (SAS/GB/Time Unit)

This is how much the user pays for write operations against this blobber, it's calculated per GB per *Time Unit* where *Time Unit* is one of the storage configuration elements

#### Max Offer Duration (duration string e.g. 700h - 3m - ..)

This is how long the blobber can keep its prices without change. After this duration elapses, the blobber's prices change and all allocations need to be updated.

#### Min Stake (SAS)

This is the least amount the blobber can be staked with by a single client. Staking is discussed in more detail in the [Tokenomics](/zus-docs/tokenomics) page.

#### Max Stake (SAS)

This is the largest amount the blobber can be staked by a single client. Staking is discussed in more detail in the [Tokenomics](/zus-docs/tokenomics) page.

#### Max Number of Delegates (no unit)

This is the maximum number of clients that can be delegated to the blobber by staking. Delegation is discussed in more detail in the [Tokenomics](/zus-docs/tokenomics) page.

#### Service Charge (Decimal, 0 to 1)

This is the ratio the blobber receives from each storage reward it earns before the rest is distributed over its delegates.

#### URL (text)

The URL of the homepage of the blobber.

#### Not Available (boolean)

Whether the blobber is available for hosting users' data or not.

### Blobber Protocols

#### File Hash

There are 3 hashes for a file on Blobber:

* Actual File Hash

  > it is used to verify the checksum of downloaded file on clients. It is the hash of original file. It is `reference_objects.actual_file_hash` in database.
* Content Hash

  > it is used to verify the checksum of uploaded data blocks on blobber server. It is hash of data blocks that is sharded by `ErasureEncoder` on client and uploaded on a blobber. It is `reference_objects.content_hash` in database.
* Challenge Hash

  > it is used to verify challenge on validator based on challenge protocol. It is `reference_objects.merkle_root` in database.

#### Hash Method

* `Actual File Hash` is computed by sha256
* `Content Hash` is computed by [MerkleTree](https://en.wikipedia.org/wiki/Merkle_tree).

> A hash tree or Merkle tree is a tree in which every leaf node is labelled with the cryptographic hash of a data block, and every non-leaf node is labelled with the cryptographic hash of the labels of its child nodes.

For better performance on memory and persistence, we have a `CompactMerkleTree` here.

**What is `CompactMerkleTree`?**

It is a `MerkleTree` which nodes are labelled and removed as soon as possible.

In `MerkleTree`, all leaf nodes are added and kept in memory before computing hash. It computes hash from leaf nodes to root node level by level.

In `CompactMerkleTree`, they will be computed instantly once two child nodes are added, save the binary hash on their parent node. The two child nodes are removed from memory.

For example:

* the size of the data block is chunk\_size.
* a data block can be released from memory once it's hash is computed and added into MerkleTree as leaf node.
* `In Memory` means it has to be kept in memory for computing hash.
* `Out Memory` means it is safe to release from memory or is not added in memory yet.

1. Trees in memory when 3 hash leaves are added

<figure><img src="https://github.com/0chain/blobber/wiki/assests/hash/merkle_tree_vs_shrinked_merkle_tree_1.png" alt=""><figcaption></figcaption></figure>

2. Trees in memory when 5 hash leaves are added

<figure><img src="https://github.com/0chain/blobber/wiki/assests/hash/merkle_tree_vs_shrinked_merkle_tree_2.png" alt=""><figcaption></figcaption></figure>

3. Trees in memory when 7 hash leaves are added

<figure><img src="https://github.com/0chain/blobber/wiki/assests/hash/merkle_tree_vs_shrinked_merkle_tree_3.png" alt=""><figcaption></figcaption></figure>

`CompactMerkleTree` is better than `MerkleTree` to persist the tree to disk or keep it in memory.

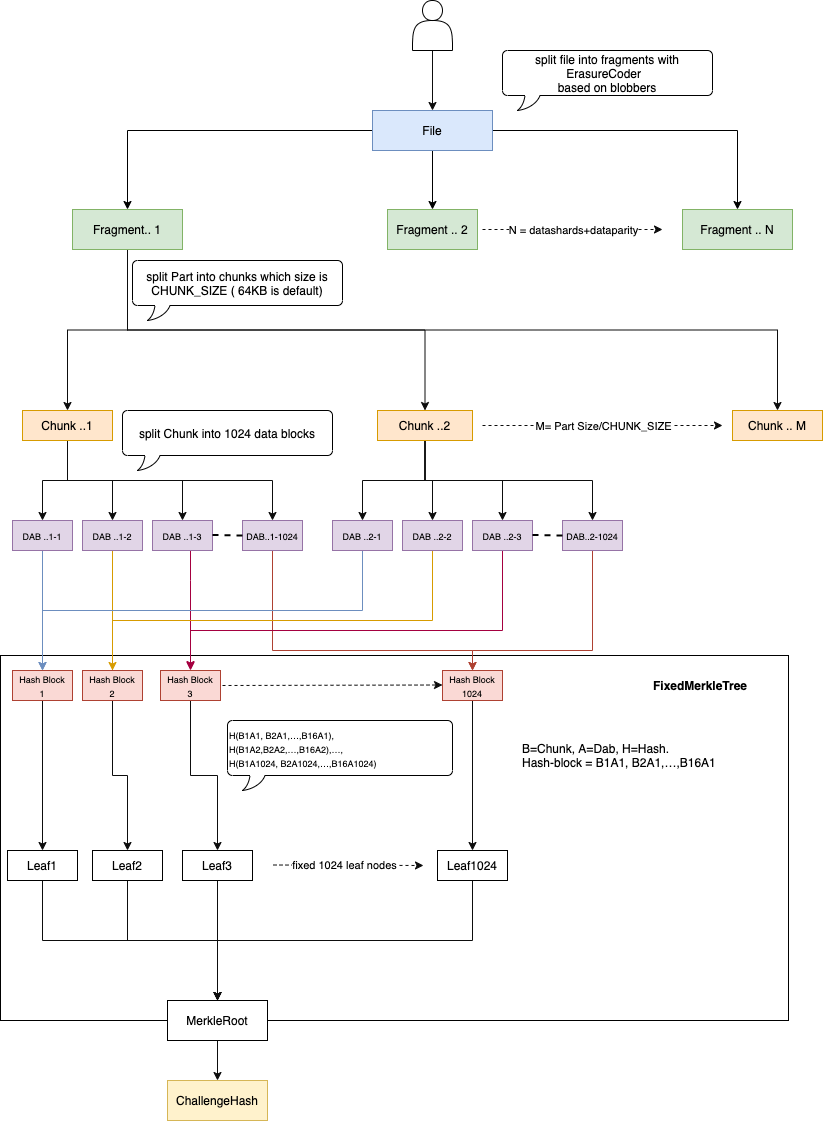
`Challenge Hash` is also computed by `MerkleTree`. For Outsourcing Attack, we have a `FixedMerkleTree` here.

{% hint style="info" %}

#### Outsourcing Attack

To ensure each storage server commits resources and doesn’t outsource its tasks, our protocol requires that the content for verification is 64 kB, derived from the full file fragment. Here’s how it works:

1. **File Division**: The file is split into ( n ) 64 kB fragments, each assigned to a storage server.
2. **Chunking**: Each 64 kB fragment is further divided into 64-byte chunks, resulting in 1024 chunks per fragment.
3. **Hashing**: Data at each index across the blocks is treated as a continuous message and hashed. These 1024 hashes form the leaf nodes of a Merkle Tree.
4. **Merkle Tree**: The root of the Merkle Tree is used to aggregate file hashes up to the directory/allocation level. The Merkle proof provides the path from the leaf to the file root and then to the allocation level.

To pass a challenge for a specific index (1 to 1024), a dishonest server would need to download all content and construct the leaf hash, discouraging outsourcing and ensuring genuine resource commitment.
{% endhint %}

**What is `FixedMerkleTree`?**

It is a `MerkleTree` in which every leaf node is labelled with the `MerkleTree` hash of a data block and every non-leaf node is labelled with the cryptographic hash of the labels of its child nodes. It always has fixed 1024 leaf nodes. That is why we call it `FixedMerkleTree`.

See detail on example:

<figure><img src="https://github.com/0chain/blobber/wiki/assests/hash/challenge_hash.png" alt=""><figcaption></figcaption></figure>

{% hint style="success" %}
`Challenge Hash` was computed hash with `MerkleTree` in which every leaf node is labelled with `sha3`, and every non-leaf node is labelled with the cryptographic hash of the labels of its child nodes. `sha3` asks fully load `block..1-n`,`block..2-n`...`block..1024-n` on memory before computing the hash for the leaf node `L..n`. I have the same issue as `sha1` in `Actual File Hash` and `Content Hash`. That is why every leaf node is labelled with `CompactMerkleTree` instead of `sha3` now.
{% endhint %}


# Validator

A **Validator** in the Züs network plays a critical role in ensuring the correctness and integrity of transactions, storage operations, and smart contract executions.

Validators verify operations and help maintain consensus within the blockchain ecosystem. They participate in staking mechanisms and earn rewards based on their contributions.

### **Validator Structure**

The **Validator** structure defines key attributes associated with a validator node in the network.

```go
// Validator represents validator information.
type Validator struct {
	ID                       common.Key       `json:"validator_id"`
	BaseURL                  string           `json:"url"`
	PublicKey                string           `json:"-"`
	DelegateWallet           string           `json:"delegate_wallet"`
	MinStake                 common.Balance   `json:"min_stake"`
	MaxStake                 common.Balance   `json:"max_stake"`
	NumDelegates             int              `json:"num_delegates"`
	ServiceCharge            float64          `json:"service_charge"`
	StakeTotal               int64            `json:"stake_total"`
	TotalServiceCharge       int64            `json:"total_service_charge"`
	UncollectedServiceCharge int64            `json:"uncollected_service_charge"`
	LastHealthCheck          common.Timestamp `json:"last_health_check"`
	IsKilled                 bool             `json:"is_killed"`
	IsShutdown               bool             `json:"is_shutdown"`
}
```

#### **Attributes**

* **ID**: Unique identifier for the validator.
* **BaseURL**: The URL through which the validator communicates with the network.
* **PublicKey**: The public key associated with the validator.
* **DelegateWallet**: The wallet address associated with the validator for staking and rewards.
* **MinStake**: Minimum stake required for participation in validation.
* **MaxStake**: Maximum stake allowed for a validator.
* **NumDelegates**: The number of delegates that can stake on this validator.
* **ServiceCharge**: Percentage of rewards charged by the validator as a service fee.
* **StakeTotal**: Total amount staked on the validator.
* **TotalServiceCharge**: Total service charge collected over time.
* **UncollectedServiceCharge**: Pending service charges yet to be collected.
* **LastHealthCheck**: Timestamp of the last health check performed on the validator.
* **IsKilled**: Indicates if the validator is terminated.
* **IsShutdown**: Indicates if the validator is currently shut down.

### **Updating Validator Settings**

Validators can update their settings using the `UpdateValidator` structure:

```go
// UpdateValidator is used during update validator settings calls.
type UpdateValidator struct {
	ID                       common.Key        `json:"validator_id"`
	BaseURL                  *string           `json:"url,omitempty"`
	DelegateWallet           *string           `json:"delegate_wallet,omitempty"`
	MinStake                 *common.Balance   `json:"min_stake,omitempty"`
	MaxStake                 *common.Balance   `json:"max_stake,omitempty"`
	NumDelegates             *int              `json:"num_delegates,omitempty"`
	ServiceCharge            *float64          `json:"service_charge,omitempty"`
	StakeTotal               *int64            `json:"stake_total,omitempty"`
	TotalServiceCharge       *int64            `json:"total_service_charge,omitempty"`
	UncollectedServiceCharge *int64            `json:"uncollected_service_charge,omitempty"`
	LastHealthCheck          *common.Timestamp `json:"last_health_check,omitempty"`
	IsKilled                 *bool             `json:"is_killed,omitempty"`
	IsShutdown               *bool             `json:"is_shutdown,omitempty"`
}
```

#### **Converting UpdateValidator to Blockchain Validation Node**

To apply updates to the blockchain, the `UpdateValidator` struct must be converted to a blockchain-compatible format:

```go
func (v *UpdateValidator) ConvertToValidationNode() *blockchain.UpdateValidationNode {
	blockValidator := &blockchain.UpdateValidationNode{
		ID:      string(v.ID),
		BaseURL: v.BaseURL,
	}

	sp := &blockchain.UpdateStakePoolSettings{
		DelegateWallet: v.DelegateWallet,
		NumDelegates:   v.NumDelegates,
		ServiceCharge:  v.ServiceCharge,
	}

	if v.DelegateWallet != nil ||
		v.MinStake != nil ||
		v.MaxStake != nil ||
		v.NumDelegates != nil ||
		v.ServiceCharge != nil {
		blockValidator.StakePoolSettings = sp
	}

	return blockValidator
}
```

### **Retrieving Validator Information**

#### **Get a Single Validator**

To retrieve information about a specific validator, use the `GetValidator` function:

```go
func GetValidator(validatorID string) (validator *Validator, err error) {
	if !client.IsSDKInitialized() {
		return nil, sdkNotInitialized
	}
	var b []byte
	b, err = screstapi.MakeSCRestAPICall(
		STORAGE_SCADDRESS,
		"/get_validator",
		map[string]string{"validator_id": validatorID},
	)
	if err != nil {
		return nil, errors.Wrap(err, "requesting validator:")
	}
	if len(b) == 0 {
		return nil, errors.New("", "empty response from sharders")
	}
	validator = new(Validator)
	if err = json.Unmarshal(b, validator); err != nil {
		return nil, errors.Wrap(err, "decoding response:")
	}
	return
}
```

#### **Get a List of Validators**

To retrieve a list of validators in the network, use:

```go
func GetValidators(stakable bool) (validators []*Validator, err error) {
	if !client.IsSDKInitialized() {
		return nil, sdkNotInitialized
	}
	var b []byte
	b, err = screstapi.MakeSCRestAPICall(
		STORAGE_SCADDRESS,
		"/validators",
		map[string]string{
			"stakable": strconv.FormatBool(stakable),
		},
	)
	if err != nil {
		return nil, errors.Wrap(err, "requesting validator list")
	}
	if len(b) == 0 {
		return nil, errors.New("", "empty response from sharders")
	}
	if err = json.Unmarshal(b, &validators); err != nil {
		return nil, errors.Wrap(err, "decoding response:")
	}
	return
}
```

### **Managing Validators**

#### **Update Validator Settings**

```go
func UpdateValidatorSettings(v *UpdateValidator) (resp string, nonce int64, err error) {
	if !client.IsSDKInitialized() {
		return "", 0, sdkNotInitialized
	}

	var sn = transaction.SmartContractTxnData{
		Name:      transaction.STORAGESC_UPDATE_VALIDATOR_SETTINGS,
		InputArgs: v.ConvertToValidationNode(),
	}
	resp, _, nonce, _, err = storageSmartContractTxn(sn)
	return
}
```

#### **Shutdown a Validator**

```go
func ShutdownProvider(providerType ProviderType, providerID string) (string, int64, error) {
	if !client.IsSDKInitialized() {
		return "", 0, sdkNotInitialized
	}

	var input = map[string]string{
		"provider_id": providerID,
	}

	var sn = transaction.SmartContractTxnData{
		InputArgs: input,
	}
	switch providerType {
	case ProviderValidator:
		sn.Name = transaction.STORAGESC_SHUTDOWN_VALIDATOR
	default:
		return "", 0, fmt.Errorf("shutdown provider type %v not implemented", providerType)
	}
	hash, _, n, _, err := storageSmartContractTxn(sn)
	return hash, n, err
}
```

Validators are integral to the Züs network, ensuring transaction integrity, maintaining consensus, and securing the blockchain. Properly managing validators, staking, and rewards distribution is crucial for a healthy decentralized ecosystem.


# Authorizer

This page provides a high-level overview of the authorizer node's structure and functionality, ensuring clarity on its role within the Züs network.

The authorizer node plays a crucial role in the token bridge protocol by validating and signing burn and mint tickets. It ensures the integrity of transactions by verifying burn transactions on the Ethereum blockchain (ERC-20 tokens) and issuing proof-of-burn tickets to clients. These tickets are then used to mint new tokens on the Züs blockchain (ZCN tokens). The authorizer node's validation is essential for maintaining the trust and security of the bridge protocol, enabling seamless token conversions between the Ethereum network and the Züs blockchain.

<figure><img src="https://lh7-rt.googleusercontent.com/docsz/AD_4nXeVL92XxiZfBTdsLtJcNocNg7TH6SyUZV9AzEunK6mrvsiwGI2T4QXQnglCULA27GbH1S0b4EBnjr2PIPGPdLSp9jaMqjShz_nCmPnl9VBt-sLT-qQ8LHURenAikV3rXjYv4WfY9jSGv5RIQ7OT3qqHce8?key=q219TutlA1OQxTDsqhUNbg" alt=""><figcaption><p>Fig1: The chart illustrates the authorizer node's role in converting WZCN (ERC-20 tokens) to ZCN (native Züs tokens) in the token bridge protocol.</p></figcaption></figure>

Below is a detailed description of its functionality:

### Signing Burn and Mint Tickets:

* Burn Tickets: When a user wants to convert WZCN tokens (ERC-20) to ZCN tokens (native to the Züs blockchain), they first burn the WZCN tokens. This generates a burn ticket, which the authorizer node must sign.
* Mint Tickets: Conversely, when a user wants to convert ZCN tokens to WZCN tokens, they burn the ZCN tokens to generate a mint ticket, which also requires the authorizer node's signature.

### Validation Process:

* Verification: The authorizer node verifies the validity of burn and mint tickets by checking the corresponding smart contracts on the Ethereum network or the Züs blockchain.
* * For burn tickets, the authorizer node ensures that the tokens have indeed been burned and that the transaction is recorded in the smart contracts.
  * For mint tickets, the node verifies that the ZCN tokens have been burned in the native network's smart contracts.

### Asymmetric Key Encryption:

* Signing Tickets: The authorizer node uses asymmetric key encryption for signing tickets. It signs the tickets using its private key.
* Verification by Smart Contracts: The validity of these tickets is then confirmed by smart contracts using the authorizer node's public key.

### Integration with Smart Contracts:

* The authorizer node interacts with smart contracts deployed on both the Ethereum network and the Züs blockchain.
* It ensures that the burn and mint tickets are properly recorded and validated, maintaining the integrity of the bridge protocol.

### Rewards and Penalties:

* Reward Mechanism: Authorizer nodes are rewarded based on the tickets they sign. The rewards are distributed as transaction fees, paid in ZCN for ZCN mint transactions and in ether for WZCN mint transactions.
* Penalties: If the authorizer fails to validate and sign tickets correctly, they may face penalties as outlined in the governance protocol.


# Node Locator (0DNS)

A service to provide addresses of active set members (miners/sharders) for the external nodes, services and clients

0DNS is a service that gets the magic block as input, then provide HTTP API to get the addresses of the miners/sharders.

### 0DNS HTTP API

0DNS is utilized via an HTTP API with a few endpoints, it will be discussed in more details in the [0DNS API](/zus-docs/http-apis/0dns-api) page.

### 0DNS Configuration

0DNS is an internally-hosted service so most probably you'll not need to care about its configuration. For those who want to demonstrate a full system deployment on-premises, we'll discuss the configuration of 0DNS in the [Configuration of Nodes and Services](broken://pages/p9QUzyKBgoWiw61veV23) page.


# Storage

Züs is a leading privacy and secure AI data platform that provides users full ownership and control of their data, with powerful AI agents on Vult.network to accelerate productivity. It is also ideal for on-prem, high speed S3 storage as well as backup and disaster recovery to prevent outage, breach, and ransomware issues.

It has an unparalleled data integrity layer on the blockchain and a zero knowledge network, with data and key distributed so that its almost impossible to breach. Another standout feature is that it allows users to share encrypted data easily, even on a public link.

This section introduces the key components, protocols, and operations that govern **storage allocation, file management, and data validation** within the Züs ecosystem.

### **Storage Structure**

The storage system in Züs consists of three main areas:

#### **Storage Protocol**

Defines the core principles and mechanisms that govern how data is stored, accessed, and validated. It includes:

* **Allocations** – Smart contracts that define storage agreements between users and the network.
* **Reference Objects** – Metadata representation of files within the system.
* **Challenges** – Validation mechanism ensuring that storage providers maintain data integrity.
* **Write Markers** – Proof-of-storage records ensuring blobbers are compensated for data storage.

#### **File Operations**

Encompasses the key functionalities related to data handling, including:

* **Uploading and Downloading** – Secure and optimized file transfer mechanisms.
* **File Sharing** – Encrypted and permission-based access to stored data.
* **Data Recovery and Replication** – Ensuring redundancy and fault tolerance.
* **Streaming and S3FS Support** – Integrating Züs storage with cloud-native applications.

#### **Storage Data Management**

Covers the structural and operational aspects of Züs storage, ensuring **scalability, performance, and security**. Key areas include:

* **Write and Read Processes** – Optimized storage and retrieval mechanisms.
* **Automatic Data Repair** – Self-healing storage for uninterrupted availability.
* **Rollback Mechanisms** – Ensuring consistency in case of failed operations.
* **Geolocation-Aware Storage** – Performance-based blobber selection for optimized access speeds.

Züs operates on a decentralized network of blobbers—storage providers responsible for holding data in a fault-tolerant, distributed manner. The network uses erasure coding to distribute file fragments across multiple nodes, ensuring redundancy and data integrity.

#### **Storage Allocation**

Storage allocation is the process by which users define the storage parameters for their data, including redundancy, pricing, and blobber selection. The key allocation components are:

* **Data Shards (`dataShards`)** – The number of shards storing actual file data.
* **Parity Shards (`parityShards`)** – Additional shards for error correction and redundancy.
* **Blobbers (`blobbers`)** – Nodes responsible for storing distributed data.
* **Allocation Size (`size`)** – The total storage allocated.

Allocations help optimize storage distribution, ensuring data availability even if some storage nodes go offline.

#### **File Uploading**

Züs employs a chunked upload system to optimize file uploads, enhancing speed, reducing failure rates, and supporting large file sizes.

**Standard File Upload**

Users can upload files to the Züs network through an allocation that defines where and how the data is stored.

```go
err := allocation.UploadFile(workdir, "/local/file.txt", "/remote/file.txt", statusCallback)
```

1. The file is split into fixed-size chunks.
2. Each chunk is encoded using erasure coding into data and parity shards.
3. The shards are distributed across multiple blobbers.
4. Blockchain write markers validate the storage.

This process ensures high availability and durability of stored data.

**Secure File Upload (Encryption)**

Züs offers AES-256 encryption for securing data before it is uploaded.

```go
err := allocation.EncryptAndUploadFile(workdir, "/local/secure.txt", "/remote/secure.txt", statusCallback)
```

Encrypted files ensure that no unauthorized entity, including storage providers, can access or modify the data.

#### **File Downloading**

Files stored in the Züs network can be retrieved using different download mechanisms.

**Standard File Download**

```go
err := allocation.DownloadFile("/local/download.txt", "/remote/file.txt", true, statusCallback, true)
```

**Block-Based Download**

Users can download specific portions of a file, useful for streaming and large datasets.

```go
err := allocation.DownloadFileByBlock("/local/download.txt", "/remote/file.txt", 10, 20, 5, true, statusCallback, true)
```

**Thumbnail Download**

Optimized for media previews and applications that require small-sized image representations.

```go
err := allocation.DownloadThumbnail("/local/thumbnail.jpg", "/remote/file.jpg", true, statusCallback, true)
```

These download features allow users to optimize bandwidth usage while ensuring data integrity through blockchain validation.

#### **File Metadata & Management**

Metadata management enables users to retrieve file details, track storage usage, and manage access control.

#### **Fetching File Metadata**

```go
fileMeta, err := allocation.GetFileMeta("/remote/file.txt")
```

Metadata includes:

* File name, hash, type, and path
* Size and number of blocks
* Encryption key and collaborator details

#### **Fetching File Metadata via Auth Ticket**

```go
fileMeta, err := allocation.GetFileMetaFromAuthTicket(authTicket, lookupHash)
```

This is useful for verifying file properties before access.

#### **Fetching File Statistics**

```go
fileStats, err := allocation.GetFileStats("/remote/file.txt")
```

Users can analyze file usage patterns, including read/write activity and access history.

#### **Secure File Sharing**

Züs enables controlled file sharing using authentication tickets, allowing granular access management.

**Generating a Shareable Auth Ticket**

```go
authTicket, err := allocation.GetAuthTicketForShare("/file.txt", "file.txt", "file", "recipientClientID")
```

Auth tickets ensure that only intended recipients can access shared files.

**Revoking Shared Access**

```go
err := allocation.RevokeShare("/file.txt", "recipientClientID")
```

Revocation prevents further access to the shared file.

#### **File Deletion & Cleanup**

Users can remove files permanently from the decentralized network.

**Deleting a File**

```go
err := allocation.DeleteFile("/remote/file.txt")
```

This action removes all copies of the file from the allocated blobbers.

**Deleting a Directory**

```go
err := allocation.createDir("/remote/folder", allocation.consensusThreshold, allocation.fullconsensus, zboxutil.NewUint128(1))
```

Deleting a directory removes all associated files and metadata.

#### **Storage Cost Estimation**

Züs provides users with tools to estimate and optimize storage costs dynamically.

**Retrieve Storage Costs**

```go
maxWrite, maxRead, err := allocation.GetMaxWriteRead()
minWrite, minRead, err := allocation.GetMinWriteRead()
```

These functions allow users to compare blobber pricing before allocating storage.

**Estimate Storage Cost**

```go
maxCost, err := allocation.GetMaxStorageCost(10 * GB)
minCost, err := allocation.GetMinStorageCost(10 * GB)
```

Cost estimation ensures users can optimize spending while selecting suitable storage providers.

#### **Data Integrity & Repairs**

Züs incorporates verification and repair mechanisms to ensure data reliability.

**Detecting Data Loss**

```go
found, deleteMask, needsRepair, fileRef, err := allocation.RepairRequired("/remote/path")
```

When inconsistencies arise, users can restore missing data.

**Initiating a Full Repair**

```go
err := allocation.RepairAlloc(statusCallback)
```

Repairing ensures that corrupted or lost file fragments are reconstructed using parity shards.

#### **Cancelling Uploads & Repairs**

Züs allows users to cancel ongoing operations when necessary.

**Cancel an Upload**

```go
err := allocation.CancelUpload("/remote/file.txt")
```

Canceling an upload prevents unnecessary resource usage.

**Cancel an Ongoing Repair**

```go
err := allocation.CancelRepair()
```

This function halts the repair process if the issue has been resolved manually.

By integrating security mechanisms, dynamic pricing, and data integrity verification, Züs offers an advanced alternative to traditional cloud storage solutions.

Its decentralized approach ensures that users have greater control over their data, reducing reliance on centralized storage providers while enhancing privacy and availability.


# Architecture and Data Management

Zus storage operates on a **distributed and decentralized model**, ensuring **high availability, fault tolerance, and optimized performance**.

This document outlines how **writes, reads, data repair, rollback mechanisms, file size constraints, encryption, and performance-based selection** work within the Zus storage ecosystem.

### **1. Write Process – Data +1 Consensus**

To ensure data reliability and durability, Zus enforces a data+1 consensus requirement for every write operation:

* A write is only considered successful when all required data shards have been stored plus one additional blobber acknowledges the write.
* This extra redundancy enhances fault tolerance and ensures that even if a blobber fails during the write process, the data can still be reconstructed.
* This approach guarantees strong data consistency and durability while minimizing risks of partial writes.

### **2. Read Process – Data Shard Requirement**

Zus follows an erasure coding model, where reads require retrieving only the minimum number of data shards needed to reconstruct a file:

* The exact number of required shards depends on the erasure coding scheme chosen by the user during allocation setup.
* Clients can tune redundancy and performance based on their desired balance between storage efficiency and fault tolerance.
* This approach optimizes bandwidth usage and download speed while ensuring that files remain accessible even if some blobbers go offline.

### **3. Automatic Data Repair – Self-Healing Mechanism**

To maintain long-term data durability, Zus includes an automated repair mechanism:

* If parity blobbers go offline or become unreachable, the system automatically reconstructs lost data shards.
* The missing shards are redistributed to healthy blobbers, ensuring the allocation remains intact.
* This self-healing mechanism prevents permanent data loss, keeping the storage network highly available and resilient.

### **4. Rollback Mechanism – Handling Partial Commits**

To prevent data inconsistency during failed writes, Zus employs an atomic rollback mechanism:

* If a write operation partially succeeds (i.e., some blobbers accept the data while others fail), the system reverts to the last known consistent state.
* This ensures strong consistency guarantees, preventing corruption, orphaned data, or incomplete writes.
* Users are assured that their stored data always reflects a coherent and valid state, regardless of network failures.

### **5. File Count and File Size Limits**

Zus offers flexibility in terms of file storage:

* There are no hard limits on the number of files within an allocation.
* The maximum file size is capped by the allocation size itself.
  * If an allocation is 1000 GB, a single file can be as large as 1000 GB, provided no other files consume space.
* This model enables large-scale data storage, allowing users to store and manage massive files efficiently.

### **6. Encryption and Secure File Sharing**

Zus supports end-to-end encryption (E2EE) to protect data at rest and in transit:

* Clients can encrypt their data before upload, ensuring that even storage providers (blobbers) cannot access raw content.
* Proxy re-encryption technology allows users to securely share encrypted files without exposing their encryption keys.
* This ensures confidentiality and controlled access, even when files are being shared between multiple users.

### **7. Data Verification – Merkle Tree Proofs**

To maintain data integrity and verifiability, Zus utilizes Merkle Tree-based validation:

* Each uploaded file is split into fixed-size chunks, with a Merkle Tree constructed over these chunks.
* Each blobber stores its respective Merkle Tree, allowing efficient proof-of-storage verification.
* During downloads, Merkle proofs are checked against the root hash stored on the blockchain:
  * Ensures no tampering or modification has occurred.
  * Guarantees that retrieved data matches the originally uploaded version.
* This cryptographic auditability enhances trust in storage integrity.

### **8. Performance-Based Blobber Selection**

To optimize download performance, Zus dynamically selects the best-performing blobbers based on real-time response metrics:

* During initial download requests, the system tracks blobber response times.
* Clients prioritize faster-performing blobbers for subsequent read operations.
* This approach balances speed, redundancy, and reliability, ensuring users receive the best available performance.

### **9. Batch Processing of Write Markers**

Each data commit generates a Write Marker, a cryptographic proof of successful storage:

* The Write Marker includes:
  * Client ID
  * Blobber ID
  * Allocation ID
  * Size of data committed
  * Allocation root hash (post-commit)
  * Timestamp and signature
* These Write Markers serve as proof-of-storage, ensuring blobbers are eligible for payment.

#### **Write Marker Chain – Batch Submission and Verification**

To optimize blockchain interactions, Zus employs a Write Marker Chain mechanism:

* Instead of submitting each Write Marker individually, blobbers batch multiple markers into a single Write Marker Chain.
* Each batch contains:
  * A sequence of write markers.
  * A cumulative root hash of the allocation.
  * A batched root hash, computed by hashing all root hashes in the batch.
* The blockchain verifies the integrity of the entire chain, ensuring:
  * Proof-of-storage validation for blobbers.
  * Reduced transaction costs by minimizing on-chain interactions.
  * Efficient cryptographic auditing, allowing individual verification of each write operation.

This batch submission approach significantly enhances scalability, performance, and economic efficiency for both users and storage providers.

### **10. Geolocation-Aware Allocation Strategy**

Zus optimizes storage allocation based on geolocation diversity, ensuring:

* Global redundancy by distributing shards across multiple regions.
* Enhanced data availability, reducing risks of localized outages.
* Optimized performance, ensuring reads and writes are routed to the closest, best-performing blobbers.

For reads, Zus prioritizes selecting the best-performing blobbers based on latency, reliability, and response times and minimizing data retrieval time by choosing blobbers that optimize efficiency for the user’s location.

***

####


# Protocol

The Züs Storage Protocol defines the fundamental rules, structures, and mechanisms that govern data storage, access, validation, and security within the decentralized Züs ecosystem.

It ensures efficient, tamper-proof, and high-availability storage by leveraging blockchain technology, cryptographic proofs, and economic incentives for storage providers.

### **Key Components of the Protocol**

we will discuss the following key components:

* **Allocations** – Smart Storage Contracts
* **Reference Objects** – File Metadata & Management
* **Challenges** – Proof-of-Storage Validation
* **Write Markers** – Proof of Data Uploads

### **How the Protocol Ensures Security & Reliability**

* **Blockchain-Enforced Data Integrity**: Every storage transaction is recorded on-chain, ensuring immutability and auditability.
* **Decentralized Storage with Redundancy:** Data is sharded and distributed across multiple blobbers, preventing single points of failure.
* **Economic Incentives for High Availability:** Blobbers are financially rewarded for uptime and penalized for storage failures, ensuring continuous reliability.
* **Smart Contract-Managed Operations:** All storage-related actions, such as creating allocations, updating metadata, and validating challenges, are governed by self-executing smart contracts on the Züs blockchain.


# Allocations

Contract between the client and Züs System about storing their data

### Introduction

To host your data on Züs system, there should be some kind of contract to agree on the terms of service, which are:

* Size limit.
* Expiration time.
* Number of data shards and parity shards.
* Write price range
* Nominating the preferred blobbers to host your data.

We call this contract **an Allocation.** In this page we'll discuss operations related to the allocation and how the data related to the allocations flow through the system.

### Allocation Structure

```go
type StorageAllocation struct {
	// ID is unique allocation ID that is equal to hash of transaction with
	// which the allocation has created.
	ID string `json:"id"`
	// Tx keeps hash with which the allocation has created or updated.
	Tx string `json:"tx"`

	DataShards        int                     `json:"data_shards"`
	ParityShards      int                     `json:"parity_shards"`
	Size              int64                   `json:"size"`
	Expiration        common.Timestamp        `json:"expiration_date"`
	Owner             string                  `json:"owner_id"`
	OwnerPublicKey    string                  `json:"owner_public_key"`
	Stats             *StorageAllocationStats `json:"stats"`
	DiverseBlobbers   bool                    `json:"diverse_blobbers"`
	PreferredBlobbers []string                `json:"preferred_blobbers"`
	// Blobbers not to be used anywhere except /allocation and /allocations table
	// if Blobbers are getting used in any smart-contract, we should avoid.
	BlobberAllocs    []*BlobberAllocation          `json:"blobber_details"`
	BlobberAllocsMap map[string]*BlobberAllocation `json:"-" msg:"-"`

	// Flag to determine if anyone can extend this allocation, meaning increase its size
	ThirdPartyExtendable bool `json:"third_party_extendable"`

	// FileOptions to define file restrictions on an allocation for third-parties
	// default 00000000 for all crud operations suggesting only owner has the below listed abilities.
	// enabling option/s allows any third party to perform certain ops
	// 00000001 - 1  - upload
	// 00000010 - 2  - delete
	// 00000100 - 4  - update
	// 00001000 - 8  - move
	// 00010000 - 16 - copy
	// 00100000 - 32 - rename
	FileOptions uint16 `json:"file_options"`

	WritePool currency.Coin `json:"write_pool"`

	// Requested ranges.
	ReadPriceRange  PriceRange `json:"read_price_range"`
	WritePriceRange PriceRange `json:"write_price_range"`

	// StartTime is time when the allocation has been created. We will
	// use it to check blobber's MaxOfferTime extending the allocation.
	StartTime common.Timestamp `json:"start_time"`
	// Finalized is true where allocation has been finalized.
	Finalized bool `json:"finalized,omitempty"`
	// Canceled set to true where allocation finalized by cancel_allocation
	// transaction.
	Canceled bool `json:"canceled,omitempty"`

	// MovedToChallenge is number of tokens moved to challenge pool.
	MovedToChallenge currency.Coin `json:"moved_to_challenge,omitempty"`
	// MovedBack is number of tokens moved from challenge pool to
	// related write pool (the Back) if a data has deleted.
	MovedBack currency.Coin `json:"moved_back,omitempty"`
	// MovedToValidators is total number of tokens moved to validators
	// of the allocation.
	MovedToValidators currency.Coin `json:"moved_to_validators,omitempty"`

	// TimeUnit configured in Storage SC when the allocation created. It can't
	// be changed for this allocation anymore. Even using expire allocation.
	TimeUnit time.Duration `json:"time_unit"`
}

```

### Allocation flow in Züs System

<figure><img src="/files/7VekByKc46EsCwzVucf0" alt=""><figcaption><p>Fig1: Allocation flow</p></figcaption></figure>

1. The allocation is managed mainly in the blockchain network, so all the allocation operations are run as transactions to the [Storage Smartcontract](/zus-docs/system-overview/smart-contracts/storage-s.c.) by the wallet of the allocation owner.
2. However, to manage your stored files that belong to the allocation, you need to communicate with the blobbers, thus the blobbers needs to know about the allocations they're involved in.
3. That's why the blobbers have a worker that synchronizes the allocation information with the blockchain periodically and store in the Blobber Metadata DB. The blobber uses the allocation data to authorize access and retrieve file references from the Blobber Metadata DB.
4. Also if you shared a file, the users who can access that file will be communicating with the blobbers to downloads and read the shared files (as discussed in the [File Sharing](/zus-docs/system-overview/storage/file-operations/file-sharing) page).

### Allocation tokenomics

#### Allocation cost

Allocation cost is calculated as the write cost of the whole size of each data/parity shard on its corresponding blobber.

```go
cost := currency.Coin(0)

// BlobberAllocations represent the relationship and terms between an allocation and a hosting blobber
for _, blobberAllocation := range allocation.BlobberAllocations {
    shardCost := currency.Multiply(blobberAllocation.WritePrice, blobberAllocation.Size)
    cost = currency.AddCoin(cost, shardCost)
}

return cost
```

#### Cancelation Charge

Cancelation charge applies on the user in the following 2 cases:

* At finalization/cancelation of the allocation.
* At removal of a blobber from the allocation.

In case of total finalization/cancelation, a base cancelation charge is calculated as a globally configured percentage of the allocation cost mentioned above.

```go
cancelationCharge := currency.Multiply(cost, cancellationFraction)
```

{% hint style="info" %}
To check all global storage configuration values, check the **storage configuration endpoint** in [Sharders API](/zus-docs/http-apis#sharder-node-api).
{% endhint %}

**If this base cancelation charge is less than the amount of used tokens of the Write Pool of the allocation (mainly used to pay for challenges) then no fee is deducted.** Otherwise, a cancelation reward is then calculated for each blobber of the allocation as a percentage of the base cancelation charge based on its passing rate and write price, and then sent to them. The total of these calculated rewards will be the total of the cancelation charge that will be deducted from the allocation Write Pool.

```go
totalCancelationCharge := currency.Coin(0)

for _, blobberAllocation := range allocation.BlobberAllocations {
    // totalWritePrice is the sum of write price for all BlobberAllocations
    blobberWritePriceWieght := float64(blobberAllocation.WritePrice) / float64(totalWritePrice)
    // passRate is how many challenges the blobber passes out of its total challenges that belong to this allocation
    cancelationReward = currency.Float64ToCoin(float64(cancelationCharge) * blobberWritePriceWeight * blobberAllocation.passRate)
    
    totalCancelationCharge = currency.AddCoin(totalCancelationCharge, cancelationReward)
}

return totalCancelationCharge
```

In case of blobber removal, the same calculation happens but taking into consideration just the blobber that is removed, not all allocation blobbers.

### Operations on allocations

In this section, we'll be demonstrating the different operations that can be conducted on the allocations. We'll be using [ZboxCLI](/zus-docs/clis/zboxcli) as a client to communicate with the network, but you can use any communication method offered by Züs (like SDKs or public HTTP APIs).

{% hint style="info" %}
If you want a simple yet powerful GUI to create and manage your allocations on Züs system, we encourage you to use [Blimp](/zus-docs/webapps/blimp) or [Vult](/zus-docs/webapps/vult) apps of the Züs Ecosystem.
{% endhint %}

#### Creating an allocation

To create an allocation, you can use `zboxcli newallocation` command.

```
zbox newallocation --data <data-shards-count> --parity <parity-shards-count> ... 
```

Check [ZboxCLI README](https://github.com/0chain/zboxcli/tree/doc/update?tab=readme-ov-file#create-new-allocation) for full usage docs of the command.

What happens under the hood is simply that:

* The client (in this case zboxcli, via [Zboxcore SDK](https://docs.zus.network/using-the-network/sdks/zboxcore-sdk)) computes the parameters of the allocation creation transaction using information from Global Storage Configuration. It also requests the chain for a list of ids of blobbers that are eligible to host the allocation. If the blobbers are not enough (they should be equal to parity shards + data shards), the creation request fails.
* After the client build the transaction data, it submits the transaction to the [`new_allocation_request`](/zus-docs/system-overview/smart-contracts/storage-s.c.#new_allocation_request) function of the storage smart contract. The process of transaction submission is explained in more details in [Using the Network > Smart Contracts](broken://pages/tDd05w33sSnSaRKfObrJ).
* The smart contract function executes the following:
  * **Validates the request**:
    * Data and parity shards should be positive numbers.
    * Number of blobber ids provided should be equal to the sum of data and parity shards.
    * Price ranges (read/write) should be correct (min <= max).
    * Size of the allocation is not less than a globally configured allocation size minimum.
    * Checks all the blobbers are active.
    * Validating auth tokens for Restricted Blobbers, which are preferred blobbers that require authentication.
    * Checks if the locked tokens are enough to cover [allocation cost](#allocation-cost).
  * Adds the allocation size to the blobber offers, which is then when a new allocation is being requested.
  * Create a new write pool for the allocation and add the lock tokens amount to it.
  * Creates and saves a new Challenge Pool to [the MPT](broken://pages/FvXqXXOEc7NU4CTAKbfQ). Challenge pool can be thought as a pool or container for tokens that will be used to pay challenge reward to the blobbers passing challenges.
  * Inserts the allocation to [the MPT](broken://pages/FvXqXXOEc7NU4CTAKbfQ).
* If the request is successful, the allocation ID is returned to the user, otherwise, the user will see the error. The allocation ID is set to the hash of the creation transaction.

#### Listing user's allocations

To list all your allocations, you can use `zboxcli listalloctions` command.

```
zbox listallocations
```

Check [ZboxCLI README](https://github.com/0chain/zboxcli/tree/doc/update?tab=readme-ov-file#create-new-allocation) for full usage docs of the command.

What happens under the hood is:

The client (in this case zboxcli, via [Zboxcore SDK](https://docs.zus.network/using-the-network/sdks/zboxcore-sdk)) communicates with the Sharer API to retrieve a list of all the allocation objects associated with your wallet.

#### Updating an allocation

To update the allocation settings, you can use `zboxcli updateallocation` command.

```
zbox updateallocation
```

The owner can update the following about the allocation settings:

* **Replace an existing blobber** with a new one by mentioning the new blobber in the `AddBlobberId` field of the transaction data (check full listing in [Storage S.C.](/zus-docs/system-overview/smart-contracts/storage-s.c.#update_allocation_request) page) and the one to remove in `RemoveBlobberId`. They should be provided together.
* **Increase the size of the allocation**, by setting the `Size` parameter of the transaction to a positive value.
* **Change the file permissions options,** by setting the `FileOptions` field of the transaction request.
* **Make the allocation third-party-extendable,** meaning non-owner clients can expand its size. You can do this by setting up `SetThirdPartyExtendable` of the transaction payload.
* **Transfer allocation ownership** (will be mentioned later).

Third party (non-owner) clients can also **extend the size of an allocation** if it's already set to be third-party-extendable by the owner.

What happens under the hood when trying to update the allocation is simply that the client (in this case zboxcli, via [Zboxcore SDK](https://docs.zus.network/using-the-network/sdks/zboxcore-sdk)) submits a transaction to the blockchain (as mentioned in [Using the Network > Smart contracts](broken://pages/tDd05w33sSnSaRKfObrJ)) to the [`update_allocation_request`](/zus-docs/system-overview/smart-contracts/storage-s.c.#update_allocation_request) function of the storage smart contract. The smart contract will validate the issuer of the function as well as the payload validity and run the required changes. The allocation txn hash is updated to the hash of the update transaction.

#### Finalizing an allocation

When the transaction is expired, either the owner or one of the blobbers of the allocation can issue a transaction to finalize the allocation. To finalize the allocation, you can `zbox alloc-fini` command:

```
zbox alloc-fini --allocation_id ...
```

Check [ZboxCLI README](https://github.com/0chain/zboxcli/tree/doc/update?tab=readme-ov-file#finalise-allocation) for full usage docs of the command.

Finalizing the allocation includes:

* Settle all open challenges for the allocation, setting the unexpired ones to successful and the expired ones to failure, and updating the stats of the related blobbers.
* Unlock the locked tokens for write operations on this allocation for all the stake pools of the involved blobbers.
* Return all locked tokens in challenge pools to the owner's wallet.
* Pays all pending reward/penalty for the settled challenges to the involved blobbers.
* Pay [cancelation charge](#cancelation-charge) if the the cancelation charge is larger than the amount of tokens payed for challenges.
* Update stats of the involved blobbers.

What happens under the hood is similar to the update allocation request, the client submit a transaction to the blockchain (as mentioned in [Using the network > Smart contracts](broken://pages/tDd05w33sSnSaRKfObrJ)) to the [`finalize_allocation`](/zus-docs/system-overview/smart-contracts/storage-s.c.#finalize_allocation) function of the Storage S.C. The smart contract will validate the issuer of the function as well as the payload validity and run the required changes.

#### Canceling an allocation

Canceling is similar to finalization, with a couple of differences:

* The cancelled allocation should NOT be expired, unlike finalization.
* Only the allocation owner can issue cancellation transaction to the allocation.

To cancel the allocation, you can use the `zbox alloc-cancel` command:

```
zbox alloc-cancel --allocation_id <allocation_id> ....
```

Check [ZboxCLI README](https://github.com/0chain/zboxcli/tree/doc/update?tab=readme-ov-file#cancel-allocation) for full usage docs of the command.

Canceling the allocation have exactly the same effect on blobber balances and token pools as finalization mentioned above.

What happens under the hood is similar to the update allocation request, the client submit a transaction to the blockchain (as mentioned in [Using the network > Smart contracts](broken://pages/tDd05w33sSnSaRKfObrJ)) to the [`cancel_allocation`](/zus-docs/system-overview/smart-contracts/storage-s.c.#cancel_allocation) function of the Storage S.C. The smart contract will validate the issuer of the function as well as the payload validity and run the required changes.

#### Transfer an allocation to another account

For some use cases, users may need to exchange ownership of the allocation. Users can do this using the `zbox transferallocation` command:

```
zbox transferallocation --allocation <allocation_id> --new_owner <owner_id> --new_owner_key <new-owner-key> ....
```

Check [ZboxCLI README](https://github.com/0chain/zboxcli/tree/doc/update?tab=readme-ov-file#transfer-allocation-ownership) for full usage docs of the command.

Transferring the ownership is simply an allocation update request to change the ownerId of the allocation. It uses the same smart contract function as [Update allocation](#updating-an-allocation).


# Reference Objects

File representation in the Blobber DB.

Reference objects represent the files in the DB of the blobber, for ease of access for validation and other operations.

### Some Important Properties

Check the definition of the `Ref` struct [here](https://github.com/0chain/blobber/blob/doc/update/code/go/0chain.net/blobbercore/reference/README.md#type-ref)

<table><thead><tr><th width="230">Properties</th><th>Definition</th></tr></thead><tbody><tr><td>FileID</td><td>ID of the file in the system.</td></tr><tr><td>Type</td><td>Either file or directory.</td></tr><tr><td>AllocationID</td><td>ID of the allocation the file belongs to.</td></tr><tr><td>LookupHash</td><td>Hash of the file path and the allocation ID, used to lookup for the file.</td></tr><tr><td>Name</td><td>Name of the file.</td></tr><tr><td>Path</td><td>Full absolute path of the file on the allocation.</td></tr><tr><td>FileMetaHash</td><td>Hash of file metadata. Used for verification.</td></tr><tr><td>Hash</td><td>Hash of the file content. Used for verification.</td></tr><tr><td>NumBlocks</td><td>Number of blocks that belong to the file.</td></tr><tr><td>PathHash</td><td>Hashed value of the file path. Used for verification.</td></tr><tr><td>Size</td><td>Size of the file.</td></tr><tr><td>FixedMerkleRoot</td><td>Calculated hash based on the contents of the file. Used for challenges. Changes only when the file contents changes. Calculated only for files.</td></tr><tr><td>MimeType</td><td>Mime type of the file.</td></tr><tr><td>AllocationRoot</td><td>Root hash of the allocation the file belongs to.</td></tr><tr><td>ThumbnailHash</td><td>Hash of the thumbnail contents.</td></tr><tr><td>ThumbnailSize</td><td>Size of the thumbnail.</td></tr><tr><td>ChunkSize</td><td>Size of the chunk of the file stored in this blobber.</td></tr><tr><td>NumUpdates</td><td>How many times the file was updated (contents changed by owner).</td></tr><tr><td>NumBlockDownloads</td><td>How many times the file was downloaded.</td></tr></tbody></table>


# Challenges

In-depth walkthrough of Züs System Storage Challenges.

Challenges are the means by which blobbers get rewards for storing users' data, also validators get reward for verifying those challenges. Let's take a look into the flow of challenge generation, verification and response through the different nodes of the system

### Challenge Generation

* For each block generated by the miners, one `generate_challenge` transaction is added by the miners. Following is the details of the txn. Check `protocol_block.go`

```go
	brTxn := transaction.Provider().(*transaction.Transaction)
	brTxn.ClientID = node.Self.ID
	brTxn.PublicKey = node.Self.PublicKey
	brTxn.ToClientID = storagesc.ADDRESS
	brTxn.CreationDate = b.CreationDate
	brTxn.TransactionType = transaction.TxnTypeSmartContract
	brTxn.TransactionData = fmt.Sprintf(`{"name":"generate_challenge","input":{"round":%d}}`, b.Round)
	brTxn.Fee = 0
```

* In block verification step, the miner runs the txns of the block, including the `generate_challenge` txn, against the smart contracts.
* This txn is handled by: `storageSmartContract.generateChallenge` and on the condition that the config: `smartcontracts.storagesc.challenge_enabled` is `true` (check sc.yaml). The smart contract does some checks:

  * If the `round` field in the txn data is the same as the current round running

  * If the current *healthy* validators is more than or equal to the config: `smartcontracts.storagesc.validators_per_challenge`

  > Healthy means it sent a health check beat in less than an hour

  * If there is blobbers to be challenged

  * After selecting a random blobber, if this selected blobber has allocations to be challenged.

  * After selecting an allocation hosted on that blobber to be challenged, If this allocation is valid for challenging on this blobber particularly (i.e. It has data and the blobber knows that, i.e. `UsedSize > 0 && blobberAlloc.AllocationRoot != ''`

  * If this allocation isn't finalized nor expired

  > As a side effect, if the allocation is finalized, The allocation is removed from the list of allocations for this blobber in the MPT
* If all the conditions pass, the allocation is generated with the following data:

```go
	var storageChallenge = new(StorageChallenge)
	storageChallenge.ID = challengeID
	storageChallenge.TotalValidators = len(selectedValidators)
	storageChallenge.ValidatorIDs = validatorIDs
	storageChallenge.BlobberID = blobberID
	storageChallenge.AllocationID = alloc.ID
	storageChallenge.Created = txn.CreationDate
	storageChallenge.RoundCreatedAt = balances.GetBlock().Round

	challInfo := &StorageChallengeResponse{
		StorageChallenge: storageChallenge,
		Validators:       selectedValidators,
		Seed:             seed,
		AllocationRoot:   allocBlobber.AllocationRoot,
		Timestamp:        allocBlobber.LastWriteMarker.Timestamp,
	}
```

* It then removes all expired challenges from the MPT, updates the stats fields related to challenge of the selected allocation and blobAlloc and finally adds three events to be run by the sharder after the block is finalized: `TagAddChallenge`, `TagAddChallengeToAllocation` and `TagUpdateBlobberOpenChallenges`
* When the sharder runs the events, following changes are applied to the db:
  * Add the challenge to the `challenges` table
  * Update `total_challenges, open_challenges, failed_challenges`for the allocation selected.
  * Update `open_challenges`. for the selected blobber

### Sync. of challenges in the blobbers

* On startup, the blobber runs a worker that synchronizes the challenges with the network. That is by periodically sending http requests to the sharders to get the open challenges. The endpoint used is: `/v1/screst/6dba10422e368813802877a85039d3985d96760ed844092319743fb3a76712d7/openchallenges?blobber=<sending_blobber_id>&limit=50&from=<round_lower_bound>`\\
* The challenges are then sorted asc. by round of creation and sent to a channel: `toProcessChallenge` to another goroutine within the challenges worker that processes those challenges

### Challenge Processing in Blobbers

* The blobber starts by checking if the challenge already exists in the blobber's db, if so it ignores the challenge
* If it's not found, It's added to the list of challenges the blobber perserves in memory. The blobbers assigns the processing of this challenge to one of its workers (their number is `challenge_response.num_workers` in 0chain\_blobber.yaml). This worker pool is virtualized by a [weighted semaphore](https://pkg.go.dev/golang.org/x/sync/semaphore). Check `challengeProcessor` in 0chain.net/blobbercore/challenge/worker.go.
* First step is adding 2 entries to the blobber's db, the challenge itself and `challenge_timing.`
* Loads the write markers related to that allocation from the timestamp of the challenge on from the db.
* Selects a random block of the allocation and computes `object_path` of this block.
* The blobber computes the `challenge_proof` which will be used by the validator for verification as the MPT Path of the allocation.
* The blobber then sends validation requests to the validators with validatorIds defined in the challenge info to receive validation ticket from each of the validators. The endpoint used is: `POST /v1/storage/challenge/new` with the following data

```go
type ChallengeRequest struct {
	ChallengeID    string                           `json:"challenge_id"`
	ObjPath        *ObjectPath                      `json:"object_path,omitempty"`
	WriteMarkers   []*writemarker.WriteMarkerEntity `json:"write_markers,omitempty"`
	ChallengeProof *ChallengeProof                  `json:"challenge_proof"`
}

type ObjectPath struct {
	RootHash     string                 `json:"root_hash"`
	Meta         *FileMetaData          `json:"meta_data"`
	Path         map[string]interface{} `json:"path"`
	FileBlockNum int64                  `json:"file_block_num"`
	RootObject   *DirMetaData           `json:"-"`
}

type WriteMarkerEntity struct {
	ClientPublicKey string       `json:"client_key"`
	WM              *WriteMarker `json:"write_marker"`
}

type WriteMarker struct {
	AllocationRoot         string           `json:"allocation_root"`
	PreviousAllocationRoot string           `json:"prev_allocation_root"`
	FileMetaRoot           string           `json:"file_meta_root"`
	AllocationID           string           `json:"allocation_id"`
	Size                   int64            `json:"size"`
	BlobberID              string           `json:"blobber_id"`
	Timestamp              common.Timestamp `json:"timestamp"`
	ClientID               string           `json:"client_id"`
	Signature              string           `json:"signature"`
}

type ChallengeProof struct {
	Proof   [][]byte `json:"proof"`
	Data    []byte   `json:"data"`
	LeafInd int      `json:"leaf_ind"`
}
```

* Challenge result is determined based on the recieved response from the validators

  * If received valid success tickets from more than 1/2 the validators, even if the other validators didn't respond at all => Passed challenge
  * If received valid tickets from more than 1/2 the validators, whatever the status is, but not more than 1/2 the validators sent success tickets, even if the other validators didn't respond at all => Failed challenge
  * If didn't receive valid tickets at all from 1/2 of the validators => Cancelled
  * Validation in the blobber of the ticket is as follows

  ```go
  func (vt *ValidationTicket) VerifySign() (bool, error) {
  	hashData := fmt.Sprintf("%v:%v:%v:%v:%v:%v", vt.ChallengeID, vt.BlobberID, vt.ValidatorID, vt.ValidatorKey, vt.Result, vt.Timestamp)
  	hash := encryption.Hash(hashData)
  	verified, err := encryption.Verify(vt.ValidatorKey, vt.Signature, hash)
  	return verified, err
  }
  ```
* Blobber then updates the status of the challenge to Processed, its UpdatedAt (both in memory) then updated `challenge_timing.complete_validation` for all the processed challenges in the db.

### Challenge Validation in the Validators

* The validator starts by getting allocation info from the network using gosdk. Check `Transaction.Verify` in 0chain.net/core/entity.go in blobber repo. Basically is gets the allocation info by sending a request to the endpoint that returns transaction confirmation and then uses transaction output as allocation info.
* It also gets the challenges as saved in the network by sending a GET request to the endpoint: \`v1/screst/6dba10422e368813802877a85039d3985d96760ed844092319743fb3a76712d7/getchallenge?blobber=\<BlobberId>\&challenge=\<ChallengeID>
* The validators then decodes the challenge request and starts verifying its parameters:

  * Verifies object path.
  * Verifies write markers.
    * Checks if their creation is the same as the challenge's timestamp from the chain.
    * Checks if their allocation is the same as the one got from the chain for this challenge
    * Compare's the write marker's clientId with the write markers client id
    * Verifies the signature of the write marker
  * Checks the order of the write markers, i.e. each write marker's PreviousAllocationRoot should be the same as the AllocationRoot of the previous write marker.
  * If ObjectPath is sent in the challenge request, compares the AllocationRoot of the last WM with the AllocationRoot calculated from ObjectPath, otherwise checks it's not empty
  * Computes a Merkle path from the challenge\_proof sent and verifies it's correctness
  * The validator then build a validation ticket, signs it and sends it back to the blobber. Its components is as follows:

  ```go
  	var validationTicket ValidationTicket

  	validationTicket.BlobberID = challengeObj.BlobberID
  	validationTicket.ChallengeID = challengeObj.ID
  	validationTicket.Result = true
  	validationTicket.MessageCode = "success"
  	validationTicket.Message = "Challenge passed"
  	validationTicket.ValidatorID = node.Self.ID
  	validationTicket.ValidatorKey = node.Self.PublicKey
  	validationTicket.Timestamp = common.Now()

  ```

### Blobbers' sending challenge response to the network to get reward

Aside from the challenges worker, the blobbers also runs a worker that is responsible for syncing the challenge response with the chain after they're processed: `commitOnChainWorker`

* The worker handles the challenges in batches of 5 (hardcoded), reading them from the in-memory treemap the blobbers maintains for challenges. It will only handle a ticket if its status is Processed. If no challenges were found that meet the criteria, will sleep for 2 secs (hardcoded) and tries again.
* The blobber checks the expiry of the challenge. A challenge is expired when the time elapsed since its creation time is more than `max_challenge_completion_time` config which the blobber gets from the chain. (check sc.yaml)
* It then submits a `challenge_response` transaction to the network with the following data:

```go
type ChallengeResponse struct {
	ChallengeID       string              `json:"challenge_id"`
	ValidationTickets []*ValidationTicket `json:"validation_tickets"`
}
```

* It makes sure the txn is confirmed by getting its txn confirmation from the sharder.
* It then updates the `challenge_timing.txn_submission` in the db.

### Processing challenge request in the chain (storage smart contract)

* The data of the request is validated thus ChallengeID is not zero and ValidationTickets are not empty. Also checks if the challenge is already processed, as well as that the blobber sending this txn is the same as the challenged blobber by this challenge.
* It then verifies the tickets
  * Checks each ticket is sent by the challenged blobber and addressed to this challenge.
  * Checks the public key of the validator
  * Checks the number of the valid tickets and if it's more than half validators
  * Checks the signature of the validator on the ticket
  * Also checks the expiry of the challenge
* Checks also if the allocation challenged is not finalized and checks the challenged blobber belongs to that allocation
* Checks that this challenge isn't already redeemed.
* If all these checks pass, then this challenge passes, where the miner does the following:
  * Updates stats for allocation and blobber
  * Emits the events:

    ```go
    TagUpdateChallenge, TagUpdateAllocationChallenge, TagUpdateBlobberChallenge
    ```
  * **Runs the flow of validator and blobber rewarding.**
  * Checks if the latestFinalizedChallenge is sooner than the latestSuccessfulChallenge (i.e there are failing challenges) and **runs the penalization flow of the blobber** based on these failing challenges.
* If the checks are not passing then the challenge is failing and the miner does the following:
  * Updates stats for allocation and blobber
  * Emits the events:

    ```go
    TagUpdateChallenge, TagUpdateAllocationChallenge, TagUpdateBlobberChallenge
    ```

    to update the data in events\_db.

***

If you have any questions or encounter any issues, please join our [Discord](https://discord.com/invite/h3BFjdtCp4) for further assistance. Our team and the community members are available to help troubleshoot your concerns and provide guidance.


# Write Markers

Write markers play a critical role in the Züs decentralized storage system, acting as a proof of data uploads and ensuring blobbers are compensated for storing data over time. Through write markers, Züs links the compensation of blobbers to their performance, verified through storage challenges, ensuring data integrity and decentralized storage management.

This section provides an in-depth explanation of how write markers function within the Züs ecosystem, ensuring secure, decentralized, and efficient storage management.

### **Purpose of Write Markers**

Write markers serve several important purposes in the Züs ecosystem:

* **Proof of Data Storage**: They provide verifiable proof that data has been uploaded and stored with the blobber.
* **Payment Commitment**: Blobbers use write markers to claim rewards for storage. Payment occurs over time, based on the successful completion of storage challenges.
* **Incentivizing Blobber Performance**: Payments are released only after the blobber passes storage challenges, ensuring they maintain proper data storage practices.

### Structure

```go
type WriteMarker struct {
    AllocationRoot         string `json:"allocation_root"`
    PreviousAllocationRoot string `json:"prev_allocation_root"`
    FileMetaRoot           string `json:"file_meta_root"`
    AllocationID           string `json:"allocation_id"`
    Size                   int64  `json:"size"`
    ChainSize              int64  `json:"chain_size"`
    ChainHash              string `json:"chain_hash"`
    ChainLength            int    `json:"chain_length"`
    BlobberID              string `json:"blobber_id"`
    Timestamp              int64  `json:"timestamp"`
    ClientID               string `json:"client_id"`
    Signature              string `json:"signature"`
}
```

### **How Write Markers Work**

1. **Creating an Allocation**:
   * A client initiates a storage contract by creating an allocation with one or more blobbers. This allocation defines:
     * **Storage Size**: How much space the client requires.
     * **Pricing**: The price the client is willing to pay for reads and writes.
     * **Duration**: How long the client needs the storage.
   * The client also sets up a **write pool**, which contains tokens that will be used to pay the blobbers for storage.
2. **Uploading Data**:
   * During an upload, the client sends data to the blobber along with a **write marker**.
   * A write marker includes:
     * **File Size**: The size of the file being uploaded.
     * **Allocation ID**: The unique identifier for the storage allocation.
     * **Merkle Root Hash**: A cryptographic hash to verify data integrity.
     * **Timestamp**: The time of the upload.
   * The blobber stores the data and commits the write marker to the blockchain.
3. **Blockchain Interaction**:
   * After receiving the write marker, the blobber submits it to the blockchain. This action:
     * Locks tokens from the client’s write pool into the **challenge pool**.
     * Represents a public commitment by the blobber to store the data.
   * Blobbers are not immediately paid. Tokens in the challenge pool are released gradually as blobbers pass storage challenges.

### **Key Token Pools**

**Write Pool**:

The client’s write pool holds tokens designated to pay blobbers for storing data. Tokens are transferred from the write pool to the challenge pool as data is uploaded. Any unused tokens are returned to the client if the allocation is canceled.

**Challenge Pool**:

Tokens in the challenge pool serve as a financial guarantee that blobbers will store data correctly. Blobbers earn these tokens over time by passing **challenges** that verify they are storing the client’s data as agreed.

### **Challenge Protocol**

The challenge protocol ensures that blobbers are continuously storing data as per their agreement. Here’s how it works:

1. **Random Challenges**: The blockchain periodically issues random challenges to blobbers, asking them to provide proof that they still have the data.
2. **Responding to Challenges**: Blobbers must respond by submitting the requested data within a specific timeframe. If the blobber passes the challenge, they receive a portion of the tokens from the challenge pool.
3. **Failed Challenges**: If the blobber fails to respond or provides incorrect data, they forfeit the payment for that challenge period. Additionally, the blobber may be penalized by having tokens deducted from their **stake pool**.

### **Stake Pools and Penalties**

To further incentivize blobbers to maintain proper storage practices, Züs requires them to lock tokens in a **stake pool**. The stake pool serves as a financial safety net in case the blobber fails to meet their obligations.

* **Stake Pool**: Blobbers (and optionally, their delegates) lock tokens into a stake pool to back their storage capacity.
* **Staked Capacity**: The amount of storage a blobber can offer is proportional to the tokens they’ve locked in their stake pool. If they have insufficient tokens, they cannot offer storage.
* **Penalties**: If a blobber fails a challenge, they are penalized by having tokens deducted from their stake pool. This penalty serves to further ensure that blobbers act responsibly and maintain data integrity.

### **Write Marker Example**

**Step 1: Setting Up an Allocation**

* A client creates a storage allocation for 100 GB of data, with the total cost of storage set at 100 ZCN for a 1-year duration. The client funds the write pool with 100 ZCN.

**Step 2: Uploading Data**

* The client uploads 50 GB of data to the blobber. A write marker is generated for the upload, containing:
  * The **Allocation ID** identifying the contract.
  * The **Merkle Root Hash** proving the integrity of the 50 GB file.
  * A **Timestamp** marking when the file was uploaded.
* The blobber stores the file and commits the write marker to the blockchain. At this point, 50 ZCN (proportional to the uploaded data) is locked into the challenge pool.

**Step 3: Challenge Process**

* Over the course of the next year, the blobber faces periodic challenges from the blockchain. For each challenge, the blobber must submit fragments of the stored file.
* If the blobber passes a challenge, they receive a portion of the 50 ZCN locked in the challenge pool.

**Step 4: Penalty for Failing a Challenge**

* After 6 months, the blobber fails a challenge. As a result:
  * They lose the ZCN that would have been released from the challenge pool.
  * They are penalized 10% of their stake pool balance.

**Step 5: Completion of Allocation**

* At the end of the year, if the blobber has passed the remaining challenges, they receive the remaining ZCN from the challenge pool. The allocation expires, and the client can either renew or delete their data.


# Chain Hashing

Chain Hashing in Write Markers is a mechanism designed to enhance the efficiency and security of data verification and payment settlement on the blockchain. Instead of submitting individual Write Markers sequentially—which increases transaction costs and slows down processing speeds—blobbers create a chain of Write Markers. This chain is verified using cryptographic hashing, ensuring data correctness and reducing blockchain congestion.

### **Problem Statement**

Blobbers must submit Write Markers to the blockchain to prove they have stored a specific amount of data. This proof is essential for:

* Enabling challenges that verify data integrity.
* Processing payments for storage services.
* Maintaining an auditable record of data transactions.

However, submitting each Write Marker individually introduces inefficiencies:

1. **High Blockchain Transaction Costs**
   * Each Write Marker submission incurs a gas fee, making frequent submissions expensive.
2. **Increased Blockchain Load**
   * Processing multiple individual transactions burdens the network, slowing down other operations.
3. **Slower Processing & Payment Verification**
   * Storing and validating each Write Marker separately delays payment settlements for blobbers.

To address these challenges, the Chained Write Marker Structure enables blobbers to aggregate multiple Write Markers into a single submission transaction, reducing overhead and improving efficiency.

### **Chain Hashing Mechanism**

The Chained Write Marker Structure is based on **cryptographic hashing** to ensure the integrity of stored data while reducing the blockchain footprint.

#### **1. Chaining Write Markers**

Each Write Marker contains a Chain Hash, which is computed as:

```
Chain Hash = SHA-256(Previous Chain Hash || Allocation Root)
```

Where:

* **Previous Chain Hash**: The hash of the last committed Write Marker.
* **Allocation Root**: The unique root hash representing the **current allocation state**.

**Initial Condition:**\
If no previous Write Marker exists (i.e., for the first marker in the chain), the **Allocation Root alone** is used.

#### **2. Submission Process**

1. The blobber accumulates up to 128 uncommitted Write Markers.
2. The latest Write Marker is submitted along with the allocation roots of all uncommitted markers.
3. The blockchain computes the chain hash using the stored previous marker and verifies the integrity of the entire chain.
4. Once verified, the new Write Marker is appended to the chain, making it an auditable, tamper-resistant record.

#### **3. Cryptographic Verification**

The Write Marker Signature Payload includes:

* **Chain Hash** (to maintain link integrity).
* **Previous Chain Hash** (to establish sequential proof).
* **Chain Size** (ensuring proper aggregation).
* **Allocation Root** (tracking the latest storage state).
* **Previous Allocation Root** (for validation).
* **Client ID** and **Blobber ID** (ensuring authenticity).
* **Timestamp** (preventing replay attacks).
* **Allocation ID** (linking to the correct storage allocation).
* **Write Marker Size** (preventing data tampering).
* **File Meta Root** (ensuring metadata integrity).

The blockchain and validators perform rigorous checks to validate:

1. The correctness of the chain hash using SHA-256.
2. The integrity of chain size to prevent tampering.
3. The validity of the user signature, ensuring the Write Marker is authentic.

If any inconsistency is detected (e.g., mismatched chain hash or incorrect chain size), the blobber's submission is rejected.

### **Chain Hash Calculation Code**

Below is the implementation for computing the Chain Hash:

```go
import (
    "crypto/sha256"
    "encoding/hex"
)

func CalculateChainHash(prevChainHash, newRoot string) string {
    hasher := sha256.New()
    if prevChainHash != "" {
        prevBytes, _ := hex.DecodeString(prevChainHash)
        hasher.Write(prevBytes) //nolint:errcheck
    }
    newBytes, _ := hex.DecodeString(newRoot)
    hasher.Write(newBytes) //nolint:errcheck
    return hex.EncodeToString(hasher.Sum(nil))
}
```

If a previous chain hash exists, it is included in the calculation. The new allocation root is hashed along with it. The resulting SHA-256 digest is returned as the new chain hash.

### **Process Flow Diagrams**

#### **1. Chaining Process**

This sequence diagram represents how **Write Markers are chained** together.

<figure><img src="/files/7p2xsLOPZW3MTpJVP7jQ" alt=""><figcaption></figcaption></figure>

Each **Write Marker** carries the **previous chain hash**. The **chain size grows cumulatively**, ensuring an ordered record. The **final marker** is submitted to the **blockchain** for validation.

#### **2. Verification Process**

This flow illustrates how **blockchain validation** ensures correctness.

<figure><img src="/files/Iwgd1EXq1LSUwb5Yz245" alt=""><figcaption></figcaption></figure>

1. The blobber submits the latest Write Marker Chain.
2. The Blockchain compute Chain hash and verify Chain size
3. If it is valid, the blockchain accepts and if it is invalid, the blockchain rejects.

The Chained Write Marker Protocol is a critical efficiency improvement in decentralized storage, ensuring faster, cheaper, and more secure Write Marker submissions.

By using chain hashing and batch processing, blobbers can optimize storage operations, improve payment turnaround times, and maintain data integrity on the blockchain.


# Two Commit

In a decentralized storage system, inconsistencies may arise when different blobbers maintain different states during a connection commit. This can happen when some blobbers successfully receive a **write marker** and commit a new state (**S1**), while others remain in the previous uncommitted state (**S0**), resulting in a broken state.

If an allocation repair is attempted in such a scenario, there may not be enough blobbers to reconstruct the committed state. Since committed changes are already merged, **rolling back** to a previous consistent state is not possible under the existing mechanism.

This issue may occur due to:

* Blobber crashes during a connection commit.
* Partial commit operations where only a subset of blobbers receives the commit request.

<figure><img src="/files/5ZQ1uv3v3v5dvCDC6sMp" alt=""><figcaption></figcaption></figure>

To solve this, we introduce a **double-commit approach**, which enables a rollback mechanism while maintaining consistency across blobbers.

### **Solution: Double-Commit Approach**

To allow recovery of a previous correct state (**S0**) even if a new state (**S1**) has been partially committed, a new **pre-committed state** is introduced. This ensures that all blobbers have a synchronized state before finalizing a commit.

<figure><img src="/files/125uMXauZcf0kawJ9ewO" alt=""><figcaption></figcaption></figure>

1. **Introduce a pre-committed state (S1):** Before finalizing a commit, changes are first stored in a pre-commit directory. The filesystem maintains a staged version that can be rolled back if needed.
2. **Decoupling of Client-Blobber Interactions:** Client-to-Blobber interactions (e.g., data uploads and connection commits) are now independent of Blobber-to-Blockchain interactions (e.g., write marker submissions and challenge completions).
3. **Write Marker Chaining for Challenges:** Blobbers store only the **latest allocation version** and do not maintain full historical versions. A rollback mechanism is implemented using **empty write markers**.

### **Implementation Details**

#### **Direct Flow (Normal Commit Process)**

<figure><img src="/files/NUxCFj3wSCMBuGCWUUIY" alt=""><figcaption></figcaption></figure>

1. User uploads two files (f1, f2).
2. User commits with a write marker (W1). Files are moved to the pre-commit directory (version 1).
3. User uploads another file (f3) and deletes f2.
4. User commits with a new write marker (W2). f1 and f2 are moved to the file store with version 1. f3 and the deletion record of f2 (stored in the reference table) are moved to the pre-commit directory (version 2).
5. User uploads another file (f4).
6. User commits with write marker (W3). f2 is deleted from the file store, and f3 is moved to the main filesystem (version 2). f4 is moved to the pre-commit directory, updating the state to version 3.

#### **Rollback Flow (Handling Inconsistencies)**

<figure><img src="/files/VILOolXi5FqTDTH35Rva" alt=""><figcaption></figcaption></figure>

1. User uploads two files (f1, f2).
2. User commits with write marker (W1). Files are moved to the pre-commit directory (version 1).
3. User uploads f3 and deletes f2.
4. User commits with write marker (W2). f1 and f2 are moved to the file store (version 1). f3 and the deletion of f2 (reference table record) are moved to the pre-commit directory (version 2).
5. User uploads f4.
6. User initiates a rollback using an empty write marker (W2e). The pre-commit directory is discarded, and the system reverts to version 1.
7. User uploads f3 again and commits with write marker (W3). The allocation is now correctly synchronized.

### **Allocation Versioning**

To synchronize state across all blobbers, a common allocation version must be introduced. This is achieved using the timestamp of the write marker.

* Users must issue write markers with the exact same timestamp across blobbers when committing changes.
* The version of an allocation is determined by the write marker timestamp assigned to the pre-commit directory.

#### **Empty Write Marker**

An empty write marker is used to rollback an allocation to a previous committed state while ensuring blockchain integrity. It is a modified version of a write marker with zero file size.

```go
type WriteMarker struct {
	AllocationRoot         string           `json:"allocation_root"` // previous allocation root
	PreviousAllocationRoot string           `json:"prev_allocation_root"` // previous allocation root (unchanged)
	FileMetaRoot           string           `json:"file_meta_root"` // unchanged
	AllocationID           string           `json:"allocation_id"` 
	Size                   int64            `json:"size"` // zero (empty marker)
	BlobberID              string           `json:"blobber_id"`
	Timestamp              common.Timestamp `json:"timestamp"` // must match the precommit timestamp
	ClientID               string           `json:"client_id"`
	Signature              string           `json:"signature"`
}
```

* The timestamp of the empty write marker must match the precommit directory version to be rolled back.
* After rollback, the last committed version is restored.
* The empty write marker is still committed to the blockchain, maintaining ledger integrity.

### **Challenge Protocol**

The existing write marker chain model is replaced by a write marker tree structure to account for rollbacks.

<figure><img src="/files/9xyCOFykoyDoBW9dYJq3" alt=""><figcaption></figcaption></figure>

* If a validator challenges a rolled-back allocation root, the blobber must provide a proof structure.
* The validator verifies that:
  * The blobber no longer holds the challenged allocation version.
  * The blobber has moved to a newer version based on a common ancestor.
* This ensures that rolled-back states are correctly handled without disrupting challenge validation.

### **Pre-Committed Section**

Currently, temporary changes are stored in the getAllocTempDir directory. The new double-commit protocol introduces a getAllocPreCommitDir directory to maintain pre-committed states (S1) separately.

* When changes are pre-committed, they are moved from getAllocTempDir to getAllocPreCommitDir.
* This isolated storage allows rollbacks without affecting committed data.

#### **Pre-Commit Event**

The pre-commit event is the central mechanism in the double-commit protocol. It modifies the commit process as follows:

1. Instead of applying changes immediately, pre-commit stores them in `getAllocPreCommitDir`.
2. Changes are only finalized on commit when moving from pre-commit to the actual file system.

#### **CommitWrite Process**

When a client commits a write, the blobber performs two key actions:

1. **Finalize the previous pre-committed data:** Apply changes using `connectionObj.ApplyChanges()`, moving files from `getAllocPreCommitDir` to the main file store.
2. **Pre-commit the current data:** Move speculative changes from `getAllocTempDir` to `getAllocPreCommitDir`.

### **Rollback Mechanism**

To revert to a previous committed state (**S0**), a rollback operation is introduced.

* Rollback removes the pre-committed state (S1) and restores the last committed state.
* Pre-committed changes are not permanently deleted, as they may be required for blockchain challenges.
* Instead, these changes are relocated from `getAllocPreCommitDir` to a temporary directory for potential use in validation.

### **Data Manipulation with Pre-Committed State**

All file (`/v1/file`) and directory (`/v1/dir`) operations now interact with the pre-committed state instead of the previously merged state.

* The system builds file state based on connectionObj.ApplyChanges(), ensuring consistency across blobbers.
* This prevents inconsistencies caused by partial commits and ensures all blobbers maintain a synchronized state.


# Blobber Repair Protocol

The Blobber Repair Protocol ensures that all blobbers within a decentralized storage allocation maintain a consistent and up-to-date version of stored data. This process becomes necessary when:

* A blobber misses a commit, leading to data inconsistencies.
* A new blobber is added or an existing one is replaced in the storage allocation.
* **Consensus Thresholds Not Met**: In cases where the consensus threshold (set under allocation settings) is less than the total number of blobbers, uploads may still succeed even if some blobbers are down. For example, if consensus is set to 5 in a 6-blobber allocation, one blobber can be offline, and the upload will proceed. However, this blobber will then need to be repaired to sync the missed data.
* **Automatic Repair Behavior**: In most cases, repair is automatically triggered on the next write operation. Similarly, when blobbers are switched or replaced, the repair mechanism ensures that the new blobber is brought up to the current allocation state automatically.

Decentralized storage uses Reed-Solomon erasure coding, which allows data recovery as long as at least `data_shards` number of blobbers possess the correct data. The repair process ensures that all blobbers sync to the same allocation root, maintaining data consistency and integrity across the network.

### **Problem Statement**

Decentralized storage relies on independent blobbers to store erasure-encoded data. However, inconsistencies can arise due to:

1. **Missed Commits:** A blobber might fail to receive or store a data update, leading to **incomplete or outdated data**.
2. **Blobber Addition or Replacement:** New blobbers start with an empty or outdated state and need to catch up with the latest allocation root.
3. **Data Integrity Concerns:** Ensuring that all blobbers store the correct and latest version of data is crucial to preventing corruption or loss.

To resolve these challenges, a structured repair process is necessary to synchronize all blobbers to the same allocation root.

### **Repair Process**

The repair process follows a structured approach to efficiently identify and synchronize missing or outdated data across blobbers.

#### **1. Allocation Root Consensus**

* The client fetches the allocation roots from all participating blobbers.
* Blobbers are grouped into sets based on their allocation roots.
* The largest consistent set (with at least `data_shards` blobbers sharing the same allocation root) is considered the master set.
* Blobbers not in the master set are identified as secondary blobbers requiring repair.

#### **2. File Synchronization Using a Lead Blobber**

* A lead blobber is selected from each set to act as a representative.
* The lead blobber generates a list of files using a paginated approach.
* The client then runs a diff function to classify discrepancies:
  * **Missing Files:** Files present in the master set but absent in secondary blobbers.
  * **Extra Files:** Files stored by secondary blobbers but missing in the master set.
  * **Modified Files:** Files with mismatched file hashes, indicating outdated versions that need updating.
* Based on the differences, file operations are queued for synchronization.

#### **3. Repair Execution**

* Batch processing is used for high-throughput repair operations.
* Files requiring repair are downloaded from the master set and uploaded to secondary blobbers.
* Pipelining is employed:
  * Data is streamed directly from the master set to secondary blobbers, reducing disk writes and improving performance.
* The repair process iterates through all files until the dataset is fully synchronized.

#### **4. Ensuring Synchronization**

* Once the repair operations are completed, the allocation root is updated for all blobbers.
* The client re-verifies that all blobbers now share the same allocation root.
* This guarantees that all blobbers in the allocation are fully synchronized, eliminating inconsistencies and ensuring data integrity.

### **Security & Data Integrity Measures**

Merkle Proofs are used to verify file integrity post-repair. The final allocation root hash is validated against the expected consensus hash. If a repaired blobber fails to match the expected state, further verification or re-repair is triggered.

The Blobber Repair Protocol is a critical component of decentralized storage, ensuring data consistency, integrity, and availability.

By using allocation root consensus, parallel processing, and direct streaming, the repair process ensures that all blobbers remain synchronized, even in the face of failures, updates, or missing commits.


# ZS3 Server

Add S3-compatible API to your allocation

ZS3 (Zus S3) is a gateway interface layer that allows users to interact with the Zus decentralized storage network using standard S3-compatible APIs.

It translates traditional object storage operations into blockchain-compliant transactions on the Zus network.

This simplifies decentralized file storage and enables familiar developer workflows using tools like AWS CLI, MinIO, or custom S3 clients.

ZS3 is designed to:

* **Bridge Traditional & Decentralized Storage**: By supporting S3 APIs, ZS3 allows users to interact with decentralized storage as if they were using traditional cloud storage like AWS S3.
* **Enable Seamless User Experience**: End-users and developers don’t need to learn new interfaces or protocols.
* **Ensure Blockchain Accountability**: All storage actions result in write markers that are committed to the blockchain, ensuring state integrity and traceability.
* **Support Enterprise Admin Controls**: Admins can control access, configure environments, and manage resource allocation.
* **Optimize Performance**: Built-in caching and batch processing minimize latency and blockchain load.

S3-compatible API to access object storage providers are now so widely adopted that it became a standard. That's why we offer support for S3-compatible API for accessing your Züs allocations, by deploying an intermediate server that provides an S3-compatible API and connects to the blobbers to get data from allocations to serve the S3 requests.

In this page we'll be discussing the flow of this feature, the structure of the components used to provide support for the S3-compatible API, the tools you can use to access this S3-compatible API and some use cases utilizing this API.

### ZS3 Feature Flow

<figure><img src="/files/kWotTsxvP3mKwNX5koIH" alt=""><figcaption><p>Fig1: S3-compatibility flow</p></figcaption></figure>

The main concepts behind supporting S3-compliant requests is mainly the ZS3 server, which is an intermediate server facing the client apps and accepting S3-compliant requests from them, then communicating with the blobbers using our Go SDK.

This server should be owned and managed by the allocation owner, where each allocation should have a separate server. In this section we'll be going through the steps by which this feature is made possible:

#### 1. Server Deployment using Blimp Webapp

Using Blimp webapp by Züs, you can create an allocation that supports S3-compliant API, and get directions on how you can deploy the ZS3-server on your own machines. For more information on this step, please use the guide of the Blimp app [here](broken://pages/QLV0aOGEcmL7Ls2fj7eC).

{% hint style="info" %}
If you want to deploy this server manually without using Blimp, check the guide in [ZS3 Server repo](https://github.com/0chain/zs3server/tree/staging?tab=readme-ov-file#running-zs3-server).
{% endhint %}

#### 2. Authorizing Users

Once your allocation is created and the server is deployed, you'll have a default account by which you can access your ZS3 server as admin. When you use Blimp to access your data using the S3-compatible methods (as mentioned in the next steps), you're prompted to add a secret key that you'll then use to access your data using CLI and APIs.

You may want to add more users who can use your ZS3 server. To do this, you'll need to use the Admins HTTP API exposed by the ZS3 server. This API is secure by the admin credentials, which you can find once you finish the creation of your ZS3 Server in "Using CLI" section, as part of the example `curl` command you can use to communicate with the HTTP API.

<figure><img src="/files/ze3KneY1Gysm05wmSkqe" alt=""><figcaption><p>Fig2: Command Example</p></figcaption></figure>

Example of this command (with the credentials part in double square parts)

{% code overflow="wrap" %}

```
curl -X GET https://blimpsogec.zus.network/minioclient/?action=createBucket&[[accessKey=devyetii&secretAccessKey=Admin@123]]
```

{% endcode %}

Now that you have an example command with the credentials attached, let's see how you can add new users. All what you need to do is to send an HTTP request to the Add User endpoint of the Admin API of your server, using the preferred HTTP client. Here is an example using `curl`

```
curl -X POST https://blimpsogec.zus.network/minioclient/admin?action=addUser&userAccessKey=newuser&userSecretKey=Strong_password&accessKey=devyetii&secretAccessKey=Admin@123
```

Let's break down the command above:

* `curl` is the tool we use to send the http request.
* Since no HTTP Method is determined, GET is used by default.
* `https://blimpsogec.zus.network` is the base url of your server, you'll find it in the example command in Blimp.
* `/minioclient/admin` is the Admin endpoint, which accepts all requests related to the admin.
* `action=addUser` is the action parameter which determines the action to be performed by the admin.
* `userAccessKey=newuser&userSecretKey=Strong_password` are the parameters of this action, which are the access key and the secret key of the user to be added.
* `accessKey=devyetii&secretAccessKey=Admin@123` are the credentials of the admin.

If the request is successfully handled, the following response will be shown in the terminal:

```
{"Success":true,"AccessKey":"newuser"}
```

Otherwise, you'll see a different response with the error message and `"Success": false`

{% hint style="info" %}
More information about Admin API in the [ZS3 Usage section](#zs3-usage).
{% endhint %}

#### 3. Accepting User Requests

The ZS3 server accepts S3-compliant requests from authorized users through the S3 API. The request should contain: the action name - the parameters of the action based on its definition - the credentials of the user.

Now you have 2 users, the admin user and the user you added in the step above. Only the admin credentials can be used to authorize access to the Admin API, but you can use the added credentials to access your data through the S3 API.

{% hint style="info" %}
More information about S3 API in the [ZS3 Usage section](#zs3-usage).
{% endhint %}

To access your data using the S3-compliant API, you can use either Blimp UI or CLI tools like `mc` or `aws-cli` or just send HTTP requests using `curl` , Postman or any other tool from you preference.

Let's check an example using `curl` to send a request to upload a file using the CreateObject action of the S3 API. Run the following command in the terminal in order to create a new bucket named "my-data"

{% code overflow="wrap" %}

```
curl -X GET https://blimpsogec.zus.network/minioclient/?action=createBucket&bucketName=my-data&accessKey=devyetii&secretAccessKey=Admin@123
```

{% endcode %}

Replace the URL and the keys with your own keys and run the command. If the request is successful, you'll see the following response:

```
{"Success":true,"Bucketname":"my-data"}
```

#### 4. File system model mapping

S3 organizes files as objects contained inside buckets, however, blobbers store files in a typical directory-based tree-level file system. ZS3 does this translation between the two storage models, it turns users block-stroage-based requests into directory-based requests to the blobber. For example, when the user creates a bucket, ZS3 sends a request for the blobbers to create a root-level directory with the name of the bucket, and all requests based on this bucket will be sent to the blobber as a typical file system request of this file under the directory representing the bucket.

#### 4. Communication with the blobbers

After doing the mapping, ZS3 Server communicates with the blobbers in order to fulfil the users requests. It uses GoSDK, the SDK Züs offers in Golang, to build the requests, which in turn uses the multi-operation Blobber API to upload, download and list storage content.

For more information on GoSDK, refer to the [SDKs](broken://pages/b0vPCrW4j2rf3ni5t93o).

#### 5. Preparing the response

ZS3 server gathers the response from the blobbers (using GoSDK mentioned in the previous section), then responds to the user with the requested data.

These point conclude how ZS3 server makes it possible to access your allocation data using an S3-compatible API.

In the next section, we'll discuss how ZS3 is structured.

### Structure of ZS3 Server

#### Core Components

**1. Admin-Deployed ZS3 Server (VM-based)**

* Deployed using provisioning tools like Blend on any cloud infrastructure (AWS, Azure, etc.).
* The admin connects via SSH and initializes the ZS3 node.
* The server runs both the MinIO Gateway and MinIO Server components.
* The admin controls access permissions, typically granting external users (teams or apps) access to ZS3 via S3 credentials.
* Each ZS3 instance is linked to one or more Zus allocations which map to actual decentralized storage across blobbers.

**2. MinIO Gateway**

* Exposes the **S3-compatible REST API** to clients.
* Clients use standard S3 commands (GET, PUT, POST, DELETE, etc.) to interact with storage.
* All S3 operations are received and passed along to the internal cache and GoSDK components.
* Serves as a compatibility layer between traditional cloud tooling and the Zus protocol.

**3. ZS3 Cache Layer**

* Acts as a temporary buffer for incoming file operations (uploads, deletions, metadata changes).
* Aggregates operations into logical batches to reduce frequent, small blockchain updates.
* Ensures that files are stored locally until they are validated and committed to the network.
* Prevents duplicate writes and reduces latency.

**4. GoSDK Adapter (zS3 Adapter)**

* Communicates with the Zus network using the Zus protocol.
* Fetches file operation batches from the cache.
* Converts them into valid updates to the Zus allocation, applying changes like file additions, deletions, etc.
* Generates a **write marker** and submits it to the blockchain to reflect the new state.
* Handles signature generation, validation, and error management.

**5. Zus Allocation & Blockchain State**

* A Zus allocation is a logical grouping of data stored on the decentralized network.
* Files are erasure-coded, distributed across multiple blobbers, and validated cryptographically.
* Each update to the allocation (e.g. file uploads) generates a **write marker**, which commits the change to the blockchain.
* Write markers ensure consensus, data integrity, and enable auditing.

### ZS3 Usage

After deploying your ZS3 Server, you can use either of the following tools:

#### UI Interface on Blimp Webapp

<figure><img src="/files/OIBayPlCuwetBheQesez" alt=""><figcaption><p>Fig3: Blimp S3 UI</p></figcaption></figure>

Once you finish deploying your ZS3 server via Blimp and creating your allocation, you'll be redirected to this page, which you can use to run S3 operations on your allocation. For more information on the operations of this page, check Blimp documentation [here](broken://pages/QLV0aOGEcmL7Ls2fj7eC#step6-conduct-s3-operation).

#### Using \`aws-cli\` tool

`aws-cli` is a tool provided by Amazon Web Services (AWS) as a native tool to access their resources, including AWS S3. Since `aws-cli` can be used to access AWS S3, it can also be used to access your ZS3 deployment, just by changing the URL of the service and adjusting the configuration as follows:

* Run the following command and enter the prompted configuration as follows:

```
> aws configure
AWS Access Key ID [None]: <your-access-key>
AWS Secret Access Key [None]: <your-secret-key>
Default region name [None]: us-east-1
Default output format [None]: <ENTER>
```

* To run any command, add `endpoint_url` parameter as follows (example of the command to list contents of a bucket):

```
> aws --endpoint-url <your-ZS3-server-url> s3 ls s3://<bucket-name>
```

That's it! For more information about the operations you can perform using `aws-cli` check the README file of the ZS3 Server repo [here](https://github.com/0chain/zs3server?tab=readme-ov-file#test-using-aws-client-aws).

#### `mc` - CLI tool

`mc` (MinIO client) is a CLI tool associated with the MinIO platform, which provides a modern alternative to UNIX commands such as ls, cat, cp, mirror, diff etc. It supports both directory-based filesystems and Amazon S3 compatible cloud storage services.

Here are the steps to use `mc` CLI tool to access your ZS3 deployment:

* First, you need to download and install it. Check this [official guide](https://min.io/download?license=agpl\&platform=linux) to download it.
* Then, configure it by setting an alias to your ZS3 server to simplify its usage later on:

```
> mc alias set <alias-name> <your-ZS3-server-url> <your-access-key> <your-secret-key> --api S3v2
```

* To perform any file operation, use the following example:

```
> mc ls <alias-name>/<bucket-name>
```

That's it! For more information about the operations you can perform using `mc` check the README file of the ZS3 Server repo [here](https://github.com/0chain/zs3server?tab=readme-ov-file#test-using-minio-client-mc).

#### HTTP APIs

You can connect directly to your ZS3 server using our HTTP API. Check the available actions and other parameters of the API [here](https://github.com/0chain/zs3server/tree/staging/client-api) in the ZS3 Server repo.

### Checking Logs

Deployed with the ZS3 server is an external service, called Logsearch API, which gathers audit logs of the ZS3 server (written by MinIO) using Websockets and provides an API to simplify access to these logs.

This API is available on port 8080 on the machine you used to deploy the ZS3 server. For more information about the usage of this API, check the [README file](https://github.com/0chain/zs3server/blob/staging/logsearchapi/README.md) of this API in the ZS3 repo.

### Enabling Data Encryption and/or Compression

We offer 2 features that contribute to the robustness of the ZS3 server. First is the data encryption, which allows secure data storage on the blobbers by encrypting the data using the ZS3 server owner's wallet, ensuring secure storage. The other is compression which optimizes blobber communication requests by compressing the data (using [lz4](https://en.wikipedia.org/wiki/LZ4_\(compression_algorithm\)) compression algorithm) on the ZS3 server before sending it to the blobbers. To enable those features, use the configuration file for ZS3: `.zcn/zs3server.json` and edit it as follows:

```
{
  "encrypt": true,
  "compress": true
}
```

### Secondary deployment and disaster recovery

Disaster recovery is process of replicating data from secondary to primary in case of primary failure. To set up disaster recovery, you need to have replication setup between primary and secondary zs3servers. In case of primary failure, you can use the following command to sync data from secondary to primary.

```
./mc mirror secondary/<BUCKET_NAME>/ primary/<BUCKET_NAME/ --summary
```

### Next Steps

Check the following use cases to utilize the interoperability of the S3-compatible API to use your Züs allocation everywhere!

* **Backup and Restore**: Backup and restore with better carbon footprint, security and performance. Check full use-case documentation [here](/zus-docs/system-overview/storage/zs3-server/use-case-backup-and-restore).
* **AI data lake:** Use FUSE based S3 cloud storage to achieve performance and low egress cost. Check full use-case documentation [here](/zus-docs/system-overview/storage/zs3-server/use-case-backup-and-restore).
* **Private data vault:** Prevent losing your business due to a breach and GDPR fine. Simply migrate and use Zus s3 instead. No code change. Check data [migration documentation](broken://pages/ipvPAbaPUvle4WLWb2Na) here.
* **Private cloud storage:** Build your own storage cloud with just a few clicks instead.


# Backup, Recovery and Replication

## Recovery

This section provides a comprehensive guide for setting up recovery between two ZS3Servers.

This setup uses the Blimp UI for deployment, Visual Studio Code for configuration, and MinIO Client (mc) for management.

Whether you're new to ZS3Server or an experienced user, this guide offers detailed instructions for every stage of the process.

### Step 1: Deploy ZS3Server1

1. Go to "Manage Allocations" and select "S3 Setup." and click on create new allocation

<figure><img src="/files/ifD01Albn9uqp4rmKWnV" alt=""><figcaption><p>Fig1: Manage Allocations</p></figcaption></figure>

<figure><img src="/files/7IEXxleQGYeO5RzEg0wB" alt=""><figcaption><p>Fig2: Create new allocation</p></figcaption></figure>

3. Now add blobbers and Click on "Confirm" to add blobbers. Review and confirm the details and pay from the existing balance. Create an allocation and the S3 server setup will open automatically. You will have to create your server instance by adding IP address.

<figure><img src="/files/UUNfoF9TEhb8H7fW06tJ" alt=""><figcaption><p>Fig3: Server setup</p></figcaption></figure>

4. You need to obtain the IP address of your server, which can be provided by your hosting provider or retrieved using the `ifconfig` command in the terminal. For example, in the server logs, you may see an IP address such as `65.109.152.43`.

<figure><img src="/files/lWxPjiOoT9vpstZyszDj" alt=""><figcaption><p>Fig4: IP Address</p></figcaption></figure>

5. Now add your IP address and click on generate script in Blimp UI. Then enter the password for S3 deployment.

<figure><img src="/files/vw3Wa3kmUzhgR1b3rLJ6" alt=""><figcaption><p>Fig5: S3 Server Setup</p></figcaption></figure>

<figure><img src="/files/en5zJif7jl3q0bvBzlPk" alt=""><figcaption><p>Fig6: S3 deployment password</p></figcaption></figure>

6. Now copy the script and run it in your server terminal.

<figure><img src="/files/ExgjDBaeRqlPK2cGQNPN" alt=""><figcaption><p>Fig7: Copy Script</p></figcaption></figure>

<figure><img src="/files/YRSJ2pK5hwVFpLecmKUL" alt=""><figcaption><p>Fig8: Run Script</p></figcaption></figure>

### Step 2: Deploy ZS3Server2

1. Go to "Standard Allocation" in the Blimp UI. Create a new allocation and name it `allocation22`.

<figure><img src="/files/vI7Wai3ph9MXfZByAkXd" alt=""><figcaption><p>Fig9: Create new standard allocation</p></figcaption></figure>

2. Click on "Confirm" and select the blobbers, then confirm again. This will create a standard allocation.

<figure><img src="/files/fOUkKDg7MnWMZpFDr7nh" alt=""><figcaption><p>Fig9: Confirm Details</p></figcaption></figure>

3. In the Blimp UI, copy the newly created standard allocation ID.

<figure><img src="/files/4MzrOhPojt1KxyFx1DZI" alt=""><figcaption><p>Fig10: Copy Standard Allocation ID</p></figcaption></figure>

4. Go to your server, create a new `.zcn2` folder in your home directory (`$HOME`), and navigate to the `blimp` folder. Inside the `blimp` folder, create the `allocation.txt` file and paste the allocation ID.

<figure><img src="/files/M6CYMZhQeWC2XbmphsgA" alt=""><figcaption><p>Fig11: Paste allocation ID</p></figcaption></figure>

5. Copy the `docker-compose.yml`, `config.yaml`, `wallet.json` and `z3server.json` files from the `.zcn` folder to the `.zcn2` folder.

<figure><img src="/files/QjeeL6iGkyw4nGGMZqn3" alt=""><figcaption><p>Fig12: Copy wallet.json</p></figcaption></figure>

<figure><img src="/files/iBykTVmah00wNHnFGoGu" alt=""><figcaption><p>Fig 13: Copy z3server.json</p></figcaption></figure>

7. Edit the ports in `docker-compose.yml.`Go to line 55 in the `.zcn2/docker-compose.yml` file and note the ports `9002:9000`. Copy these ports to the `.zcn/docker-compose.yml` file.

   \
   Now run the following commands to start the Docker containers for `.zcn2` folder defined in the `docker-compose.yml`:

   ```
   cd ~/.zcn2/
   docker-compose up -d
   ```

<figure><img src="/files/1FgpV9iiASUShiC9oQbt" alt=""><figcaption><p>Fig14: Copy Ports</p></figcaption></figure>

* Change the first port in `.zcn` from `9002` to `9000` in docker-compose.yml file, making it `9000:9000`.

<figure><img src="/files/LGKmgZ6T5DdEeDUxENux" alt=""><figcaption><p>Fig15: Paste ports</p></figcaption></figure>

Now run the following commands to start the Docker containers defined in the `docker-compose.yml`:

```
cd ~/.zcn/
docker-compose up -d
```

<figure><img src="/files/Wfz12BJ347w3TTVvUUUH" alt=""><figcaption><p>Fig16: Run commands</p></figcaption></figure>

### Step 3: Install MinIO Client (mc)

Follow the installation guide provided in the [ZS3Server documentation](https://min.io/docs/minio/linux/index.html#procedure).

#### 1. macOS **Homebrew**

Install mc packages using [Homebrew](http://brew.sh/)

```
brew install minio/stable/mc
mc --help
```

#### 2. GNU/Linux

**Binary Download**

| Platform    | Architecture | URL                                                    |
| ----------- | ------------ | ------------------------------------------------------ |
| GNU/Linux   | 64-bit Intel | <https://dl.min.io/client/mc/release/linux-amd64/mc>   |
| GNU/Linux   | 64-bit PPC   | <https://dl.min.io/client/mc/release/linux-ppc64le/mc> |
| GNU/Linux   | 64-bit ARM   | <https://dl.min.io/client/mc/release/linux-arm64/mc>   |
| Linux/s390x | S390X        | <https://dl.min.io/client/mc/release/linux-s390x/mc>   |

```
wget https://dl.min.io/client/mc/release/linux-amd64/mc
chmod +x mc
./mc --help
```

#### 3. Microsoft Windows

**Binary Download**

<table><thead><tr><th width="246">Platform</th><th>Architecture</th><th>URL</th></tr></thead><tbody><tr><td>Microsoft Windows</td><td>64-bit Intel</td><td><a href="https://dl.min.io/client/mc/release/windows-amd64/mc.exe">https://dl.min.io/client/mc/release/windows-amd64/mc.exe</a></td></tr></tbody></table>

```
mc.exe --help
```

### Step 4: Create Alias for ZS3Server1

Run the following command to create an alias for `zs3server1`:

```
mc alias set zs3server1 http://65.109.152.43:9000 shahnawaz rootroot --api S3v2
```

<figure><img src="/files/o3jXP4H1u5UG03dacleA" alt=""><figcaption><p>Fig17: Create Alias for ZS3Server1</p></figcaption></figure>

### Step 5: Create Alias for ZS3Server2

Run the following command to create an alias for `zs3server2`:

```
mc alias set zs3server2 http://65.109.152.43:9002 shahnawaz rootroot --api S3v2
```

<figure><img src="/files/bxNI49Xdl2226NJdzuFU" alt=""><figcaption><p>Fig18: Create Alias for ZS3Server2</p></figcaption></figure>

### Step 6: Create Bucket and Copy Data in ZS3Server1

1. Create a bucket in `zs3server1` with `allocation21`:

   ```
   mc mb zs3server1/allocation21
   ```
2. Verify the bucket:

   ```
   mc ls zs3server1
   ```
3. Copy data to the created bucket:

   ```
   mc cp ./ zs3server1/allocation21
   ```

<figure><img src="/files/UASiAPEB7FTeqhDXExDT" alt=""><figcaption><p>Fig19: Create bucker and copy data for ZS3Server1</p></figcaption></figure>

### Step 7: Create Bucket and Copy Data in ZS3Server2

1. Create a bucket in `zs3server2` with `allocation22`:

   ```
   mc mb zs3server2/allocation22
   ```
2. Verify the bucket:

   ```
   mc ls zs3server2
   ```

<figure><img src="/files/zefMXTa9GA9kjbuA0BZb" alt=""><figcaption><p>Fig20: Create bucker and copy data for ZS3Server1</p></figcaption></figure>

### Step 8: Set Up Replication

Run the following command to create replication between the buckets:

```
mc mirror zs3server1/allocation21/ zs3server2/allocation22/ --remove watch
```

<figure><img src="/files/fP8vMZdxr9MbjxWdwKGJ" alt=""><figcaption><p>Fig21 : Set up allocation</p></figcaption></figure>

Any deletions in `bucket1` will automatically replicate in `bucket2`.

### Step 9: Perform Disaster Recovery

1. Shut down `zs3server1` and clean up its deployment.
2. Create a new allocation (`allocation23`) using the Blimp UI with a standard allocation.
3. Update the `allocation.txt` file in `.zcn` with the new `allocation23` ID.
4. Set up an alias for the new server:

   ```
   mc alias set zs3server3 http://65.109.152.43:9000 shahnawaz rootroot --api S3v2
   ```
5. Create a new bucket:

   ```
   mc mb zs3server3/allocation23
   ```
6. Restore data to the new allocation:

   ```
   mc mirror zs3server2/allocation22/ zs3server3/allocation23/
   ```

<figure><img src="/files/y6h4GqxBexIiT1OkJYZQ" alt=""><figcaption><p>Fig22: Perform Disaster Recover</p></figcaption></figure>

### Step 10: Verify Recovery

Check that the files have been recovered to the new allocation:

```
mc ls zs3server3/allocation3
```

***

## Replication

This section outlines the steps to set up replication between two ZS3Servers.

Replication ensures that data from one server is mirrored to another for backup and redundancy.

Follow the steps below to configure and initiate replication.

{% embed url="<https://drive.google.com/file/d/1Vjw3b2HqWGTT-PDVIdMYJ4e2iVYHTPms/view?usp=drive_link>" %}
Replication Video Tutorial
{% endembed %}

### Prerequisites

* For running two ZS3Servers on the same machine:
  * Copy the contents of the `.zcn` folder to `.zcn2`.
  * Update `allocation.txt` and `zs3server.json` in `.zcn2`.
  * Update the `docker-compose.yml` file to use unique ports.
* Ensure both ZS3Servers are configured using MinIO Client aliases:
  * Alias for the first server (`zcn`):

    ```bash
    mc alias set primary http://<HOST_IP>:9000 root root --api S3v2
    ```
  * Alias for the second server (`zcn2`):

    ```bash
    mc alias set secondary http://<HOST_IP>:9002 root root --api S3v2
    ```

### Step 1: Verify Configuration

1. Navigate to the `.zcn2` folder:

   ```bash
   cd .zcn2/
   ```
2. Open the terminal and run:

   ```bash
   ls
   cat docker-compose.yml
   ```

   * Verify the ports are correctly set to `9002:9000`.

<figure><img src="/files/ddVcYLUf5G319bZI9kGD" alt=""><figcaption><p>Fig23: Verify Ports</p></figcaption></figure>

3. Check the standard allocation ID:

```bash
cat blimp/allocation.txt
```

* Compare this ID with the allocation ID in the Blimp dashboard to ensure consistency.

<figure><img src="/files/wNJgvklgxynBYtVJbVdD" alt=""><figcaption><p>Fig24: Check Allocation ID</p></figcaption></figure>

### Step 2: Configure Aliases

1. Use the MinIO Client (mc) to configure aliases for both servers:

**Format**:

```bash
mc alias set primary http://<HOST_IP>:9000 miniouser miniopassword --api S3v2
mc alias set secondary http://<HOST_IP>:9002 miniouser miniopassword --api S3v2
```

**Example**:

```bash
mc alias set primary http://65.109.152.43:9000 root root --api S3v2
mc alias set secondary http://65.109.152.43:9002 root root --api S3v2
```

2. Run the alias commands:

```bash
mc alias set .zcn http://<HOST_IP>:9000 root root --api S3v2
mc alias set .zcn2 http://<HOST_IP>:9002 root root --api S3v2
```

### Step 3: Initiate Replication

1. Use the following command to start replication:

   ```bash
   ./mc mirror primary/<BUCKET_PREFIX>/ secondary/<BUCKET_PREFIX>/ --remove --watch
   ```

   * Replace `<BUCKET_PREFIX>` with the appropriate bucket names.
2. Example:

   ```bash
   ./mc mirror zcn/test2-s3/ zcn2/mbtest2 --remove --watch
   ```

* `test2-s3` is a folder in the S3 allocation.

<figure><img src="/files/YuHJWr6r1Cin0rEm5igA" alt=""><figcaption><p>Fig25: test2-s3</p></figcaption></figure>

* `mbtest2` will be created in the standard allocation on `zcn2`.

<figure><img src="/files/HZRHE28y2gmgpnXotJ5r" alt=""><figcaption><p>Fig26: mbtest2</p></figcaption></figure>

* All data from `test2-s3` will be replicated into `mbtest2`.

### Step 4: Verify Replication

1. Check the contents of the buckets:

   ```bash
   mc ls zcn
   mc ls zcn2
   ```
2. Create new buckets if necessary:

   ```bash
   mc mb zcn/test2-s3
   mc mb zcn2/mbtest2
   ```
3. Confirm that the data is mirrored correctly:

```bash
./mc mirror zcn/test2-s3/ zcn2/mbtest2 --remove --watch
```

## Backup and Restore with Restic

Use [Restic](https://restic.net/) for lightweight, versioned, and secure backups to your ZS3 bucket.

### Step 1: Install Restic

```
sudo apt update -y
sudo apt install restic -y
sudo restic self-update
```

### Step 2: Set Environment Variables

```
export AWS_ACCESS_KEY_ID=<ACCESS_KEY>
export AWS_SECRET_ACCESS_KEY=<SECRET_KEY>
export RESTIC_REPOSITORY="s3:<ZS3_URL>"
```

### Step 3: Initialize the Repository

```
restic init
```

### Step 4: Run a Backup

```
restic -r s3:<ZS3_URL> --verbose backup <path-to-directory-to-backup>
```

### Step 5: List Snapshots

```
restic snapshots
```

### Step 6: Restore Snapshot

```
restic restore latest --target ~/ --verbose
```

### Step 7: Automate via Crontab (Optional)

Use `crontab -e` to add periodic backup jobs.


# Encryption and Compression

This section guides you through configuring encryption and compression for S3-compatible storage using the MinIO Client (`mc`).

{% embed url="<https://drive.google.com/file/d/1eUlgh_YQorIYBadUrNHDuvt2AG8gA_sf/view?usp=sharing>" %}
Encryption and Compression
{% endembed %}

Encryption ensures data security, while compression optimizes storage usage.

### Step 1: Install MinIO Client

The MinIO Client allows you to interact with your MinIO server. The MinIO Server provides an S3-compatible API and supports core S3 features.

The MinIO Server provides an S3-compatible API and supports core S3 features. Choose one of the following installation methods for Linux:

**RPM (RHEL-based Systems)**

* Download the latest stable MinIO RPM package. Install the package using `dnf`:

```bash
wget https://dl.min.io/server/minio/release/linux-amd64/archive/minio-20241218131544.0.0-1.x86_64.rpm -O minio.rpm
sudo dnf install minio.rpm
```

**DEB (Debian/Ubuntu Systems)**

* Download the appropriate `.deb` package from the MinIO Downloads Page. Install the package using `dpkg`:

```bash
wget https://dl.min.io/server/minio/release/linux-amd64/archive/minio_20241218131544.0.0_amd64.deb -O minio.deb
sudo dpkg -i minio.deb
```

**Binary Installation (Universal Method)**

* Download the MinIO Server binary. Make the binary executable and move the binary to a directory in your system PATH:

```bash
wget https://dl.min.io/server/minio/release/linux-amd64/minio
chmod +x minio
sudo mv minio /usr/local/bin/
```

#### Installing MinIO Client (mc)

The MinIO Client allows command-line interaction with your MinIO server.

1. Download the MinIO Client binary:

   ```bash
   wget https://dl.min.io/client/mc/release/linux-amd64/mc
   ```
2. Make the binary executable:

   ```bash
   chmod +x mc
   ```
3. Move the binary to a directory in your system PATH:

   ```bash
   sudo mv mc /usr/local/bin/mc
   ```
4. Verify the installation:

   ```bash
   mc --version
   ```

For other operating systems, refer to this [resource](https://min.io/docs/minio/linux/index.html).

### Step 2: Set Up mc Alias

1. Set an alias for your server:

   ```bash
   mc alias set zcn https://<BLIMP_DOMAIN> <ACCESS_KEY> <SECRET_KEY> --api S3v2
   ```

   * Replace `<BLIMP_DOMAIN>` with the domain link from the Blimp output.
   * Replace `<ACCESS_KEY>` and `<SECRET_KEY>` with your credentials.

   Example:

   ```bash
   mc alias set zcn https://blimpibh5l.zus.network shahnawaz rootroot --api S3v2
   ```
2. Verify the alias setup by listing buckets:

   ```bash
   mc ls zcn
   ```

### Step 3: Create a Bucket

1. Create a bucket for storing encrypted and compressed data:

   ```bash
   mc mb zcn/encryption-compression
   ```
2. Confirm the bucket creation by listing the contents:

   ```bash
   mc ls zcn
   ```

### Step 4: Upload Files with Compression

1. Copy files or directories recursively to the bucket, applying compression:

   ```bash
   mc cp --recursive ../mc/docs zcn/encryption-compression/
   ```

   Example commands:

   ```bash
   mc cp --recursive ../mc/docs zcn/encryption-compression/
   mc cp --recursive ../mc/buildscripts zcn/encryption-compression/
   mc cp --recursive ../mc/primary zcn/encryption-compression/
   ```
2. List the contents of the bucket to verify the upload:

   ```bash
   mc ls zcn/encryption-compression/
   ```

### Step 5: Test Encryption

1. Ensure that the uploaded files are encrypted on the server by verifying through:

   ```bash
   mc stat zcn/encryption-compression/<FILE_NAME>
   ```

   * Replace `<FILE_NAME>` with the name of any uploaded file.
   * Check the metadata to confirm encryption.
2. To download and decrypt, use:

   ```bash
   mc cp zcn/encryption-compression/<FILE_NAME> /local/path/
   ```

### Notes

* **Recursive Upload**: Use the `--recursive` flag to upload entire directories.
* **Bucket Verification**: Always verify the presence of the bucket and its contents after each operation.
* **Compression**: Compression is applied automatically during file transfer. Ensure that the server supports compression for optimal results.
* **Encryption**: Encryption is configured at the server level. Confirm the settings in your ZS3Server configuration to enable encryption.


# Use Case - FUSE-based S3FS Mountpoint

Use S3FS to interact with your bucket with filesystem commands.

S3FS allows you to mount an S3-compatible object storage bucket as a local file system. This enables seamless access to Züs storage for applications such as Docker containers, WordPress, and analytics tools like Grafana.

**Key Features:**

* Mounts S3 buckets as directories on the host system.
* Supports configuration for access keys, permissions, and URL endpoint customization.
* Provides compatibility for Docker volumes and applications.

After deploying your S3 server, you can integrate [S3FS](https://github.com/s3fs-fuse/s3fs-fuse) to be able to use your allocation as a Data Lake, with S3 support for seamless migration, and lower egress cost compared to other providers.

S3FS makes you operate files and directories in S3 bucket like a local file system, which mean that you can use it in pretty much every use case you can use a typical filesystem directory in (logging, database storage, regular file storage, mount directory for docker containers for data storage or logging).

Moreover, if you have an application that depends on filesystem, you can utilize the power of Züs Storage with **zero code change**.

### Mount your bucket to a filesystem directory using S3FS

Here's a step-by-step guide on how you can apply this change:

1. **Register** to [`https://blimp.software`](https://blimp.software/)
2. **Deploy `zs3server`** as mentioned in [this page](broken://pages/QLV0aOGEcmL7Ls2fj7eC). Once deployed, you can find your URL, access key and secret key in the "Use CLI" section in Blimp's S3 operations page, as shown in the image below.

<figure><img src="/files/slqShqfczDbetUlS2Z1M" alt=""><figcaption><p>Fig1: URL, secret and access keys in Using CLI section</p></figcaption></figure>

Example of this command (with the credentials part in double square parts)

{% code overflow="wrap" %}

```
curl -X GET [[https://blimpsogec.zus.network]]/minioclient/?action=createBucket&[[accessKey=devyetii&secretAccessKey=Admin@123]]
```

{% endcode %}

In this example:

* **The URL:** `https://blimpsogec.zus.network`
* **The Access Key:** `devyetii`
* **The secret key:** `Admin@123`

3. **Connect to the machine you'll be using to mount S3FS**. This can be your local machine, or any other remote machine that you have. If it's a remote machine, then you can use SSH to connect to it as follows:

```
ssh <user>@<ip>
```

4. **Create a path to mount your S3 directory** using the command below:

```
mkdir -p <directory_path>
```

{% hint style="info" %}
You can create any mounting path. But make sure you remember it as we'll be using it in Step 7.
{% endhint %}

5. **Prepare you environment variables** as follows:

```
export AWS_ACCESS_KEY_ID=<your-access-key-in-step2>
export AWS_SECRET_ACCESS_KEY=<your-secret-key-in-step2>  
```

6. **Create a bucket on your ZS3 server** as follows:

```
aws --endpoint-url https://<zs3server-url-from-step2> s3 mb s3://<bucket-name>        
```

`aws-cli` installation and usage is explained in details [here](https://github.com/0chain/zs3server/?tab=readme-ov-file#test-using-aws-client-aws).

7. **Install S3FS on your machine.** Provided down below are commands to install in on an Ubuntu machine. If you have any other distro of Linux or another OS, you can refer to this [link](https://github.com/s3fs-fuse/s3fs-fuse)

```
   sudo apt update
   sudo apt install s3fs
```

8. **Prepare the password file** that you'll be using with S3FS to mount your bucket on the mount point. Run the following command to write the contents of your password file, which will be stored in `$HOME/.passwd-s3fs`

```
   echo <your-access-key-from-step2>:<your-secret-key-from-step2> > ${HOME}/.passwd-s3fs 
   chmod 600 ${HOME}/.passwd-s3fs
```

You should replace `<your-access-key-from-step2>` and `<your-secret-key-from-step2>` with the corresponding values.

9. **Mount your bucket** to the created directory path using `s3fs` using the command below:

{% code overflow="wrap" %}

```
   s3fs <bucket-name> <mount-directory> -o passwd_file=${HOME}/.passwd-s3fs -o url=<your-zs3server-url-from-step2> -o  use_path_request_style,allow_other,umask=000,complement_stat,nocopyapi,norenameapi
```

{% endcode %}

You should replace the placeholders in the command as follows:

* `<bucket-name>` should be replaced by the bucket name you used to create the bucket in step 6.
* `<mount-directory>` should be replaced by the mount directory you created in step 4.
* `<your-zs3server-url-from-step2>` should be replaced by the URL shown in step2.

{% hint style="info" %}
You can use the command below to unmount the zus-storage from `<directory_path>`:\
`umount -l <directory_path>`
{% endhint %}

10. **Check if your bucket is mounted successfully** to S3FS mount directory as follows:

```
df -ha | grep "s3fs"
```

This command displays the mounting path details.

**If there is no output,** recheck all the steps to ensure they were executed correctly.

11. Once you mount the Zus storage, any created, copied, or deleted files or directories within the mount **will be reflected on your allocation files** in Blimp, and vice versa.

### Usage Examples

After mounting your bucket to the S3FS mountpoint, you can perform any typical file operation on this mount directory, and it will automatically be reflected to your ZS3 bucket, hence your allocation data showed in Blimp.

For example, write a file and save it to the mount directory (assume it's /mnt/s3fs)

```
cat "I use Züs!" > /mnt/s3fs/my-tools.txt
```

To copy a file:

```
cp ~/my-files/an-awesome-file /mnt/s3fs/my-awesome-files
```

To move a file:

```
mv ~/my-files/an-awesome-file /mnt/s3fs/my-awesome-files
```

To delete a file:

```
rm /mnt/s3fs/my-awesome-files
```

### Troubleshooting and checking the logs

If you encountered any issue working with your mountpoint (using Ubuntu), you can check `syslog` as follows:

```
tail -f /var/logs/syslog | grep s3fs
```

You can also enable debug logging on S3FS as follows:

{% code overflow="wrap" %}

```
s3fs mybucket /path/to/mountpoint -o passwd_file=${HOME}/.passwd-s3fs -o dbglevel=info -f -o curldbg
```

{% endcode %}

### Note on using your S3FS directory as the storage directory for Postgres DBs (using Docker)

You can configure your Postgres DB deployment (using Docker) to use the mounted S3FS directory as storage directory for the DB.

If you're using `docker run` to deploy your Postgres DB, attach the S3FS directory as a mount directory to your deployed container as follows:

{% code overflow="wrap" %}

```
docker run [...some options...] -v <path-in-your-s3fs-mount-directory>:/var/lib/postgresql/data [...some other options...] postgres:15
```

{% endcode %}

If you're using `docker-compose` you can configure your Postgres DB service to use the mounted S3FS directory as storage directory for the DB as follows:

```
services:
    ....
    postgres:
        ....
        volumes:
            - <path-in-your-s3fs-mount-directory>:/var/lib/postgresql/data
        ....
```

In both examples, you should replace `<path-in-your-s3fs-mount-directory>` with some path in your S3FS mount directory, for example: `/mnt/s3fs/data/postgres`

### Integration with Docker Compose

The mounted paths will be used in **Docker Compose** files to specify volumes for various components like logs, Grafana, Sharders, Miners, and RocksDB.

**Paths:**

1. **Sharder Blocks**: `/mnt/s3fs/sharder${SHARDER}/data/blocks`
2. **Miner RocksDB**: `/mnt/s3fs/miner${MINER}/data`
3. **Grafana Loki Logs**: `/mnt/s3fs/loki`

**Docker Compose Configuration**

Sample configuration for **Sharder**:

```yaml
volumes:
  - /mnt/s3fs/sharder${SHARDER}/data/blocks:/0chain/data/blocks
```

Sample configuration for **Grafana Loki**:

```yaml
volumes:
  - /mnt/s3fs/loki:/mnt/s3fs/loki
```

Sample configuration for **Miner**:

```yaml
volumes:
  - /mnt/s3fs/miner${MINER}/data:/0chain/data
```

### Use Cases and Applications

#### **Logs and Monitoring**

* **Grafana Loki**: Stores log data in `/mnt/s3fs/loki`. Use this for real-time log analytics.
* **Sharder Logs**: Logs from sharder operations are stored in `/mnt/s3fs/sharder${SHARDER}/log`.

#### **Data Storage for Load Testing**

For load testing Züs components like Sharders, Miners, and Blobbers:

* Configure **RocksDB** for Miners: `/mnt/s3fs/miner${MINER}/data`.
* Configure **Blocks** for Sharders: `/mnt/s3fs/sharder${SHARDER}/data/blocks`.

{% hint style="info" %}

* **Permissions**: Always secure your `.passwd-s3fs` file to avoid exposing access credentials.
* **Mount Optimization**: Use `-o allow_other` and `-o use_path_request_style` for compatibility with Docker containers.
* **Testing**: Regularly verify mounted paths and data accessibility before starting containers.
* **Monitoring**: Use Grafana Loki and other monitoring tools to track resource usage and logs.
  {% endhint %}


# Use Case - Backup and Restore

Use your ZS3 buckets as backup storage space for your data

After deploying your S3 server, you can use [Restic](https://restic.net/) to be able to use your bucket as backup storage space for your data, with better carbon footprint, security and performance.

### Setup restic to use your bucket for backup

Here are the steps to use your ZS3 buckets for backup using Restic:

1. **Register** to [`https://blimp.software`](https://blimp.software/)
2. **Deploy `zs3server`** as mentioned in [this page](broken://pages/QLV0aOGEcmL7Ls2fj7eC). Once deployed, you can find your URL, access key and secret key in the "Use CLI" section in Blimp's S3 operations page, as shown in the image below.

<figure><img src="/files/slqShqfczDbetUlS2Z1M" alt=""><figcaption><p>Fig1: URL, secret and access keys in Using CLI section</p></figcaption></figure>

Example of this command (with the credentials part in double square parts)

{% code overflow="wrap" %}

```
curl -X GET [[https://blimpsogec.zus.network]]/minioclient/?action=createBucket&[[accessKey=devyetii&secretAccessKey=Admin@123]]
```

{% endcode %}

In this example:

* **The URL:** `https://blimpsogec.zus.network`
* **The Access Key:** `devyetii`
* **The secret key:** `Admin@123`

3. **Connect to the machine you'll be using for backup/restore**. This can be your local machine, or any other remote machine that you have. If it's a remote machine, then you can use SSH to connect to it as follows:

```
ssh <user>@<ip>
```

5. **Install Restic** on your machine. Provided below are steps to install Restic on Ubuntu machine. For other Linux distros or other OSs, check [Restic Installation Guide](https://restic.readthedocs.io/en/stable/020_installation.html).

```
sudo apt update -y
sudo apt install restic -y
sudo restic self-update
```

6. **Prepare you environment variables** as follows:

```
export AWS_ACCESS_KEY_ID=<your-access-key-from-step2>
export AWS_SECRET_ACCESS_KEY=<your-secret-key-from-step2>
export RESTIC_REPOSITORY="s3:<your-zs3server-url-from-step2>"
```

You should replace the placeholders in the command (`<your-access-key-from-step2>`, `<your-secret-key-from-step2>` and `<your-url-from-step2>`) with the corresponding values from Step 2.

7. **Initialize your Restic repository** as follows:

```
restic init
```

8. After the repository is initialized, we're ready to **make a backup**. Find a local directory with data files to backup. Use below command to start back up.

{% code overflow="wrap" %}

```
restic -r s3:<your-zs3server-url-from-step2> --verbose backup <path-to-directory-to-backup>
    
```

{% endcode %}

You should replace the command placeholders (`<your-zs3server-url-from-step2>`, `<path-to-directory-to-backup>` ) with corresponding values.

Now, a new backup snapshot of this directory is created and saved to the Restic repository. You can add this command to your crontab file to run the backup periodically.

9. You can also **list all of your snapshots** with the following command:

```
restic snapshots
```

10. To **restore the latest snapshot** to a specific target you can use the following command:

```
restic restore latest --target ~/ --verbose
```

{% hint style="info" %}
For more sets of restic commands, you can refer to the [official Restic Backup docs](https://restic.readthedocs.io/en/latest/040_backup.html).
{% endhint %}


# S3FS Setup and Usage

S3FS allows you to mount an S3-compatible server as a file system on your local machine using the FUSE-based S3FS utility.

This section provides step-by-step instructions for setting up and using S3FS with your ZS3Server.

{% embed url="<https://drive.google.com/file/d/1o35Gy0IoHXZllfk3DXxX4iuXRi1jB3bA/view?usp=sharing>" %}

### Step 1: Create the Password File

1. Create a `.passwd-s3fs` file containing your `ACCESS_KEY_ID` and `SECRET_ACCESS_KEY`:

   ```bash
   echo ACCESS_KEY_ID:SECRET_ACCESS_KEY > ${HOME}/.passwd-s3fs
   ```

   Example:

   ```bash
   echo test1:rootroot > ${HOME}/.passwd-s3fs
   ```
2. Update the file permissions for security:

   ```bash
   chmod 600 ${HOME}/.passwd-s3fs
   ```

### Step 2: Create a Mount Point

1. Create a directory to use as the mount point:

   ```bash
   mkdir -p /mnt/s3fs
   ```

### Step 3: Install Tools

#### Option A: Using MinIO Client (mc)

The MinIO Client allows you to interact with your MinIO server.

The MinIO Server provides an S3-compatible API and supports core S3 features. Choose one of the following installation methods for Linux:

**RPM (RHEL-based Systems)**

* Download the latest stable MinIO RPM package. Install the package using `dnf`:

```bash
wget https://dl.min.io/server/minio/release/linux-amd64/archive/minio-20241218131544.0.0-1.x86_64.rpm -O minio.rpm
sudo dnf install minio.rpm
```

**DEB (Debian/Ubuntu Systems)**

* Download the appropriate `.deb` package from the MinIO Downloads Page. Install the package using `dpkg`:

```bash
wget https://dl.min.io/server/minio/release/linux-amd64/archive/minio_20241218131544.0.0_amd64.deb -O minio.deb
sudo dpkg -i minio.deb
```

**Binary Installation (Universal Method)**

* Download the MinIO Server binary. Make the binary executable and move the binary to a directory in your system PATH:

```bash
wget https://dl.min.io/server/minio/release/linux-amd64/minio
chmod +x minio
sudo mv minio /usr/local/bin/
```

Installing MinIO Client (mc)

The MinIO Client allows command-line interaction with your MinIO server.

1. Download the MinIO Client binary:

   ```bash
   wget https://dl.min.io/client/mc/release/linux-amd64/mc
   ```
2. Make the binary executable:

   ```bash
   chmod +x mc
   ```
3. Move the binary to a directory in your system PATH:

   ```bash
   sudo mv mc /usr/local/bin/mc
   ```
4. Verify the installation:

   ```bash
   mc --version
   ```
5. Set an alias for your server:

```bash
mc alias set zcn https://<BLIMP_DOMAIN> <ACCESS_KEY> <SECRET_KEY> --api S3v2
```

* Replace `<BLIMP_DOMAIN>` with the domain link from the Blimp output.
* Replace `<ACCESS_KEY>` and `<SECRET_KEY>` with your credentials.

Example:

```bash
mc alias set zcn https://blimpibh5l.zus.network shahnawaz rootroot --api S3v2
```

6. Verify the alias setup by listing buckets:

```bash
mc ls zcn
```

#### Option B: Using AWS CLI

If you prefer AWS CLI over MinIO:

**Install AWS CLI**

Follow installation from [AWS CLI Docs](https://docs.aws.amazon.com/cli/latest/userguide/install-cliv2.html).

**Set Environment Variables**

```
export AWS_ACCESS_KEY_ID=devuser
export AWS_SECRET_ACCESS_KEY=Admin@123
```

**Create a Bucket**

```
aws --endpoint-url https://blimpsogec.zus.network s3 mb s3://s3fs
```

### Step 4: Create and List Buckets

1. Use MinIO Client to create a bucket:

   ```bash
   ./mc mb zcn/s3fs
   ```
2. List the contents of the S3 server to verify:

   ```bash
   ./mc ls zcn
   ```

   The bucket `s3fs` should now be visible.

### Step 5: Mount the Server

1. Mount the S3 bucket as a local file system:

   ```bash
   s3fs mybucket /path/to/mountpoint -o passwd_file=${HOME}/.passwd-s3fs -o url=https://url.to.s3/ -o use_path_request_style,allow_other,umask=000,complement_stat,nocopyapi,norenameapi
   ```

   Replace the placeholders:

   * `mybucket` with the name of your bucket (`s3fs`).
   * `/path/to/mountpoint` with `/mnt/s3fs`.
2. Example using Blimp URL:

   ```bash
   s3fs s3fs /mnt/s3fs -o passwd_file=${HOME}/.passwd-s3fs -o url=https://blimp7fyct.zus.network -o use_path_request_style,allow_other,umask=000,complement_stat,nocopyapi,norenameapi
   ```

### Step 6: Verify the Mount

1. Check the mounted file system:

   ```bash
   df -ha
   ```
2. Navigate to the mount point:

   ```bash
   cd /mnt/s3fs
   ls
   ```

### Step 7: Test the Setup

1. Create a file in the mounted directory:

   ```bash
   touch file1.txt
   ```
2. List the contents to verify the file:

   ```bash
   ls
   ```

### Step 8: Verify on Blimp

1. Open the Blimp dashboard. Navigate to the bucket associated with the mounted directory (`s3fs`).
2. Confirm that the file (`file1.txt`) and other contents of the mounted directory are visible on Blimp.

### Additional Examples

#### File Operations Examples

```bash
# Write a file
echo "I use Züs!" > /mnt/s3fs/my-tools.txt

# Copy a file
cp ~/my-files/testfile /mnt/s3fs/

# Move a file
mv ~/my-files/testfile /mnt/s3fs/

# Delete a file
rm /mnt/s3fs/testfile
```

All file operations will reflect in your ZS3 bucket via Blimp.

#### Docker Integration

Docker Run Example

```bash
docker run -v /mnt/s3fs/data/postgres:/var/lib/postgresql/data postgres:15
```

Docker Compose Example

```
services:
  postgres:
    image: postgres:15
    volumes:
      - /mnt/s3fs/data/postgres:/var/lib/postgresql/data
```

Additional Volume Mappings

* Grafana Loki Logs: `/mnt/s3fs/loki`
* Sharder Blocks: `/mnt/s3fs/sharder${SHARDER}/data/blocks`
* Miner RocksDB: `/mnt/s3fs/miner${MINER}/data`

#### Troubleshooting

Check Mount

```bash
df -ha | grep s3fs
```

Check Logs (Ubuntu)

```bash
tail -f /var/log/syslog | grep s3fs
```

Enable Debug Logging

```bash
s3fs s3fs /mnt/s3fs -o passwd_file=${HOME}/.passwd-s3fs -o dbglevel=info -f -o curldbg
```

Unmount ZS3

```bash
umount -l /mnt/s3fs
```

### Additional Notes

* The S3FS utility uses FUSE (Filesystem in Userspace) to mount S3 servers as a local file system.
* The `s3fs` command includes options for security and compatibility:
  * `-o passwd_file=${HOME}/.passwd-s3fs`: Specifies the password file.
  * `-o url=https://url.to.s3/`: Points to the S3-compatible server URL.
  * `-o use_path_request_style,allow_other,umask=000,complement_stat`: Enables compatibility and allows other users to access the mounted file system.
* **Compression**: If you are using compression, it's recommended to use the MinIO Client for efficient file operations.


# Configuring Veeam Backup with Züs S3 (ZS3)

Züs offers decentralized, S3-compatible object storage via **ZS3Server**, which can be integrated seamlessly with enterprise backup tools like **Veeam Backup for Microsoft 365**.

This guide will walk you through the full process of connecting Veeam to Züs S3 for storing your backups securely on decentralized cloud infrastructure.

### 1. Launch Veeam and Navigate to Backup Infrastructure

In the Veeam Backup & Replication console, go to **Backup Infrastructure → Backup Repositories → Add Repository → Object Storage**. This opens the object storage integration wizard.

Select "S3 Compatible" as Storage Type. Veeam supports multiple cloud object storage providers. Click next.

<figure><img src="/files/HoRdGfpoer9sNT2IMahK" alt=""><figcaption><p>Fig1: Launch Veeam</p></figcaption></figure>

### 2. Enter Züs S3 Endpoint & Region

In the “S3 compatible storage system” section, fill out the fields:

* **Service Point**: `https://YOURID.gslb.z3.zeroservices.eu`\
  \&#xNAN;*(Replace `YOURID` with your ZS3 instance ID or deployment name)*
* **Data Center Region**: `eu-central-1` or `us-east-1`\
  \&#xNAN;*(Choose based on your configuration — this does not impact functionality)*

<figure><img src="/files/B1ClekV1U7eIYOJ5pUD5" alt=""><figcaption><p>Fig2: Enter ZS3 Endpoint</p></figcaption></figure>

### 3. Add S3 Access & Secret Key

Click on the **“Add”** button beside the account credentials dropdown:

<figure><img src="/files/O62VrxGij4tfWqtq8i8Z" alt=""><figcaption><p>Fig3: Add keys</p></figcaption></figure>

* **Access Key**: Your ZS3 Access Key
* **Secret Key**: Your ZS3 Secret Key
* **Description**: (Optional) Label your key for clarity

Click **OK**, then select the added credential from the dropdown and then click on Next.

<figure><img src="/files/bURuOAnYD2KmKkuUMNOc" alt=""><figcaption><p>Fig4; Keys added</p></figcaption></figure>

### 4. Select the Bucket & Folder

In the “S3 compatible storage system bucket” screen:

* **Bucket**: Choose your designated bucket (e.g., `Veeam`)
* **Folder**: Optionally create or select a folder like `Backup365` to organize backup data.

<figure><img src="/files/NP6fugZcuTbV4RLv0DrG" alt=""><figcaption><p>Fig5: Select Bucket and Folder</p></figcaption></figure>

You can also check the **immutability** option to prevent deletion or tampering during the retention period — a best practice against ransomware attacks.

### 5. Finalize Configuration

Enter a **name and description** for your object storage entry.

<figure><img src="/files/HTrzLIQgF4SJWVip5wCW" alt=""><figcaption><p>Fig6: Finalize</p></figcaption></figure>

Example:

* **Name**: `zs3-zero-backup`
* **Description**: `Created by zero at 05/10/2024 19:07:10`

Click **Next** and finish the proces&#x73;**.**

Your Züs S3 storage will now appear under: **Backup Infrastructure → Object Storage**

### 6. Review Cloud Credentials (Credential Manager)

After clicking **Next**, Veeam opens the **Cloud Credential Manager** automatically to display the credentials you just created.

<figure><img src="/files/lTPUJHVnMM4nKZyDLSc3" alt=""><figcaption></figcaption></figure>

Here’s what you can do in this view:

* **Review** the created S3-compatible credential.
* **Edit** the credential by selecting the entry and clicking the **Edit** button.
* **View or modify** the:
  * **Access Key**
  * **Secret Key**
  * **Description** (e.g., created by your team or timestamped info)

This is useful for quickly verifying that the correct keys were used, or updating them later if rotated.


# Backup & Recovery with Restic on Blimp + ZS3 Server

A Step-by-Step Guide to Encrypted, Deduplicated Snapshots and Daily Restores

In this guide, we’ll show you how to leverage **Blimp’s** intuitive UI alongside the **ZS3 Server** S3-compatible gateway to build a robust, versioned backup and recovery pipeline for your business. **Blimp** lets you spin up and manage Züs allocations with a few clicks, while **ZS3 Server** translates those allocations into standard S3 endpoints—so you can keep using your favorite tools (AWS CLI, MinIO Client, Restic, etc.) without learning anything new.

By combining ZS3 Server’s decentralized, blockchain-anchored storage with Restic’s source-dedupe, encryption, and versioning, Blimp delivers an enterprise-grade backup solution that is **standards-based** (S3 API), **auditable, performant, and cost-effective.** This solution would be helpful for small-to-mid-size businesses and enterprises running Linux servers that need daily, off-site backups.

{% hint style="info" %}
Prerequisite:

* Have an active Blimp account. If you don't have one yet, sign up [here](https://www.blimp.software/authentication). Check out our docs on how to go through the registration [here](https://docs.zus.network/zus-docs/webapps/blimp/login-register)
* Public-facing Linux server : A VM or bare-metal box (Ubuntu 22.04+, Debian, CentOS, etc.) with a public IP , SSH access, and ports 80/443 open
* Basic command-line skills
  {% endhint %}

## Create an S3 Allocation

**Step 1: Navigate to the S3 Tab**

* Open the Blimp UI and navigate to the **S3** tab. Click on the **Create New Allocation** button to start the process of setting up a new allocation.

<figure><img src="/files/C6FMcU2H6l7UP4bhQiF8" alt=""><figcaption><p>Fig1: Create new S3 allocation</p></figcaption></figure>

**Step 2: Fill in Allocation Details**

* In the form that appears, enter the required details about your allocation.
* Once all fields are completed, click the **Confirm** button to proceed.

<figure><img src="/files/nUxbjxCxf3DtTGKFU237" alt=""><figcaption><p>Fig2: Add Allocation Details</p></figcaption></figure>

{% hint style="info" %}
All Blobber types can use USD for payment. If you want to pay in ZCN, you must select "All Blobbers" or "Unbranded".
{% endhint %}

**Step 3: Select Storage Providers**

* By default, Blobbers are automatically chosen based on geodiversity. Optionally, manually select up to five sharded providers if needed.
* After finalizing your provider selection, click on the **Pay with USD** button. Or if you want to pay in ZCN, click the text "Pay with ZCN" located to the right of the header.

<figure><img src="/files/R7e0xqQ0hELzitUthCtv" alt=""><figcaption><p>Fig3: Select storage providers</p></figcaption></figure>

**Step 4: Complete Payment (in ZCN)**

* You can pay using ZCN from your existing balance. If you do not have sufficient ZCN in your wallet, you have the option to purchase more ZCN by connecting your Metamask or Coinbase wallet.

<figure><img src="/files/H2smyLhHSz07fK4kPwHw" alt=""><figcaption><p>Fig4: Review Payment (in ZCN)</p></figcaption></figure>

<figure><img src="/files/ScKVCSM2O22asWHait5J" alt=""><figcaption><p>Fig5. Get ZCN and Confirm Payment</p></figcaption></figure>

Upon successful payment, the allocation with be created.

***

## Deploy your Blimp ZS3 Gateway

#### Step 0: Have Access to a Public-facing Linux Server

* Your ZS3 gateway needs to run on a machine that:
  * **Has a publicly reachable IP**
  * **Runs a Linux distro** (Ubuntu, Debian, CentOS, Amazon Linux, etc.)
  * **Allows SSH access** on port 22 (for deploying the script)
  * **Has ports 80 & 443 open** (so Caddy can obtain and serve TLS certificates)
  * **Has Key Pairs** to enable access into SSH

**Firewall rules for HTTP(S)**

<table><thead><tr><th width="124.6953125">Direction</th><th width="89.6328125">Protocol</th><th width="106.36328125">Port Range</th><th width="151.4375">Source</th><th>Purpose</th></tr></thead><tbody><tr><td>Inbound</td><td>TCP</td><td>22</td><td>YOUR·IP/32</td><td>SSH (from your location)</td></tr><tr><td>Inbound</td><td>TCP</td><td>80</td><td>0.0.0.0/0, ::/0</td><td>HTTP (for ACME HTTP-01)</td></tr><tr><td>Inbound</td><td>TCP</td><td>443</td><td>0.0.0.0/0, ::/0</td><td>HTTPS (Caddy + S3 gateway)</td></tr><tr><td>Outbound</td><td>ALL</td><td>ALL</td><td>0.0.0.0/0, ::/0</td><td>Allow your instance to reach the Internet for Docker pulls, ACME, etc.</td></tr></tbody></table>

* In this example, we use an AWS EC2 Instance:
  * AMI: Ubuntu Server 22.04 LTS (HVM)
  * Instance: t3.medium (2 vCPU, 4GB RAM)
  * Storage: 20 GiB root + 50–100 GiB gp3 data volume

#### Step 1: Identify your IP address

* Find your server's IP address. In AWS, go to the EC2 Instance Dashboard. Select the instance you are using and look for the Public IPv4 address in your Details>Instance Summary.

<figure><img src="/files/xR3GHIOduvlFJllQAcjL" alt=""><figcaption><p>Fig6. AWS EC2 Instance Dashboard</p></figcaption></figure>

**Step 2: Generate the Script**

* Click "Manage Allocations". Find the allocation you would like to work with and click the ellipses at the last column of your allocation row. Once drop down opens, click "Setup".

<figure><img src="/files/kMECjx4tG4uNyEtxte88" alt=""><figcaption><p>Fig7. Manage Allocation Setup Location</p></figcaption></figure>

* Enter your server's IP address in the provided field within the Blimp UI. Click on the **Generate Script** button.

<figure><img src="/files/xf3nU0E31chlu4CgFRmi" alt=""><figcaption><p>Fig8. Generate Script</p></figcaption></figure>

* A modal will then pop out to set the password for the S3 deployment. This will be used to access your Blimp S3 server allocation

<figure><img src="/files/fJMkT3OVyHckODJMcACU" alt=""><figcaption><p>Fig9. Setup Secret Key</p></figcaption></figure>

{% hint style="warning" %}
Note you cannot use special characters in this password. It will cause future errors such as : "The request signature we calculated does not match the signature you provided. Check your key and signing method."
{% endhint %}

**Step 3: Execute the Script**

* Start by accessing your server using your key pair .pem or .ppk file. As an example, you can ssh into your terminal by typing:

  ```
  ssh -i ~/.ssh/yourkey.pem ubuntu@your-ec2-public-ip
  ```
* Once inside, copy the cURL Script from the S3 server setup page. Looks something like this:

  <pre data-overflow="wrap"><code>curl -fSsL https://raw.githubusercontent.com/0chain/zcnwebappscripts/main/blimp.sh | sed 's/0chainminiousername/&#x3C;blimp-username>/; s/0chainminiopassword/MySecretPa55word/; s/0chainallocationid/&#x3C;s3-allocation-id>/; s/0chainblockworker/https:\/\/mainnet.zus.network\/dns\//; s/0chainminiotoken/12345/; s/blimpdomain/blimp8fbfl.zus.network/; s/0chainwalletid/&#x3C;wallet-id>/; s/0chainwalletpublickey/&#x3C;public-key>/; s/0chainwalletprivatekey/&#x3C;private-key>/; s/0chainmnemonics/&#x3C;mnemonic-if-not-using-split-key>/ '| bash
  </code></pre>

<figure><img src="/files/RZEefBgo51q9pA3KBOXl" alt=""><figcaption><p>Fig10. S3 Server Setup after Script Generation</p></figcaption></figure>

* Run the script on your server terminal

<figure><img src="/files/4ALbzOvuuwoD8XRbP3v8" alt=""><figcaption><p>Fig11. Execute Script</p></figcaption></figure>

Once the script runs successfully, Blimp will automatically detect your server and guide you to the next step.

{% hint style="danger" %}
If you clear your browser cache (or use private/incognito mode) and click **Setup** again for the same allocation, Blimp will generate a brand-new deployment script. That script won’t match your existing ZS3 Server, so you’ll have to run it again on your host and effectively redeploy the gateway.

**Tip:** Only run **Setup** once per allocation—unless you *want* to reset and redeploy your server.
{% endhint %}

#### Step 4: Create a Bucket

* **Create a Bucket**: Select **Create Bucket** from the **Type of Request** menu.

<figure><img src="/files/dWwM6BUjdLm6QdgXRXJ7" alt=""><figcaption><p>Fig12: Conduct S3 Operations</p></figcaption></figure>

* Enter your desired bucket name. Click on **Run cURL Request**.

<figure><img src="/files/1l6JQTrzwwBgHgxgN4gd" alt=""><figcaption><p>Fig13. Run cURL Request</p></figcaption></figure>

* The response will be displayed in the right-hand panel.

<figure><img src="/files/I8B9qKI63Gx3V0KkYDM0" alt=""><figcaption><p>Fig14. Check Response</p></figcaption></figure>

* **List Existing Buckets**: Choose **Buckets** from the **List Operations** section under the **Type of Request** menu. Click on **Run cURL Request** to view the list of buckets.

<figure><img src="/files/SQnURrd3f0HP9aItxs78" alt=""><figcaption><p>Fig15: Choose Buckets</p></figcaption></figure>

By completing this step, you have successfully deployed the ZS3 server, created the S3-compatible allocation, and performed basic S3 operations. To learn more about the ZS3 server, check out the docs [here](https://docs.zus.network/zus-docs/system-overview/storage/zs3-server#zs3-feature-flow).

{% hint style="warning" %}
**Note:** The ZS3 gateway embeds your wallet credentials when you deploy it. If you later add that wallet to Vault for split-key management (or make any other change to it), your existing cURL/API credentials will no longer match and requests will fail. To fix this, simply go back to the allocation "setup", regenerate the deploy script, and run it again so the gateway picks up your updated wallet.
{% endhint %}

***

## Extract Blimp ZS3 Server Endpoint

{% embed url="<https://drive.google.com/file/d/1uwFIdHQjWdi42-0v83lUjPADKFhmERmM/view?usp=sharing>" %}
Tutorial 2: Extract Endpoint from Blimp-generated Script
{% endembed %}

When you generate and execute the deployment script using Blimp, it provides an endpoint URL for accessing your deployed ZS3 server. This endpoint is dynamically configured within the `curl` command.

Going back to the script you used to deploy the ZS3 server, the script includes various parameters such as authentication credentials, location IDs, and domain configurations.

In the provided example, the executed command is:

{% code overflow="wrap" %}

```
curl -fSsL https://raw.githubusercontent.com/0chain/zcnwebappscripts/main/blimp.sh | sed 's/0chainminiousername/<blimp-username>/; s/0chainminiopassword/MySecretPa55word/; s/0chainallocationid/<s3-allocation-id>/; s/0chainblockworker/https:\/\/mainnet.zus.network\/dns\//; s/0chainminiotoken/12345/; s/blimpdomain/blimp8fbfl.zus.network/; s/0chainwalletid/<wallet-id>/; s/0chainwalletpublickey/<public-key>/; s/0chainwalletprivatekey/<private-key>/; s/0chainmnemonics/<mnemonic-if-not-using-split-key>/ '| bash
```

{% endcode %}

In your cURL code, look for the "blimpdomain".

```
s/blimpdomain/blimp8fbfl.zus.network/;
```

This indicates that `blimp8fbfl.zus.network` is the assigned ZS3 endpoint for your deployed ZS3 instance.

***

Restic is an open-source, cross-platform CLI tool that creates encrypted, deduplicated snapshots of local files and stores them on S3-compatible backends. In this section, we will use Restic to initialize a repository on our Blimp + ZS3 Server endpoint, run daily backups of our server data, and demonstrate restoring from those snapshots.

## Backup with Restic

### Step 1: Install Restic

To get started, make sure you are still within your Linux server. Using the terminal, we will update your `apt` function then install `restic` for your current OS release:

```
sudo apt update -y
sudo apt install restic -y
```

Afterwards, download the newest official Restic binary from GitHub. It will verify its signature and replace the `/usr/bin/restic` with the fresh build:

```
sudo restic self-update
```

The output should look like this :

```
Output

writing restic to /usr/bin/restic
find latest release of restic at GitHub
latest version is 0.19.0
download SHA256SUMS
download SHA256SUMS.asc
GPG signature verification succeeded
download restic_0.18.0_linux_amd64.bz2
downloaded restic_0.18.0_linux_amd64.bz2
saved 29765816 bytes in /usr/bin/restic
successfully updated restic to version 0.18.0
```

When seeing "successfully updated restic to version x.xx.x", you have properly installed `restic`.

### Step 2: Get Environment Variables

The ACCESS\_KEY is your blimp username and the SECRET\_KEY is the password recorded when generating the deployment script.

\
If you do not recall them, you can go back to the "Conduct S3 operations" page and look at your "Using CLI" cURL. It may look something like this:

{% code overflow="wrap" %}

```
curl -X GET https://blimp8fbfl.zus.network/minioclient/?action=listBuckets&accessKey=rikachet&secretAccessKey=MySecretPa55word
```

{% endcode %}

<figure><img src="/files/w7ATFbSCmWGnN0s1yBGi" alt=""><figcaption><p>Fig16. Location of cURL in Conduct S3 Operations page</p></figcaption></figure>

At the end of the cURL you can see two items:

* accessKey = rikachet ---> ACCESS\_KEY
* secretAccessKey = MySecretPa55word ---> SECRET\_KEY

You can extract your ACCESS\_KEY and SECRET\_KEY from here.

### Step 3: Set Environment Variables

Inside of your server terminal, or in this case the AWS EC2 instance, run each line separately:

```
export AWS_ACCESS_KEY_ID=<ACCESS_KEY>
export AWS_SECRET_ACCESS_KEY=<SECRET_KEY>
export RESTIC_REPOSITORY="s3:https://<endpoint>/<blimp-bucket>"

## An example of what it could look like ##
export AWS_ACCESS_KEY_ID=rikachet
export AWS_SECRET_ACCESS_KEY=MySecretPa55word
export RESTIC_REPOSITORY="s3:https://blimp8fbfl.zus.network/s3-backup-recovery"
```

### Step 4: Initialize the Repository

To initiate a new restic repository, use:

```
restic init
```

Following this, you will be prompted to create a password. Note, this will be your password for RESTIC\_PASSWORD and will be used to access your repository.

When completed, you will see:

```
Output

created restic repository XXXXXXXXXX at s3:https://<endpoint>/<blimp-bucket>
```

{% hint style="warning" %}
Please note that knowledge of your restic password is required to access the repository. Losing your password means your data is irrecoverably lost.
{% endhint %}

### Step 5: Run a Backup

To run a back up for a specific directory on your server, you will need your blimp endpoint and the path to your directory you would like to back up.

```
restic -r s3:https://<endpoint>/<blimp-bucket> --verbose backup <path-to-directory-to-be-backedup>
```

If successfully backed up, you will see a similar output as the following:

```
Output

...
processed X files, XXX MiB in X:XX
snapshot 2a6902ec saved
```

<figure><img src="/files/JzbV10HO5iuFk805qn4B" alt=""><figcaption><p>Fig17. Terminal Output when Backup Completes</p></figcaption></figure>

You can also check your blimp allocation for the snapshot by going into your s3 allocation "Home" > your bucket > snapshots. You should be able to see your snapshots here.

<figure><img src="/files/sCds52puipq1o48okF07" alt=""><figcaption><p>Fig18. Snapshot Folder in Blimp S3 Allocation</p></figcaption></figure>

{% hint style="info" %}
If you cannot see the folders for your S3 Allocation, go to "Manage Allocations" and make sure your desired allocation is "Selected". Click "Select" button if not selected.
{% endhint %}

### Step 6: List Snapshots

To check your snapshots through your server terminal, you can run this:

```
restic -r s3:https://<endpoint>/<bucket> snapshots
```

Paste your restic password. Once the script is complete, you may see an output like this:

<figure><img src="/files/AUWQBWEo9Lpjxn4CTUw5" alt=""><figcaption><p>Fig19. Output for Listing Snapshots</p></figcaption></figure>

### Step 7: Automate via Crontab (Optional)

Create a small wrapper script (e.g. /home/ubuntu/run-restic-backup.sh) :

<pre><code><strong>#!/bin/bash
</strong>set -euo pipefail

# Environment
export AWS_ACCESS_KEY_ID=&#x3C;Access-Key>
export AWS_SECRET_ACCESS_KEY=&#x3C;Secret-Key>
export RESTIC_REPOSITORY="s3:https://&#x3C;endpoint>/&#x3C;bucket>"
export RESTIC_PASSWORD='your-restic-password'

# Backup command
/usr/bin/restic backup /home/ubuntu/test-files
</code></pre>

Make it executable:

```
chmod +x /home/ubuntu/run-restic-backup.sh
```

Edit your crontab:

```
crontab -e
```

Add this line to run it at 2 AM daily :

```
0 2 * * * /home/ubuntu/run-restic-backup.sh
```

{% hint style="info" %}
Feel free to set a specific time and date for your cron job(s). Also, adjust the time according to the timezone of your server.
{% endhint %}

Verify your crontab:

```
crontab -l
```

The output should show your crontab entries.

### Step 8: Restore Snapshot

If you want to restore your latest snapshot saved in blimp, run this line:

```
restic \
  -r s3:https://<endpoint>/<bucket> \
  --verbose \
  restore latest \
  --target <path-to-directory>
```

The output should look similar to this :

```
Output

repository 3f44df87 opened (version 2, compression level auto)
[0:00] 100.00%  1 / 1 index files loaded
restoring snapshot 2a6902ec of [/home/ubuntu/test-files] at 2025-04-29 21:02:01.044981857 +0000 UTC by ubuntu@ip-172-31-15-36 to /home/ubuntu/restore-test
Summary: Restored 7 files/dirs (113.679 MiB) in 0:02
```

***

That is it! Congrats on backing up and recovering with Restic on Blimp and ZS3 Server!

If you're interested in using Veeam for backup instead, check out the steps [here](https://docs.zus.network/zus-docs/system-overview/storage/zs3-server/configuring-veeam-backup-with-zus-s3-zs3)!


# Backup & Recovery with Veeam on Blimp + ZS3 Server

A Step-by-Step Guide to Encrypted, Deduplicated Snapshots and Daily Restores

In this guide, we’ll show you how to leverage **Veeam Backup & Replication** alongside **Blimp’s decentralized storage** and the **ZS3 Server’s S3-compatible gateway** to build a secure, scalable backup and recovery pipeline for your business.

**ZS3 Server** makes your Blimp allocation accessible through the familiar S3 API, so you can use Veeam just like you would with AWS S3 or other traditional object storage platforms—without the high egress fees, vendor lock-in, or centralized risks.

By combining **Veeam’s enterprise-grade backup features** with **Züs’s zero-knowledge, blockchain-anchored storage**, this solution delivers encrypted, cost-efficient, and ransomware-resistant backups. It’s ideal for organizations running Microsoft 365, virtual machines, or file servers that require off-site, cloud-based data protection.

{% hint style="info" %}
Prerequisite:

Before you begin, ensure you have the following:

* **Blimp Account** with a funded S3-compatible allocation
* **ZS3 Server Deployment**:
  * Linux server (Ubuntu 22.04+, CentOS, etc.) with public IP
  * Ports 22, 80, and 443 open
  * Docker installed
  * Wallet file (for mounting allocation)
* **ZS3 Access Key & Secret Key** (generated via Blimp UI after setup)
* **Veeam Backup & Replication** v11+ or **Veeam Backup for Microsoft 365** v6+ on a Windows VM or server
* Basic familiarity with SSH and Veeam’s UI
  {% endhint %}

## Create an S3 Allocation

**Step 1: Navigate to the S3 Tab**

* Open the Blimp UI and navigate to the **S3** tab. Click on the **Create New Allocation** button to start the process of setting up a new allocation.

<figure><img src="/files/C6FMcU2H6l7UP4bhQiF8" alt=""><figcaption><p>Fig1: Create new S3 allocation</p></figcaption></figure>

**Step 2: Fill in Allocation Details**

* In the form that appears, enter the required details about your allocation.
* Once all fields are completed, click the **Confirm** button to proceed.

<figure><img src="/files/nUxbjxCxf3DtTGKFU237" alt=""><figcaption><p>Fig2: Add Allocation Details</p></figcaption></figure>

{% hint style="info" %}
All Blobber types can use USD for payment. If you want to pay in ZCN, you must select "All Blobbers" or "Unbranded".
{% endhint %}

**Step 3: Select Storage Providers**

* By default, Blobbers are automatically chosen based on geodiversity. Optionally, manually select up to five sharded providers if needed.
* After finalizing your provider selection, click on the **Pay with USD** button. Or if you want to pay in ZCN, click the text "Pay with ZCN" located to the right of the header.

<figure><img src="/files/R7e0xqQ0hELzitUthCtv" alt=""><figcaption><p>Fig3: Select storage providers</p></figcaption></figure>

**Step 4: Complete Payment (in ZCN)**

* You can pay using ZCN from your existing balance. If you do not have sufficient ZCN in your wallet, you have the option to purchase more ZCN by connecting your Metamask or Coinbase wallet.

<figure><img src="/files/H2smyLhHSz07fK4kPwHw" alt=""><figcaption><p>Fig4: Review Payment (in ZCN)</p></figcaption></figure>

<figure><img src="/files/ScKVCSM2O22asWHait5J" alt=""><figcaption><p>Fig5. Get ZCN and Confirm Payment</p></figcaption></figure>

Upon successful payment, the allocation will be created.

***

## Deploy your Blimp ZS3 Gateway

{% embed url="<https://drive.google.com/file/d/1ur9TNZns5knWAihWsLC0NK_8CKAQkeNt/view?usp=sharing>" %}
Tutorial 1: Deploy New Script Using Blimp
{% endembed %}

#### Step 0: Have Access to a Public-facing Linux Server

* Your ZS3 gateway needs to run on a machine that:
  * **Has a publicly reachable IP**
  * **Runs a Linux distro** (Ubuntu, Debian, CentOS, Amazon Linux, etc.)
  * **Allows SSH access** on port 22 (for deploying the script)
  * **Has ports 80 & 443 open** (so Caddy can obtain and serve TLS certificates)
  * **Has Key Pairs** to enable access into SSH

**Firewall rules for HTTP(S)**

<table><thead><tr><th width="124.6953125">Direction</th><th width="89.6328125">Protocol</th><th width="106.36328125">Port Range</th><th width="151.4375">Source</th><th>Purpose</th></tr></thead><tbody><tr><td>Inbound</td><td>TCP</td><td>22</td><td>YOUR·IP/32</td><td>SSH (from your location)</td></tr><tr><td>Inbound</td><td>TCP</td><td>80</td><td>0.0.0.0/0, ::/0</td><td>HTTP (for ACME HTTP-01)</td></tr><tr><td>Inbound</td><td>TCP</td><td>443</td><td>0.0.0.0/0, ::/0</td><td>HTTPS (Caddy + S3 gateway)</td></tr><tr><td>Outbound</td><td>ALL</td><td>ALL</td><td>0.0.0.0/0, ::/0</td><td>Allow your instance to reach the Internet for Docker pulls, ACME, etc.</td></tr></tbody></table>

* In this example, we use an AWS EC2 Instance:
  * AMI: Ubuntu Server 22.04 LTS (HVM)
  * Instance: t3.medium (2 vCPU, 4GB RAM)
  * Storage: 20 GiB root + 50–100 GiB gp3 data volume

#### Step 1: Identify your IP address

* Find your server's IP address. In AWS, go to the EC2 Instance Dashboard. Select the instance you are using and look for the Public IPv4 address in your Details>Instance Summary.

<figure><img src="/files/xR3GHIOduvlFJllQAcjL" alt=""><figcaption><p>Fig6. AWS EC2 Instance Dashboard</p></figcaption></figure>

**Step 2: Generate the Script**

* Click "Manage Allocations". Find the allocation you would like to work with and click the ellipses at the last column of your allocation row. Once drop down opens, click "Setup".

<figure><img src="/files/kMECjx4tG4uNyEtxte88" alt=""><figcaption><p>Fig7. Manage Allocation Setup Location</p></figcaption></figure>

* Enter your server's IP address in the provided field within the Blimp UI. Click on the **Generate Script** button.

<figure><img src="/files/xf3nU0E31chlu4CgFRmi" alt=""><figcaption><p>Fig8. Generate Script</p></figcaption></figure>

* A modal will then pop out to set the password for the S3 deployment. This will be used to access your Blimp S3 server allocation

<figure><img src="/files/fJMkT3OVyHckODJMcACU" alt=""><figcaption><p>Fig9. Setup Secret Key</p></figcaption></figure>

{% hint style="warning" %}
Note you cannot use special characters in this password. It will cause future errors such as : "The request signature we calculated does not match the signature you provided. Check your key and signing method."
{% endhint %}

**Step 3: Execute the Script**

* Start by accessing your server using your key pair .pem or .ppk file. As an example, you can ssh into your terminal by typing:

  ```
  ssh -i ~/.ssh/yourkey.pem ubuntu@your-ec2-public-ip
  ```
* Once inside, copy the cURL Script from the S3 server setup page. Looks something like this:

  <pre data-overflow="wrap"><code>curl -fSsL https://raw.githubusercontent.com/0chain/zcnwebappscripts/main/blimp.sh | sed 's/0chainminiousername/&#x3C;blimp-username>/; s/0chainminiopassword/MySecretPa55word/; s/0chainallocationid/&#x3C;s3-allocation-id>/; s/0chainblockworker/https:\/\/mainnet.zus.network\/dns\//; s/0chainminiotoken/12345/; s/blimpdomain/blimp8fbfl.zus.network/; s/0chainwalletid/&#x3C;wallet-id>/; s/0chainwalletpublickey/&#x3C;public-key>/; s/0chainwalletprivatekey/&#x3C;private-key>/; s/0chainmnemonics/&#x3C;mnemonic-if-not-using-split-key>/ '| bash
  </code></pre>

<figure><img src="/files/RZEefBgo51q9pA3KBOXl" alt=""><figcaption><p>Fig10. S3 Server Setup after Script Generation</p></figcaption></figure>

* Run the script on your server terminal

<figure><img src="/files/4ALbzOvuuwoD8XRbP3v8" alt=""><figcaption><p>Fig11. Execute Script</p></figcaption></figure>

Once the script runs successfully, Blimp will automatically detect your server and guide you to the next step.

{% hint style="danger" %}
If you clear your browser cache (or use private/incognito mode) and click **Setup** again for the same allocation, Blimp will generate a brand-new deployment script. That script won’t match your existing ZS3 Server, so you’ll have to run it again on your host and effectively redeploy the gateway.

**Tip:** Only run **Setup** once per allocation—unless you *want* to reset and redeploy your server.
{% endhint %}

#### Step 4: Create a Bucket

* **Create a Bucket**: Select **Create Bucket** from the **Type of Request** menu.

<figure><img src="/files/dWwM6BUjdLm6QdgXRXJ7" alt=""><figcaption><p>Fig12: Conduct S3 Operations</p></figcaption></figure>

* Enter your desired bucket name. Click on **Run cURL Request**.

<figure><img src="/files/1l6JQTrzwwBgHgxgN4gd" alt=""><figcaption><p>Fig13. Run cURL Request</p></figcaption></figure>

* The response will be displayed in the right-hand panel.

<figure><img src="/files/I8B9qKI63Gx3V0KkYDM0" alt=""><figcaption><p>Fig14. Check Response</p></figcaption></figure>

* **List Existing Buckets**: Choose **Buckets** from the **List Operations** section under the **Type of Request** menu. Click on **Run cURL Request** to view the list of buckets.

<figure><img src="/files/SQnURrd3f0HP9aItxs78" alt=""><figcaption><p>Fig15: Choose Buckets</p></figcaption></figure>

By completing this step, you have successfully deployed the ZS3 server, created the S3-compatible allocation, and performed basic S3 operations. To learn more about the ZS3 server, check out the docs [here](https://docs.zus.network/zus-docs/system-overview/storage/zs3-server#zs3-feature-flow).

{% hint style="warning" %}
**Note:** The ZS3 gateway embeds your wallet credentials when you deploy it. If you later add that wallet to Vault for split-key management (or make any other change to it), your existing cURL/API credentials will no longer match and requests will fail. To fix this, simply go back to the allocation "setup", regenerate the deploy script, and run it again so the gateway picks up your updated wallet.
{% endhint %}

***

## Extract Blimp ZS3 Server Endpoint

{% embed url="<https://drive.google.com/file/d/1uwFIdHQjWdi42-0v83lUjPADKFhmERmM/view?usp=sharing>" %}
Tutorial 2: Extract Endpoint from Blimp-generated Script
{% endembed %}

When you generate and execute the deployment script using Blimp, it provides an endpoint URL for accessing your deployed ZS3 server. This endpoint is dynamically configured within the `curl` command.

Going back to the script you used to deploy the ZS3 server, the script includes various parameters such as authentication credentials, location IDs, and domain configurations.

In the provided example, the executed command is:

{% code overflow="wrap" %}

```
curl -fSsL https://raw.githubusercontent.com/0chain/zcnwebappscripts/main/blimp.sh | sed 's/0chainminiousername/<blimp-username>/; s/0chainminiopassword/MySecretPa55word/; s/0chainallocationid/<s3-allocation-id>/; s/0chainblockworker/https:\/\/mainnet.zus.network\/dns\//; s/0chainminiotoken/12345/; s/blimpdomain/blimp8fbfl.zus.network/; s/0chainwalletid/<wallet-id>/; s/0chainwalletpublickey/<public-key>/; s/0chainwalletprivatekey/<private-key>/; s/0chainmnemonics/<mnemonic-if-not-using-split-key>/ '| bash
```

{% endcode %}

In your cURL code, look for the "blimpdomain".

```
s/blimpdomain/blimp8fbfl.zus.network/;
```

This indicates that `blimp8fbfl.zus.network` is the assigned ZS3 endpoint for your deployed ZS3 instance.

## Backup with Veeam

This guide will walk you through the full process of connecting Veeam to Züs S3 for storing your backups securely on decentralized cloud infrastructure.

### 1. Launch Veeam and Navigate to Backup Infrastructure

In the Veeam Backup & Replication console, go to **Backup Infrastructure → Backup Repositories → Add Repository → Object Storage**. This opens the object storage integration wizard.

Select "S3 Compatible" as Storage Type. Veeam supports multiple cloud object storage providers. Click next.

<figure><img src="/files/HoRdGfpoer9sNT2IMahK" alt=""><figcaption><p>Fig1: Launch Veeam</p></figcaption></figure>

### 2. Enter Züs S3 Endpoint & Region

In the “S3 compatible storage system” section, fill out the fields:

* **Service Point**: Enter your z3server url
* **Data Center Region**: `eu-central-1` or `us-east-1`\
  \&#xNAN;*(Choose based on your configuration — this does not impact functionality)*

<figure><img src="/files/B1ClekV1U7eIYOJ5pUD5" alt=""><figcaption><p>Fig2: Enter ZS3 Endpoint</p></figcaption></figure>

### 3. Add S3 Access & Secret Key

Click on the **“Add”** button beside the account credentials dropdown:

<figure><img src="/files/O62VrxGij4tfWqtq8i8Z" alt=""><figcaption><p>Fig3: Add keys</p></figcaption></figure>

* **Access Key**: Your ZS3 Access Key
* **Secret Key**: Your ZS3 Secret Key
* **Description**: (Optional) Label your key for clarity

Click **OK**, then select the added credential from the dropdown and then click on Next.

<figure><img src="/files/bURuOAnYD2KmKkuUMNOc" alt=""><figcaption><p>Fig4; Keys added</p></figcaption></figure>

### 4. Select the Bucket & Folder

In the “S3 compatible storage system bucket” screen:

* **Bucket**: Choose your designated bucket (e.g., `Veeam`)
* **Folder**: Optionally create or select a folder like `Backup365` to organize backup data.

<figure><img src="/files/NP6fugZcuTbV4RLv0DrG" alt=""><figcaption><p>Fig5: Select Bucket and Folder</p></figcaption></figure>

You can also check the **immutability** option to prevent deletion or tampering during the retention period — a best practice against ransomware attacks.

### 5. Finalize Configuration

Enter a **name and description** for your object storage entry.

<figure><img src="/files/HTrzLIQgF4SJWVip5wCW" alt=""><figcaption><p>Fig6: Finalize</p></figcaption></figure>

Example:

* **Name**: `zs3-zero-backup`
* **Description**: `Created by zero at 05/10/2024 19:07:10`

Click **Next** and finish the proces&#x73;**.**

Your Züs S3 storage will now appear under: **Backup Infrastructure → Object Storage**

### 6. Review Cloud Credentials (Credential Manager)

After clicking **Next**, Veeam opens the **Cloud Credential Manager** automatically to display the credentials you just created.

<figure><img src="/files/lTPUJHVnMM4nKZyDLSc3" alt=""><figcaption></figcaption></figure>

Here’s what you can do in this view:

* **Review** the created S3-compatible credential.
* **Edit** the credential by selecting the entry and clicking the **Edit** button.
* **View or modify** the:
  * **Access Key**
  * **Secret Key**
  * **Description** (e.g., created by your team or timestamped info)

***

That is it! You're all set! You’ve successfully configured Veeam to back up to decentralized storage using Blimp and ZS3 Server.

This setup provides secure, scalable, and cost-effective backup for your Microsoft 365, VM, or file-based workloads.


# File Operations

The **File Operations** section of Züs provides an in-depth look at how users can interact with their decentralized storage. Züs supports a variety of file management capabilities, ensuring **secure, efficient, and fault-tolerant data operations** within the ecosystem.

File operations on Züs include **uploading, downloading, sharing, recovery, replication, and encryption**, all of which are designed to work seamlessly within the decentralized storage architecture.

### **Key Features of File Operations**

Züs provides several core file operation functionalities:

#### **Upload and Download**

Züs allows users to **securely upload and retrieve files** from blobbers. The system ensures high availability by leveraging erasure coding and redundancy mechanisms. Read and write operations are optimized for performance and data integrity.

#### **File Sharing**

Users can share files either **publicly or privately**. Private sharing uses **Proxy Re-Encryption**, ensuring secure access without compromising encryption keys. AuthTickets are used for authentication and access control, making file sharing seamless and secure.

#### **Partial Error Recovery**

In the event of **failed operations** due to network inconsistencies, Züs provides **repair and rollback mechanisms**. These ensure that blobbers remain synchronized and that users do not experience data loss due to temporary failures.

#### **Streaming**

Züs supports **video and media streaming**, using efficient chunk-based downloads and adaptive playback mechanisms. The system dynamically optimizes storage and retrieval to ensure smooth media access.

#### **Recovery and Replication**

To maintain data integrity, Züs provides **self-healing mechanisms** where missing shards are automatically reconstructed and redistributed. Replication features allow for seamless data migration between servers.

#### **S3FS Setup and Usage**

Users can integrate Züs with **S3-compatible tools**, enabling cloud-based applications to interact with the storage network just like they would with traditional S3 cloud storage services.

#### **Encryption and Compression**

Züs implements **end-to-end encryption (E2EE)**, allowing users to encrypt files before upload, ensuring that even storage providers (blobbers) cannot access raw data. Compression features optimize storage efficiency.

Got it 👍\
This piece is more of a **clarification / troubleshooting note** than part of the core setup.

📍 **Best place to add it**:

* Either at the **end of the documentation** in a new section called **“Known Issues & Troubleshooting”**,
* OR directly **under the "Directory Listings" / "List" command section**, since that’s where users might run into this error.

Here’s a rewritten version in clean, GitBook-ready Markdown:

#### Note on List Errors (Warp Tool)

All Züs repos (`zboxcli`, `rclone_zus`, `zs3server`, `gosdk`, and `eblobber`) handle **list operations** correctly.

The list errors reported during testing were not due to rclone\_zus itself, but to the **`./warp` benchmarking tool**. The issue comes from differences in the default `pagelimit` values:

* **rclone\_zus** → `pagelimit = 1000`
* **zboxcli** → `pagelimit = 500`
* **zs3server (S3 list API)** → `pagelimit = 500`
* **warp tool** → `pagelimit = 100` (default)

When running `./warp` with a large number of objects (e.g., 5,000 or 10,000), errors may appear because the tool is only fetching 100 keys per request.

Use the `--max-keys` flag in `./warp` to increase the limit (e.g., `--max-keys 1000`) so it aligns with rclone\_zus and other Züs components.


# Upload

Uploading files involves chunked file transfers to multiple blobbers using erasure coding (EC). This approach ensures fault tolerance, redundancy, and efficient retrieval.

The system uses **n:p EC ratio**, where:

* **n** = Number of data blobbers (storing actual data)
* **p** = Number of parity blobbers (storing error correction data)

<figure><img src="/files/xlcxXSrv0lVefywwLumF" alt=""><figcaption><p>Fig1: Upload Flow</p></figcaption></figure>

This method provides faster upload/download speeds through parallel processing and ensures data reliability.

### **1. Upload Process**

The upload mechanism follows a chunked approach for handling large files efficiently. Here is step by step process:

1. **Chunk Preparation**
   * Read the file in 64 KB chunks. Ensure each chunk has n \* 64 KB fragments.
   * If the last fragment is smaller, pad it with null bytes.
2. **Erasure Encoding**
   * Compute p parity-shards using Reed-Solomon encoding.
   * This ensures data redundancy and fault tolerance.
3. **Shard Distribution**
   * Each shard (data or parity) is sent to a respective blobber.
   * n + p upload requests are created.
4. **Temporary Storage on Blobbers**
   * Blobbers store chunks in a temporary directory.
   * Subsequent fragments are appended to the same file.
5. **Chunk Upload Confirmation**
   * Once all fragments are uploaded successfully, the file is considered fully uploaded.

### **2. Merkle Root Calculation**

The Merkle root ensures data integrity and is uniquely computed for each blobber. Lets talk about Merkle Root Calculation Process

* **Chunk Division**: Each 64 KB chunk is split into 64-byte blocks, creating 1024 blocks.
* **Leaf Hash Calculation: E**ach index i (0-1023) has m number of 64-byte blocks (continuous data). Compute the hash of these m blocks → This forms the Merkle tree leaf.
* **Merkle Tree Construction**: The Merkle root is derived from these 1024 leaf hashes.
* **Unique Blobber Merkle Roots**: Since each blobber stores different shards, their Merkle roots differ.

### **3. Challenge Issuance from Smart Contract**

Challenges ensure file integrity and availability by periodically verifying blobber-stored data. Here is how challenges are issued.

1. **Block Count Tracking**
   * Each uploaded file has `num_of_blocks`, representing **the total 64 KB chunks** stored per blobber.
   * A directory's `num_of_blocks` is the **sum of its children's `num_of_blocks`**.
2. **Random Block Selection for Challenge**
   * The network selects a **random block\_num** using:

     ```
     block_num = rand.NewSource(random_seed).Int63n(total_num_of_blocks)
     ```
   * The random seed is **generated by the blockchain**.
3. **Fetching Object Path**
   * The challenge queries GetObjectPath() to find:
     * File reference
     * Merkle root
     * Write markers history
4. **Blobber’s Response to Challenge**
   * Check if a challenge exists for the blobber.
   * Retrieve the required block.
   * Recalculate the Merkle tree.
   * Submit verification proof to the validator.
5. **Validation and Rewards**
   * Validators verify the challenge response.
   * If successful:
     * Blobber earns rewards from the challenge pool.
   * If failed:
     * Stake is penalized (if blobber fails multiple challenges).

### **4. Observations & Optimization Strategies**

To **improve efficiency**, dynamic configurations can be considered:

| **File Size** | **Block Size** | **Merkle Chunk Size** | **Optimizations**          |
| ------------- | -------------- | --------------------- | -------------------------- |
| < 1 KB        | 1 KB           | 1 Byte                | Fewer Merkle leaves        |
| > 1 GB        | 50 MB          | 50 KB                 | Reduced computational load |

By dynamically adjusting chunk sizes, the system can optimize performance based on:

* File size
* Data-shards count
* Token economy impact
* Computational efficiency


# Download

In a decentralized storage network, downloading a file efficiently while ensuring data integrity, security, and performance presents several challenges:

* **Consensus on file correctness:** Data is distributed across multiple blobbers, requiring consensus on the correct file hash before reconstruction.
* **Efficient data retrieval:** Downloading from multiple sources must be optimized for speed and reliability.
* **Integrity verification:** Ensuring downloaded data is correct and unmodified using cryptographic proofs.
* **Handling encrypted files:** Securely decrypting data while preserving access control.
* **Erasure coding reconstruction:** Recovering the original file from distributed data shards.

### Process

To overcome these challenges, the download process follows a structured approach:

<figure><img src="/files/4Gapsxe0e053nsoTsCho" alt=""><figcaption><p>Fig1: Download Process</p></figcaption></figure>

#### 1. Consensus on File Hash

* Before downloading, **consensus** is reached on the actual file hash across all blobbers.
* A subset of blobbers is selected based on successful validation of stored data.
* The **consensus threshold** is set to `data_shards`, as this is the minimum required to decode erasure-encoded data.

#### 2. Parallel Block-Based Download

* Data is downloaded in **blocks** of `64KB * data_shards`, ensuring efficient retrieval.
* Each blobber is requested to send **100 blocks per request** by default.
* **Performance tracking:** The first request is timed, and a subset of blobbers is selected based on response time to optimize speed.
* Downloading occurs **in parallel** from multiple blobbers, significantly improving speed compared to a single-provider approach.

#### 3. Erasure Decoding and Decryption

**Erasure Coding Reconstruction**

* The system uses **Reed-Solomon erasure coding** to reconstruct the original file from `data_shards` out of `data_shards + parity_shards`.
* Missing or slow blobbers do not impact file recovery as long as the threshold is met.

**Decryption (If Encrypted)**

* Each block is decrypted using the **user's private key**.
* Decryption follows **AES-GCM (Authenticated Encryption with Associated Data)** to ensure both confidentiality and authenticity.
* If the file was shared using **Proxy Re-Encryption (PRE)**, the downloaded data is **re-encrypted** by blobbers for the recipient, and the recipient decrypts it using their private key.

#### 4. Integrity Verification

**Validation Merkle Proofs**

* Each block’s correctness is verified using **Merkle Proofs** provided by blobbers.
* Blobbers generate a **Validation Merkle Proof** for each block, which is verified against the **Validation Merkle Root Hash** calculated during the upload.
* This ensures that **data integrity is maintained** and that no blobber has modified or provided incorrect data.

**File Hash Verification**

* Once all blocks are retrieved and decoded, the **final reconstructed file hash** is computed.
* The computed hash is compared against the **consensus-agreed file hash** to ensure correctness.
* Any mismatch results in **rejection** of the downloaded data.

#### 5. Authorization for Shared Files

* Users can download shared files using an **Auth Ticket**, which ensures proper **access control**.
* The **Auth Ticket** contains the necessary metadata and cryptographic permissions for the recipient.
* If the file was encrypted, **Proxy Re-Encryption (PRE)** enables blobbers to **re-encrypt** data without exposing plaintext.


# File Sharing

In-depth walkthrough of file sharing feature.

File sharing enables you to share the files in your allocation, either publicly or privately. Check Webapps documentation on how to use it from Blimp/Vult webapps. In this page, we'll be going into the internals of file sharing and the implementation of Proxy Re-Encryption for private file sharing.

### Sharing Internals <a href="#id-5fkfvyecdwr6" id="id-5fkfvyecdwr6"></a>

File sharing depend on an `AuthTicket` generated for the shared file, that is used to authenticate other users' access to the shared files.

#### AuthTicket format <a href="#lroxpwrce1dd" id="lroxpwrce1dd"></a>

```go
type AuthTicket struct {
	ClientID        string `json:"client_id"`
	OwnerID         string `json:"owner_id"`
	AllocationID    string `json:"allocation_id"`
	FilePathHash    string `json:"file_path_hash"`
	ActualFileHash  string `json:"actual_file_hash"`
	FileName        string `json:"file_name"`
	RefType         string `json:"reference_type"`
	Expiration      int64  `json:"expiration"`
	Timestamp       int64  `json:"timestamp"`
	ReEncryptionKey string `json:"re_encryption_key,omitempty"`
	Encrypted       bool   `json:"encrypted"`
	Signature       string `json:"signature"`
}
```

The `AuthTicket` is usually encoded in Base64 format and signed with the owner's private key. To access the information contained within the `AuthTicket`, you can decode it to retrieve the following details:

| Parameter           | Description                                                                                                                                                   |
| ------------------- | ------------------------------------------------------------------------------------------------------------------------------------------------------------- |
| `client_id`         | The client of the user with whom you want to share this file/folder, or empty in case of public sharing.                                                      |
| `owner_id`          | The ID (or wallet address) of the owner of the allocation.                                                                                                    |
| `allocation_id`     | The ID of the allocation containing this file.                                                                                                                |
| `file_path_hash`    | Hash of the file/folder path.                                                                                                                                 |
| `actual_file_hash`  | The actual hash of the contents of the shared file, which is used in the [file system](broken://pages/ay9jAwIqQxfozPPnYusY), or just empty in case of folder. |
| `file_name`         | The name of the shared file/folder.                                                                                                                           |
| `reference_type`    | Indicates whether it is a file or a folder.                                                                                                                   |
| `expiration`        | The duration for which the AuthTicket remains valid.                                                                                                          |
| `timestamp`         | The timestamp when the AuthTicket was created.                                                                                                                |
| `re_encryption_key` | This is the Re-Encryption key used in case of private sharing. Discussed below in [Private Sharing](#nvpayhmkau3u).                                           |
| `encrypted`         | Indicates whether the file should be encrypted by the recipient public key on retrieval. Discussed below in [Private Sharing](#nvpayhmkau3u).                 |
| `signature`         | The signature of the AuthTicket, used for validation.                                                                                                         |

### Share a file/folder using zboxcli <a href="#id-4wu9mu9tlcul" id="id-4wu9mu9tlcul"></a>

You can share a file using the `share` command in zboxcli:

```
./zbox share --allocation <allocation-id> --remotepath <path-of-the-file-or-folder-on-the-allocation> [other flags] 
```

Check the [zboxcli repo README](https://github.com/0chain/zboxcli?tab=readme-ov-file#share) for full usage docs of this command. After running the command you'll get an `AuthTicket` (encrypted in Base64), which you can share with whomever you want to access this file.

```
Auth token eyJjbGllbnRfaWQiOiIiLCJvd25lcl9pZCI6IjE3ZTExOTQwNmQ4ODg3ZDAyOGIxNDE0YWNmZTQ3ZTg4MDhmNWIzZjk4Njk2OTk4Nzg3YTIwNTVhN2VkYjk3YWYiLCJhbGxvY2F0aW9uX2lkIjoiODlkYjBjZDI5NjE4NWRkOTg2YmEzY2I0ZDBlODE0OTE3NmUxNmIyZGIyMWEwZTVjMDZlMTBmZjBiM2YxNGE3NyIsImZpbGVfcGF0aF9oYXNoIjoiM2NhNzIyNTQwZTY1M2Y3NTQ1NjI5ZjBkYzE5ZGY2ODk5ZTI0MDRjNDI4ZDRiMWZlMmM0NjI3ZGQ3MWY3ZmQ2NCIsImFjdHVhbF9maWxlX2hhc2giOiIyYmM5NWE5Zjg0NDlkZDEyNjFmNmJkNTg3ZjY3ZTA2OWUxMWFhMGJiIiwiZmlsZV9uYW1lIjoidGVzdC5wZGYiLCJyZWZlcmVuY2VfdHlwZSI6ImYiLCJleHBpcmF0aW9uIjoxNjM1ODQ5MzczLCJ0aW1lc3RhbXAiOjE2MjgwNzMzNzMsInJlX2VuY3J5cHRpb25fa2V5IjoiIiwiZW5jcnlwdGVkIjpmYWxzZSwic2lnbmF0dXJlIjoiZDRiOTM4ZTE0MDk0ZmZkOGFiMDcwOWFmN2QyMDAyZTdlMGFmNmU3MWJlNGFmMmRjNmUxMGYxZWJmZTUwOTMxOSJ9
```

What happens in the background is simply :

* The client (in this case zboxcli via [Zboxcore SDK](/zus-docs/sdks/go-sdk)) creates the AuthTicket and signs it with the private key of the owner.
* The client submits the ticket in a `ShareRequest` to one of the blobber of the allocation, via the endpoint: `POST /v1/marketplace/shareinfo/` (see in [Blobber API](/zus-docs/http-apis#blobber-api) documentation).
* The blobber creates/updates the `ShareInfo` for the `file_path_hash` in the `AuthTicket`, after validating the request.

```go
shareInfo := reference.ShareInfo{
	OwnerID:                   authTicket.OwnerID,
	ClientID:                  authTicket.ClientID,
	FilePathHash:              authTicket.FilePathHash,
	ReEncryptionKey:           authTicket.ReEncryptionKey,
	ClientEncryptionPublicKey: encryptionPublicKey,
	ExpiryAt:                  common.ToTime(authTicket.Expiration).UTC(),
	AvailableAt:               common.ToTime(availableAt).UTC(),
}
```

### Downloading a shared file/folder <a href="#id-4wu9mu9tlcul" id="id-4wu9mu9tlcul"></a>

To download a shared file, you can utilize the `download` command from [zboxcli](/zus-docs/clis/zboxcli), using the `authTicket` that was provided in the share step:

```
./zbox download --authticket <the-generated-AuthTicket> --localpath <local-path-to-save-the-file>
```

Check the [zboxcli repo README](https://github.com/0chain/zboxcli?tab=readme-ov-file#download) for full usage docs of this command.

{% hint style="info" %}
In case of folder download, you'll need to download the files inside the folder one by one, by providing either `remotepath` or `lookuphash` flags to the download command.`lookuphash` is the hash of file path and allocation ID, concatenated, using the [`Hash`](https://github.com/0chain/gosdk/blob/doc/initial/core/encryption/README.md#func-hash) function of encryption package in GoSDK.
{% endhint %}

What happens in the background is simply:

* The client (in this case zboxcli, via [Zboxcore SDK](/zus-docs/sdks/go-sdk)) prepares the request based on the given flags. For example, it creates a `lookuphash` if the `remotepath` is given, because `lookuphash` is required for the download request of the blobber API.
* The client sends the blobber a series of `downloadRequest`'s, block-by-block, on the endpoint: `/v1/file/download/` (see [Blobber API](/zus-docs/http-apis#blobber-api)), attaching the AuthTicket in that response.
* The blobber does some validation and verification checks on the request to make sure all is lined up, including:
  * Checks the path in the request is actually inside the allocation in the request.
  * Checks user has enough daily download quota (see [Download](/zus-docs/system-overview/storage/file-operations/download)).
  * Verifies the signature of the AuthTicket.
  * Verifies the owner of the ticket is the same as the owner of the allocation.
  * If the ticket has ClientID (meaning the file is privately shared with this specific client), then the blobber will verify that this client actually has access to this blobber. Otherwise, if ClientID is empty, then the file is publicly shared.
  * Checks the time now is later than `availableAfter` from `ShareInfo` above.
  * Checks the expiry, if expiration date is provided. Otherwise, a default expiry date of **90 Days** use&#x64;*.*
  * Checks the `lookuphash` provided in the request is the same as the `file_path_hash` in the AuthTicket, otherwise (in case of directory tickets) checks if the provided `lookuphash` translates to a [ReferenceObject](/zus-docs/system-overview/storage/protocol/reference-objects) (representation of the file in the database) whose path starts with the `file_hash_path`in the ticket (i.e. the requested file lies inside the directory for which the ticket is issued).
  * Checks the time now is later than `availableAfter` from `ShareInfo` stored for this ticket.
  * Check the ticket is not revoked (see [Revoking](#revoking-tickets)).

### Listing files in a shared folder <a href="#id-4wu9mu9tlcul" id="id-4wu9mu9tlcul"></a>

To list the files listed under the shared path in the `AuthTicket`, you can use the `list` command from zboxcli:

```
./zbox list --authticket $AUTH_TICKET
```

Check the [zboxcli repo README](https://github.com/0chain/zboxcli?tab=readme-ov-file#list) for full usage docs of this command.

What happens under the hood is simply:

* The client (in this case zboxcli, via [Zboxcore SDK](/zus-docs/sdks/go-sdk)) build a ListRequest with the AuthTicket and the `file_path_hash.`

```go
listReq := &ListRequest{Consensus: Consensus{RWMutex: &sync.RWMutex{}}}
listReq.allocationID = a.ID
listReq.allocationTx = a.Tx
listReq.blobbers = a.Blobbers
listReq.fullconsensus = a.fullconsensus
listReq.consensusThresh = a.consensusThreshold
listReq.ctx = a.ctx
listReq.remotefilepathhash = lookupHash
listReq.authToken = at
// It later adds "offset" and "limit" for the request for pagination.
```

* The client then sends the list request to the allocation blobbers, seeking a consensus based on the returned results. The blobber API endpoint used is: `/v1/file/list/`(see [Blobber API](/zus-docs/http-apis#blobber-api))
* The blobber will then verify the AuthTicket (same as in [Download](#id-4wu9mu9tlcul-1)) and prepare the list of descendant files/directories of the required path, based on the given parameters.
* The client collects replies from the blobbers and returns the result in case consensus is achieved.

### Revoking Access (Public/Private)

To revoke access for a publicly shared file, you'll need to use the `zbox share` endpoint with `--revoke`flag:

```bash
./zbox share --allocation <allocation-id> --revoke --remotepath <remote-path-of-the-shared-file> --clientid <client-id> 
```

Check the [zboxcli repo README](https://github.com/0chain/zboxcli/tree/doc/update?tab=readme-ov-file#share) for full usage docs of this command.

What happens under the hood is simply:

* The client (in this case zboxcli, via [Zboxcore SDK](/zus-docs/sdks/go-sdk)) sends revoke share request to all the blobbers of the allocation. The blobber API endpoint used is: `DELETE /v1/marketplace/shareinfo/{allocation}` (see [Blobber API](/zus-docs/http-apis#blobber-api)).
* The blobber deletes the token related to the mentioned file (and the mentioned client in case of private sharing).

### Private Sharing & Proxy Re-encryption <a href="#nvpayhmkau3u" id="nvpayhmkau3u"></a>

Our storage system enables secure private file sharing through **authorization tickets (auth tickets)** while maintaining access control and data confidentiality.

When a user shares a file privately, they generate an auth ticket tied to a specific recipient (client ID). This ensures that only the intended user can access the shared file without exposing the data to unauthorized parties.

For encrypted files, the system utilizes a **proxy re-encryption (PRE) scheme** that allows file sharing without requiring the owner to download and manually re-encrypt the data. This ensures a secure and efficient sharing process while maintaining end-to-end encryption.

#### **1. Referee Key Generation**

Before a file is shared, the recipient, referred to as the **referee**, generates an encryption key pair.

* The key pair consists of a **private key** and a **public encryption key**.
* The public encryption key is derived from the referee's private key, ensuring that only the referee can decrypt the final re-encrypted file.

#### **2. Re-Encryption Key Computation**

To enable proxy re-encryption, the **file owner** generates a re-encryption key using the following inputs:

* Their **private key**.
* The **public encryption key** of the referee.
* The **original encryption key** of the file, which is unique for every encrypted file.

This computed **re-encryption key** is included in the **auth ticket** and stored on the **blobbers** responsible for holding the file.

**3. Proxy Re-Encryption by Blobbers**

When the referee initiates the file download, the blobbers apply the **re-encryption key** to transform the encrypted file.

* The blobbers perform the re-encryption process without decrypting the file.
* The transformed file remains encrypted and is accessible only to the referee.
* Since the blobbers never gain access to the decrypted data, end-to-end encryption is preserved.

**4. Decryption by the Referee**

Once the re-encrypted file is retrieved, the referee decrypts it using their **private key**.

* The private key used for decryption corresponds to the public encryption key that was provided for re-encryption.
* The referee can seamlessly access the shared file without requiring any additional steps from the file owner.

Proxy re-encryption ensures that file sharing remains both secure and efficient without compromising data confidentiality.

* The file owner does not need to manually re-encrypt the data before sharing it with different users.
* Data remains encrypted throughout the entire process, ensuring security even during re-encryption.
* Blobbers facilitate the re-encryption process without having access to the actual file contents.
* Only the intended recipient can decrypt and access the file, preventing unauthorized access.

{% hint style="warning" %}
Always keep your private keys safe and secure.
{% endhint %}


# Partial Error Recovery

Recovering in case of partial error in any of the file operations

Repair/Rollback of allocation are ways to handle difference of data of an allocation on the blobbers hosting it which happen due to failure of applying operations on some blobbers hosting the allocation.

### Why can such errors occur ?

These errors are client-dependent, meaning they can occur based on how you chose to design the client that uses Züs network and blobbers. The clients that Züs offer (CLI tools, Webapps) depend on [GoSDK](/zus-docs/sdks), which implements file operations in a way that trades consistency off for availability and fault tolerance (AP system as defined by CAP theorem).

In [GoSDK](/zus-docs/sdks), A file operation is considered successful when the client receives **`data_shards + 1` success messages out of all the blobbers hosting the allocation in which the operation takes place.** This doesn't guarantee that all the blobbers of the allocation will run the operation successfully, which can lead sometimes to inconsistency between stored data for an allocation among its blobbers.

If you're implementing a client that prefers consistency over availability, you'll not have to deal with such issue. However, if one of the allocation blobbers goes down, the allocation will be almost unusable.

### How to deal with such errors ?

Although it's important that Since such errors are client-dependent, dealing with them is the responsibility of the client in the first place. We don't dictate a specific way to deal with such errors. However, GoSDK gives a good example of how such error can be handled, introducing the concepts of **Repair and Rollback.**

### Repair

Repair occurs if a *successful* file operation was missed by some of the blobbers hosting the allocations. Since the operation itself is successful, the user will need to initiate a new special operation to perform the repair. The repair itself is performed as follows:

* Starting from the root directory, if the directory is empty, or a file is encountered:
  * If it's found in the majority of the blobbers, it will be created in the rest of them (and copied from the majority if it's a file).
  * If it's not found in the majority, it will be deleted from the other.
* If the directory has children, the process of repair will continue through its children.

To run the repair process, you can either use `zboxcli start-repair` command or `zboxcli updateallocation` (without settings `add_blobber_id` ). Check [ZboxCLI README](https://github.com/0chain/zboxcli/tree/doc/update?tab=readme-ov-file#repair) for detailed documentatio of both commands.

### Rollback

* Rollback means undoing the allocation changes ran on the minority of blobbers if it's not sycned by the majority of blobbers hosting the allocation.
* Rollback runs on an allocation if and only if **the number of the blobbers on the latest version (having the latest changes) is less than the number of data shards of the allocations.**


# Streaming

## Architecture

The streaming system is designed with a robust architecture, encapsulated within a core player function. The key responsibilities include:

* **Video Uploading**: Handles video file uploads, segments them for streaming, generates thumbnails, and prepares the video for playback.
* **Video Transcoding**: Uses FFmpeg for transcoding video segments into streaming-compatible formats.
* **Video Playback**: Uses the Media Source Extensions (MSE) API for dynamic playback of transcoded video segments.
* **Resource Management**: Efficiently manages system resources, including FFmpeg instances and Web Workers.

### Key Components and Their Functionalities

#### Dependencies and Imports

The system relies on specific dependencies to execute various tasks:

* **`@custom/ffmpeg`**: A browser-compatible FFmpeg module optimized for video transcoding.

#### Video Uploading with `uploadToIndexDb` Function

The video upload phase involves the following steps:

1. **File Handling**:
   * Creates and mounts a virtual filesystem in FFmpeg (`WORKERFS`) to store the uploaded video.
2. **Metadata Extraction**:
   * Extracts key metadata (e.g., duration, audio presence) using FFmpeg probes.
3. **Thumbnail Generation**:
   * Captures a single frame from the video to generate a thumbnail image.
4. **Video Segmentation**:
   * Splits the video into smaller segments (e.g., 5-second chunks) to enable efficient streaming.
   * Each segment is stored as an individual file in the virtual filesystem.
5. **JSON Metadata Creation**:
   * Compiles a JSON object detailing the video segments' metadata, including duration, segment count, and audio presence.

#### Video Playback with `transcodeFileToMediaSource` Function

This function manages the playback phase, dynamically transcoding and streaming video segments.

1. **Media Source Initialization**:
   * Creates a `MediaSource` object and attaches it to the video element for MSE-based streaming.
2. **Job Management**:
   * Maintains a queue of transcoding jobs for video segments.
   * Uses FFmpeg to transcode each segment into a suitable format (e.g., MP4 with H.264 codec).
3. **Buffer Management**:
   * Appends transcoded segments to the `sourceBuffer` of the `MediaSource`.
   * Adjusts buffering logic dynamically based on playback position.
4. **Event Handling**:
   * Monitors video and buffer events (e.g., play, pause, seeking) to manage playback state and user interactions.
5. **Error Handling and Recovery**:
   * Implements mechanisms to retry failed transcoding tasks, ensuring a solid playback experience.

### FFmpeg Commands

FFmpeg is central to the system, performing tasks such as thumbnail generation, video segmentation, transcoding, and merging.

#### Thumbnail Generation

```javascript
await ffmpegs[0].exec([
  '-i', name,
  '-ss', `${pictureFrame}`,
  '-threads', '4',
  '-vframes', '1',
  'thumbnail_generated.jpg',
]);
```

* **Purpose**: Captures a single frame from the video.
* **Key Parameters**:
  * `-i`: Input file.
  * `-ss`: Timestamp for the frame.
  * `-threads`: Number of threads for processing.
  * `-vframes 1`: Outputs a single frame.

#### Video Segmentation

```javascript
await ffmpegs[0].exec([
  '-fflags', '+genpts',
  '-i', name,
  '-threads', '4',
  '-f', 'segment',
  '-segment_time', '5',
  '-segment_time_delta', '0.01',
  '-c', 'copy',
  '-reset_timestamps', '1',
  `${fileName}_%03d.${ext}`,
]);
```

* **Purpose**: Splits the video into 5-second segments.
* **Key Parameters**:
  * `-segment_time`: Duration of each segment.
  * `-reset_timestamps`: Resets timestamps for synchronization.
  * `-c copy`: Avoids re-encoding to preserve quality.

#### Transcoding for Playback

```javascript
await ffmpeg.exec([
  '-nostats',
  '-loglevel', 'error',
  '-threads', '4',
  '-i', inputFileChunk,
  '-fflags', '+genpts',
  '-an',
  '-movflags', 'frag_every_frame+empty_moov+default_base_moof',
  '-preset', 'ultrafast',
  '-c:v', 'libx264',
  '-crf', `${cfrValue}`,
  '-copyts', `/temp_video_${job.id}.mp4`,
], undefined, { signal });
```

* **Purpose**: Transcodes video segments for streaming.
* **Key Parameters**:
  * `-c:v libx264`: Specifies the H.264 codec.
  * `-preset ultrafast`: Optimizes for speed.
  * `-movflags`: Configures the MP4 container for MSE compatibility.

#### Audio Transcoding and Merging

```javascript
await ffmpeg.exec([
  '-nostats',
  '-loglevel', 'error',
  '-threads', '4',
  '-i', `/temp_video_${job.id}.mp4`,
  '-i', `/temp_audio_${job.id}.aac`,
  '-c:v', 'copy',
  '-c:a', 'aac',
  '-b:a', '256k',
  '-movflags', 'frag_every_frame+empty_moov+default_base_moof',
  '-copyts',
  '-af', 'aresample=async=1',
  '-shortest', outputFile,
], undefined, { signal });
```

* **Purpose**: Merges video and audio streams into a final MP4 file.
* **Key Parameters**:
  * `-c:a aac`: Specifies AAC codec for audio.
  * `-af aresample=async=1`: Ensures audio-video sync.

#### Concatenating Video Segments for Download

```javascript
await ffmpegs[0].exec([
  '-f', 'concat',
  '-safe', '0',
  '-i', 'concat_list.txt',
  '-c', 'copy',
  '-fflags', '+bitexact',
  file.name,
]);
```

* **Purpose**: Combines all video segments for user download.
* **Key Parameters**:
  * `-f concat`: Enables concatenation of video files.

### Job Queue Management

#### Initialization

* **Jobs Array**: Stores job objects representing video segments.

```javascript
let jobs = [];
```

* **Chunk Parameters**: Define segment durations and manage timing.

```javascript
let chunkStart = 0;
let durationLeft = duration;
let chunkDurationSize = 5;
```

#### Creating Job Objects

Each job includes metadata about the segment:

```javascript
let job = {
  id: index,
  chunkStart,
  chunkDuration,
  state: 'queued',
  outputData: null,
};
jobs.push(job);
```

#### Concurrent Processing

* Concurrent FFmpeg Instances:

```javascript
let ffmpegCount = 1;
```

* Job Assignment:

```javascript
let job = jobQueue.shift();
job.state = 'running';
```

#### Appending Data to `SourceBuffer`

* Event Listener:

```javascript
sourceBuffer.addEventListener('updateend', async () => {
  let job = await getCompletedJob(ii++);
  if (job) sourceBuffer.appendBuffer(job.outputData);
});
```

* Stream Finalization

Signals end-of-stream to the video element:

```javascript
mediaSource.endOfStream();
```

### Directory Structure for Download

Video Folder:

* `Original file`
* `0kb marker file`
* `Thumbnail file`
* `Preview folder`:
  * Segments named sequentially (e.g., `1`, `2`, `3`).
  * `metadata.json`.

This ensures a comprehensive and efficient streaming system while supporting user download capabilities.


# Rent a Blobber

The **Rent Blobber Registration** process is used within the Züs ecosystem to register blobber storage providers for **renting purposes**.

Blobbers are an essential component in the decentralized storage architecture of Züs, offering storage services that can be leased by users.

By registering a rent blobber, storage providers can **participate in the network**, lease storage space, and manage their instances efficiently.

This guide provides a step-by-step approach for correctly setting up and registering a **rent blobber** via an API request. It includes:

* A detailed explanation of the API request structure.
* The required authentication headers and request body parameters.
* Configuration steps in `0box.yaml` to ensure correct integration.
* An overview of portainer management within the Züs network.

### **Registering a Rent Blobber**

To register a **rent blobber**, execute the following `curl` command:

```bash
curl -X POST \  
              -H "X-CSRF-TOKEN: ${X-CSRF-TOKEN}" \  
              -H "X-App-Client-ID: ${X-App-Client-ID}" \  
              -H "X-App-User-ID: ${X-App-User-ID}" \  
              -H "Content-Type: application/json" \  
              -d "{\"blobber_id\": \"${client_id}\", \"private_key\": \"${private_key}\", \"portainer_id\": \"${portainer_id}\", \"container_id\": \"${container_id}\", \"delegate_wallet\": \"${delegate_wallet}\"}" \  
              https://0box.dev.zus.network/v2/add-rent-blobber
```

### **Parameter Details**

The request requires several **header properties** and **body parameters**:

#### **Headers:**

* **X-CSRF-TOKEN** → The security token for authentication.
* **X-App-Client-ID** → This should match `wallets.team_wallet` in `0box.yaml`.
* **X-App-User-ID** → This should match `rent_blobbers.user_id` in `0box.yaml`.
* **Content-Type** → Must be set to `application/json`.

#### **Body Parameters:**

* **blobber\_id** → The unique identifier of the blobber being registered.
* **private\_key** → The private key associated with the blobber.
* **portainer\_id** → The identifier for the portainer instance. It must match an entry in `0box.yaml` under `portainer.rent_blobbers.hosts`.
* **container\_id** → The **name of the Docker container** within the selected portainer instance.
* **delegate\_wallet** → The delegate wallet of the blobber.

### **Portainer Configuration in 0box.yaml**

In `0box.yaml`, **portainer instances** should be defined as follows:

```bash
portainer:
  rent_blobbers:
    username: "******"
    password: "******"
    hosts: 
      - "dev1.zus.network"
      - "dev2.zus.network"
      - "dev3.zus.network"
```

The **`portainer_id`** used in the request should correspond to the **index of the host** in `portainer.rent_blobbers.hosts`.

For example:

* `portainer_id: 0` → corresponds to `dev1.zus.network`
* `portainer_id: 1` → corresponds to `dev2.zus.network`
* `portainer_id: 2` → corresponds to `dev3.zus.network`

### **Additional Configuration in 0box.yaml**

Ensure that the following properties exist in `0box.yaml` for proper registration:

```bash
kms:
  user_id: *******
  domain: *******

rent_blobbers:
  user_id: *******
```

These properties are necessary to ensure **secure key management** and **correct user identification** during the blobber registration process.


# Smart Contracts

Smart contracts that provide functionality for the Züs System

### Smart Contracts

Smart contracts are self-executing programmatic contracts listing the functionality and the terms of service between the clients and Züs systems.

In Züs, we have actively 3 smart contracts:

#### Storage smart contract

The **Storage** smart contract is responsible for handling all functions related to file storage on the Züs network. This includes creating and managing allocations, locking and unlocking stake pools for storage providers, functions related to storage providers (blobbers and validators), write markers and challenges.

#### Miner smart contract

The **Miner** smart contract is responsible for handling all functions related to providers that contribute to block generation and consensus (miners and sharders). This includes addition, health signals, termination, fees, rewards, staking and global settings of those types of providers.

#### ZCN smart contract

The **Authorizer** smart contract is responsible for handling all functions related to Bridge protocol and inter-network tokenomics between Züs Network and Ethereum network. This includes addition, staking and management of Authorizers in addition to mint and burn functions.

#### ERC-20 smart contracts

Those are smart contracts that are deployed by Züs team on the Ethereum network. They're used to fulfill the operations needed to exchange Züs tokens (ZCN) with ERC-20 (we call it the [Bridge Protocol](/zus-docs/system-overview/smart-contracts/bridge-protocol)).

### Communicating with smart contracts using transactions

<figure><img src="/files/2RoS4GlEnjebFluvguTJ" alt=""><figcaption><p>Fig1: Communication with smart contracts</p></figcaption></figure>

In order to communicate with the smart contracts, you need to:

* Submit a transaction to the blockchain, stating the smart contract and the function name you need, and providing the inputs needed for the function.
* The transaction need to be signed by the client's private key as it will be verified by the network using the client's public key.
* After submitting the transactions, it will then be selected by the miners to be part of one of the blocks and then be processed.
* After processing the transaction, the network will generate a confirmation for the transaction, inclusing its status and output. This confirmation will be persisted by the sharders.
* The client should communicate with the sharders in order to get confirmation for their transaction, to make sure it's processed and view its status and output.

Check [Using the Network > Smart contracts](broken://pages/tDd05w33sSnSaRKfObrJ) for full listing of the possible functions and the structure of the transaction.

### Smart Contract Addresses

Each smart contract is represented by a fixed address on the network, which is used as value for `the to_client_id` field of the transaction. The addresses of the smart contracts are as follows:

<table data-header-hidden><thead><tr><th width="134"></th><th width="677"></th></tr></thead><tbody><tr><td>Storage SC</td><td>6dba10422e368813802877a85039d3985d96760ed844092319743fb3a76712d7</td></tr><tr><td>Miner SC</td><td>6dba10422e368813802877a85039d3985d96760ed844092319743fb3a76712d9</td></tr><tr><td>ZCN SC</td><td>6dba10422e368813802877a85039d3985d96760ed844092319743fb3a76712e0</td></tr></tbody></table>

In these pages we'll be listing all the functions that are provided by our smart contracts, which you can use to manage your resources (like allocations and deployed providers).

To communicate with the smart contracts, you need to do the following:

* Construct a correct and complete HTTP request with you request to the Put Transaction endpoint in Miner API.
* Sign the transaction request with your private key and provide your signature with the request.
* After submitting the transactions, you need to poll the transaction confirmation endpoint of the Sharder API to make sure your transaction is confirmed i.e. processed and to check its status and output.

{% hint style="info" %}
Although you can use the smart contracts directly, as mentioned above, we encourage you to either use the SDK or the CLIs, which should simplify your usage experience and guarantee request correctness and completeness.
{% endhint %}

In the next pages, we'll be listing all the functions offered by the smart contracts and their required inputs.


# Storage S.C.

{% hint style="info" %}
This page is under progressive development.
{% endhint %}

### Allocation-related functions <a href="#allocation-related-functions" id="allocation-related-functions"></a>

#### `new_allocation_request`

Create a new allocation and lock tokens in the client's write pool, given the following inputs:

```go
type newAllocationRequest struct {
	Name                 string     `json:"name"`
	DataShards           int        `json:"data_shards"`
	ParityShards         int        `json:"parity_shards"`
	Size                 int64      `json:"size"`
	Owner                string     `json:"owner_id"`
	OwnerPublicKey       string     `json:"owner_public_key"`
	Blobbers             []string   `json:"blobbers"`
	BlobberAuthTickets   []string   `json:"blobber_auth_tickets"`
	ReadPriceRange       PriceRange `json:"read_price_range"`
	WritePriceRange      PriceRange `json:"write_price_range"`
	ThirdPartyExtendable bool       `json:"third_party_extendable"`
	FileOptionsChanged   bool       `json:"file_options_changed"`
	FileOptions          uint16     `json:"file_options"`
}
```

| Field                    | Description                                                                                                                                           |
| ------------------------ | ----------------------------------------------------------------------------------------------------------------------------------------------------- |
| name                     | (not used) the name of the allocation                                                                                                                 |
| data\_shards             | Number of data shards.                                                                                                                                |
| parity\_shards           | Number of prity shards used for error correction.                                                                                                     |
| size                     | Size of the allocation.                                                                                                                               |
| owner                    | ClientID of the owner of the alloaction.                                                                                                              |
| owner\_public\_key       | Public Key of the owner of the allocation.                                                                                                            |
| blobbers                 | List of blobber IDs to show for the blobbers.                                                                                                         |
| blobber\_auth\_tickets   | List of auth tickets corresponding to the list of blobber ids to host the allocation.                                                                 |
| read\_price\_range       | Range of read price offer for the blobbers chosen for the allocation (Reads in Züs are free!).                                                        |
| write\_price\_range      | Range of write price offer for the blobbers chosen for the allocation.                                                                                |
| third\_party\_extendable | Whether the allocation can be extendable by third party or not, meaning its size can be increased by a client other than the owner of the allocation. |
| file\_options\_changed   | Whether file option flags are changed.                                                                                                                |
| file\_options            | File option flags mask which control permissions of the files that belong to the allocation.                                                          |

#### `update_allocation_request`

Updates the parameters of an existing allocation given the following parameters:​

```go
type updateAllocationRequest struct {
	ID                      string `json:"id"`               // allocation id
	Name                    string `json:"name"`             // allocation name
	OwnerID                 string `json:"owner_id"`         // Owner of the allocation
	OwnerPublicKey          string `json:"owner_public_key"` // Owner Public Key of the allocation
	Size                    int64  `json:"size"`             // difference
	Extend                  bool   `json:"extend"`
	AddBlobberId            string `json:"add_blobber_id"`
	AddBlobberAuthTicket    string `json:"add_blobber_auth_ticket"`
	RemoveBlobberId         string `json:"remove_blobber_id"`
	SetThirdPartyExtendable bool   `json:"set_third_party_extendable"`
	FileOptionsChanged      bool   `json:"file_options_changed"`
	FileOptions             uint16 `json:"file_options"`
}
```

| Field                         | Description                                                                                                                               |
| ----------------------------- | ----------------------------------------------------------------------------------------------------------------------------------------- |
| ID                            | The id of the allocation                                                                                                                  |
| name                          | (not used) the name of the allocation                                                                                                     |
| owner\_id                     | ClientID of the owner of the alloaction.                                                                                                  |
| owner\_public\_key            | Public Key of the owner of the allocation.                                                                                                |
| size                          | Size of the allocation.                                                                                                                   |
| extend                        | Whether the allocation should be extended.                                                                                                |
| add\_blobber\_id              | ID of the blobber to add to the allocation.                                                                                               |
| add\_blobber\_auth\_ticket    | Auth ticket of the blobber to add to the allocation.                                                                                      |
| remove\_blobber\_id           | ID of the blobber to remove from the allocation.                                                                                          |
| read\_price\_range            | Range of read price offer for the blobbers chosen for the allocation (Reads in Züs are free!).                                            |
| write\_price\_range           | Range of write price offer for the blobbers chosen for the allocation.                                                                    |
| set\_third\_party\_extendable | Set the allocation to be extendable by third party, meaning its size can be increased by a client other than the owner of the allocation. |
| file\_options\_changed        | Whether file option flags are changed.                                                                                                    |
| file\_options                 | File option flags mask which control permissions of the files that belong to the allocation.                                              |

#### `finalize_allocation`

Finalize an expired allocation by allocation owner or one of blobbers of the allocation. It moves all tokens have to be moved between pools and empties write pool moving left tokens to the client. It requires the following input parameters:

```go
AllocationID string `json:"allocation_id"`
```

#### `cancel_allocation`

Cancel the allocation before its expiry date. It moves all tokens have to be moved between pools and empties write pool moving left tokens to the client, it also deducts a cancelation fee mentioned in the [Allocations](/zus-docs/system-overview/storage/protocol/allocations) page. It required the following input parameters:

```go
AllocationID string `json:"allocation_id"`
```


# Miner S.C.

### Miner-related Functions

**`NewMinerSmartContract`**

Creates a new instance of the Miner Smart Contract.

```go
goCopy codefunc NewMinerSmartContract() sci.SmartContractInterface {
	var mscCopy = &MinerSmartContract{
		SmartContract: sci.NewSC(ADDRESS),
		bcContext:     &smartcontract.BCContext{},
	}
	mscCopy.initSC()
	mscCopy.setSC(mscCopy.SmartContract, mscCopy.bcContext)
	return mscCopy
}
```

**`Execute`**

Executes a specified function within the Miner Smart Contract, based on the function name and input data provided.

**Function Parameters:**

```go
goCopy codefunc (msc *MinerSmartContract) Execute(
	t *transaction.Transaction,
	funcName string, 
	input []byte, 
	balances cstate.StateContextI
) (string, error)
```

**Parameters:**

| Field      | Description                                               |
| ---------- | --------------------------------------------------------- |
| `t`        | Transaction to be executed.                               |
| `funcName` | The function name to execute within the smart contract.   |
| `input`    | Byte array of input data for the function.                |
| `balances` | State context interface for maintaining blockchain state. |

***

### Global Node Management

**`getGlobalNode`**

Retrieves the global configuration node from the blockchain state.

**Function Signature:**

```go
goCopy codefunc getGlobalNode(balances cstate.CommonStateContextI) (gn *GlobalNode, err error)
```

**Parameters:**

| Field      | Description                         |
| ---------- | ----------------------------------- |
| `balances` | Blockchain state context interface. |

**Returns**:

* `*GlobalNode` - Pointer to the global node configuration.
* `error` - Error if retrieval fails.

**`InitConfig`**

Initializes the global configuration settings for the Miner Smart Contract.

**Function Signature:**

```go
goCopy codefunc InitConfig(balances cstate.CommonStateContextI) error
```

**Parameters:**

| Field      | Description                         |
| ---------- | ----------------------------------- |
| `balances` | Blockchain state context interface. |

**Description**:\
This function initializes the settings in the blockchain, validating and storing the global node configuration if it does not already exist. If a global node does not exist, a default node is created and stored.

***

### Execution Statistics

Miner Smart Contract records performance metrics for each key function:

| Function Name             | Description                                              |
| ------------------------- | -------------------------------------------------------- |
| `add_miner`               | Tracks time taken to add a new miner.                    |
| `add_sharder`             | Tracks time taken to add a new sharder.                  |
| `collect_reward`          | Measures the time required for reward collection.        |
| `miner_health_check`      | Monitors time taken to conduct miner health checks.      |
| `sharder_health_check`    | Tracks time taken for sharder health checks.             |
| `update_globals`          | Counts the number of global configuration updates.       |
| `update_miner_settings`   | Tracks the time taken to update miner settings.          |
| `update_sharder_settings` | Tracks time taken to update sharder settings.            |
| `payFees`                 | Monitors the time taken for processing fee payments.     |
| `feesPaid`                | Keeps a count of total fees paid by miners and sharders. |
| `mintedTokens`            | Counts the total tokens minted in the smart contract.    |


# ZCN S.C.

### ZCN Smart Contract Functions

**`NewZCNSmartContract`**

Creates a new instance of the ZCN Smart Contract.

```go
goCopy codefunc NewZCNSmartContract() smartcontractinterface.SmartContractInterface {
	var contract = &ZCNSmartContract{
		smartcontractinterface.NewSC(ADDRESS),
		make(map[string]smartContractFunction),
	}

	contract.InitSC()
	contract.setSC(contract.SmartContract, &smartcontract.BCContext{})
	return contract
}
```

**`InitSC`**

Initializes smart contract functions within the ZCN Smart Contract, associating each function with a key.

```go
goCopy codefunc (zcn *ZCNSmartContract) InitSC()
```

#### **Key Functions**

* **Configuration**
  * `update-global-config`: Updates the global configuration of the smart contract.
  * `update-authorizer-config`: Configures specific authorizers for the smart contract.
* **Bridge-Related**
  * `mint`: Mints new ZCN tokens.
  * `burn`: Burns ZCN tokens, typically used for cross-chain interactions.
* **Authorizer Management**
  * `add-authorizer`: Adds a new authorizer.
  * `delete-authorizer`: Removes an existing authorizer.
  * `authorizer-health-check`: Conducts a health check on an authorizer.
* **Delegate Pools**
  * `add-to-delegate-pool`: Adds tokens to the delegate pool for staking.
  * `delete-from-delegate-pool`: Removes tokens from the delegate pool.
  * `update-authorizer-stake-pool`: Updates the stake pool for an authorizer.

***

### Execution Statistics

ZCN Smart Contract records metrics for each major function to track performance:

| Function Name               | Description                                                |
| --------------------------- | ---------------------------------------------------------- |
| `add-authorizer`            | Tracks time taken to add a new authorizer.                 |
| `delete-authorizer`         | Monitors time taken to delete an authorizer.               |
| `update-global-config`      | Tracks time taken to update the global configuration.      |
| `update-authorizer-config`  | Tracks time taken to update an authorizer's configuration. |
| `mint`                      | Measures the time taken for minting tokens.                |
| `burn`                      | Measures the time taken for burning tokens.                |
| `add-to-delegate-pool`      | Tracks the time taken to add to the delegate pool.         |
| `delete-from-delegate-pool` | Tracks the time taken to remove from the delegate pool.    |

***

### Core Functions

**`Execute`**

Executes a specified function within the ZCN Smart Contract based on the provided method name and input data.

**Function Signature:**

```go
goCopy codefunc (zcn *ZCNSmartContract) Execute(
	trans *transaction.Transaction,
	method string,
	input []byte,
	ctx cstate.StateContextI
) (string, error)
```

**Parameters:**

| Field    | Description                                              |
| -------- | -------------------------------------------------------- |
| `trans`  | Transaction to be executed.                              |
| `method` | Name of the method to execute within the smart contract. |
| `input`  | Input data for the method in byte format.                |
| `ctx`    | Blockchain state context interface.                      |

**Returns:**

* `string` - Result of the function execution.
* `error` - Error if the execution fails.

***

### Cost Table Retrieval

**`GetCostTable`**

Retrieves the cost table for the smart contract, containing configuration costs associated with each operation.

**Function Signature:**

```go
goCopy codefunc (zcn *ZCNSmartContract) GetCostTable(balances cstate.StateContextI) (map[string]int, error)
```

**Parameters:**

| Field      | Description                                                       |
| ---------- | ----------------------------------------------------------------- |
| `balances` | Blockchain state context interface used to retrieve global costs. |

**Returns:**

* `map[string]int` - A map containing the cost configuration for each function.
* `error` - Error if retrieval fails.


# ERC-20 S.C.s

The **ZCN Token Smart Contract** is an **ERC-20 token** built for the **Züs blockchain ecosystem**. It follows the ERC-20 standard while incorporating key features such as **custom decimals, controlled minting, and allowance management**.

The contract is built using **OpenZeppelin’s** secure and tested libraries, ensuring interoperability with wallets, exchanges, and decentralized applications (dApps).

### **Contract Overview**

* **Token Name:** Configurable (set during deployment)
* **Symbol:** Configurable (set during deployment)
* **Decimals:** **10** (instead of the default 18)
* **Initial Supply:** **500,000,000 ZCN**
* **Total Supply:** Can be increased via minting by the contract **owner**
* **Minting:** Restricted to the **owner**
* **Allowance Management:** Includes `increaseApproval()` for backward compatibility
* **Standard Functions:** Implements all ERC-20 functions such as `transfer`, `approve`, `allowance`, etc.

### **Smart Contract Code**

```solidity
// SPDX-License-Identifier: MIT
pragma solidity 0.8.18;

import "@openzeppelin/contracts/access/Ownable.sol";
import "@openzeppelin/contracts/token/ERC20/ERC20.sol";

/**
 * @title Token
 *
 * @notice Represents ERC20 implementation for ZCN tokens
 */
contract Token is ERC20, Ownable {
    constructor(string memory name_, string memory symbol_)
        ERC20(name_, symbol_)
    {
        _mint(msg.sender, 500000000 * 10**decimals());
    }

    /**
     * @notice Overrides ERC20 decimals function to modify amount of token decimals
     * @return uint8 The amount of token decimals
     */
    function decimals() public pure override returns (uint8){
        return 10;
    }

    /**
     * @notice Public mint function
     * @param account_ The address to mint tokens to
     * @param amount_ The amount of tokens to mint
     */
    function mint(address account_, uint256 amount_) external onlyOwner {
        _mint(account_, amount_);
    }

    /**
     * @notice Alias for an older version of ERC20 smart contract to use increaseAllowance method
     * @param spender_ The address to increase allowance for
     * @param amount_ The amount to increase
     */
    function increaseApproval(address spender_, uint256 amount_) external onlyOwner {
        increaseAllowance(spender_, amount_);
    }
}
```

### **Key Features**

#### **1. ERC-20 Compliance**

This contract follows the **ERC-20 standard**, meaning it supports:

* `transfer()`: Allows token transfers between users.
* `approve()`: Grants spending permission to another address.
* `allowance()`: Checks the approved spending limit.
* `transferFrom()`: Executes transfers on behalf of a user.

#### **2. Custom Decimals**

Unlike the default **18 decimals** in ERC-20, this token has **10 decimals**:

```solidity
function decimals() public pure override returns (uint8){
    return 10;
}
```

* This allows for finer precision in transactions.

#### **3. Minting New Tokens**

* Only the **contract owner** can mint new tokens:

```solidity
function mint(address account_, uint256 amount_) external onlyOwner {
    _mint(account_, amount_);
}
```

* Use case:
  * This function can be used for **staking rewards, governance incentives, or controlled token supply expansion**.

#### **4. Increased Allowance Function (`increaseApproval`)**

* Provides backward compatibility for older ERC-20 implementations:

```solidity
function increaseApproval(address spender_, uint256 amount_) external onlyOwner {
    increaseAllowance(spender_, amount_);
}
```

* This function allows **adjusting allowances without resetting them**, which is useful in **older DeFi applications**.

### **Deployment & Usage**

#### **1. Deploying the Contract**

To deploy the contract, provide the **token name** and **symbol**:

```solidity
Token zcnToken = new Token("Zus Coin", "ZCN");
```

#### **2. Interacting with the Contract**

**Minting New Tokens**

```solidity
zcnToken.mint(0xRecipientAddress, 1000 * 10**10);
```

✅ Mints **1,000 ZCN** tokens.

**Transferring Tokens**

```solidity
zcnToken.transfer(0xRecipientAddress, 500 * 10**10);
```

✅ Transfers **500 ZCN** to the recipient.

**Approving a Spender**

```solidity
zcnToken.approve(0xSpenderAddress, 200 * 10**10);
```

✅ Allows **spender** to transfer up to **200 ZCN** on behalf of the owner.

**Checking Balance**

```solidity
zcnToken.balanceOf(0xUserAddress);
```

✅ Returns the **token balance** of a user.

**Using `increaseApproval`**

```solidity
zcnToken.increaseApproval(0xSpenderAddress, 50 * 10**10);
```

✅ Increases allowance by **50 ZCN**.

### **Use Cases**

* **Utility Token:** Used for transactions, fees, and governance within the **Züs ecosystem**.
* **DeFi & Staking:** Can be used in **staking, farming, and liquidity pools**.
* **Token Bridging:** Supports **cross-chain transfers between Ethereum and Züs**.

The **ZCN ERC-20 Smart Contract** is designed for efficiency, security, and seamless integration within the **Züs ecosystem**. It offers **controlled minting, customized decimals, and standard ERC-20 functions**, ensuring compatibility with **DeFi applications, wallets, and exchanges**.


# Bridge Protocol

The Bridge Protocol facilitates the conversion between Wrapped ZCN (WZCN), an ERC-20 token on Ethereum, and Züs Coin (ZCN), the native token of the Züs blockchain.

This process ensures a seamless and trustless transfer of assets between two blockchain ecosystems using a burn-and-mint mechanism, with verification and authorization handled by the Authorizer node.

The protocol ensures security through asymmetric key encryption, smart contract validation, and a structured reward-and-penalty mechanism for Authorizers.

### **Key Processes in the Bridge Protocol**

<figure><img src="/files/n1wVlXzAZ1J7qm1L08eH" alt=""><figcaption></figcaption></figure>

#### **1. Signing Burn and Mint Tickets**

The Bridge Protocol operates based on burn and mint tickets, which serve as proofs of token conversion:

* **Burn Tickets (WZCN → ZCN)**
  * When a user wants to convert WZCN (Ethereum) to ZCN (Züs), they initiate a burn transaction on the Ethereum blockchain.
  * This generates a burn ticket, which is sent to an Authorizer node.
  * The Authorizer node verifies the transaction and signs the burn ticket.
* **Mint Tickets (ZCN → WZCN)**
  * When a user wants to convert ZCN (Züs) back to WZCN (Ethereum), they burn ZCN on the Züs blockchain.
  * This action generates a mint ticket, which must be signed by the Authorizer node before minting WZCN on Ethereum.

#### **2. Validation Process**

The **Authorizer node** plays a critical role in ensuring the validity of token conversions:

* **Burn Ticket Validation**
  * The Authorizer node verifies that WZCN tokens have been burned on Ethereum.
  * The node checks the Ethereum smart contract to confirm that the burn transaction is recorded.
  * Once validated, the Authorizer signs the burn ticket.
* **Mint Ticket Validation**
  * For mint tickets, the Authorizer node ensures that ZCN tokens have been burned on the Züs blockchain.
  * The node verifies the burn event in the Züs smart contract.
  * If verified, the Authorizer signs the mint ticket, allowing the minting of new WZCN on Ethereum.

#### **3. Asymmetric Key Encryption & Ticket Signing**

* The Authorizer node signs burn and mint tickets using asymmetric key encryption.
* Each signed ticket includes:
  * Burn/Mint transaction details.
  * Authorizer's digital signature (using its private key).
* Smart contracts on Ethereum and Züs can verify the validity of the signed ticket using the Authorizer’s public key.

#### **4. Integration with Smart Contracts**

The Bridge Protocol relies on smart contracts for enforcement and tracking:

* **Ethereum Smart Contracts**
  * Store burn events of WZCN.
  * Validate signed tickets before minting WZCN.
* **Züs Smart Contracts**
  * Track burn events of ZCN.
  * Verify mint ticket signatures before minting ZCN.

This ensures that every cross-chain transaction is properly recorded and authorized.

#### **5. Reward and Penalty Mechanism**

To maintain security and incentivize correctness, the Bridge Protocol implements a **reward-and-penalty** system:

**Rewards**

* Authorizer nodes earn rewards for validating and signing tickets.
* Rewards are distributed based on:
  * The number of burn tickets signed (for WZCN → ZCN).
  * The number of mint tickets signed (for ZCN → WZCN).
* **Rewards are paid in:**
  * ZCN for ZCN mint transactions.
  * ETH for WZCN mint transactions.

**Penalties**

* If an Authorizer node fails to properly validate a ticket, they may face penalties.
* Penalties include:
  * Loss of staking rewards.
  * Suspension from the Authorizer network for repeated failures.
* This ensures that malicious or careless behavior is discouraged, keeping the protocol secure.


# Blockchain & Consensus

Züs utilizes a **synchronous Byzantine Fault Tolerant (BFT) consensus protocol** designed for high-speed, decentralized blockchain operations.

The protocol ensures the security, scalability, and efficiency of transactions while maintaining a distributed network of miners and sharders.

This documentation outlines the key aspects of Züs' consensus mechanism, its security guarantees, and how it achieves **fast finalization** of transactions.

### **Züs Consensus Protocol**

The Züs blockchain employs a Dfinity-like synchronous consensus protocol to ensure fast block production and verification. Unlike traditional Proof-of-Work (PoW) or Proof-of-Stake (PoS) models, Züs uses a multi-step process involving miners and sharders.

<figure><img src="/files/rFrgfhh4bNYWYrTEyUDV" alt=""><figcaption><p>Fig1: <strong>Züs Consensus Protocol</strong></p></figcaption></figure>

#### **Key Participants**

* **Miners:** Responsible for block production and verification. Miners store the **current state of the blockchain** but not the full history.
* **Sharders:** Store full blockchain history, ensuring long-term data availability. They do not participate in block validation.
* **Generators (Leaders):** A subset of miners chosen to propose new blocks in each round.
* **Replicas (Verifiers):** Other miners who validate the block and sign it using verification tickets.

### **Consensus Process**

The consensus operates in rounds, where miners and sharders work together to finalize new blocks.

#### **Rounds and Subrounds**

* A round consists of the process of producing a single block.
* Subrounds occur if the generator fails to produce a block within the allotted time.
* Miners notarize blocks based on the votes they receive from verifiers.

#### **Block Production Workflow**

1. A generator miner (leader) is selected to propose a block.
2. Replicas verify the block and generate signed verification tickets.
3. If a block receives 2/3+ approvals, it is notarized.
4. Miners broadcast the notarized block to sharders, who store it permanently.
5. If a block is not notarized, a new subround starts, and the next generator takes over.

### **Consensus Guarantees**

Züs ensures three key properties in its consensus mechanism:

1. **Liveness:** The blockchain continuously progresses, generating new blocks in a sequential manner.
2. **Safety:** Every honest node eventually reaches the same correct state.
3. **Finalization:** Once a block is finalized, all future blocks extend this blockchain, preventing forks.

These properties ensure that **once a block is validated, it becomes immutable**.

### **Threat Model and Byzantine Fault Tolerance**

Züs' consensus is stable as long as fewer than 1/3 of miners act maliciously. The protocol assumes zero-delay adversaries, meaning attackers can coordinate in real time.

#### **Byzantine Fault Tolerance (BFT)**

* Even with adversarial actors, the system ensures that honest nodes reach the same state.
* If a miner produces invalid blocks, the network will reject them and switch to another generator.

#### **Synchrony Assumptions**

The protocol assumes a synchronous network, meaning:

* Every node has a bounded network delay (Δ).
* Messages must reach all honest nodes within Δ.
* Synchronization prevents adversaries from introducing hidden forks.

### **Handling Network Delays and Failures**

#### **Delayed Nodes**

* Nodes that fall behind can sync back to the network using notarization events.
* This prevents long-term splits or chain divergence.

#### **Optimistic Responsiveness**

* If a block is verified quickly, the network does not wait for timeouts.
* The next round starts immediately, speeding up consensus.

This means that blocks are finalized as fast as the network latency allows, ensuring high throughput.

### **Finalization of Blocks**

Finalization guarantees that a block and its predecessors cannot be reversed. This is achieved through the lock-commit mechanism, inspired by HotStuff and Tendermint.

#### **Finalization Process**

1. In round r, at least one block is notarized.
2. If all notarized blocks extend the same block B(r-2), that block becomes finalized.
3. This prevents forks and ensures every honest node agrees on the same history.

#### **Probabilistic Finality**

Even if the above conditions are not met immediately, the next rounds will eventually converge to a single chain, ensuring eventual finalization.

### **Attack Vectors and Mitigation**

Züs' protocol is designed to withstand various attack scenarios.

#### **Trigger Timeout Attack**

* A malicious leader can delay rounds by equivocating (sending different blocks to different nodes).
* Solution: Honest nodes will switch to a new leader if timeout occurs.

#### **Delayed Finalization Attack**

* An adversary may create multiple competing blocks to delay finalization.
* Solution: The network eventually selects the longest valid chain, resolving conflicts.

#### **Miner Forfeit Attack**

* A malicious leader may intentionally extend a weaker block to deprive another miner of rewards.
* Solution: Honest miners always extend the heaviest notarized block, ensuring fair rewards.

These mechanisms ensure that even under adversarial conditions, the blockchain continues to function securely and efficiently.

### **Protocol Complexity and Performance**

Züs' consensus protocol achieves high throughput with minimal overhead.

#### **Complexity Analysis**

* Best-case scenario: O(n²) messages at network latency speed.
* Worst-case scenario: O(f × Δ) latency, where f is the number of faulty nodes.

This ensures that honest transactions are finalized quickly, while attacks slow down only malicious nodes.

#### **Throughput Optimization**

* No artificial delays—blocks are notarized as soon as consensus is reached.
* High-speed notarization allows transactions to be confirmed in milliseconds.

This makes Züs one of the fastest decentralized consensus protocols available today.

Through optimistic responsiveness and notarization-based synchronization, Züs achieves scalability and security, making it a powerful solution for decentralized applications and cloud storage systems.

The Dfinity-inspired consensus model, combined with robust failure-handling mechanisms, ensures that even under network failures or adversarial conditions, the blockchain continues progressing without forks.


# Entities

The Züs blockchain is structured around key entities that ensure the secure and efficient execution of transactions, state updates, and consensus.

These entities form the foundation of the decentralized storage network, enabling users to interact with the blockchain through transactions while ensuring data integrity, security, and verifiability.

This section provides an overview of the essential blockchain entities, including:

* **Block Entity:** Represents a summary of a finalized block, including its hash, miner information, round details, and cryptographic proofs.
* **Transaction Entity:** Defines how clients interact with smart contracts and other network participants, encapsulating key details such as sender, recipient, transaction type, and cryptographic signatures.
* **Transaction Confirmation:** Validates transaction finality by linking transactions to blocks and providing proof of execution.
* **Magic Block:** Governs network-wide changes by defining the active set of miners and sharders, ensuring continuity and security across view changes.

### The Block Entity

Block entity represents the summary of a block from the blockchain.

```go
type BlockSummary struct {
	Version 	      string `json:"version" msgpack:"_v"`
	CreationDate 	      common.Timestamp `json:"creation_date"`
	Hash                  string        `json:"hash"`
	MinerID               datastore.Key `json:"miner_id"`
	Round                 int64         `json:"round"`
	RoundRandomSeed       int64         `json:"round_random_seed"`
	StateChangesCount     int           `json:"state_changes_count"`
	MerkleTreeRoot        string        `json:"merkle_tree_root"`
	ClientStateHash       util.Key      `json:"state_hash"`
	ReceiptMerkleTreeRoot string        `json:"receipt_merkle_tree_root"`
	NumTxns               int           `json:"num_txns"`
	*MagicBlock           `json:"maigc_block,omitempty" msgpack:"mb,omitempty"`
}
```

<table><thead><tr><th width="242">Field</th><th>Description</th></tr></thead><tbody><tr><td>version</td><td>Version of the block. Latest is "1.0".</td></tr><tr><td>creation_date</td><td>Time when the block is created.</td></tr><tr><td>hash</td><td>Hash of the block, which represents a SHA256 hash represented in hex string for all the fields of the block concatenated together and separated with <code>:</code>.</td></tr><tr><td>miner_id</td><td>The ID of the miner generated the block.</td></tr><tr><td>round</td><td>Round when the block was generated.</td></tr><tr><td>round_random_seed</td><td>Seed number used to generate random numbers.</td></tr><tr><td>state_changes_count</td><td>Count of changes applied on the MPT state.</td></tr><tr><td>merkle_tree_root</td><td>Current root of the MPT computed from the transactions contained inside the block.</td></tr><tr><td>state_hash</td><td>Hex hash of the root of the MPT.</td></tr><tr><td>receipt_merkle_tree_root</td><td>The root of an MPT computed from the transactions of the block.</td></tr><tr><td>num_txns</td><td>Number of the transactions in the block.</td></tr><tr><td>magic_block</td><td><a href="/pages/PueNaAkJ7dfxtQ0xMxoy">Magic Block</a> entity used while generating the block.</td></tr></tbody></table>

### Transaction

Transaction represents the format of communication between the clients and the smart contracts, securely and atomically, to execute an operation on their data. It also represents the unit of work and state change in the blockchain, and the main contents of the blocks. Transactions play an important role in any blockchain, by and large.

A transaction in the Züs Network consists of the following:

```go
type Transaction struct {
	// Hash of the transaction, SHA256 of the fields of the transaction, concatenated
	// together and represented in HEX format. It's calculated automatically so no need to
	// be provided in the response body for the endpoints using this entity.
	//
	// required: false
	Hash 		string 		`json:"hash"`
	
	// Version of the transaction. Useful to differentiate between recent transactions and old ones.
	// When a change occur in the schema of the transactions and deployed to the mainnet, we need to 
	// sure that the old transactions are still replayable. That's why we use versioning here
	// along with Hard Forking in the smartcontract code.
	//
	// required: true
	// default: "1.0"
	Version 	string 		`json:"version"`
	
	// ClientID of the client issuing the transaction
	//
	// required: true
	ClientID  string `json:"client_id"`

	// Public key of the client issuing the transaction
	//
	// required: true
	PublicKey string `json:"public_key,omitempty"`

	// ToClientID - the client id of the recipient, the other party in the transaction. It can be a client id or the address of a smart contract
	//
	// required: true
	ToClientID      string           `json:"to_client_id,omitempty"`

	// ChainID - the chain id of the transaction
	//
	// required: true
	ChainID         string           `json:"chain_id,omitempty"`

	// TransactionData - the data associated with the transaction
	//
	// required: true
	TransactionData string           `json:"transaction_data"`

	// Value - a numeric value associated with this transaction. Its role is determined by the smart contract function
	//
	// required: true
	Value           currency.Coin    `json:"transaction_value"`

	// Signature - Issuer signature of the transaction
	//
	// required: true
	Signature       string           `json:"signature"`
	
	// CreationDate - the time when the transaction was created
	//
	// required: true
	CreationDate    common.Timestamp `json:"creation_date"`

	// Fee - the fee associated with the transaction
	//
	// required: true
	Fee             currency.Coin    `json:"transaction_fee"`
	
	// Nonce - the nonce associated with the transaction
	//
	// required: true
	Nonce           int64            `json:"transaction_nonce"`

	// TransactionType - the type of the transaction. 
	//	Possible values are:
	//		- 0: TxnTypeSend - A transaction to send tokens to another account, state is maintained by account.
	//		- 10: TxnTypeData - A transaction to just store a piece of data on the block chain.
	//		- 1000: TxnTypeSmartContract - A smart contract transaction type.
	// required: true
	TransactionType   int    `json:"transaction_type"`

	// TransactionOutput - the output of the transaction
	//
	// required: true
	TransactionOutput string `json:"transaction_output,omitempty"`

	// OutputHash - the hash of the transaction output
	//
	// required: true
	OutputHash        string `json:"txn_output_hash"`

	// Status - the status of the transaction.
	//
	// TxnSuccess = 1 - Indicates the transaction is successful in updating the state or smart contract
	// TxnError   = 2 - Indicates a transaction has errors during execution
	// TxnFail    = 3 - Indicates a transaction has failed to update the state or smart contract
	//
	// required: true
	Status            int    `json:"transaction_status"`
}
```

### Transaction Confirmation

After the transaction is selected in a block and the block is finalized, the sharder fires an event to add transaction confirmation, which is then added to the EventDB. For a client to make sure their transaction was successful, or to check the error in case of failure, they need to query the confirmation from the [Sharder API](/zus-docs/http-apis#sharder-node-api).

```go
type Confirmation struct {
	Version           string       `json:"version"`
	Hash              string       `json:"hash"`
	BlockHash         string       `json:"block_hash"`
	PreviousBlockHash string       `json:"previous_block_hash"`
	Transaction       *Transaction `json:"txn,omitempty"`
	datastore.CreationDateField
	MinerID               datastore.Key `json:"miner_id"`
	Round                 int64         `json:"round"`
	Status                int           `json:"transaction_status"`
	
	// low level fields
	RoundRandomSeed       int64         `json:"round_random_seed"`
	StateChangesCount     int           `json:"state_changes_count"`
	MerkleTreeRoot        string        `json:"merkle_tree_root"`
	MerkleTreePath        *util.MTPath  `json:"merkle_tree_path"`
	ReceiptMerkleTreeRoot string        `json:"receipt_merkle_tree_root"`
	ReceiptMerkleTreePath *util.MTPath  `json:"receipt_merkle_tree_path"`
}
```

<table><thead><tr><th width="236">Field</th><th>Description</th></tr></thead><tbody><tr><td>version</td><td>Default is "1.0". Reflects the used version of the schema.</td></tr><tr><td>hash</td><td>Hash of the transaction, acts as a unique identifier.</td></tr><tr><td>block_hash</td><td>Hash of the block, acts as a unique identifier.</td></tr><tr><td>previous_block_hash</td><td>Hash of the previous block, acts as a unique identifier.</td></tr><tr><td>txn</td><td><a href="#transaction">Transaction</a> entity of the transaction related to this confirmation.</td></tr><tr><td>miner_id</td><td>ID of the miner generated the block contained this transaction.</td></tr><tr><td>round</td><td>Round when the block contained this transaction was generated.</td></tr><tr><td>transaction_status</td><td>Status of the transaction. Same as in <a href="#transaction">Transaction Entity</a>.</td></tr><tr><td>round_random_seed</td><td>Random seed of the round contained this txn.</td></tr><tr><td>state_changes_count</td><td>Count of change in state associated with the block. Explained in <a href="/pages/4oqBni55iLVrAc2pPheb">Block Entity</a>.</td></tr><tr><td>merkle_tree_root</td><td>Current root of the merkle tree computed from the transactions contained inside the block.</td></tr><tr><td>merkle_tree_path</td><td>Path of the hash of the transaction in merkle tree of txns.</td></tr><tr><td>receipt_merkle_tree_root</td><td>The root of a merkle tree computed from the transaction hashes of the block.</td></tr><tr><td>receipt_merkle_tree_path</td><td>Path of the hash of the transaction in the merkle tree of txn receipts.</td></tr></tbody></table>

### Magic Block

Magic Block is an entity that contains meta information and configuration of the blockchain. It's changed during the view change process where it defines the new Active Set (set of miners/sharders contributing to the generation of the blocks in the blockchain) and the new hyper-parameter of the view change process (T, K, N).

```go
type MagicBlock struct {
	Hash 		       string		   `json:"hash"`
	PreviousMagicBlockHash string              `json:"previous_hash"`
	MagicBlockNumber       int64               `json:"magic_block_number"`
	StartingRound          int64               `json:"starting_round"`
	Miners                 *node.Pool          `json:"miners"`
	Sharders               *node.Pool          `json:"sharders"`
	ShareOrSigns           *GroupSharesOrSigns `json:"share_or_signs"`
	Mpks                   *Mpks               `json:"mpks"`
	T                      int                 `json:"t"`
	K                      int                 `json:"k"`
	N                      int                 `json:"n"`
}
```

<table><thead><tr><th width="236">Field</th><th>Description</th></tr></thead><tbody><tr><td>Hash</td><td>SHA256 Hash of the magic block fields concatenated with each other, in Hexadecimal format.</td></tr><tr><td>PreviousMagicBlockHash</td><td>The hash of the magic block previous to this magic block.</td></tr><tr><td>MagicBlockNumber</td><td>The order of this magic block.</td></tr><tr><td>StartingRound</td><td>Round where this magic block started to be used.</td></tr><tr><td>Miners</td><td>The set of the miners used in generating the blocks.</td></tr><tr><td>Sharders</td><td>The set of the sharders used in generating the blocks.</td></tr><tr><td>ShareOrSigns</td><td>Shares and signs are pieces of information used to build the active set during the phases of the view change process.</td></tr><tr><td>Mpks</td><td>Set of Miner Public Keys.</td></tr><tr><td>T</td><td>Threshold of signatures to verify a signature.</td></tr><tr><td>K</td><td>The threshold of signatures needed for the view change to be successful.</td></tr><tr><td>N</td><td>The maximum number of miners, n.</td></tr></tbody></table>


# User Authentication and Wallet Management System

This document describes the comprehensive architecture and implementation details of the Enterprise User Authentication and Wallet Management System, which integrates Okta, Firebase, 0box, zVault, and zAuth to securely manage enterprise user identities, authentication flows, cryptographic wallets, and transaction validation within Zus services.

### **Main Components and Their Roles**

#### **Architecture-Level Components**

The system comprises multiple integrated services:

| Component                                           | Function                                                                                                        |
| --------------------------------------------------- | --------------------------------------------------------------------------------------------------------------- |
| **Okta (OAuth2 Provider)**                          | Stores enterprise user information and handles authentication for registered clients.                           |
| **Firebase (Identity Verification and JWT Issuer)** | Manages all Züs users and verifies Okta authentication before issuing its own JWT token.                        |
| 0box                                                | Controls access to zAuth and zVault, ensures wallet security, and manages registration expirations.             |
| zVault                                              | Stores user wallets and cryptographic keys, requiring JWT-based authentication, creates enterprise user wallets |
| zAuth                                               | Handles transaction signing, ensuring that only authorized users can perform secure actions                     |

### **Authentication and Access Flow**

<figure><img src="/files/JIy2pJbHuZybHHkF8qlm" alt=""><figcaption></figcaption></figure>

Each service interacts to maintain **robust security, administrative oversight, and secure wallet management**:

**Step 1: Admin Registers Users in Okta**

* Enterprise users are registered in Okta, which stores their credentials

**Step 2: User Logs in via Okta**

* Users authenticate using email/password, and Okta generates a JWT auth token.

**Step 3: User Signs in with Firebase (Using Okta Token for Verification)**

* Users present their Okta JWT token to Firebase as proof of authentication.
* Firebase verifies the Okta token before issuing its own Firebase JWT token.
* This ensures that only authenticated Okta users can interact with Firebase services.

**Step 4: JWT-Based Authentication for Vault Access**

* Users authenticate with 0box using their Firebase JWT token.
* 0box validates access and provides a JWT for accessing zVault

**Step 5: Wallet Generation and Registration in zVault**

* The wallet is generated and registered in zVault using the JWT vault token for authentication.

**Step 6: Transactions Require JWT Authentication via zAuth**

* Any transaction or sensitive operation requires a valid JWT vault token.
* zAuth verifies the token before signing transactions.

**Step 7: 0box Manages Registration Expirations**

* If necessary, 0box can revoke a user's registration, restricting access to wallets and authentication services

### **Security and Authentication Mechanisms**

#### **Multi-Layered Authentication**

* Each component issues its own JWT token to authorized users, ensuring secure access.
* Firebase verifies Okta authentication before issuing its token, ensuring enterprise users are authenticated.
* Wallets are generated and registered securely in zVault.
* 0box acts as the central access controller, regulating interactions with zAuth and zVault.
* Multiple authentication layers (Okta + Firebase + JWTs) enhance security and identity verification.

### **Frequently Asked Questions (Q\&A)**

**Q: Does the user generate the wallet, or does zVault create it for them?**

**A:** For enterprise users, wallets are securely generated directly in zVault. Sensitive keys (mnemonics and master keys) are never exposed to the client.

**Q: Can Okta admins access a user’s wallet if they control the login?**

**A:** Yes, zVault generates a pair of split-keys for admins, allowing continuous access to user wallets, even post-account revocation.

**Q: What happens to the user’s wallet and data if they are revoked or leave?**

**A:** User access is immediately revoked, rendering the wallet inactive for the user. Admins retain access via the provided split-key mechanism, ensuring continuous administrative control.

### **Benefits of Enterprise Integration with Zus**

* **Enhanced Security:** Multi-layered authentication safeguards user wallets and sensitive transactions.
* **Automated User Management:** Instant synchronization and revocation of user access through webhook integration.
* **Administrative Continuity:** Admin-level split-key ensures continuous secure access to wallets post-user account deletion or revocation.
* **Better User Experience:** OAuth2-based Okta integration simplifies user identity management.

This system ensures secure authentication, controlled access to user wallets, and transaction security using JWT-based authentication.

By integrating Okta and Firebase for identity management and leveraging 0box for access control, the system maintains strict security policies while ensuring smooth user interactions.


# OKTA Integration

OKTA is an OAuth2 authentication service that allows different organizations to be used for authentication in Zus services.

To integrate OKTA with Zus, an organization must follow a structured onboarding process that involves coordination with Zus management and proper configuration of authentication and user management settings.

Below are the steps and required details for setting up an OKTA organization in Zus.

### **1. Prerequisites**

Before integrating OKTA with Zus, **organizations must coordinate with Zus management** to facilitate the onboarding process. This includes:

* Setting up an **OKTA organization**.
* Creating an **Admin User** who will have **full access to all user wallets**, including those of deleted users.

### **2. Required Organization Details**

The organization must provide the following details to Zus management to enable integration:

#### **Basic Information**

These details will be displayed on Zus services and are essential for the organization’s identity:

* **Name** – The organization's name as it should appear on Zus services.
* **URL** – The official website link of the organization.
* **Description** – A short description of the organization's operations and purpose.

#### **OKTA Application Credentials**

These credentials must be retrieved from the **OKTA Application Settings** page in the OKTA dashboard:

* **Domain** – The organization's domain from OKTA.
* **Client ID** – Unique identifier for the OKTA application.
* **Client Secret** – Secret key associated with the OKTA application for secure authentication.
* **Admin Client ID** – The Admin User's Client ID, specifically created to manage user wallets, even if users are deleted.

#### **Where to Find These Credentials?**

1. Navigate to **Okta OAuth2 Manage Dashboard > Applications > Applications > (Selected Application) > Settings**
2. Copy Domain, Client ID, and Client Secret.
3. Create an Admin User and retrieve its Client ID.

<figure><img src="/files/usoNwWq6tvRGp8Tp72BS" alt=""><figcaption><p>Fig1: Application Settings</p></figcaption></figure>

### 3. Configuring Application URIs and Web Origins

To ensure proper redirection after successful authentication, the following settings must be configured in the OKTA application:

#### **Allowed Callback URLs**

After the user authenticates, OKTA will redirect the user to one of these URLs.

<figure><img src="/files/TS352ZhJ6p21zW0QrhsW" alt=""><figcaption><p>Fig3: Allowed Callback URLs</p></figcaption></figure>

**Example:**

```
https://blimp.software/authentication
```

Multiple valid URLs can be specified, separated by commas. Ensure that the URLs start with `https://` as callbacks will fail otherwise.

#### **Allowed Web Origins**

This setting ensures that Zus services can properly interact with OKTA authentication.

<figure><img src="/files/WIgeZbhNFimYgM2PHkZ1" alt=""><figcaption><p>Fig4: Allowed Web Origins</p></figcaption></figure>

**Example:**

```
https://blimp.software
```

Wildcards can be used at the subdomain level, but query strings and hash information are ignored.

These settings must be configured by the **organization owner** to allow proper redirection to Zus services after user authentication.

### **4. Setting Up User Removal Webhook**

To ensure account deletions are properly managed, the organization needs to configure a User Removal Webhook in OKTA.

Here are steps to Configure Back-Channel Logout Webhook.

1. Navigate to **Okta OAuth2 Manage Dashboard → Applications → Applications → (Selected Application) → Settings → OpenID Connect Back-Channel Logout**.
2. Locate the "Back-Channel Logout" section. Enter the Webhook URL: Use the Zus-provided webhook endpoint

```
https://0box.mainnet.zus.network/v2/okta/webhook?name={organization_name}
```

4. Select "Selected Initiators Only" in Back-Channel Logout Initiators.
5. Enable Specific Logout Conditions: Ensure that the following options are selected:
   1. Account Deleted
   2. Account Deactivated

<figure><img src="/files/Ked3RTcCGOpoPFai9K21" alt=""><figcaption><p>Fig5: OKTA Configuration</p></figcaption></figure>

If organization is intended to rotate secrets. Please connect with Zus management and we will enable removal\_protection mode not to remove the organization because of non-actual secrets.

By following these steps, organizations can seamlessly integrate OKTA with Zus, ensuring secure, automated user management.


# Key Management System (KMS)

The **Key Management System (KMS)** in the 0Chain network enhances security by introducing split key mechanisms for transactions and messages.

This ensures that signature-based authentication is performed securely using a dual-key approach, reducing the risk of key compromise.

* **Standard Signature Mode**: In the traditional signature mechanism, a single key pair is used:
  * The **private key** generates the signature.
  * The **public key** (client key) verifies the signature.
* **KMS Mode**: In **KMS mode**, two key pairs are used to generate a signature:
  * The **first key pair** is used by the user to create an initial signature.
  * The **second key pair** is securely managed within the 0Chain infrastructure and is inaccessible to the end user.
  * The **final signature** is formed by combining both signatures, which is then verified using the user's public key.

This approach ensures enhanced security and enables the concept of **split keys**, allowing controlled access and revocation without exposing the master private key.

{% hint style="info" %}
This approach is used in provider renting logic. With its help 0chain operational wallet is not exposed to the user and user can use its split key instead. When renting period ends, that split key is revoked.
{% endhint %}

### KMS Components: ZVault and ZAuth

KMS operations rely on two essential services: **ZVault** and **ZAuth**.

#### **ZVault**

ZVault acts as a **secure key storage and management system**. It is responsible for:

* Holding both **master and split keys** for user wallets.
* Generating **split keys** based on the user’s master private key.
* Managing **permissions and revocation** of split keys.
* Ensuring secure storage using **Enclave hardware encryption**, which provides an additional layer of protection against unauthorized access.

**Key Request Process**

1. The user initiates a **key request** using a **JWT (JSON Web Token) for enterprise authentication**.
2. The request is sent to **ZVault**, which validates the request and determines whether to grant access to the key shards.
3. **ZVault retrieves the necessary key shard** and assigns it a **TTL (Time-To-Live)** to ensure temporary access.

{% hint style="info" %}
TTL is always set to 0 (infinite) as of now, but will be implemented in the future.
{% endhint %}

**Security Considerations**

* **Enterprise-level authentication with JWT** ensures only authorized systems or users can request keys.
* **Encryption in transit and at rest** ensures that the key shard remains secure.

#### **ZAuth**

ZAuth is responsible for **signature generation and combination.**

It ensures that transactions are authorized using the KMS approach while maintaining compliance with access control policies.

**S**igning Process

1. A sign request is generated, typically for a transaction or message verification initiated by the user.
2. ZAuth receives the key shard, along with the TTL (Time-To-Live) and authentication details.
3. ZAuth verifies the requestor’s permissions using the authentication metadata to ensure that the operation is authorized.
4. If the request is valid, ZAuth proceeds to generate a second signature using infrastructure-managed keys, which are securely stored.
5. ZAuth then combines the user-generated signature (created with their private key) and the infrastructure-generated signature into a final verifiable signature.
6. The final signature is returned to the requestor, enabling them to use it for transaction execution or message validation.

**Security Considerations**

* ZAuth does not expose private keys, ensuring that signing operations occur in a secure enclave.
* Multi-signature validation ensures that all requests go through a proper verification process.
* Audit logs and tracking mechanisms allow for monitoring and forensic analysis in case of security incidents.

### **Workflow Diagram**

The image below illustrates the interaction between ZVault and ZAuth in the key management and signing process:

<figure><img src="/files/41KF1qRZEb7mhmYfS3VD" alt=""><figcaption><p>Fig1: KMS Process</p></figcaption></figure>

1. User initiates a key request. The request includes a JWT (JSON Web Token) for enterprise authentication. This request is sent to ZVault for key management.
2. ZVault generates a split key. ZVault holds the user's master private key. It generates split keys based on the user’s master private key. These split keys allow wallet sharing with limited permissions.
3. User signs the request with their split key. The first signature is created on the user side using the split key. This signature confirms the identity of the user.
4. Request is sent to ZAuth for the second signature. ZAuth generates a second signature using a hidden infrastructure key. This key is not available to the end user, ensuring secure transaction handling.
5. Signatures are combined. ZAuth merges the user’s signature with the infrastructure signature. This combined signature is then verified by the user’s public client key.
6. Final request Auth Header is forwarded.

This architecture ensures **a secure, permission-controlled, and revocable key signing process** while preventing full key exposure at any step.

### Benefits of KMS Mode

* **Enhanced security**: User wallets operate with split keys, preventing unauthorized access and minimizing exposure to attacks.
* **Wallet sharing with limited permissions**: Specific operations can be delegated to users without full wallet access, enabling controlled access management.
* **Revocation of split keys**: Shared keys can be revoked when needed, ensuring controlled access to wallet functions.
* **Minimized risk in provider renting logic**: Enables safe interaction with 0Chain operational wallets while ensuring the user’s transactions remain secure and independent.
* **Secure multi-party access**: Ensures multiple users can interact with the same wallet while maintaining distinct access permissions.

### **API Documentation**

For API details, check below api documentation:

## Deletes existing master key.

> Deletes existing master key, propagating changes to Zauth.

```json
{"openapi":"3.1.1","info":{"version":"0.0.1"},"paths":{"/delete/:client_id":{"post":{"description":"Deletes existing master key, propagating changes to Zauth.","summary":"Deletes existing master key.","parameters":[{"type":"string","description":"0box generated JWT token","name":"X-Jwt-Token","in":"header","required":true}],"responses":{"200":{"description":"OK"},"400":{"description":"Bad Request"},"500":{"description":"Internal Server Error"}}}}}}
```

## Generate new split key.

> Generates new split key using previously stored or generated master key, propagating changes to zauth.

```json
{"openapi":"3.1.1","info":{"version":"0.0.1"},"paths":{"/key/:client_id":{"post":{"description":"Generates new split key using previously stored or generated master key, propagating changes to zauth.","summary":"Generate new split key.","parameters":[{"type":"string","description":"0box generated JWT token","name":"X-Jwt-Token","in":"header","required":true}],"responses":{"201":{"description":"Created"},"400":{"description":"Bad Request"},"500":{"description":"Internal Server Error"}}}}}}
```

## GET /keys/:client\_id

> Retrieves split keys for the given master key.

```json
{"openapi":"3.1.1","info":{"version":"0.0.1"},"paths":{"/keys/:client_id":{"get":{"summary":"Retrieves split keys for the given master key.","parameters":[{"type":"string","description":"0box generated JWT token","name":"X-Jwt-Token","in":"header","required":true}],"responses":{"200":{"description":"OK"},"400":{"description":"Bad Request"},"500":{"description":"Internal Server Error"}}}}}}
```

## GET /restrictions

> Retrieves restrictions for the given split key.

```json
{"openapi":"3.1.1","info":{"version":"0.0.1"},"paths":{"/restrictions":{"get":{"summary":"Retrieves restrictions for the given split key.","parameters":[{"type":"string","description":"0box generated JWT token","name":"X-Jwt-Token","in":"header","required":true},{"type":"string","description":"Peer public key of the split key, which restrictions should be updated","name":"X-Peer-Public-Key","in":"header","required":true}],"responses":{"200":{"description":"OK"},"400":{"description":"Bad Request"},"500":{"description":"Internal Server Error"}}}}}}
```

## Update restrictions for the existing split key.

> Updates restrictions for existing split key, propagating changes to Zauth.

```json
{"openapi":"3.1.1","info":{"version":"0.0.1"},"paths":{"/restrictions/:client_id":{"put":{"description":"Updates restrictions for existing split key, propagating changes to Zauth.","summary":"Update restrictions for the existing split key.","parameters":[{"type":"string","description":"0box generated JWT token","name":"X-Jwt-Token","in":"header","required":true},{"type":"string","description":"Peer public key of the split key, which restrictions should be updated","name":"X-Peer-Public-Key","in":"header","required":true}],"responses":{"200":{"description":"OK"},"400":{"description":"Bad Request"},"500":{"description":"Internal Server Error"}}}}}}
```

## Revoke existing split key.

> Revokes existing split key, propagating changes to Zauth.

```json
{"openapi":"3.1.1","info":{"version":"0.0.1"},"paths":{"/revoke/:client_id":{"post":{"description":"Revokes existing split key, propagating changes to Zauth.","summary":"Revoke existing split key.","parameters":[{"type":"string","description":"0box generated JWT token","name":"X-Jwt-Token","in":"header","required":true}],"responses":{"200":{"description":"OK"},"400":{"description":"Bad Request"},"500":{"description":"Internal Server Error"}},"requestBody":{"content":{"application/x-www-form-urlencoded":{"schema":{"type":"string"}}},"description":"Public key of split key to be removed","required":true}}}}}
```

## Share existing split key to the givens user.

> Shares previously created split key to the given user.

```json
{"openapi":"3.1.1","info":{"version":"0.0.1"},"paths":{"/share":{"post":{"description":"Shares previously created split key to the given user.","summary":"Share existing split key to the givens user.","parameters":[{"type":"string","description":"0box generated JWT token","name":"X-Jwt-Token","in":"header","required":true}],"responses":{"200":{"description":"OK"},"400":{"description":"Bad Request"},"500":{"description":"Internal Server Error"}}}}}}
```

## Store 0box wallet private key.

> Stores external 0box generated wallet private key as master key used to generate new split keys.

```json
{"openapi":"3.1.1","info":{"version":"0.0.1"},"paths":{"/store":{"post":{"description":"Stores external 0box generated wallet private key as master key used to generate new split keys.","summary":"Store 0box wallet private key.","parameters":[{"type":"string","description":"0box generated JWT token","name":"X-Jwt-Token","in":"header","required":true}],"responses":{"201":{"description":"Created"},"400":{"description":"Bad Request"},"500":{"description":"Internal Server Error"}}}}}}
```

## Generate new wallet.

> Generates new wallet used as master key to generate new split keys.

```json
{"openapi":"3.1.1","info":{"version":"0.0.1"},"paths":{"/wallet":{"post":{"description":"Generates new wallet used as master key to generate new split keys.","summary":"Generate new wallet.","parameters":[{"type":"string","description":"0box generated JWT token","name":"X-Jwt-Token","in":"header","required":true}],"responses":{"201":{"description":"Created"},"400":{"description":"Bad Request"},"500":{"description":"Internal Server Error"}}}}}}
```

## GET /wallets

> Retrieves split wallets for the given master key.

```json
{"openapi":"3.1.1","info":{"version":"0.0.1"},"paths":{"/wallets":{"get":{"summary":"Retrieves split wallets for the given master key.","parameters":[{"type":"string","description":"0box generated JWT token","name":"X-Jwt-Token","in":"header","required":true}],"responses":{"200":{"description":"OK"},"400":{"description":"Bad Request"},"500":{"description":"Internal Server Error"}}}}}}
```

## GET /wallets/shared

> Retrieves shared split keys shared with the given user.

```json
{"openapi":"3.1.1","info":{"version":"0.0.1"},"paths":{"/wallets/shared":{"get":{"summary":"Retrieves shared split keys shared with the given user.","parameters":[{"type":"string","description":"0box generated JWT token","name":"X-Jwt-Token","in":"header","required":true}],"responses":{"200":{"description":"OK"},"400":{"description":"Bad Request"},"500":{"description":"Internal Server Error"}}}}}}
```


# Event Tags and Processing

This section documents all event types emitted and consumed within the 0box platform, primarily via the **KafkaEventsTopic** and **KafkaBlobberMonitorEventsTopic**. These events represent blockchain state transitions or service-side activities, and they are used to:

* Persist blockchain/provider/user state in the event store DB
* Trigger downstream processes like indexing, metrics aggregation, allocation updates, or Redis publishing

## Kafka Topics

#### 1. **KafkaEventsTopic**

* Used for **core blockchain and provider events**.
* Events are **grouped by blockchain round and source**.
* Processed in **batches**, atomically inside a DB transaction.
* After DB update, certain events are **published to Redis** for real-time tracking (e.g., user rewards, finalised blocks).

#### 2. **KafkaBlobberMonitorEventsTopic**

* Used for **real-time blobber monitoring stats** (e.g., disk usage, availability).
* Events are **processed immediately**, one at a time.
* No grouping or consensus logic.
* Data is unmarshalled into `BlobberMonitoring` objects and stored in the DB.

## Event Tags

Below are all tags handled by the `EventStore.Process` logic. Tags are grouped by entity type.

### Block Events

| Tag                | Description                                                        |
| ------------------ | ------------------------------------------------------------------ |
| `TagFinalizeBlock` | Adds or updates block, increments finalized block count for miner. |

### User Events

| Tag                     | Description                       |
| ----------------------- | --------------------------------- |
| `TagAddOrOverwriteUser` | Adds or updates a user in the DB. |

### Transaction Events

| Tag                  | Description                                               |
| -------------------- | --------------------------------------------------------- |
| `TagAddTransactions` | Adds transactions, indexes them in Elasticsearch (async). |

### Blobber Events

| Tag                                    | Description                                             |
| -------------------------------------- | ------------------------------------------------------- |
| `TagAddBlobber`                        | Adds a new blobber.                                     |
| `TagUpdateBlobber`                     | Updates blobber metadata or config.                     |
| `TagDeleteBlobber`                     | Deletes blobber from system.                            |
| `TagUpdateBlobberAllocatedSavedHealth` | Updates allocated size, saved data, and health metrics. |
| `TagUpdateBlobberTotalStake`           | Updates total delegated stake for a blobber.            |
| `TagUpdateBlobberTotalOffers`          | Updates the number of storage offers available.         |

### Authorizer Events

| Tag                             | Description                              |
| ------------------------------- | ---------------------------------------- |
| `TagAddAuthorizer`              | Adds an authorizer to the system.        |
| `TagDeleteAuthorizer`           | Removes an authorizer from the system.   |
| `TagUpdateAuthorizerTotalStake` | Updates the total stake for authorizers. |

### Validator Events

| Tag                            | Description                    |
| ------------------------------ | ------------------------------ |
| `TagAddOrOverwiteValidator`    | Adds or updates a validator.   |
| `TagUpdateValidator`           | Updates validator metadata.    |
| `TagUpdateValidatorStakeTotal` | Updates total validator stake. |

### Miner Events

| Tag                        | Description                  |
| -------------------------- | ---------------------------- |
| `TagAddMiner`              | Adds a new miner.            |
| `TagUpdateMiner`           | Updates miner details.       |
| `TagDeleteMiner`           | Deletes a miner.             |
| `TagUpdateMinerTotalStake` | Updates miner’s total stake. |

### Sharder Events

| Tag                          | Description                    |
| ---------------------------- | ------------------------------ |
| `TagAddSharder`              | Adds a new sharder.            |
| `TagUpdateSharder`           | Updates sharder info.          |
| `TagDeleteSharder`           | Deletes a sharder.             |
| `TagUpdateSharderTotalStake` | Updates sharder’s total stake. |

### Stake Pool Events

| Tag                     | Description                                |
| ----------------------- | ------------------------------------------ |
| `TagAddDelegatePool`    | Adds a delegate pool.                      |
| `TagUpdateDelegatePool` | Updates delegate pool info.                |
| `TagStakePoolReward`    | Records rewards to a pool & blobber stats. |
| `TagStakePoolPenalty`   | Applies penalty to pool and blobber stats. |

### User Fee/Reward Events

| Tag                             | Description                      |
| ------------------------------- | -------------------------------- |
| `TagUpdateUserCollectedRewards` | Updates total rewards collected. |
| `TagUpdateUserPayedFees`        | Updates user’s total paid fees.  |

### Lock/Unlock Pool Events

| Tag                  | Description                     |
| -------------------- | ------------------------------- |
| `TagLockStakePool`   | Locks stake pool tokens.        |
| `TagUnlockStakePool` | Unlocks stake pool tokens.      |
| `TagLockReadPool`    | Locks tokens into read pool.    |
| `TagUnlockReadPool`  | Unlocks tokens from read pool.  |
| `TagLockWritePool`   | Locks tokens into write pool.   |
| `TagUnlockWritePool` | Unlocks tokens from write pool. |

### Allocation Events

| Tag                         | Description                                             |
| --------------------------- | ------------------------------------------------------- |
| `TagAddAllocation`          | Adds new storage allocation.                            |
| `TagUpdateAllocation`       | Updates an allocation. Cancels Stripe sub if cancelled. |
| `TagUpdateAllocationStakes` | Updates allocation stake pools.                         |

### Reward Minting

| Tag             | Description                        |
| --------------- | ---------------------------------- |
| `TagMintReward` | Adds mint record for user rewards. |

### Challenge Events

| Tag                            | Description                             |
| ------------------------------ | --------------------------------------- |
| `TagAddChallenge`              | Adds a new challenge.                   |
| `TagAddChallengeToAllocation`  | Associates challenge with allocation.   |
| `TagUpdateChallenge`           | Updates challenge outcome/status.       |
| `TagUpdateBlobberChallenge`    | Updates blobber challenge statistics.   |
| `TagUpdateAllocationChallenge` | Updates challenge stats per allocation. |

### Allocation Blobber Term Events

| Tag                                      | Description                                  |
| ---------------------------------------- | -------------------------------------------- |
| `TagAddOrOverwriteAllocationBlobberTerm` | Adds or overwrites allocation blobber terms. |
| `TagUpdateAllocationBlobberTerm`         | Updates blobber term for allocation.         |
| `TagDeleteAllocationBlobberTerm`         | Deletes allocation blobber term.             |

### Stat Updates

| Tag                       | Description                       |
| ------------------------- | --------------------------------- |
| `TagUpdateAllocationStat` | Updates storage allocation stats. |
| `TagUpdateBlobberStat`    | Updates blobber usage/statistics. |

### Challenge Pool

| Tag                           | Description                   |
| ----------------------------- | ----------------------------- |
| `TagAddOrUpdateChallengePool` | Updates challenge pool stats. |

### Read Pool

| Tag                 | Description                       |
| ------------------- | --------------------------------- |
| `TagInsertReadpool` | Inserts a new read pool entry.    |
| `TagUpdateReadpool` | Updates existing read pool entry. |

### Provider Reward

| Tag                        | Description                      |
| -------------------------- | -------------------------------- |
| `TagCollectProviderReward` | Logs provider reward collection. |

### Health Check Events

| Tag                        | Description                           |
| -------------------------- | ------------------------------------- |
| `TagMinerHealthCheck`      | Updates health status for miner.      |
| `TagSharderHealthCheck`    | Updates health status for sharder.    |
| `TagBlobberHealthCheck`    | Updates health status for blobber.    |
| `TagAuthorizerHealthCheck` | Updates health status for authorizer. |
| `TagValidatorHealthCheck`  | Updates health status for validator.  |

### Burn & Mint Events

| Tag                 | Description                            |
| ------------------- | -------------------------------------- |
| `TagAuthorizerBurn` | Tracks tokens burned by authorizer.    |
| `TagAddBurnTicket`  | Adds a burn ticket.                    |
| `TagAddBridgeMint`  | Adds mint record from bridge contract. |

### Shutdown/Kill Events

| Tag                   | Description                  |
| --------------------- | ---------------------------- |
| `TagShutdownProvider` | Marks provider as shut down. |
| `TagKillProvider`     | Marks provider as killed.    |

### Summary

* **KafkaEventsTopic** is critical for state sync and historic aggregation.
* Tags are mapped to specific DB models and also feed analytics systems.
* Certain events (like rewards, transactions, allocations) also drive Stripe subscription logic, search indexing, and wallet updates.
* The event system ensures **strong consistency** by grouping events per round and applying DB updates atomically.


# Workers

The 0Box platform employs a suite of background workers to manage asynchronous tasks, ensuring robust system operation and scalability without blocking user-facing APIs.

These workers handle critical background functions including Stripe-funded allocation processing, restricted blobber ticket generation, expiring storage notifications, free token disbursement, AI batch job submission, and external resource cleanup.

Each worker is designed to be:

* **Isolated** – Responsible for a single well-defined function (e.g., creating allocations, sending funding).
* **Resilient** – Capable of retrying failed operations automatically or on the next scheduled cycle.
* **Asynchronous** – Operates outside the main request/response loop, allowing longer-running or delayed tasks to be completed safely.

Periodic schedules, database state conditions, or webhook/task insertion typically trigger workers. Most include a **producer-executor model**:

* **Producers** scan the system for pending work (e.g., Stripe payments needing allocation creation).
* **Executors** carry out the actual task (e.g., calling the blockchain SDK or OpenAI API).

All workers log activity and errors for traceability. Some support **idempotent execution**, ensuring tasks can be retried without duplicating side effects. Each worker's impact on data is scoped to its purpose and may involve the database, external APIs (like Stripe or OpenAI), or in-memory state.

#### **Worker Categories**

| Worker Name                  | Domain Area             | Core Responsibility                                               |
| ---------------------------- | ----------------------- | ----------------------------------------------------------------- |
| `create_allocation`          | Storage / Stripe        | Ensures successful creation of allocations from paid Stripe tasks |
| `authorized_blobbers`        | Blobber Access Control  | Issues and stores access tickets for restricted blobbers          |
| `expiring_allocations`       | User Notifications      | Detects allocations nearing expiry and generates alerts           |
| `delete_wallet_transactions` | Database Maintenance    | Cleans historical wallet spend records for performance/compliance |
| `free_storage`               | Blockchain Config Sync  | Updates free storage parameters from smart contract config        |
| `funding_zbox`               | Token Grants            | Transfers free tokens from team wallet to eligible users          |
| `openai_batch_request`       | AI / OpenAI Integration | Submits user file/prompt batches to OpenAI asynchronously         |
| `delete_openai_files`        | OpenAI Storage Cleanup  | Periodically deletes old or unneeded files from OpenAI storage    |

### **1. `create_allocation`**

**Purpose:**\
Automatically creates or upgrades storage allocations for users who have completed Stripe payments, but where the blockchain transaction failed or was never initiated. This ensures allocations paid for via Stripe are eventually fulfilled without user intervention.

**Trigger Mechanism:**\
Runs periodically. Monitors the Stripe allocation task table for entries with `TxSuccess = false`.

**Producer Logic:**

* Queries for allocation tasks where:
  * A Stripe payment was received
  * `TxSuccess = false` (transaction not yet successful)
* Batches eligible tasks for execution, respecting concurrency limits

**Executor Logic:**

1. **Determine task type:**
   * If allocation exists → perform an *upgrade*
   * If not → create a *new allocation*
2. **New Allocation Flow:**
   * Calculate required tokens (based on data/parity shards, size, price)
   * Generate blobber authorization tickets (if needed)
   * Call `CreateAllocationForOwner` via blockchain SDK
   * Record funding via `CreateAllocationStripeRecord`
   * Capture blockchain transaction hash
3. **Upgrade Flow:**
   * Load existing allocation
   * Calculate additional token cost
   * Add/remove blobbers as needed (with auth tickets)
   * Call `UpdateAllocation` via SDK
   * Record funding used
   * Capture updated allocation ID
4. **Finalise Task:**
   * Call `UpdateStripeAllocationTask`
   * Mark `TxSuccess = true` and update DB status
   * Completed tasks are skipped in future runs

**Error Handling:**

* If blockchain call fails, task remains `TxSuccess = false`
* Retries are handled by future producer runs
* Logs all errors per attempt

**Data Affected:**

* `StripeAllocationTask` table
* Allocation records
* Funding record (via `CreateAllocationStripeRecord`)
* Blockchain transaction (via SDK)

***

### **2. `authorized_blobbers`**

**Purpose:**\
Generates and stores authorization tickets for blobbers marked as restricted. These tickets allow authenticated clients to interact with blobbers that require access control.

**Trigger Mechanism:**\
Runs periodically. Scans for blobbers where `auth_ticket` is null and `restricted = true`.

**Producer Logic:**

* Queries restricted blobbers missing `auth_ticket`
* Batches up to a configured limit
* Enqueues tasks for processing

**Executor Logic:**

1. For each blobber:
   * Call the blobber’s API endpoint to generate `auth_ticket`
   * Store the ticket in the DB (RestrictedBlobber record)
   * If it fails, apply cooldown (extend retry delay)
2. Tracks retry attempts or last-attempt time (for cooldown management)

**Failure Handling:**

* If blobber is unreachable or errors, task is not deleted
* Retry is delayed using a cooldown mechanism

**Data Affected:**

* `RestrictedBlobber` DB table
  * Fields: `auth_ticket`, timestamp, retry state

**Use Cases:**

* Enables clients to use restricted blobbers without manual ticket generation
* Ensures blobbers are ready to serve storage securely

***

### **3. `expiring_allocations`**

**Purpose:**\
Detects allocations that are nearing expiration and triggers user notifications, allowing proactive renewals or downloads before access ends.

**Trigger Mechanism:**\
Scheduled task (e.g. daily). Checks for allocations expiring in X days (1, 3, 7 etc.).

**Producer Logic:**

* Queries for allocations with expiration in the configured future window
* Creates one task per matching allocation
* Batches them per cycle

**Executor Logic:**

* For each expiring allocation:
  * Creates a notification entry in Elasticsearch
    * Message: “Your allocation expires in X days”
    * User ID and allocation ID are attached

**Side Effects:**

* Elasticsearch notifications may be consumed by:
  * User dashboard
  * Mobile/app notification service
  * (Possibly triggers push/email separately)

**Error Handling:**

* If Elasticsearch fails, logs the error
* Task will be retried on the next cycle if window still valid

**Data Affected:**

* Writes new notification documents to Elasticsearch
* Does not modify allocations themselves

***

### 4. `delete_wallet_transactions`

**Purpose:**\
Performs daily cleanup of historical entries in the `TeamWalletSpending` table, removing old wallet spending records to comply with data retention policies and improve database efficiency.

**Trigger Mechanism:**\
Runs on a fixed schedule: once every 24 hours.

**Operation Logic:**

* Begins a new database transaction
* Calls `fundingRepo.DeleteWalletSpendingData` to delete outdated rows\
  (Retention cutoff not specified — likely configurable)
* Commits the transaction if successful
* Logs and aborts if any error occurs

**Retry Behaviour:**

* No immediate retry
* Job will automatically run again the next day

**Data Affected:**

* Deletes old rows from `TeamWalletSpending` table only

**Side Effects:**

* None — purely internal cleanup

**Notes:**

* All deletions are performed transactionally
* This job ensures the table only contains recent, relevant data

***

### 5. `free_storage`

**Purpose:**\
Fetches the latest free storage and pricing configuration from the blockchain and updates the application’s global storage config accordingly.

**Trigger Mechanism:**\
Runs every 1 hour on a schedule

**Operation Logic:**

1. Calls `gosdk.zboxcore.UpdateStorageConfig()`\
   Retrieves config from the blockchain smart contract
2. Updates the system’s global storage settings:
   * `FreeAllocationSettingsSize`
   * `FreeAllocationSettingsDataShards`
   * `FreeAllocationSettingsParityShards`
   * `MaxWritePrice`
   * `CancellationCharge`
3. Changes are applied globally and are visible across all services and UIs that reference the `StorageConfig`

**Error Handling:**

* If the fetch or update fails, logs the error
* Retries on the next scheduled hour

**Data Affected:**

* In-memory global configuration (and/or cached config store)
* No user-specific data is changed

**Side Effects:**

* Ensures current system behaviour reflects updated economic limits or campaign settings

***

### 6. `funding_zbox`

**Purpose:**\
Processes pending funding tasks that send tokens from the team wallet to users (e.g. free signup tokens, promotional grants).

**Trigger Mechanism:**\
Runs periodically (frequency not specified; likely every few minutes).\
Scans for incomplete funding tasks.

**Producer Logic:**

* Queries DB for all funding tasks marked as incomplete

**Executor Logic:**

1. For each pending task:
   * Performs token transfer using blockchain SDK (from team wallet to user wallet)
   * Marks the task as complete in DB
   * Sends a user notification (via Firebase Cloud Messaging)
2. Records transaction hash and updates audit logs if needed

**Error Handling:**

* On transfer failure:
  * Task remains marked as incomplete
  * Will be retried in future run
  * Logs errors

**Data Affected:**

* Updates funding task status in DB
* May log transaction details or audit trail
* Affects user balance on-chain (not stored locally)

**Side Effects:**

* Triggers Firebase notification: “You have received X free tokens”

***

### 7. `openai_batch_request`

**Purpose:**\
Handles asynchronous batch processing of files or prompts using OpenAI’s GPT-based APIs. Used for large-scale summarisation, document parsing, etc.

**Trigger Mechanism:**\
Runs periodically to pick up pending tasks from `OpenAiBatchEntity` table.

**Producer Logic:**

* Queries DB for tasks with `status = pending`
* Locks or tags tasks to prevent duplicate execution

**Executor Logic:**

1. Reads task input: prompt, system prompt, model, ShareInfoIds
2. Downloads files from blobbers (via auth\_ticket + lookup\_hash)
3. Prepares `.jsonl` file:
   * If image: uploads to S3, includes URL in prompt
   * If text: embeds content directly
   * Constructs structured OpenAI prompts per file
4. Uploads `.jsonl` to OpenAI Files API
5. Submits batch job to OpenAI’s chat/completion API
6. Stores the returned Batch ID in the database
7. Deletes any temp files/S3 uploads

**Post-Processing:**

* Worker does **not** fetch batch results
* Retrieval is triggered separately via `GET /openai_batch_response`

**Error Handling:**

* On error:
  * Marks task as `failed`
  * Logs details
  * Task is not retried automatically unless re-submitted

**Data Affected:**

* `OpenAiBatchEntity` table (status, batch ID, etc.)
* Temporary S3 buckets and local temp files (cleaned up)

**Notes:**

* System ensures task idempotency
* Actual result delivery is separated for responsiveness

### 8. `delete_openai_files`

**Purpose:**\
Cleans up stale or unnecessary files from the OpenAI account to control storage costs and enforce data retention limits.\
Targets JSONL or temporary files uploaded during batch requests.

**Trigger Mechanism:**\
Runs **every 1 hour** on a fixed schedule.

**Operation Logic:**

1. **List Files from OpenAI:**
   * Uses OpenAI’s API to fetch all files
   * Each file includes metadata: `created_at`, `purpose`
2. **Filter for Deletion:**
   * File must meet **both** conditions:
     * Created more than **24 hours ago**
     * `purpose` is **not** `"batch"`
3. **Delete Eligible Files:**
   * For each matching file:
     * Calls OpenAI’s API to delete it permanently
4. **Log Results:**
   * Logs all deletions
   * Logs any API errors or failures

**Error Handling:**

* If listing or deletion fails:
  * Errors are logged
  * No retry is attempted within the same hour
  * Files will be re-evaluated in the next cycle

**Data Affected:**

* Only affects **OpenAI’s file storage**
* No changes made to 0Box database or internal services

**Side Effects:**

* Helps reduce cost and risk by removing stale uploaded content
* Prevents build-up of unused temporary files

**Considerations:**

* Files marked as `"batch"` are **not deleted**
  * Assumed to still be in use or retained for audit/debug purposes
* Schedule can be tuned if batch jobs complete faster/slower
* Policy may evolve based on OpenAI’s file lifecycle guarantees


# Wallet-based Authentication Flows

Zus supports multiple wallet-based authentication methods to give users flexibility in how they access the platform. Instead of traditional username/password logins, authentication relies on cryptographic signatures that prove control of a wallet address.

The backend (“Obox”) then validates this proof and issues a **Firebase Custom Token**, which the frontend uses to establish a secure session.

There are three main flows, each serving a different user scenario:

1. **Metamask / Coinbase Wallet Login**\
   Designed for users who prefer to sign in with widely used Web3 wallets. The flow issues a unique nonce, requires the user to sign it, and validates the signature before returning a session token.
2. **ZCN Mnemonic Signup/Login**\
   Built around wallets derived from Zus Cloud Network mnemonics. The mnemonic never leaves the device; instead, the frontend proves wallet ownership by signing backend-issued challenges. This flow supports both first-time signup (with reCAPTCHA) and returning user login.
3. **Partner Wallet Login**\
   Enables login through integrated partner wallets (e.g., MetaMask, Coinbase, Binance). If the wallet is recognized, the system verifies ownership and links it to an existing account. If not, the flow gracefully falls back to the ZCN mnemonic-based signup/login.

This section documents all three flows with their **step-by-step sequences, API contracts, security considerations, and error models** to help developers implement wallet-based authentication consistently across Zus applications.

***

## 1. Metamask/Coinbase Signup/Login Flow

This flow enables users to sign up or log in to the platform using their **Metamask** or **Coinbase Wallet**. It leverages wallet-based authentication and message signing to verify ownership of the wallet address before issuing a Firebase authentication token.

### Overview

* **Frontend (FE):** Initiates login requests and manages interaction with the wallet provider.
* **Obox:** Backend service that issues nonces, verifies signed messages, and generates Firebase custom tokens.
* **Wallet (Metamask or Coinbase):** Used by the user to sign messages cryptographically, proving ownership of the wallet address.

<figure><img src="/files/FVw1Lyc8F4XMcjZPnuSj" alt=""><figcaption><p>Metamask/Coinbase Signup/Login Flow</p></figcaption></figure>

The authentication process consists of **two main API calls**:

1. `GET /wallet/nonce`
2. `POST /wallet/verify`

### Step-by-Step Flow

#### 1. Request Nonce

* **Endpoint:** `GET /wallet/nonce`
* **Initiated by:** FE → Obox
* **Purpose:** Generate a unique challenge (nonce + message) for the user to sign with their wallet.

**Response Example:**

```json
{
  "message": "Login request for authentication",
  "nonce": "123456"
}
```

#### 2. Sign Message

* The FE passes the received **message** and **nonce** to the connected wallet (Metamask or Coinbase).
* The user signs the message with their wallet’s private key.
* The wallet returns the signed payload back to the FE.

#### 3. Verify Wallet Signature

* **Endpoint:** `POST /wallet/verify`
* **Initiated by:** FE → Obox
* **Purpose:** Send signed data to backend for verification.

**Request Example:**

```json
{
  "walletAddress": "0x1234abcd...",
  "signature": "0xshjads9as...",
  "provider": "coinbase",
  "nonce": "123456"
}
```

#### 4. Backend Verification

* Obox validates the request by checking:
  * The signature matches the wallet address.
  * The nonce is correct and not reused.
* If successful, Obox generates a **Firebase custom token** for the user session.

**Response Example:**

```json
{
  "message": "certified successfully",
  "data": "firebaseCustomTokenHere"
}
```

### Security Considerations

* **Nonce Uniqueness:** Prevents replay attacks. Each nonce can only be used once.
* **Message Signing:** Ensures that only the wallet owner can authenticate.
* **Firebase Custom Token:** Used to manage authenticated sessions securely on the frontend

***

## 2. ZCN Mnemonic Signup/Login Flow

This section documents the wallet-based authentication shown in the “**ZCN Mnemonic Signup/Login flow**” diagram. Users authenticate by proving control of a wallet derived from a mnemonic. The mnemonic **never leaves the device**. The backend (“**Obox**”) issues short-lived challenges and, on successful verification, returns a **firebase\_custom\_token** and **uid**. (Firebase itself isn’t shown in the diagram; see **Token usage** below.)

### Actors

* **FE (Frontend)** — Derives the wallet from the user’s mnemonic locally, requests challenges, signs them, and calls the auth APIs.
* **Obox (Backend)** — Creates challenges, verifies signatures, links public keys to users, and returns `firebase_custom_token`.

<figure><img src="/files/ZmjXdRkWB1ckbHKLGIym" alt=""><figcaption><p>ZCN Mnemonic Signup/Login Flow</p></figcaption></figure>

### When to use each flow

* **First time on a device / new user:** **Sign-up / link key** via `POST /firebase/custom-token`.
* **Returning user:** **Login** via `GET /wallet/auth/challenge` → sign → `POST /wallet/auth/verify`.

### API contracts

#### 1) Sign-up / Link Public Key

**POST** `/firebase/custom-token`

Creates (or fetches) a user linked to the provided `public_key`. Requires a valid reCAPTCHA token.

**Request**

```json
{
  "public_key": "04a162a3d4e5f...",
  "recaptcha_token": "recaptcha_token"
}
```

**Response 200**

```json
{
  "token": "firebase_custom_token",
  "uid": "firebase_user_uid",
  "phone_number": "user_phone_number",
  "email": "user_email"
}
```

**Notes**

* **Idempotent:** if the `public_key` is already linked, returns a fresh custom token and existing `uid`.
* `recaptcha_token` is validated server-side.

#### 2) Start Login (issue challenge)

**GET** `/wallet/auth/challenge`

Issues a single-use challenge the FE must sign exactly as provided.

**Response 200**

```json
{
  "random_message": "440004d8f1",
  "expires_at": 1754163986,
  "challenge_token": "69a5fd2566b46e"
}
```

**Notes**

* `expires_at` is UNIX time (seconds).
* `challenge_token` is single-use and bound to the issued `random_message`.

#### 3) Complete Login (verify signature)

**POST** `/wallet/auth/verify`

Verifies that the signature corresponds to `public_key` and the issued `random_message` and `challenge_token`.

**Request**

```json
{
  "public_key": "04a162a3d4e5f...",
  "signed_message": "3045022100a1890a6b...",
  "random_message": "440004d8f1",
  "expires_at": 1754163986,
  "challenge_token": "69a5fd2566b46e"
}
```

**Response 200**

```json
{
  "token": "firebase_custom_token",
  "uid": "firebase_uid"
}
```

**Server checks**

* `challenge_token` exists, unused, and not expired.
* `random_message` and `expires_at` match the stored challenge.
* `signed_message` verifies against `public_key` **for the exact bytes** of `random_message`.
* `public_key` is linked to a user (else return `public_key_not_found`).

### Field reference

| Field                   | Type    | Description                                                                                    |
| ----------------------- | ------- | ---------------------------------------------------------------------------------------------- |
| `public_key`            | string  | Hex/Base58 (implementation-defined). Must match FE/BE convention (compressed vs uncompressed). |
| `recaptcha_token`       | string  | reCAPTCHA token collected on FE during sign-up.                                                |
| `token`                 | string  | Firebase Custom Token to establish the FE session.                                             |
| `uid`                   | string  | User id associated with `public_key`.                                                          |
| `phone_number`, `email` | string? | Optional profile fields if stored for the user.                                                |
| `random_message`        | string  | Opaque challenge payload to sign exactly as given.                                             |
| `expires_at`            | number  | UNIX seconds until the challenge expires.                                                      |
| `challenge_token`       | string  | One-time handle for the issued challenge.                                                      |
| `signed_message`        | string  | Signature over `random_message` using the wallet private key (encoding per implementation).    |

### End-to-end sequences

#### Sign-up (first time / linking)

1. **FE → Obox**: `POST /firebase/custom-token { public_key, recaptcha_token }`
2. **Obox → FE**: `{ token, uid, phone_number?, email? }`
3. *(Out of diagram scope)* FE uses the token to start the session (see **Token usage**).

#### Login (returning)

1. **FE → Obox**: `GET /wallet/auth/challenge`
2. **FE**: Signs `random_message` locally with the mnemonic-derived key
3. **FE → Obox**: `POST /wallet/auth/verify { public_key, signed_message, random_message, expires_at, challenge_token }`
4. **Obox → FE**: `{ token, uid }`

### Security & correctness

* **Mnemonic privacy:** Mnemonic and private key never leave the FE.
* **Replay protection:** `challenge_token` is single-use; mark as consumed after success.
* **Expiry enforcement:** Reject any challenge past `expires_at` (allow small clock skew).
* **Exact-bytes signing:** FE must sign the **exact** `random_message` (no trimming, prefixes, or encoding changes).
* **Rate limiting:** Apply per IP and per `public_key` for challenge and verify.
* **Audit logs:** Record sign-ups, challenge issuance, and verification attempts with non-PII identifiers.
* **Algorithm agreement:** FE and Obox must agree on curve, signature format (e.g., DER hex vs raw 64-byte base64), and public key format.

***

## 3. User Partner Wallet Login

This flow lets a user log in with a **partner wallet** (e.g., MetaMask, Coinbase Wallet, Binance Web3). If the partner wallet isn’t recognized in our system, we **fallback to the ZCN Mnemonic Signup/Login flow**.

### Purpose

* Support passwordless login with external wallets
* Verify the user by a signed challenge
* Map the partner wallet to an existing account and **return a `firebase_custom_token`**

### Actors

* **FE (Frontend):** Connects to the chosen partner wallet, requests challenges, signs them, calls APIs.
* **Obox (Backend):** Checks existence, issues/verifies challenges, validates provider mapping, returns `firebase_custom_token`.

<figure><img src="/files/h1yiUEE4Q4h8rmZiFt3O" alt=""><figcaption><p>User Partner Wallet Login</p></figcaption></figure>

### Prerequisites

* FE can request the active wallet address from the chosen provider.
* Both sides agree on:
  * **Chain/curve:** (e.g., Ethereum `secp256k1`)
  * **Signing method:** EIP-191 `personal_sign` (or provider-specific equivalent)
  * **Key/address format:** checksum-normalized hex (all addresses should be normalized server-side)

### Data model (server)

**Table: `partner_wallets`**

* `id` (pk)
* `provider` (`metamask|coinbase|binance|...`)
* `wallet_address` (checksum-normalized, unique per provider)
* `user_id` (maps to account / `uid`)
* `wallet_id` (internal wallet identifier, if applicable)
* `created_at`, `last_login_at`, `status`

### Endpoints

#### 1) Check existence

**GET** `/wallet/partner/exists?address={addr}&provider={provider}`

**Response 200**

```json
{ "exists": true, "wallet_id": "w_123", "uid": "firebase_uid" }
```

or

```json
{ "exists": false }
```

**Notes**

* Normalize `address` before lookup.
* If `exists: false`, FE should **fallback to ZCN Mnemonic Signup/Login** (see that section).

#### 2) Issue challenge (only if exists)

**GET** `/wallet/partner/challenge?address={addr}&provider={provider}`

**Response 200**

```json
{
  "random_message": "8a4d0da9c0",
  "expires_at": 1754163986,
  "challenge_token": "c9d1f0f4a1"
}
```

**Notes**

* Single-use `challenge_token`, bound to `address`, `provider`, and `random_message`.
* `expires_at` in UNIX seconds (allow small clock skew).

#### 3) Verify signature (complete login)

**POST** `/wallet/partner/verify`

**Request**

```json
{
  "provider": "coinbase",
  "wallet_address": "0x1234...ABCD",
  "signed_message": "0x3045022100...",
  "random_message": "8a4d0da9c0",
  "expires_at": 1754163986,
  "challenge_token": "c9d1f0f4a1"
}
```

**Response 200**

```json
{
  "message": "certified successfully",
  "token": "firebase_custom_token",
  "uid": "firebase_uid",
  "wallet_id": "w_123"
}
```

**Server checks**

* `challenge_token` exists, unused, not expired.
* `random_message` & `expires_at` match the stored challenge.
* `wallet_address` and `provider` match the challenge binding.
* `signed_message` verifies for the **exact** `random_message` using `wallet_address`’s public key.
* Partner wallet record exists and maps to `wallet_id`/`uid`.

### End-to-end sequences

#### A) Happy path (wallet exists)

1. **FE → Obox:** `GET /wallet/partner/exists?address&provider`
2. **Obox:** returns `{ exists: true, wallet_id, uid }`
3. **FE → Obox:** `GET /wallet/partner/challenge?address&provider`
4. **FE:** wallet signs `random_message` via `personal_sign`
5. **FE → Obox:** `POST /wallet/partner/verify { provider, wallet_address, signed_message, random_message, expires_at, challenge_token }`
6. **Obox:** returns `{ token, uid, wallet_id }`
7. **FE:** exchanges `token` with Firebase SDK to establish the session

#### B) Fallback (wallet not found)

1. **FE → Obox:** `GET /wallet/partner/exists?address&provider`
2. **Obox:** returns `{ exists: false }`
3. **FE:** **fallback to “ZCN Mnemonic Signup/Login Flow”** to create/link an account
4. (Optional) Offer a post-signup step in profile settings to map the partner wallet

### FE notes

* Use the provider’s recommended signing method (e.g., `ethereum.request({ method: "personal_sign", params: [hexMessage, address] })` for EVM wallets).
* **Sign exactly the `random_message`** as returned; don’t add banners/prefixes unless the backend expects them.
* On `{ exists: false }`, route to **ZCN Mnemonic Signup/Login** UI.

### Optional extensions

* **Link partner wallet** in user settings (after mnemonic signup) by running the challenge/verify sequence and persisting `(provider, address) → {uid, wallet_id}`.
* **Multi-wallet accounts:** allow multiple partner wallets mapped to the same `uid`; return the active `wallet_id` used for the token.
* **Network guardrails:** include `chainId` in the challenge and enforce it at verification time.


# Cloud Deployments

The **Cloud Deployments (AWS)** section provides step-by-step guidance for deploying Züs components on Amazon Web Services.

It covers the complete lifecycle — from onboarding via the AWS Marketplace to provisioning clusters, applying prerequisites, and enabling advanced configurations like private IP networking and datalake use cases.

***

### 📌 What You’ll Find Here

* **Onboarding Flow (AWS Marketplace)**\
  How to subscribe to Züs Cache via the AWS Marketplace and register through the Blimp platform.
* **Provisioning Flow (Cluster Creation)**\
  End-to-end provisioning pipeline for deploying Züs Blobbers and ZS3 servers into your AWS account.
* **Prerequisites (EC2 Quota & IAM Policy)**\
  AWS vCPU quota requirements, IAM role setup, and security policies needed before cluster launch
* **Private IP Communication**\
  Implementation guide for enabling private IP networking between eBlobbers and zs3server, ensuring efficient, secure internal communication.

***

### Who Should Use This Section

* **Enterprise users** onboarding Züs via AWS Marketplace.
* **Cloud/DevOps engineers** provisioning clusters in AWS environments.
* **Architects** designing secure, cost-optimized Züs deployments on AWS.


# AWS vCPU Limit Prerequisites for SaaS Product

### Overview

When you launch your SaaS product, it provisions EC2 instances in your AWS account via Terraform.\
The instance types depend on the ratio you select.

By default, AWS imposes vCPU limits on EC2 instance families, which may prevent your instances from launching.\
You must request vCPU quota increases from AWS **before** launching the product.

### Required EC2 Instances by Ratio

| Ratio | EC2 Instances (Types)                      | vCPUs per Instance | Total vCPUs Needed | EC2 Instance Family Quota to Increase               |
| ----- | ------------------------------------------ | ------------------ | ------------------ | --------------------------------------------------- |
| 2/1   | <p>1 × c5n.4xlarge<br>3 × c6i.2xlarge</p>  | <p>16<br>8</p>     | 40                 | <p>c5n quota (16 vCPUs)<br>c6i quota (24 vCPUs)</p> |
| 4/1   | <p>1 × c5n.9xlarge<br>5 × c6i.2xlarge</p>  | <p>36<br>8</p>     | 76                 | <p>c5n quota (36 vCPUs)<br>c6i quota (40 vCPUs)</p> |
| 8/1   | <p>1 × c5n.18xlarge<br>9 × c6i.2xlarge</p> | <p>72<br>8</p>     | 144                | <p>c5n quota (72 vCPUs)<br>c6i quota (72 vCPUs)</p> |

### Step 1 — Check Current vCPU Limits

1. Sign in to the [AWS Management Console](https://aws.amazon.com/console/).
2. Go to **Service Quotas**.
3. Search for **"Running On-Demand Standard (A, C, D, H, I, M, R, T, Z) instances"**.
4. Look for the quota specific to the instance family:
   * `c5n`
   * `c6i`
   * [Direct link to EC2 quotas](https://console.aws.amazon.com/servicequotas/home/services/ec2/quotas)
5. Compare your current limit to the total vCPUs needed from the table above.

### Step 2 — Request vCPU Limit Increase

1. In **Service Quotas**, click the instance family quota (e.g., *Running On-Demand C instance vCPUs*).
2. Click **Request quota increase**.
3. Enter the new limit — set it **higher** than the total vCPUs you need (we recommend at least **+20% buffer**).
4. Submit the request.
5. AWS typically approves within a few hours to 1 business day.

### Step 3 — Verify Before Launch

Once AWS approves your request:

1. Go back to **Service Quotas**.
2. Confirm the new vCPU limit for each required family.
3. Proceed to launch the SaaS product.

### Example for 4/1 Ratio

If you choose a **4/1** ratio, you need:

* `c5n` quota → at least **36 vCPUs**
* `c6i` quota → at least **40 vCPUs**

We recommend requesting:

* `c5n` quota → **50 vCPUs**
* `c6i` quota → **50 vCPUs**


# Provision Flow for ZUS Cache (AWS Marketplace)

The provision flow is used when an existing Blimp user wants to provision additional ZUS Cache clusters in their AWS account.

Unlike onboarding, this flow does not require registration on the Blimp platform. However, the user must have already completed the onboarding flow at least once.

### Prerequisites

To proceed with the provision flow:

* The user must have a valid account on Blimp Software.
* The user must have already subscribed to the ZUS Cache product via AWS Marketplace.
* The user must have previously saved AWS Assume Role ARN and External ID, or must provide them again during provisioning. If the previously saved Assume Role was deleted or revoked, users must re-enter valid AWS credentials.
* **AWS EC2 vCPU Quota**
  * You must have sufficient EC2 vCPU quota in your chosen AWS region for the required instance families (`c5n` and `c6i`) based on your selected cluster ratio.
  * AWS enforces vCPU limits per instance family, which may block provisioning if limits are too low.

{% hint style="info" %}
Request \~20% higher quota than required for buffer.
{% endhint %}

**Reference guide:**

{% content-ref url="/pages/HvHbJkxLdJJvdt6WtUNM" %}
[AWS vCPU Limit Prerequisites for SaaS Product](/zus-docs/system-overview/cloud-deployments/aws-vcpu-limit-prerequisites-for-saas-product)
{% endcontent-ref %}

* **IAM Policy Requirements**
  * Before onboarding, create an IAM policy in your AWS account with the following permissions to allow Blimp to provision and manage ZUS Cache infrastructure: **File:** `zus-cache-policy.json`

```json
{
  "Version": "2012-10-17",
  "Statement": [
    { "Sid": "VPCManagement", "Effect": "Allow", "Action": [ "ec2:CreateVpc", "ec2:ModifyVpcAttribute", "ec2:DeleteVpc", "ec2:DescribeVpcs", "ec2:DescribeVpcAttribute", "ec2:DescribeAccountAttributes", "ec2:DescribeNetworkInterfaces" ], "Resource": "*" },
    { "Sid": "SubnetManagement", "Effect": "Allow", "Action": [ "ec2:CreateSubnet", "ec2:ModifySubnetAttribute", "ec2:DeleteSubnet", "ec2:DescribeSubnets" ], "Resource": "*" },
    { "Sid": "InternetGatewayManagement", "Effect": "Allow", "Action": [ "ec2:CreateInternetGateway", "ec2:AttachInternetGateway", "ec2:DetachInternetGateway", "ec2:DeleteInternetGateway", "ec2:DescribeInternetGateways" ], "Resource": "*" },
    { "Sid": "RouteTableManagement", "Effect": "Allow", "Action": [ "ec2:CreateRouteTable", "ec2:AssociateRouteTable", "ec2:DisassociateRouteTable", "ec2:CreateRoute", "ec2:ReplaceRoute", "ec2:DeleteRoute", "ec2:DeleteRouteTable", "ec2:DescribeRouteTables" ], "Resource": "*" },
    { "Sid": "SecurityGroupManagement", "Effect": "Allow", "Action": [ "ec2:CreateSecurityGroup", "ec2:UpdateSecurityGroupRuleDescriptionsIngress", "ec2:UpdateSecurityGroupRuleDescriptionsEgress", "ec2:AuthorizeSecurityGroupIngress", "ec2:AuthorizeSecurityGroupEgress", "ec2:RevokeSecurityGroupIngress", "ec2:RevokeSecurityGroupEgress", "ec2:DeleteSecurityGroup", "ec2:DescribeSecurityGroups" ], "Resource": "*" },
    { "Sid": "EC2InstanceManagement", "Effect": "Allow", "Action": [ "ec2:RunInstances", "ec2:ModifyInstanceAttribute", "ec2:TerminateInstances", "ec2:StartInstances", "ec2:StopInstances", "ec2:RebootInstances", "ec2:DescribeInstances", "ec2:DescribeInstanceTypes", "ec2:DescribeInstanceAttribute" ], "Resource": "*" },
    { "Sid": "TagManagement", "Effect": "Allow", "Action": ["ec2:CreateTags", "ec2:DeleteTags", "ec2:DescribeTags"], "Resource": "*" },
    { "Sid": "AMIAndZoneAccess", "Effect": "Allow", "Action": ["ec2:DescribeImages", "ec2:DescribeAvailabilityZones"], "Resource": "*" },
    { "Sid": "EBSVolumeManagement", "Effect": "Allow", "Action": [ "ec2:CreateVolume", "ec2:ModifyVolume", "ec2:AttachVolume", "ec2:DetachVolume", "ec2:DeleteVolume", "ec2:DescribeVolumes" ], "Resource": "*" }
  ]
}
```

### Step by Step Flow:

#### 1. Log in to Blimp Software

The user logs in to <https://blimp.software> using existing credentials.

#### 2. Navigate to ZUS Cache → Provision New Cluster (Need to be change based on UI)

In the Enterprise section, under the ZUS Cache module, the user can click “Provision New Cluster”.

#### 3. Providing the AWS Assume Role and External ID

If AWS Assume Role ARN and External ID are still valid, just leave as it is; otherwise, provide new values in the respective fields

{% hint style="info" %}
To create AWS Assume Role and external ID for ZUS Cache, you can refer to the following guide: [How to create an AWS IAM Role for SaaS access](https://docs.aws.amazon.com/IAM/latest/UserGuide/id_roles_create.html)
{% endhint %}

These values are essential for securely provisioning infrastructure in the user’s AWS account using the best practices encouraged by AWS.

#### 4. Choose Cluster Configuration

User selects the desired cluster configuration:

| Options | Data Blobbers | Parity Blobbers | Cluster Ratio |
| ------- | ------------- | --------------- | ------------- |
| 2/1     | 2             | 1               | 2:1           |
| 4/1     | 4             | 1               | 4:1           |
| 8/1     | 8             | 1               | 8:1           |

#### 5. Cluster Provisioning

Once the form is submitted, Blimp will use the provided (or previously saved) credentials.

* The system automatically provisions the new ZUS Cache cluster in the user’s AWS account.
* Provisioning status and cluster information will be shown in the ZUS Dashboard.

The user now has access to the newly provisioned cluster. All clusters can be viewed and managed from the Blimp platform.


# Onboarding Flow for ZUS Cache (AWS Marketplace)

The onboarding process allows enterprise users to subscribe to ZUS Cache via the AWS Marketplace and provision a ZUS cluster using the Blimp Software UI.

### Prerequisites

* **AWS EC2 vCPU Quota**
  * You must have sufficient EC2 vCPU quota in your chosen AWS region for the required instance families (`c5n` and `c6i`) based on your selected cluster ratio.
  * AWS enforces vCPU limits per instance family, which may block provisioning if limits are too low.

{% hint style="info" %}
Request \~20% higher quota than required for buffer.
{% endhint %}

**Reference guide:**

{% content-ref url="/pages/HvHbJkxLdJJvdt6WtUNM" %}
[AWS vCPU Limit Prerequisites for SaaS Product](/zus-docs/system-overview/cloud-deployments/aws-vcpu-limit-prerequisites-for-saas-product)
{% endcontent-ref %}

* **IAM Policy Requirements**
  * Before onboarding, create an IAM policy in your AWS account with the following permissions to allow Blimp to provision and manage ZUS Cache infrastructure: **File:** `zus-cache-policy.json`

```json
{
  "Version": "2012-10-17",
  "Statement": [
    { "Sid": "VPCManagement", "Effect": "Allow", "Action": [ "ec2:CreateVpc", "ec2:ModifyVpcAttribute", "ec2:DeleteVpc", "ec2:DescribeVpcs", "ec2:DescribeVpcAttribute", "ec2:DescribeAccountAttributes", "ec2:DescribeNetworkInterfaces" ], "Resource": "*" },
    { "Sid": "SubnetManagement", "Effect": "Allow", "Action": [ "ec2:CreateSubnet", "ec2:ModifySubnetAttribute", "ec2:DeleteSubnet", "ec2:DescribeSubnets" ], "Resource": "*" },
    { "Sid": "InternetGatewayManagement", "Effect": "Allow", "Action": [ "ec2:CreateInternetGateway", "ec2:AttachInternetGateway", "ec2:DetachInternetGateway", "ec2:DeleteInternetGateway", "ec2:DescribeInternetGateways" ], "Resource": "*" },
    { "Sid": "RouteTableManagement", "Effect": "Allow", "Action": [ "ec2:CreateRouteTable", "ec2:AssociateRouteTable", "ec2:DisassociateRouteTable", "ec2:CreateRoute", "ec2:ReplaceRoute", "ec2:DeleteRoute", "ec2:DeleteRouteTable", "ec2:DescribeRouteTables" ], "Resource": "*" },
    { "Sid": "SecurityGroupManagement", "Effect": "Allow", "Action": [ "ec2:CreateSecurityGroup", "ec2:UpdateSecurityGroupRuleDescriptionsIngress", "ec2:UpdateSecurityGroupRuleDescriptionsEgress", "ec2:AuthorizeSecurityGroupIngress", "ec2:AuthorizeSecurityGroupEgress", "ec2:RevokeSecurityGroupIngress", "ec2:RevokeSecurityGroupEgress", "ec2:DeleteSecurityGroup", "ec2:DescribeSecurityGroups" ], "Resource": "*" },
    { "Sid": "EC2InstanceManagement", "Effect": "Allow", "Action": [ "ec2:RunInstances", "ec2:ModifyInstanceAttribute", "ec2:TerminateInstances", "ec2:StartInstances", "ec2:StopInstances", "ec2:RebootInstances", "ec2:DescribeInstances", "ec2:DescribeInstanceTypes", "ec2:DescribeInstanceAttribute" ], "Resource": "*" },
    { "Sid": "TagManagement", "Effect": "Allow", "Action": ["ec2:CreateTags", "ec2:DeleteTags", "ec2:DescribeTags"], "Resource": "*" },
    { "Sid": "AMIAndZoneAccess", "Effect": "Allow", "Action": ["ec2:DescribeImages", "ec2:DescribeAvailabilityZones"], "Resource": "*" },
    { "Sid": "EBSVolumeManagement", "Effect": "Allow", "Action": [ "ec2:CreateVolume", "ec2:ModifyVolume", "ec2:AttachVolume", "ec2:DetachVolume", "ec2:DeleteVolume", "ec2:DescribeVolumes" ], "Resource": "*" }
  ]
}
```

### Step by Step Flow:

#### Step 1: Register on Blimp

Before subscribing to the ZUS Cache product, users must register on the Blimp platform.

* **Platform**: [https://blimp.software](https://blimp.software/)
* **Registration Guide**: Refer to [Registration Documentation](broken://pages/LIki3g5AuGxOAOoHdXe5)

Once registered and logged in, the user should navigate to the Enterprise section of the Blimp dashboard.

#### Step 2: Subscribe to ZUS Cache via AWS Marketplace

Within the Enterprise section of Blimp, a “Subscribe on AWS Marketplace” button is located under the ZUS Cache module.

* Click the button — the user will be redirected to the ZUS Cache AWS Marketplace

  listing.

<figure><img src="/files/sP2H1Eo2eJXbxyfnbsyJ" alt=""><figcaption></figcaption></figure>

* Complete the subscription flow on AWS Marketplace.

<figure><img src="/files/C944W3tyu9z3eP0enBCu" alt=""><figcaption></figcaption></figure>

* Upon successful subscription, AWS will redirect the user to Blimp with a temporary AWS Marketplace token appended to the URL. **Redirect format:** `https://www.blimp.software/?token=[token]`

#### Step 3: Handle AWS Marketplace Redirect

Upon redirect back to Blimp:

* The user lands on the Blimp Software dashboard.
* A pop-up dialog appears automatically requesting AWS role information.

#### Step 4: Provide AWS Assume Role Details

The user must provide the following details in the pop-up:

* AWS Assume Role ARN
* AWS External ID

{% hint style="info" %}
To create AWS Assume Role and external ID for ZUS Cache, you can refer to the following guide: [How to create an AWS IAM Role for SaaS access](https://docs.aws.amazon.com/IAM/latest/UserGuide/id_roles_create.html)
{% endhint %}

These values are essential for securely provisioning infrastructure in the user’s AWS account using the best practices encouraged by AWS.

#### Step 5: Choose ZUS Cluster Configuration

The pop-up also asks the user to select the desired cluster configuration. Each optio represents a combination of Data Blobbers and Parity Blobbers:

| Options | Data Blobbers | Parity Blobbers | Cluster Ratio |
| ------- | ------------- | --------------- | ------------- |
| 2/1     | 2             | 1               | 2:1           |
| 4/1     | 4             | 1               | 4:1           |
| 8/1     | 8             | 1               | 8:1           |

The user selects a configuration based on data durability and performance needs.

#### Step 6: Provisioning ZUS Cache Cluster

After submitting the form:

* The Blimp backend uses the provided AWS Assume Role credentials.
* It triggers an automated provisioning pipeline to deploy ZUS Cache Blobbers into the user’s AWS account.
* Cluster details and status will be displayed on the ZUS Dashboard inside Blimp once provisioning is complete.

Once provisioning is successful:

* The user can begin uploading and retrieving data via ZUS Cache.
* All management tasks, logs, and monitoring are available via the Blimp platform.

  Resources


# Private IP Communication Implementation

### Objective

Enable private IP communication between **eBlobbers** and **zs3server** by leveraging AWS VPC internal networking. This eliminates public IP traffic between these components and ensures secure, cost-efficient communication.

### Technical Architecture

#### 1. Network Infrastructure

**VPC Design**

* VPC CIDR: `10.0.0.0/16`
* Subnets:
  * **Public Subnet:** `10.0.1.0/24` (eBlobbers + Parity Blobbers)
  * **Private Subnet:** `10.0.2.0/24` (zs3server)

<figure><img src="/files/zOysaMH8vi2ZOsuROu7Z" alt="" width="375"><figcaption><p>VPC Design</p></figcaption></figure>

**Routing Architecture**

* Internet ↔ Internet Gateway ↔ Public Subnet (Blobbers)
* NAT Gateway ↔ Private Subnet (zs3server)

**Security Groups**

* **Public SG (allow-web-and-ssh):** Attached to blobber instances for internet access.
* **Private SG (allow-private-communication):** Attached to zs3server, restricting traffic to VPC-only communication.

#### 2. Instance Placement Strategy

**Blobber Instances**

* **Location**: Public subnet (`10.0.1.0/24`)
* **Access**: Internet-facing for external sync.
* **Communication**: Private IP communication to zs3server.

**zs3server Instance**

* **Location**: Private subnet (`10.0.2.0/24`)
* **Access**: Outbound internet via NAT Gateway (for updates, package downloads).
* **Communication**: Private IP endpoints for blobber interactions.

### Technical Implementation

#### 1. Terraform Infrastructure

**New Resources**

* Private subnet for zs3server
* NAT Gateway for outbound internet
* Private route table (linked to NAT Gateway)
* Security group for private communication

**Modified Resources**

* zs3server moved into private subnet
* Security groups updated for private-only communication

#### 2. Blobber Configuration

* **Dynamic Private IP Discovery**: Blobbers automatically discover zs3server private IP.
* **Auto-Generated Config Files**: Ensures updated configurations without manual intervention.
* **Continuous Health Monitoring**: Keeps communication stable and fault-tolerant.

### Implementation Status

| Component       | Status | Completion | Notes                              |
| --------------- | ------ | ---------- | ---------------------------------- |
| Infrastructure  | ✅ Done | 100%       | VPC, subnets, NAT Gateway, routing |
| Security Groups | ✅ Done | 100%       | Access control rules applied       |
| Blobber Config  | ✅ Done | 100%       | Dynamic IP discovery + monitoring  |

### Technical Deep-Dive

**Network Flow**

```
Blobber (10.0.1.x) → Private IP → ZS3Server (10.0.2.x:8080)
```

**Security Implementation**

* Network isolation: zs3server in private subnet
* Security groups enforce access policies
* Audit logging tracks all requests

### Success Metrics

* Private subnet created and verified
* NAT Gateway operational
* Security groups configured correctly
* Private IP communication active between blobbers and zs3server


# Züs Cache Preliminary Datasheet

This section introduces Züs Cache, the AWS-hosted deployment of the Züs storage platform available via the AWS Marketplace. It provides an end-to-end overview of the product’s architecture, key capabilities, configuration parameters, and benchmark results.

Züs Cache enables users to deploy a zero-trust, blockchain-secured storage cluster within their own AWS account, offering scalability, data ownership, and encrypted collaboration.

This datasheet serves as a technical reference for solution architects, DevOps engineers, and IT administrators who wish to understand the capabilities, performance characteristics, and operational parameters of Züs Cache on AWS before provisioning or onboarding the service.

***

#### **High Level Architecture**

* **ZS3Server** – a gateway interface server that allows users to interact with the Züs storage cluster using standard S3-compatible APIs.\
  Check out the Github here → <https://github.com/0chain/zs3server>
* **Blobber** – a storage server which can mount EBS volumes or connect to an EFS file system.\
  Check out the Github here → <https://github.com/0chain/eblobber>

<figure><img src="/files/08PEFzYIX01CcogL12im" alt=""><figcaption></figcaption></figure>

**Figure 1:** Züs storage architecture of a single cluster on AWS

***

#### **Recommended Allocation Parameters**

| **Settings**                   | **Description**        | **Value**                            | **Notes**                                                           |
| ------------------------------ | ---------------------- | ------------------------------------ | ------------------------------------------------------------------- |
| **Data/Parity** (erasure code) | Data and Parity Shards | 4 data, 1 parity or 8 data, 1 parity | Select 8/1 for higher throughput, lower latency, 4/1 for lower cost |
| **EBS Provisioned storage**    |                        | 64 TB or 128 TB                      | Example: 4 data × 16 TB EBS volume = 64 TB for a 4/1 cluster        |
| **EFS**                        | Usage-based storage    | Unlimited                            | Automatically tiers to EFS-IA or Archive                            |

***

#### **Performance Results**

The objective is to benchmark a single node Züs cluster performance for different data/parity combination and object sizes.\
These configurations and DevOps processes will be available on AWS Marketplace via **Blimp.Software** soon.

***

**Test Setup**

* **Eblobber**\
  HW/instance type: `c6i.2xlarge`\
  Storage: Mounted EBS (gp3): 500 GiB; IOPS 3000; Throughput 1000 MiB/s
* **ZS3Server**\
  Version used: <https://github.com/0chain/zs3server/pull/177>\
  HW/instance type: `c5n.18xlarge`\
  `zs3server.json` file:

  ```json
  {
    "encrypt": false,
    "compress": false,
    "max_batch_size": 40,
    "batch_wait_time": 70,
    "batch_workers": 72,
    "upload_workers": 72,
    "download_workers": 72,
    "max_concurrent_requests": 400
  }
  ```
* **Allocation** – created through zboxcli\
  Check out the Github here → <https://github.com/0chain/zboxcli>\
  Data/parity: 4/1 and 8/1\
  Size: 800 GB

***

**Test Procedure**

* Used **Warp** to benchmark the performance. Instructions can be found here.: <https://docs.zus.network/zus-devops/zus-network-testing/performance-test/zs3server-warp-benchmark-testing>
* To generate benchmark data, each test was conducted 3 times in a row. Commands used were as follows:

```bash
./warp put --host <zs3server-ip:port> --access-key rootroot --secret-key rootroot \
--bucket benchmark --duration 3m --concurrent 16 --obj.size 128MB

./warp get --host <zs3server-ip:port> --access-key rootroot --secret-key rootroot \
--bucket benchmark --duration 3m --concurrent 16 --obj.size 128MB --objects 32

./warp put --host <zs3server-ip:port> --access-key rootroot --secret-key rootroot \
--bucket benchmark --duration 3m --concurrent 16 --obj.size 512MB

./warp get --host <zs3server-ip:port> --access-key rootroot --secret-key rootroot \
--bucket benchmark --duration 3m --concurrent 16 --obj.size 512MB --objects 32
```

***

**Warp Results**

Results are generated based on the Warp configuration above.

**GET**

| **Metric**             | **4/1 (128 MB)** | **4/1 (512 MB)** | **8/1 (128 MB)** | **8/1 (512 MB)** |
| ---------------------- | ---------------- | ---------------- | ---------------- | ---------------- |
| **Throughput (GiB/s)** | 2.5              | 2.5              | 4.6              | 4.6              |
| **Latency (s)**        | 0.8              | 3.1              | 0.4              | 1.7              |
| **TTFB (s)**           | 0.3              | 1.0              | 0.2              | 0.4              |

**PUT**

| **Metric**             | **4/1 (128 MB)** | **4/1 (512 MB)** | **8/1 (128 MB)** | **8/1 (512 MB)** |
| ---------------------- | ---------------- | ---------------- | ---------------- | ---------------- |
| **Throughput (GiB/s)** | 1.6              | 1.9              | 2.1              | 2.4              |
| **Latency (s)**        | 1.2              | 4.0              | 0.9              | 3.3              |


# APIs

APIs provided by Züs Network nodes

Züs offer public APIs that helps users to interact with the data on-chain. This should help the users who are interested to build apps or tools on top of Züs network.

We offer the following APIs:

### Miner Node API

#### **Base URL**

Since this API is provided by the miners, the base URL is the URL of any active miner. Check available miners on mainnet in <https://mainnet.zus.network>.

#### Overview

Includes the endpoints that are provided by the miner nodes. Those endpoints provide information about the miners and the chain status. It also provides the Put Transaction endpoint used to submit transaction to the smartcontracts.

#### Reference

Check the reference for this API [here](https://github.com/0chain/0chain/blob/sprint-1.16/docs/swagger_miner.md) in 0chain repo.

### Sharder Node API

#### Base URL

Since this API is provided by the sharders, the base URL is the URL of any active sharder. Check available sharders on mainnet in <https://mainnet.zus.network>.

#### Overview

Includes the endpoints that are provided by the sharder nodes. Those endpoints provide information about the miners and the chain status. Most of them are used to view information and statistics and check transaction confirmation.

#### Reference

Check the reference for this API [here](https://github.com/0chain/0chain/blob/sprint-1.16/docs/swagger_sharder.md) in 0chain repo.

### Smart Contract APIs

#### Base URL

Since this API is provided by the sharders, the base URL is the URL of any active sharder. Check available sharders on mainnet in <https://mainnet.zus.network>.

#### Overview

Includes the endpoints that are used to explore the on-chain data (data related to the transactions). All those endpoints are GET HTTP requests that provide data from the persistence layer of the network data.

#### Reference

We have an API for each smartcontract, all in 0chain repo:

* [Miner SC](https://github.com/0chain/0chain/blob/sprint-1.16/docs/miner_sc_api.md)
* [Storage SC](https://github.com/0chain/0chain/blob/sprint-1.16/docs/storage_sc_api.md)
* [ZCN SC](https://github.com/0chain/0chain/blob/sprint-1.16/docs/zcn_sc_api.md)

### Blobber API

#### Base URL

Since this API is provided by the blobber, the base URL is the URL of any active blobber. You can get the blobber URL either from Atlus or by using [zboxcli](/zus-docs/clis/zboxcli).

#### Overview

Includes endpoints to access and manage the blobber and your stored data on it (like upload, download, move, copy, update, rename)

#### Reference

Check the reference for this API [here](https://github.com/0chain/blobber/blob/sprint-1.16/swagger.md) in blobber repo.

### 0DNS API

#### Base URL

The endpoints of this API should be based to the URL of the node locator of the network (0DNS service). For mainnet, this is <https://mainnet.zus.network/dns>.

#### Overview

Includes all the endpoints exposed by the Node Locator service, which is used by the clients that need to communicate with the nodes of the chain (Miners/Sharders) to locate them retrieving their URLs and meta-information about the network.

#### Reference

Check this API reference [here](/zus-docs/http-apis/0dns-api).


# 0DNS API

Endpoints exposed by the node locator service, 0DNS.

Here listed all the endpoints exposed by the Node Locator service, which is used by the clients that need to communicate with the nodes of the chain (Miners/Sharders) to locate them retrieving their URLs and meta-information about the network. All endpoints should be prefixed by the url of the DNS service.

### Get Network Nodes - `GET /network`

Retrieve main nodes of the network. No parameters needed.

**Response**

```
{
  "miners": [
    "https://dev2.zus.network/miner01",
    "https://dev3.zus.network/miner01",
    "https://dev1.zus.network/miner01"
  ],
  "sharders": [
    "https://dev2.zus.network/sharder01",
    "https://dev3.zus.network/sharder01",
    "https://dev1.zus.network/sharder01"
  ]
}
```

### Get Latest Magic Block - `GET /magic_block`

Magic block is a special type of blocks that contains meta information about the network and its nodes. For more information about the magic block, refer to the [Magic Block entity](broken://pages/PueNaAkJ7dfxtQ0xMxoy) page. No parameters needed.

**Response**

```
{
  "hash": "506391f07cabd7bfee330f979ba9baab498b721b748eb869ba2b5c054932c8bd",
  "previous_hash": "",
  "magic_block_number": 1,
  "starting_round": 0,
  "miners": {
    "type": 0,
    "nodes": {
      "8f9a15b9551f8552a19cf4750ef14bff3bbac83bc1decd4d5a013a7f36f7ef71": {
        "id": "8f9a15b9551f8552a19cf4750ef14bff3bbac83bc1decd4d5a013a7f36f7ef71",
        "version": "",
        "creation_date": 1669895308,
        "public_key": "a93743137c318274bf375e32c00b91439c18c0c0432eac550b2c1a54d909fa0f6669408c3208e5f68fab5aa6c36c91e1978670f17118d3fb75b854d68c1c740f",
        "n2n_host": "dev2.zus.network",
        "host": "dev2.zus.network",
        "port": 7071,
        "path": "miner01",
        "type": 0,
        "description": "dev2@gmail.com",
        "set_index": 0,
        "status": 0,
        "info": {
          "build_tag": "",
          "state_missing_nodes": 0,
          "miners_median_network_time": 0,
          "avg_block_txns": 0
        }
      },
      "96b96df7631e00d339f9a25131927c43cba9f130b075f4af09e8934c21173341": {
        "id": "96b96df7631e00d339f9a25131927c43cba9f130b075f4af09e8934c21173341",
        "version": "",
        "creation_date": 1669895308,
        "public_key": "171fbdcbd536fc64f4bcf7f2730731a1c9468210a377e4efcc83f0e3a072560231ea028c56ae6e956f74463ab6438bd375ab4d8f877dadd42914c6488cb9621b",
        "n2n_host": "dev3.zus.network",
        "host": "dev3.zus.network",
        "port": 7071,
        "path": "miner01",
        "type": 0,
        "description": "dev3@gmail.com",
        "set_index": 1,
        "status": 0,
        "info": {
          "build_tag": "",
          "state_missing_nodes": 0,
          "miners_median_network_time": 0,
          "avg_block_txns": 0
        }
      },
      "c3227e496fdf3c9aa604f3470a2bbd1249f00142150bc067996cd0d6ffcd77ea": {
        "id": "c3227e496fdf3c9aa604f3470a2bbd1249f00142150bc067996cd0d6ffcd77ea",
        "version": "",
        "creation_date": 1669895308,
        "public_key": "0e33db4984e356e7cf5963d3b83fbf6273c5d309f68f95f5dc985c7d4368bc182d6be685dd3eefdbfc3652b1c914b4a862d07ac2c0197ae68fac62c2ed4a7093",
        "n2n_host": "dev1.zus.network",
        "host": "dev1.zus.network",
        "port": 7071,
        "path": "miner01",
        "type": 0,
        "description": "dev1@gmail.com",
        "set_index": 2,
        "status": 0,
        "info": {
          "build_tag": "",
          "state_missing_nodes": 0,
          "miners_median_network_time": 0,
          "avg_block_txns": 0
        }
      }
    }
  },
  "sharders": {
    "type": 1,
    "nodes": {
      "371a09c9eec259d9d3ba794ecccdd392ecdeec4c35565ccc5977fba44e20217d": {
        "id": "371a09c9eec259d9d3ba794ecccdd392ecdeec4c35565ccc5977fba44e20217d",
        "version": "",
        "creation_date": 1669895308,
        "public_key": "c628ee0089586353bdda3476e9b70c9c91d6e0cd9e6ecb6b7d03628e6dd667245e97007fe143e47e6a67d1cd1f902e1a7ac2e9108ae9795050c5f2bafbd28ea1",
        "n2n_host": "dev2.zus.network",
        "host": "dev2.zus.network",
        "port": 7171,
        "path": "sharder01",
        "type": 1,
        "description": "dev2@gmail.com",
        "set_index": 0,
        "status": 0,
        "info": {
          "build_tag": "",
          "state_missing_nodes": 0,
          "miners_median_network_time": 0,
          "avg_block_txns": 0
        }
      },
      "afa396409ef1a78dff132f586c1f55e4725ccdc8554a727a525fcab44b3bcb16": {
        "id": "afa396409ef1a78dff132f586c1f55e4725ccdc8554a727a525fcab44b3bcb16",
        "version": "",
        "creation_date": 1669895308,
        "public_key": "163e5b04d2fbc4268af7e02a019bc0e7a623397464d695f8d3cabc997a145a11812fc5be9381964e9310a1c24762085ec224f0a1520d55ecd4e8920d56b486a3",
        "n2n_host": "dev3.zus.network",
        "host": "dev3.zus.network",
        "port": 7171,
        "path": "sharder01",
        "type": 1,
        "description": "dev3@gmail.com",
        "set_index": 1,
        "status": 0,
        "info": {
          "build_tag": "",
          "state_missing_nodes": 0,
          "miners_median_network_time": 0,
          "avg_block_txns": 0
        }
      },
      "e3cc90b550e7c5e906583897648dea5bc0cd61ae2127edb044892203384a1f33": {
        "id": "e3cc90b550e7c5e906583897648dea5bc0cd61ae2127edb044892203384a1f33",
        "version": "",
        "creation_date": 1669895308,
        "public_key": "ffb93216d151399d02357ec5b24f4a07a4667ae957fa163aaf603e7ec5a3df1bee32ef78bcb4551478ad3705016ba8c95fdba99daf02dcae3c2634654c016905",
        "n2n_host": "dev1.zus.network",
        "host": "dev1.zus.network",
        "port": 7171,
        "path": "sharder01",
        "type": 1,
        "description": "dev1@gmail.com",
        "set_index": 2,
        "status": 0,
        "info": {
          "build_tag": "",
          "state_missing_nodes": 0,
          "miners_median_network_time": 0,
          "avg_block_txns": 0
        }
      }
    }
  },
  "share_or_signs": {
    "shares": {
      "8f9a15b9551f8552a19cf4750ef14bff3bbac83bc1decd4d5a013a7f36f7ef71": {
        "id": "8f9a15b9551f8552a19cf4750ef14bff3bbac83bc1decd4d5a013a7f36f7ef71",
        "share_or_sign": {
          "96b96df7631e00d339f9a25131927c43cba9f130b075f4af09e8934c21173341": {
            "id": "",
            "message": "d9cd2ce0df45e1677e9a80a6866a728dc81f4f900de8407b9c6a7cc6c8347050",
            "share": "",
            "sign": "1 1f95773ebaba44ca362d3c6c56e9aadcac60d1a3a39048dfba228a344f2ed739 33dea02718fe85e8288089f6efa2276247abd6291d753c81cadc654e4258469"
          },
          "c3227e496fdf3c9aa604f3470a2bbd1249f00142150bc067996cd0d6ffcd77ea": {
            "id": "",
            "message": "34074c8b8ae0605369fc1f9638f4ec9cee172cefb459ba4b191d2453aa6ca564",
            "share": "",
            "sign": "1 10bd1f7168a29b8215a3b7b194c1a0d9d8dbf0cf7a95e751024bd8e7710bd0b0 23327791cf1a76cd2913a50891ea473fc07663c24baf8701794ab3d6f94ef3f4"
          }
        }
      },
      "96b96df7631e00d339f9a25131927c43cba9f130b075f4af09e8934c21173341": {
        "id": "96b96df7631e00d339f9a25131927c43cba9f130b075f4af09e8934c21173341",
        "share_or_sign": {
          "8f9a15b9551f8552a19cf4750ef14bff3bbac83bc1decd4d5a013a7f36f7ef71": {
            "id": "",
            "message": "6a3567e309f71b623739d2deb24386fcc9788f1163225aa3b756c05f398cac92",
            "share": "",
            "sign": "1 14aaa08b323db21f2f3f9d27631525a7fb2b97cad97f3337d5ff81d8c22c685f b7acb4663200f30edce6c41991c7d48e42305b9feb1de64c452266006bc662f"
          },
          "c3227e496fdf3c9aa604f3470a2bbd1249f00142150bc067996cd0d6ffcd77ea": {
            "id": "",
            "message": "df80067ccb70c759dbd313bb9e93d9da6240e5017d3f2e12d237fda7551d97b6",
            "share": "",
            "sign": "1 182512ec851506556a4228897fc78dcb0eda11aeefbfbf15e4f032b7376f348b 2917c106b04e007b55e375d26cb2c56b35efc550fd5965ac8ab1afbc12e3d35"
          }
        }
      },
      "c3227e496fdf3c9aa604f3470a2bbd1249f00142150bc067996cd0d6ffcd77ea": {
        "id": "c3227e496fdf3c9aa604f3470a2bbd1249f00142150bc067996cd0d6ffcd77ea",
        "share_or_sign": {
          "8f9a15b9551f8552a19cf4750ef14bff3bbac83bc1decd4d5a013a7f36f7ef71": {
            "id": "",
            "message": "bc91f71dbba3cd44f6e664f07916063ef858402954354200e1129f641bbbd89c",
            "share": "",
            "sign": "1 702844529627c0ffb1a40cd29b02b90f173c703abf84fa73a95bd715ed5583c 105634cd2e050eea4d7dfc6ce38e2974ac89487e370f3de507e3f47b1db838cb"
          },
          "96b96df7631e00d339f9a25131927c43cba9f130b075f4af09e8934c21173341": {
            "id": "",
            "message": "a3787d198451b056d27839cb20227340dc66dea79188100929703a5f951ec0cc",
            "share": "",
            "sign": "1 4649b4b7fa099bc1f8d0fb7c864ed7df7272c60ee6f29fff5fb042fa4ad645 1bfb6786f910e4c52999d527029c04c3618e7625512ee38f2087a93e595adceb"
          }
        }
      }
    }
  },
  "mpks": {
    "Mpks": {
      "8f9a15b9551f8552a19cf4750ef14bff3bbac83bc1decd4d5a013a7f36f7ef71": {
        "ID": "8f9a15b9551f8552a19cf4750ef14bff3bbac83bc1decd4d5a013a7f36f7ef71",
        "Mpk": [
          "1 149193bdf3444a563a4f4ac776bbfba49374776f0262b93b377f30e5649d3ad5 1a2e7868c6940f15bf56950688c26376985dcf850c35c8f754e438d28f91c705 14ae808cd1e9ac93f524a96f9f44e73028cb636931a19d4e971089eb0fb72286 fcc941c5a29381a2dedb1c186abc6f8b9bbbc1cb774ed2efa89667d2f9d51e",
          "1 9ff8f430a5be8323003a714b7d3c1dc55792971413431b585234feaf7fc2379 1cdc7a25bc42c913b00a351392cb2d5762807dab078c1bbb05c4e0fa909dbe5c 145c357ede6c97a107712a862bb4bc153311fc1e41150838e40844b6a2cefe58 8a5253e9d84d2fb6d066936ed97e64b00c20a1fd7de0b672faed6cdc35dbb3e"
        ]
      },
      "96b96df7631e00d339f9a25131927c43cba9f130b075f4af09e8934c21173341": {
        "ID": "96b96df7631e00d339f9a25131927c43cba9f130b075f4af09e8934c21173341",
        "Mpk": [
          "1 4845997dc7fe3ecc9e2992b264dcdbbadf008b6d5bf949b8b57d23c2efeac7f 37fc94a3f09139cedba07972634e42a54d59cea06c2d04ff0d4d6ad20e05195 1d54d1cce350642e7ae6a1caae81d9f0bee3e36397aa76beb12612f61db3288b 1adfe1b02a9e6bdc64fad117f7d21849bd6fc8fb1cd5d27981b9f9234002efd5",
          "1 23cdd8c60a0c8a0fe1e3d44d91ea5848e085c7c6115fc7307e2d63ae2e5410e5 22e51b03f133b1e53ad825d4e22f2bcefefbf1b652eaa774e62ccdd5502b00e8 1d03bb6dec690747ec1e1659de1a2c93e8f267a596d20b965a30811bad28ea1 22f9ade2b6f3a47d60f8ea22e19bbd5c01d81c6436932303f02857c69bffc8c2"
        ]
      },
      "c3227e496fdf3c9aa604f3470a2bbd1249f00142150bc067996cd0d6ffcd77ea": {
        "ID": "c3227e496fdf3c9aa604f3470a2bbd1249f00142150bc067996cd0d6ffcd77ea",
        "Mpk": [
          "1 16d44868531c5462f539c40c89942fe1f660124a3c120d495af9baae60464027 ef31d67e79edf882c6f85b2b4d688fe73064544c95a7a0015dca3b7b5a3f102 15f7fbb6f5aabe28274457fa5bf2017faefaf26db5b47bab463556f711760713 15e173baa89bf8bfbe013e3b8ef25f1ef67f51e071b1aa27224fb04cbfff3ef4",
          "1 24a3950914dbd84eda94a329b4e6a1049ef085038e59497304747bde6e4e7aec 21534de560851803e3d5d3f33e5c42eac88fa57b89ad414f8a5e5472f814210a 1d57305133ce377a29367ebe24d48ffc8b103b772898f2c3b410a2e68c7a9d15 10054ffdbe0afd7c9a97699807b8ed2870b4a24801d224049025a39abf43615c"
        ]
      }
    }
  },
  "t": 2,
  "k": 3,
  "n": 3
}
```


# JS API

After initializing the SDK, you can use the Züs JS SDK to perform various operations such as creating and managing allocations, uploading and downloading files, executing smart contracts, and more.

### SDK Methods Index

In this guide, we will introduce you to all the available methods provided by the Züs JS SDK.

#### Wallet Methods

The wallet methods allow you to create and manage wallets, set the wallet, and get wallet information.

| Method                   | Description                                                                     |
| ------------------------ | ------------------------------------------------------------------------------- |
| `createWallet`           | Create a new wallet. Also, helps to recover a wallet using its mnemonic phrase. |
| `createWalletKeys`       | Create a new wallet keys and mnemonic.                                          |
| `getPublicEncryptionKey` | Get the public encryption key by wallet mnemonic.                               |
| `isWalletId`             | Check whether thef wallet id is valid.                                          |
| `send`                   | Send token from one wallet to another.                                          |
| `getWalletBalance`       | Get the balance of a wallet.                                                    |
| `getUSDRate`             | Get the USD rate by token symbol. (e.g. `zcn`, `eth`)                           |

#### Burn & Mint Methods

The `initBridge` method must be called to initialize the bridge client before using the any of the burn and mint methods.

| Method                         | Description                                                                                                      |
| ------------------------------ | ---------------------------------------------------------------------------------------------------------------- |
| `initBridge`                   | Initialize the bridge for calling burn and mint functions.                                                       |
| `burnZCN`                      | Bridge method to burn ZCN tokens.                                                                                |
| `mintZCN`                      | Bridge method to mint ZCN tokens.                                                                                |
| `getMintWZCNPayload`           | Bridge method to get *Mint WZCN Payload* for a given burn transaction hash.                                      |
| `getUnprocessedWZCNBurnEvents` | Get all unprocessed WZCN burn events from the Ethereum network.                                                  |
| `getProcessedZCNBurnTickets`   | Get all processed ZCN burn tickets burned for a certain Ethereum address.                                        |
| `estimateMintWZCNGasAmount`    | Perform gas amount estimation for the given Mint WZCN transaction.                                               |
| `estimateBurnWZCNGasAmount`    | Perform gas amount estimation for the given burn WZCN transaction.                                               |
| `estimateGasPrice`             | Perform gas estimation for the given transaction using Alchemy enhanced API returning approximate final gas fee. |
| {/\*                           | `getFaucetToken`                                                                                                 |

#### Allocation Storage Methods

The allocation storage methods allow you to create, update, and manage allocations.

| Method                                   | Description                                                                                                                              |
| ---------------------------------------- | ---------------------------------------------------------------------------------------------------------------------------------------- |
| `createAllocation`                       | Creates an allocation with the specified allocation terms and preferred blobber IDs.                                                     |
| `getAllocationMinLock`                   | Retrieves the minimum lock value for the allocation creation.                                                                            |
| `listAllocations`                        | List all the allocations.                                                                                                                |
| `getAllocation`                          | Gets allocation details for a given `allocationId` from cache or the blockchain.                                                         |
| `reloadAllocation`                       | Re-fetches allocation details using `allocationId` from blockchain and updates cache.                                                    |
| `getAllocationWith`                      | Get allocation details of a free allocation or a shared allocation details by using an authTicket.                                       |
| `freezeAllocation`                       | Freeze an allocation so that the allocation data can no longer be modified.                                                              |
| `cancelAllocation`                       | Cancel an Allocation                                                                                                                     |
| `updateAllocation`                       | Update the allocation settings                                                                                                           |
| `updateAllocationWithRepair`             | Updates your allocation settings and repairs the allocation if any blobber was replaced or added                                         |
| `getUpdateAllocationMinLock`             | Retrieves the minimum lock value for the allocation after update.                                                                        |
| `updateForbidAllocation`                 | UpdateForbidAllocation updates the permissions of an allocation, given the permission parameters in a forbid-first manner.               |
| `getUpdateAllocTicket`                   | Generates and signs an "Update Allocation ticket", which authorizes the "add blobber" or "replace blobber" operation from other wallets. |
| `checkAllocStatus`                       | Check the health status of the allocation.                                                                                               |
| `skipStatusCheck`                        | Skips the `checkAlloctionStatus` health status check of the allocation.                                                                  |
| `repairAllocation`                       | Start a repair process for an allocation.                                                                                                |
| `repairSize`                             | Retrieves the repair size for a specific path in an allocation.                                                                          |
| `createWorkers`                          | Manually create local workers that sync with the allocation.                                                                             |
| `terminateWorkers`                       | Remove local workers that sync with the allocation. This is useful when switching between allocations.                                   |
| {/\*                                     | `transferAllocation`                                                                                                                     |
| {/\* createFreeAllocation // DOTODO \*/} |                                                                                                                                          |

#### Blobber Methods

The blobber methods allow you to retrieve information, manage and interact with blobbers.

| Method                  | Description                                                                           |
| ----------------------- | ------------------------------------------------------------------------------------- |
| `getBlobbers`           | Retrieves a list of active blobbers details from the network                          |
| `getBlobberIds`         | Get Blobber IDs from a list of blobber URLs                                           |
| `getAllocationBlobbers` | Retrieves a list of blobber IDs of blobber which match your allocation terms          |
| `updateBlobberSettings` | Updates the blobber settings                                                          |
| `getContainers`         | GetContainers returns all the running containers in a given domain.                   |
| `searchContainer`       | searchContainer searches for a container with a given name in a given domain.         |
| `updateContainer`       | UpdateContainer updates the given container ID with a new image ID in a given domain. |

#### File Operation Methods

The file operation methods allow you to perform various operations on files.

| Method                      | Description                                                                                                                                 |
| --------------------------- | ------------------------------------------------------------------------------------------------------------------------------------------- |
| `getLookupHash`             | Generate lookup hash for a given file path and allocation ID                                                                                |
| `createDir`                 | Create a folder on the blobbers                                                                                                             |
| `setUploadMode`             | Sets the upload mode for modifying the upload speed and CPU usage                                                                           |
| `multiUpload`               | Upload multiple files in a batch. Also, used to resume a paused upload.                                                                     |
| `pauseUpload`               | Pause the upload operation of the file.                                                                                                     |
| `cancelUpload`              | Cancel the upload operation of the file.                                                                                                    |
| `getFileStats`              | Gets the file stats                                                                                                                         |
| `listObjects`               | List the files for a given allocation ID and remote path                                                                                    |
| `getFileMetaByName`         | Get file metadata by name. (File Search)                                                                                                    |
| `multiDownload`             | Download multiple files together                                                                                                            |
| `downloadBlocks`            | Downloads a specified range of blocks from a file.                                                                                          |
| `cancelDownloadBlocks`      | Cancels the download of a specified range of blocks from a file.                                                                            |
| `downloadDirectory`         | Download files in a directory.                                                                                                              |
| `cancelDownloadDirectory`   | Cancel the download of a directory.                                                                                                         |
| `multiOperation`            | Perform multiple file operations (copy, move, delete, create directory) together                                                            |
| `deleteFile`                | Deletes a file from an allocation. Only the owner of the allocation can delete a file. Prefer `multiOperation` for deleting multiple files. |
| `share`                     | Generate an authToken that provides the authorization to the holder to the specified file on the remotepath.                                |
| `listObjectsFromAuthTicket` | List objects from an auth ticket. It's useful for accessing a shared resource by a non-owner                                                |

#### Smart Contract Methods

The smart contract methods allow you to interact with smart contracts.

| Method              | Description                                                       |
| ------------------- | ----------------------------------------------------------------- |
| `makeSCRestAPICall` | Issues a request to the public API of the smart contracts         |
| `getStakePoolInfo`  | Get information about the stake pool for the allocation           |
| `lockWritePool`     | Lock given number of tokens for given duration in write pool      |
| `lockStakePool`     | Stake number of tokens for a given provider given its type and ID |
| `unlockStakePool`   | Unlock the write pool                                             |
| `collectRewards`    | Collect all rewards for a given delegate and provider pair.       |

#### Utility Functions

| Method                     | Description                                                                                                         |
| -------------------------- | ------------------------------------------------------------------------------------------------------------------- |
| `decodeAuthTicket`         | Decode the AuthTicket of a shared file                                                                              |
| `getGosdkVersion`          | Retrieves the version of the initialized GoSDK WASM.                                                                |
| `getWasmType`              | Returns the type of the GoSDK WASM file (standard or enterprise).                                                   |
| `sasTokenToZcn`            | Converts SAS token value in ZCN                                                                                     |
| `zcnToSasToken`            | Converts ZCN value in SAS token                                                                                     |
| `checkIfWasmLoaded`        | Waits until the "desired mode" GoSDK WASM is loaded and initialized.                                                |
| `awaitWasmLoad`            | Waits until the GoSDK WASM is loaded and initialized.                                                               |
| `updateWasmMode`           | Updates the "desired mode" value of the GoSDK WASM.                                                                 |
| `getDesiredMode`           | Returns the "desired mode" value of the GoSDK WASM.                                                                 |
| `isDesiredWasmInitialized` | Checks if the desired GoSDK WASM mode is initialized. Returns `true` if the WASM is initialized, `false` otherwise. |


# Mobile API

This document lists all available API endpoints grouped by functionality with details including method, path, and descriptions.

***

### `GET` /v2/owner

**Name**: owner

**Description**: Fetches data related to `owner`.

**Request Info:**

| Field    | Value       |
| -------- | ----------- |
| Method   | `GET`       |
| Endpoint | `/v2/owner` |

**Response Codes:**

* `200 OK`: Success
* `400 Bad Request`: Client error
* `401 Unauthorized`: Authentication failure

***

### `GET` /v2/username/exists

**Name**: username exists

**Description**: Fetches data related to `exists`.

**Request Info:**

| Field    | Value                 |
| -------- | --------------------- |
| Method   | `GET`                 |
| Endpoint | `/v2/username/exists` |

**Response Codes:**

* `200 OK`: Success
* `400 Bad Request`: Client error
* `401 Unauthorized`: Authentication failure

***

### `GET` /v2/owner/autocomplete

**Name**: username search autocomplete

**Description**: Fetches data related to `autocomplete`.

**Request Info:**

| Field    | Value                    |
| -------- | ------------------------ |
| Method   | `GET`                    |
| Endpoint | `/v2/owner/autocomplete` |

**Response Codes:**

* `200 OK`: Success
* `400 Bad Request`: Client error
* `401 Unauthorized`: Authentication failure

***

### `POST` /v2/owner

**Name**: owner

**Description**: Creates data related to `owner`.

**Request Info:**

| Field    | Value       |
| -------- | ----------- |
| Method   | `POST`      |
| Endpoint | `/v2/owner` |

**Response Codes:**

* `200 OK`: Success
* `400 Bad Request`: Client error
* `401 Unauthorized`: Authentication failure

***

### `PUT` /v2/owner

**Name**: owner

**Description**: Updates data related to `owner`.

**Request Info:**

| Field    | Value       |
| -------- | ----------- |
| Method   | `PUT`       |
| Endpoint | `/v2/owner` |

**Response Codes:**

* `200 OK`: Success
* `400 Bad Request`: Client error
* `401 Unauthorized`: Authentication failure

***

### `DELETE` /v2/owner

**Name**: owner

**Description**: Deletes data related to `owner`.

**Request Info:**

| Field    | Value       |
| -------- | ----------- |
| Method   | `DELETE`    |
| Endpoint | `/v2/owner` |

**Response Codes:**

* `200 OK`: Success
* `400 Bad Request`: Client error
* `401 Unauthorized`: Authentication failure

***

### `GET` /v2/contact/wallets

**Name**: contact/wallets

**Description**: Fetches data related to `wallets`.

**Request Info:**

| Field    | Value                 |
| -------- | --------------------- |
| Method   | `GET`                 |
| Endpoint | `/v2/contact/wallets` |

**Response Codes:**

* `200 OK`: Success
* `400 Bad Request`: Client error
* `401 Unauthorized`: Authentication failure

***

### `GET` /v2/wallet/active

**Name**: active wallet

**Description**: Fetches data related to `active`.

**Request Info:**

| Field    | Value               |
| -------- | ------------------- |
| Method   | `GET`               |
| Endpoint | `/v2/wallet/active` |

**Response Codes:**

* `200 OK`: Success
* `400 Bad Request`: Client error
* `401 Unauthorized`: Authentication failure

***

### `GET` /v2/wallet/exist

**Name**: wallet/exist

**Description**: Fetches data related to `exist`.

**Request Info:**

| Field    | Value              |
| -------- | ------------------ |
| Method   | `GET`              |
| Endpoint | `/v2/wallet/exist` |

**Response Codes:**

* `200 OK`: Success
* `400 Bad Request`: Client error
* `401 Unauthorized`: Authentication failure

***

### `GET` /v2/phone/exist

**Name**: phone/exist

**Description**: Fetches data related to `exist`.

**Request Info:**

| Field    | Value             |
| -------- | ----------------- |
| Method   | `GET`             |
| Endpoint | `/v2/phone/exist` |

**Response Codes:**

* `200 OK`: Success
* `400 Bad Request`: Client error
* `401 Unauthorized`: Authentication failure

***

### `GET` /v2/wallet/list

**Name**: wallet/list

**Description**: Fetches data related to `list`.

**Request Info:**

| Field    | Value             |
| -------- | ----------------- |
| Method   | `GET`             |
| Endpoint | `/v2/wallet/list` |

**Response Codes:**

* `200 OK`: Success
* `400 Bad Request`: Client error
* `401 Unauthorized`: Authentication failure

***

### `GET` /v2/allocation/list

**Name**: allocation/list

**Description**: Fetches data related to `list`.

**Request Info:**

| Field    | Value                 |
| -------- | --------------------- |
| Method   | `GET`                 |
| Endpoint | `/v2/allocation/list` |

**Response Codes:**

* `200 OK`: Success
* `400 Bad Request`: Client error
* `401 Unauthorized`: Authentication failure

***

### `GET` /v2/allocation/exists

**Name**: allocation exists

**Description**: Fetches data related to `exists`.

**Request Info:**

| Field    | Value                   |
| -------- | ----------------------- |
| Method   | `GET`                   |
| Endpoint | `/v2/allocation/exists` |

**Response Codes:**

* `200 OK`: Success
* `400 Bad Request`: Client error
* `401 Unauthorized`: Authentication failure

***

### `GET` /v2/download/7b99ce9d12fc583d6de9529ab6ba17c8319f1d654afa6bf9faf12e1042406994

**Name**: download nft collection meta json

**Description**: Fetches data related to `7b99ce9d12fc583d6de9529ab6ba17c8319f1d654afa6bf9faf12e1042406994`.

**Request Info:**

| Field    | Value                                                                           |
| -------- | ------------------------------------------------------------------------------- |
| Method   | `GET`                                                                           |
| Endpoint | `/v2/download/7b99ce9d12fc583d6de9529ab6ba17c8319f1d654afa6bf9faf12e1042406994` |

**Response Codes:**

* `200 OK`: Success
* `400 Bad Request`: Client error
* `401 Unauthorized`: Authentication failure

***

### `GET` /v2/download/fd303a0c8327e7769f6042e49e5c44a674b702c0eeb2611b787c71910d30aedb/col-img

**Name**: download nft collection image

**Description**: Fetches data related to `col-img`.

**Request Info:**

| Field    | Value                                                                                   |
| -------- | --------------------------------------------------------------------------------------- |
| Method   | `GET`                                                                                   |
| Endpoint | `/v2/download/fd303a0c8327e7769f6042e49e5c44a674b702c0eeb2611b787c71910d30aedb/col-img` |

**Response Codes:**

* `200 OK`: Success
* `400 Bad Request`: Client error
* `401 Unauthorized`: Authentication failure

***

### `GET` /v2/download/74c5c7203253575a53c339a22fb8dd5915b01e0dc60566f39562a2ed81a3cf36/col-banner

**Name**: download nft banner image

**Description**: Fetches data related to `col-banner`.

**Request Info:**

| Field    | Value                                                                                      |
| -------- | ------------------------------------------------------------------------------------------ |
| Method   | `GET`                                                                                      |
| Endpoint | `/v2/download/74c5c7203253575a53c339a22fb8dd5915b01e0dc60566f39562a2ed81a3cf36/col-banner` |

**Response Codes:**

* `200 OK`: Success
* `400 Bad Request`: Client error
* `401 Unauthorized`: Authentication failure

***

### `GET` /v2/download/7b99ce9d12fc583d6de9529ab6ba17c8319f1d654afa6bf9faf12e1042406994/1

**Name**: download nft meta json Copy

**Description**: Fetches data related to `1`.

**Request Info:**

| Field    | Value                                                                             |
| -------- | --------------------------------------------------------------------------------- |
| Method   | `GET`                                                                             |
| Endpoint | `/v2/download/7b99ce9d12fc583d6de9529ab6ba17c8319f1d654afa6bf9faf12e1042406994/1` |

**Response Codes:**

* `200 OK`: Success
* `400 Bad Request`: Client error
* `401 Unauthorized`: Authentication failure

***

### `GET` /v2/download/7b99ce9d12fc583d6de9529ab6ba17c8319f1d654afa6bf9faf12e1042406994/1/img

**Name**: download nft image

**Description**: Fetches data related to `img`.

**Request Info:**

| Field    | Value                                                                                 |
| -------- | ------------------------------------------------------------------------------------- |
| Method   | `GET`                                                                                 |
| Endpoint | `/v2/download/7b99ce9d12fc583d6de9529ab6ba17c8319f1d654afa6bf9faf12e1042406994/1/img` |

**Response Codes:**

* `200 OK`: Success
* `400 Bad Request`: Client error
* `401 Unauthorized`: Authentication failure

***

### `POST` /v2/shareinfo

**Name**: shareinfo

**Description**: Creates data related to `shareinfo`.

**Request Info:**

| Field    | Value           |
| -------- | --------------- |
| Method   | `POST`          |
| Endpoint | `/v2/shareinfo` |

**Response Codes:**

* `200 OK`: Success
* `400 Bad Request`: Client error
* `401 Unauthorized`: Authentication failure

***

### `GET` /v2/shareinfo/shared

**Name**: shareinfo shared

**Description**: Fetches data related to `shared`.

**Request Info:**

| Field    | Value                  |
| -------- | ---------------------- |
| Method   | `GET`                  |
| Endpoint | `/v2/shareinfo/shared` |

**Response Codes:**

* `200 OK`: Success
* `400 Bad Request`: Client error
* `401 Unauthorized`: Authentication failure

***

### `GET` /v2/shareinfo/received

**Name**: shareinfo received

**Description**: Fetches data related to `received`.

**Request Info:**

| Field    | Value                    |
| -------- | ------------------------ |
| Method   | `GET`                    |
| Endpoint | `/v2/shareinfo/received` |

**Response Codes:**

* `200 OK`: Success
* `400 Bad Request`: Client error
* `401 Unauthorized`: Authentication failure

***

### `DELETE` /v2/shareinfo

**Name**: shareinfo

**Description**: Deletes data related to `shareinfo`.

**Request Info:**

| Field    | Value           |
| -------- | --------------- |
| Method   | `DELETE`        |
| Endpoint | `/v2/shareinfo` |

**Response Codes:**

* `200 OK`: Success
* `400 Bad Request`: Client error
* `401 Unauthorized`: Authentication failure

***

### `GET` /v2/chimney/deploy/1

**Name**: chimney deployment

**Description**: Fetches data

**Request Info:**

| Field    | Value                  |
| -------- | ---------------------- |
| Method   | `GET`                  |
| Endpoint | `/v2/chimney/deploy/1` |

**Response Codes:**

* `200 OK`: Success
* `400 Bad Request`: Client error
* `401 Unauthorized`: Authentication failure

***

### `DELETE` /v2/chimney/deploy/2

**Name**: chimney deployment

**Description**: Deletes data

**Request Info:**

| Field    | Value                  |
| -------- | ---------------------- |
| Method   | `DELETE`               |
| Endpoint | `/v2/chimney/deploy/2` |

**Response Codes:**

* `200 OK`: Success
* `400 Bad Request`: Client error
* `401 Unauthorized`: Authentication failure

***

### `GET` /v2/blimp/deploy/1

**Name**: blimp deployment

**Description**: Fetches data

**Request Info:**

| Field    | Value                |
| -------- | -------------------- |
| Method   | `GET`                |
| Endpoint | `/v2/blimp/deploy/1` |

**Response Codes:**

* `200 OK`: Success
* `400 Bad Request`: Client error
* `401 Unauthorized`: Authentication failure

***

### `GET` /v2/blimp/deploy/allocation/39262c12469be1cc42f10db07c07267e9a508d4c1598df2409c1cfcf19b84d51

**Name**: blimp deployment from allocation

**Description**: Fetches data related to `39262c12469be1cc42f10db07c07267e9a508d4c1598df2409c1cfcf19b84d51`.

**Request Info:**

| Field    | Value                                                                                          |
| -------- | ---------------------------------------------------------------------------------------------- |
| Method   | `GET`                                                                                          |
| Endpoint | `/v2/blimp/deploy/allocation/39262c12469be1cc42f10db07c07267e9a508d4c1598df2409c1cfcf19b84d51` |

**Response Codes:**

* `200 OK`: Success
* `400 Bad Request`: Client error
* `401 Unauthorized`: Authentication failure

***

### `DELETE` /v2/blimp/deploy/1

**Name**: blimp deployment

**Description**: Deletes data

**Request Info:**

| Field    | Value                |
| -------- | -------------------- |
| Method   | `DELETE`             |
| Endpoint | `/v2/blimp/deploy/1` |

**Response Codes:**

* `200 OK`: Success
* `400 Bad Request`: Client error
* `401 Unauthorized`: Authentication failure

***

### `GET` /v2/migration/deploy/1

**Name**: s3migration deployment

**Description**: Fetches data

**Request Info:**

| Field    | Value                    |
| -------- | ------------------------ |
| Method   | `GET`                    |
| Endpoint | `/v2/migration/deploy/1` |

**Response Codes:**

* `200 OK`: Success
* `400 Bad Request`: Client error
* `401 Unauthorized`: Authentication failure

***

### `GET` /v2/migration/deploy/allocation/23b39d63311ea290b6fa680cb1e8e3fd684a43c6e925ace107e290a8f1a9648

**Name**: s3migration deployment from allocation

**Description**: Fetches data related to `23b39d63311ea290b6fa680cb1e8e3fd684a43c6e925ace107e290a8f1a9648`.

**Request Info:**

| Field    | Value                                                                                             |
| -------- | ------------------------------------------------------------------------------------------------- |
| Method   | `GET`                                                                                             |
| Endpoint | `/v2/migration/deploy/allocation/23b39d63311ea290b6fa680cb1e8e3fd684a43c6e925ace107e290a8f1a9648` |

**Response Codes:**

* `200 OK`: Success
* `400 Bad Request`: Client error
* `401 Unauthorized`: Authentication failure

***

### `DELETE` /v2/migration/deploy/1

**Name**: s3migration deployment

**Description**: Deletes data

**Request Info:**

| Field    | Value                    |
| -------- | ------------------------ |
| Method   | `DELETE`                 |
| Endpoint | `/v2/migration/deploy/1` |

**Response Codes:**

* `200 OK`: Success
* `400 Bad Request`: Client error
* `401 Unauthorized`: Authentication failure

***

### `GET` /v2/provider/brand

**Name**: provider brand

**Description**: Fetches data related to `brand`.

**Request Info:**

| Field    | Value                |
| -------- | -------------------- |
| Method   | `GET`                |
| Endpoint | `/v2/provider/brand` |

**Response Codes:**

* `200 OK`: Success
* `400 Bad Request`: Client error
* `401 Unauthorized`: Authentication failure

***

### `GET` /v2/stripe/subscriptions

**Name**: subscriptions

**Description**: Fetches data related to `subscriptions`.

**Request Info:**

| Field    | Value                      |
| -------- | -------------------------- |
| Method   | `GET`                      |
| Endpoint | `/v2/stripe/subscriptions` |

**Response Codes:**

* `200 OK`: Success
* `400 Bad Request`: Client error
* `401 Unauthorized`: Authentication failure

***

### `GET` /v2/stripe/payment-intents

**Name**: payment intents

**Description**: Fetches data related to `payment-intents`.

**Request Info:**

| Field    | Value                        |
| -------- | ---------------------------- |
| Method   | `GET`                        |
| Endpoint | `/v2/stripe/payment-intents` |

**Response Codes:**

* `200 OK`: Success
* `400 Bad Request`: Client error
* `401 Unauthorized`: Authentication failure

***

### `GET` /v2/referral/code

**Name**: referral code

**Description**: Fetches data related to `code`.

**Request Info:**

| Field    | Value               |
| -------- | ------------------- |
| Method   | `GET`               |
| Endpoint | `/v2/referral/code` |

**Response Codes:**

* `200 OK`: Success
* `400 Bad Request`: Client error
* `401 Unauthorized`: Authentication failure

***

### `GET` /v2/referral/count

**Name**: referral count

**Description**: Fetches data related to `count`.

**Request Info:**

| Field    | Value                |
| -------- | -------------------- |
| Method   | `GET`                |
| Endpoint | `/v2/referral/count` |

**Response Codes:**

* `200 OK`: Success
* `400 Bad Request`: Client error
* `401 Unauthorized`: Authentication failure

***

### `GET` /v2/referral/userrank

**Name**: referral rank

**Description**: Fetches data related to `userrank`.

**Request Info:**

| Field    | Value                   |
| -------- | ----------------------- |
| Method   | `GET`                   |
| Endpoint | `/v2/referral/userrank` |

**Response Codes:**

* `200 OK`: Success
* `400 Bad Request`: Client error
* `401 Unauthorized`: Authentication failure

***

### `GET` /v2/referral/topusers

**Name**: referral top users

**Description**: Fetches data related to `topusers`.

**Request Info:**

| Field    | Value                   |
| -------- | ----------------------- |
| Method   | `GET`                   |
| Endpoint | `/v2/referral/topusers` |

**Response Codes:**

* `200 OK`: Success
* `400 Bad Request`: Client error
* `401 Unauthorized`: Authentication failure

***

### `POST` /v2/referral/reward

**Name**: referral reward

**Description**: Creates data related to `reward`.

**Request Info:**

| Field    | Value                 |
| -------- | --------------------- |
| Method   | `POST`                |
| Endpoint | `/v2/referral/reward` |

**Response Codes:**

* `200 OK`: Success
* `400 Bad Request`: Client error
* `401 Unauthorized`: Authentication failure

***

### `GET` /sharder01/v1/screst/6dba10422e368813802877a85039d3985d96760ed844092319743fb3a76712d7/getblobbers

**Name**: get blobber list

**Description**: Fetches data related to `getblobbers`.

**Request Info:**

| Field    | Value                                                                                               |
| -------- | --------------------------------------------------------------------------------------------------- |
| Method   | `GET`                                                                                               |
| Endpoint | `/sharder01/v1/screst/6dba10422e368813802877a85039d3985d96760ed844092319743fb3a76712d7/getblobbers` |

**Response Codes:**

* `200 OK`: Success
* `400 Bad Request`: Client error
* `401 Unauthorized`: Authentication failure

***

### `GET` /sharder01/v1/screst/6dba10422e368813802877a85039d3985d96760ed844092319743fb3a76712d7/getBlobber

**Name**: get blobber

**Description**: Fetches data related to `getBlobber`.

**Request Info:**

| Field    | Value                                                                                              |
| -------- | -------------------------------------------------------------------------------------------------- |
| Method   | `GET`                                                                                              |
| Endpoint | `/sharder01/v1/screst/6dba10422e368813802877a85039d3985d96760ed844092319743fb3a76712d7/getBlobber` |

**Response Codes:**

* `200 OK`: Success
* `400 Bad Request`: Client error
* `401 Unauthorized`: Authentication failure

***

### `GET` /sharder01/v1/screst/6dba10422e368813802877a85039d3985d96760ed844092319743fb3a76712d7/getBlobber

**Name**: get blobber Copy

**Description**: Fetches data related to `getBlobber`.

**Request Info:**

| Field    | Value                                                                                              |
| -------- | -------------------------------------------------------------------------------------------------- |
| Method   | `GET`                                                                                              |
| Endpoint | `/sharder01/v1/screst/6dba10422e368813802877a85039d3985d96760ed844092319743fb3a76712d7/getBlobber` |

**Response Codes:**

* `200 OK`: Success
* `400 Bad Request`: Client error
* `401 Unauthorized`: Authentication failure

***

### `GET` /sharder01/v1/screst/6dba10422e368813802877a85039d3985d96760ed844092319743fb3a76712d9/getMinerList

**Name**: get miner list

**Description**: Fetches data related to `getMinerList`.

**Request Info:**

| Field    | Value                                                                                                |
| -------- | ---------------------------------------------------------------------------------------------------- |
| Method   | `GET`                                                                                                |
| Endpoint | `/sharder01/v1/screst/6dba10422e368813802877a85039d3985d96760ed844092319743fb3a76712d9/getMinerList` |

**Response Codes:**

* `200 OK`: Success
* `400 Bad Request`: Client error
* `401 Unauthorized`: Authentication failure

***

### `GET` /sharder01/v1/screst/6dba10422e368813802877a85039d3985d96760ed844092319743fb3a76712d9/getSharderList

**Name**: get sharder list

**Description**: Fetches data related to `getSharderList`.

**Request Info:**

| Field    | Value                                                                                                  |
| -------- | ------------------------------------------------------------------------------------------------------ |
| Method   | `GET`                                                                                                  |
| Endpoint | `/sharder01/v1/screst/6dba10422e368813802877a85039d3985d96760ed844092319743fb3a76712d9/getSharderList` |

**Response Codes:**

* `200 OK`: Success
* `400 Bad Request`: Client error
* `401 Unauthorized`: Authentication failure

***

### `GET` /sharder01/v1/screst/6dba10422e368813802877a85039d3985d96760ed844092319743fb3a76712d9/nodeStat

**Name**: get minser/sharder

**Description**: Fetches data related to `nodeStat`.

**Request Info:**

| Field    | Value                                                                                            |
| -------- | ------------------------------------------------------------------------------------------------ |
| Method   | `GET`                                                                                            |
| Endpoint | `/sharder01/v1/screst/6dba10422e368813802877a85039d3985d96760ed844092319743fb3a76712d9/nodeStat` |

**Response Codes:**

* `200 OK`: Success
* `400 Bad Request`: Client error
* `401 Unauthorized`: Authentication failure

***

### `GET` /sharder01/v1/screst/6dba10422e368813802877a85039d3985d96760ed844092319743fb3a76712d7/validators

**Name**: get validator list

**Description**: Fetches data related to `validators`.

**Request Info:**

| Field    | Value                                                                                              |
| -------- | -------------------------------------------------------------------------------------------------- |
| Method   | `GET`                                                                                              |
| Endpoint | `/sharder01/v1/screst/6dba10422e368813802877a85039d3985d96760ed844092319743fb3a76712d7/validators` |

**Response Codes:**

* `200 OK`: Success
* `400 Bad Request`: Client error
* `401 Unauthorized`: Authentication failure

***

### `GET` /sharder01/v1/screst/6dba10422e368813802877a85039d3985d96760ed844092319743fb3a76712d7/get\_validator

**Name**: get validator

**Description**: Fetches data related to `get_validator`.

**Request Info:**

| Field    | Value                                                                                                 |
| -------- | ----------------------------------------------------------------------------------------------------- |
| Method   | `GET`                                                                                                 |
| Endpoint | `/sharder01/v1/screst/6dba10422e368813802877a85039d3985d96760ed844092319743fb3a76712d7/get_validator` |

**Response Codes:**

* `200 OK`: Success
* `400 Bad Request`: Client error
* `401 Unauthorized`: Authentication failure

***

### `GET` /sharder01/v1/screst/6dba10422e368813802877a85039d3985d96760ed844092319743fb3a76712e0/getAuthorizerNodes

**Name**: get authorizer list

**Description**: Fetches data related to `getAuthorizerNodes`.

**Request Info:**

| Field    | Value                                                                                                      |
| -------- | ---------------------------------------------------------------------------------------------------------- |
| Method   | `GET`                                                                                                      |
| Endpoint | `/sharder01/v1/screst/6dba10422e368813802877a85039d3985d96760ed844092319743fb3a76712e0/getAuthorizerNodes` |

**Response Codes:**

* `200 OK`: Success
* `400 Bad Request`: Client error
* `401 Unauthorized`: Authentication failure

***

### `GET` /sharder01/v1/screst/6dba10422e368813802877a85039d3985d96760ed844092319743fb3a76712e0/getAuthorizer

**Name**: get authorizer

**Description**: Fetches data related to `getAuthorizer`.

**Request Info:**

| Field    | Value                                                                                                 |
| -------- | ----------------------------------------------------------------------------------------------------- |
| Method   | `GET`                                                                                                 |
| Endpoint | `/sharder01/v1/screst/6dba10422e368813802877a85039d3985d96760ed844092319743fb3a76712e0/getAuthorizer` |

**Response Codes:**

* `200 OK`: Success
* `400 Bad Request`: Client error
* `401 Unauthorized`: Authentication failure

***

### `GET` /blobber01//v1/file/list/6c14d5912df2dd7ddc0ed2851e7e8c9dd8db56f326a1f5f584c50d79d4e90a0c

**Name**: get allocation file list

**Description**: Fetches data related to `6c14d5912df2dd7ddc0ed2851e7e8c9dd8db56f326a1f5f584c50d79d4e90a0c`.

**Request Info:**

| Field    | Value                                                                                       |
| -------- | ------------------------------------------------------------------------------------------- |
| Method   | `GET`                                                                                       |
| Endpoint | `/blobber01//v1/file/list/6c14d5912df2dd7ddc0ed2851e7e8c9dd8db56f326a1f5f584c50d79d4e90a0c` |

**Response Codes:**

* `200 OK`: Success
* `400 Bad Request`: Client error
* `401 Unauthorized`: Authentication failure

***

### `GET` /blobber01//v1/file/list/6c14d5912df2dd7ddc0ed2851e7e8c9dd8db56f326a1f5f584c50d79d4e90a0c

**Name**: get allocation file list Copy

**Description**: Fetches data related to `6c14d5912df2dd7ddc0ed2851e7e8c9dd8db56f326a1f5f584c50d79d4e90a0c`.

**Request Info:**

| Field    | Value                                                                                       |
| -------- | ------------------------------------------------------------------------------------------- |
| Method   | `GET`                                                                                       |
| Endpoint | `/blobber01//v1/file/list/6c14d5912df2dd7ddc0ed2851e7e8c9dd8db56f326a1f5f584c50d79d4e90a0c` |

**Response Codes:**

* `200 OK`: Success
* `400 Bad Request`: Client error
* `401 Unauthorized`: Authentication failure

### `GET` /v2/twilio/phone/send

**Name**: twilio phone send

**Description**: Fetches data related to `send`.

**Request Info:**

| Field    | Value                   |
| -------- | ----------------------- |
| Method   | `GET`                   |
| Endpoint | `/v2/twilio/phone/send` |

**Response Codes:**

* `200 OK`: Success
* `400 Bad Request`: Client error
* `401 Unauthorized`: Authentication failure

***

### `POST` /v2/twilio/phone/verify/login

**Name**: twilio phone verify login

**Description**: Creates data related to `login`.

**Request Info:**

| Field    | Value                           |
| -------- | ------------------------------- |
| Method   | `POST`                          |
| Endpoint | `/v2/twilio/phone/verify/login` |

**Response Codes:**

* `200 OK`: Success
* `400 Bad Request`: Client error
* `401 Unauthorized`: Authentication failure

***

### `POST` /v2/twilio/phone/verify/signup

**Name**: twilio phone verify signup

**Description**: Creates data related to `signup`.

**Request Info:**

| Field    | Value                            |
| -------- | -------------------------------- |
| Method   | `POST`                           |
| Endpoint | `/v2/twilio/phone/verify/signup` |

**Response Codes:**

* `200 OK`: Success
* `400 Bad Request`: Client error
* `401 Unauthorized`: Authentication failure

***

### `GET` /v2/twilio/email/send

**Name**: twilio email send

**Description**: Fetches data related to `send`.

**Request Info:**

| Field    | Value                   |
| -------- | ----------------------- |
| Method   | `GET`                   |
| Endpoint | `/v2/twilio/email/send` |

**Response Codes:**

* `200 OK`: Success
* `400 Bad Request`: Client error
* `401 Unauthorized`: Authentication failure

***

### `POST` /v2/twilio/email/verify

**Name**: twilio email verify

**Description**: Creates data related to `verify`.

**Request Info:**

| Field    | Value                     |
| -------- | ------------------------- |
| Method   | `POST`                    |
| Endpoint | `/v2/twilio/email/verify` |

**Response Codes:**

* `200 OK`: Success
* `400 Bad Request`: Client error
* `401 Unauthorized`: Authentication failure


# Obox API

The OBox API serves as the Explorer Node for the Züs decentralized storage network. It exposes endpoints to query and track the network’s state, including allocation metadata, usage statistics, and user-driven actions over time.

In addition to network observability, OBox also provides critical support for user profile management and features used by Züs web applications (such as wallet onboarding, funding tasks, and S3-compatible deployments).

It acts as a bridge between developers and the Züs ecosystem, enabling both individual users and enterprise clients to interact programmatically with the network.

Here is the list of APIs and their endpoints:

{% content-ref url="/pages/eEIHNtrRpScNCKXrFaSf" %}
[Owner Profile and Wallet Management](/zus-docs/http-apis/obox-api/owner-profile-and-wallet-management)
{% endcontent-ref %}

{% content-ref url="/pages/wYTYY5eZuxAf4RBHWquc" %}
[Storage Allocation Management](/zus-docs/http-apis/obox-api/storage-allocation-management)
{% endcontent-ref %}

{% content-ref url="/pages/4MHtvb8gwHetRAjjnhHi" %}
[File Sharing and Share Requests](/zus-docs/http-apis/obox-api/file-sharing-and-share-requests)
{% endcontent-ref %}

{% content-ref url="/pages/MaGPe6C0rK5uHvFhRsIv" %}
[S3 Deployment](/zus-docs/http-apis/obox-api/s3-deployment)
{% endcontent-ref %}

{% content-ref url="/pages/J0Rg01nf1OtVTwPmpxD0" %}
[DEX State APIs and User Notifications](/zus-docs/http-apis/obox-api/dex-state-apis-and-user-notifications)
{% endcontent-ref %}

{% content-ref url="/pages/bcv1rajY6ycEeYdT0xWr" %}
[Stripe APIs](/zus-docs/http-apis/obox-api/stripe-apis)
{% endcontent-ref %}

{% content-ref url="/pages/7h1HuGhpd5le1I1kXhIJ" %}
[AI APIs](/zus-docs/http-apis/obox-api/ai-apis)
{% endcontent-ref %}


# Owner Profile and Wallet Management

### **Owner Profile Management**

These endpoints manages creation, retrieval, and updates to owner profiles linked to wallets and storage activities.

#### **Get Owner by Wallet ID**

* **Path:** `/v2/owner/wallet/:ID`
* **Method:** `GET`
* **Access:** CSRF API
* **Description:** Public profile fetch by wallet ID.
* **Path Params:** `ID` (string)
* **Response:**

```json
{
  "user_id": "abcdef123456",
  "username": "johndoe",
  "biography": "Short bio here",
  "avatar": "<base64>",
  "background": "<base64>",
  "created_at": "2024-05-30T12:34:00"
}
```

* **Error:** `{"error": "owner not found"}`

#### **Get Current Owner**

* **Path:** `/v2/owner`
* **Method:** `GET`
* **Access:** Signature API
* **Response:**

```json
{
  "user_id": "abcdef123456",
  "phone_number": "+1234567890",
  "username": "johndoe",
  "email": "john@example.com",
  "biography": "Short bio here",
  "avatar": "<base64>",
  "background": "<base64>",
  "created_at": "2024-05-30T12:34:00"
}
```

#### **Update Owner**

* **Path:** `/v2/owner`
* **Method:** `PUT`
* **Access:** Signature API
* **Form Data:**
  * `username` (optional)
  * `avatar` (optional file)
  * `background` (optional file)
  * `biography` (optional string)
* **Response:**

```json
{
  "message": "updated owner details successfully"
}
```

#### **Delete Owner**

* **Path:** `/v2/owner`
* **Method:** `DELETE`
* **Access:** Private API
* **Response:**

```json
{
  "message": "owner deleted successfully"
}
```

* Deletes: DB record, Elasticsearch index, Stripe subscriptions, Firebase account.

#### **Autocomplete Owners by Name**

* **Path:** `/v2/owner/autocomplete`
* **Method:** `GET`
* **Access:** Signature API
* **Query Parameters:**
  * `name` (required)
  * `app_type` (required)
  * `offset`, `limit`, `order` (optional)
* **Response:**

```json
[
  {
    "user_id": "abcdef123456",
    "username": "johndoe",
    "biography": "Short bio here",
    "avatar": "<base64>",
    "background": "<base64>",
    "created_at": "2024-05-30T12:34:00"
  }
]
```

### **Wallet Management**

These endpoints enables wallet creation, updates, and funding workflows essential for interacting with the Züs network.

#### **Create Wallet**

* **Path:** `/v2/wallet`
* **Method:** `POST`
* **Access:** Signature API
* **Description:**\
  Creates a new wallet for the authenticated user. Can optionally include a referral code and custom mnemonic.
* **Form Data (multipart/form-data):**
  * `name` (string, optional): Wallet name.
  * `description` (string, optional): Wallet description.
  * `mnemonic` (string, optional): Predefined mnemonic (if restoring).
  * `pub_encryption_key` (string, optional): Public encryption key.
  * `refcode` (string, optional): Referral code.
* **Response (201 Created):**

```json
{
  "client_id": "abcdef123456",
  "wallet_id": 123,
  "name": "My Wallet",
  "description": "Personal wallet",
  "mnemonic": "word1 word2 ...",
  "public_key": "abcdef...",
  "last_update": "2024-06-01T12:00:00",
  "referral_success": false
}
```

* **Error Response:**

```json
{
  "error": "owner not found"
}
```

#### **Update Wallet**

* **Path:** `/v2/wallet`
* **Method:** `PUT`
* **Access:** Signature API
* **Description:**\
  Updates metadata for an existing wallet.
* **Form Data:**
  * Any wallet metadata fields from `handler.WalletDetails` such as:
    * `name`, `description`, `pub_encryption_key`, etc.
* **Response:**

```json
{
  "message": "wallet updated successfully"
}
```

* **Error Response:**

```json
{
  "error": "wallet not found"
}
```

#### **Delete Wallet**

* **Path:** `/v2/wallet`
* **Method:** `DELETE`
* **Access:** Signature API
* **Description:**\
  Deletes a wallet for the authenticated user.
* **Query Parameters:**
  * `wallet_id` (string, required): ID of wallet to be deleted.
* **Response:**

```json
{
  "message": "wallet deleted successfully"
}
```

#### **Set Active Wallet**

* **Path:** `/v2/wallet`
* **Method:** `PUT`
* **Access:** Signature API
* **Description:**\
  Sets the currently active wallet for an app type (e.g., Vult/Blimp).\
  Also updates the user's profile and rewards signup tokens if first-time setup.
* **Form Data (multipart/form-data):**
  * `refcode` (string, optional): Referral code for reward.
* **Response:**

```json
{
  "owner_id": 123,
  "wallet_id": "abcdef123456",
  "app_type": "vult",
  "kms_public_key": "kms_pub_key_value"
}
```

* **Error Response:**

```json
{
  "error": "Cannot switch wallet"
}
```

#### **Get Wallet Keys**

* **Path:** `/v2/wallet/keys`
* **Method:** `GET`
* **Access:** Signature API
* **Description:**\
  Retrieves public keys and metadata of the currently active wallet.
* **Response:**

```json
{
  "client_id": "abcdef123456",
  "wallet_id": 123,
  "name": "My Wallet",
  "public_key": "abcdef..."
}
```

#### **Check Wallet Exists**

* **Path:** `/v2/wallet/exist`
* **Method:** `GET`
* **Access:** CSRF API
* **Headers:** Non-auth headers required
* **Description:**\
  Checks whether a wallet already exists for the user.
* **Response:**

```json
{
  "field": "wallet",
  "exists": true
}
```

#### **Get Wallet List**

* **Path:** `/v2/wallet/list`
* **Method:** `GET`
* **Access:** CSRF API
* **Headers:** Non-auth headers required
* **Query Parameters (optional):**
  * `limit` (string)
  * `offset` (string)
* **Response:**

```json
[
  {
    "client_id": "abcdef123456",
    "wallet_id": 123,
    "name": "My Wallet",
    "public_key": "abcdef..."
  }
]
```

#### **Get Active Wallet**

* **Path:** `/v2/wallet/list` *(Overloaded)*
* **Method:** `GET`
* **Access:** CSRF API
* **Description:**\
  Fetches the currently active wallet for the logged-in user.
* **Response:**

```json
{
  "owner_id": "abcdef123456",
  "wallet_id": 123,
  "kms_public_key": "abcdef...",
  "app_type": "vult"
}
```

#### **Update KMS Keys**

* **Path:** `/v2/wallet/kms`
* **Method:** `PUT`
* **Access:** Signature API
* **Description:**\
  Updates the KMS (Key Management Service) public key for encryption purposes.
* **Form Data (multipart/form-data):**
  * Fields from `handler.WalletKMSDetails`, e.g.:
    * `kms_public_key`, etc.
* **Response:**

```json
{
  "message": "setting KMS successfully"
}
```

#### **Call Contact Wallets**

* **Path:** `/v2/contact/wallets`
* **Method:** `GET`
* **Access:** Signature API
* **Description:**\
  Retrieves wallets associated with user contacts.
* **Response:**

```json
[
  {
    "name": "abcdef123456",
    "phone_number": "walletid1",
    "pub_encryption_key": "johndoe",
    "client_id": "vult"
  }
]
```

### **Wallet Funding Tasks (ZBOX)**

These endpoints allow users to receive initial funding (one-time) to perform actions like creating allocations.

#### **Create Funding Task Wallet**

* **Path:** `/zbox/fund/wallet`
* **Method:** `POST`
* **Access:** Signature API
* **Description:**\
  Creates a new funding task for a wallet. This enables one-time token funding per owner/app type for bootstrapping usage.
* **Headers Required:**\
  `X-App-Client-ID`, `X-App-Client-Key`, `X-App-Timestamp`, `X-App-ID-TOKEN`, `X-App-Phone-Number`, `X-CSRF-TOKEN`, `X-APP-TYPE`
* **Body:**

```json
{
  "client_id": "abcdef123456",
  "description": "Initial funding for allocation"
}
```

* **Response (201 Created):**

```json
{
  "id": 1,
  "client_id": "abcdef123456",
  "owner_id": 123,
  "amount": 100000000,
  "checkout_session": null,
  "description": "Initial funding for allocation",
  "funded": false,
  "tx_done": false,
  "tx_hash": "",
  "app_type": "vult",
  "funding_type": "allocation",
  "cool_down": 0
}
```

#### **Get Funding Task**

* **Path:** `/v2/zbox/fund/:ID`
* **Method:** `GET`
* **Access:** Signature API
* **Description:**\
  Retrieves a specific funding task using its ID.
* **Path Param:** `ID` (integer)
* **Response:**

```json
{
  "id": 1,
  "client_id": "abcdef123456",
  "owner_id": 123,
  "amount": 100000000,
  "checkout_session": null,
  "description": "Initial funding for allocation",
  "funded": false,
  "tx_done": false,
  "tx_hash": "",
  "app_type": "vult",
  "funding_type": "allocation",
  "cool_down": 0
}
```

#### **Get Wallet Spending Status**

* **Path:** `/v2/zbox/fund/spent/status`
* **Method:** `GET`
* **Access:** Signature API
* **Description:**\
  Returns wallet’s current spending usage stats (daily/weekly) to prevent abuse.
* **Response:**

```json
{
  "owner_id": 123,
  "daily_spent": 50000000,
  "weekly_spent": 200000000,
  "app_type": "vult"
}
```

#### **Delete Funding Task**

* **Path:** `/v2/zbox/fund/:ID`
* **Method:** `DELETE`
* **Access:** Signature API
* **Description:**\
  Deletes a previously created funding task.
* **Path Param:** `ID` (integer)
* **Response (Success):**

```json
{
  "message": "funding task successful"
}
```

* **If nothing was deleted:**

```json
{
  "message": "no funding task was deleted for these details"
}
```


# Storage Allocation Management

### **Storage Allocation Management**

These endpoints manage decentralized storage allocations and permissions.

#### **Insert Allocation**

* **Path:** `/v2/allocation`
* **Method:** `POST`
* **Access:** Signature API
* **Description:**\
  Creates a new allocation for the authenticated user. Used to provision decentralized storage via blobbers.
* **Headers Required:** `AuthHeader`
* **Body:**

```json
{
  "id": "a1b2c3d4e5f6g7h8i9j0",
  "name": "My First Allocation",
  "description": "This is my primary storage allocation.",
  "allocation_type": "standard",
  "alloc_blobbers_type": "hot"
}
```

* **Response:**

```json
{
  "message": "allocation created successfully"
}
```

#### **Update Allocation**

* **Path:** `/v2/allocation`
* **Method:** `PUT`
* **Access:** Signature API
* **Description:**\
  Updates an existing allocation with new configuration such as size or blobber replacement.
* **Headers Required:** `AuthHeader`
* **Body:**

```json
{
  "id": "a1b2c3d4e5f6g7h8i9j0",
  // Additional fields from handler.AllocationDetails
}
```

* **Response:**

```json
{
  "message": "allocation updated successfully"
}
```

#### **Delete Allocation**

* **Path:** `/v2/allocation/:ID`
* **Method:** `DELETE`
* **Access:** Signature API
* **Description:**\
  Permanently deletes a specified allocation.
* **Path Param:** `ID` (string)
* **Headers Required:** `AuthHeader`
* **Response:**

```json
{
  "message": "allocation deleted successfully"
}
```

#### **Get Allocation**

* **Path:** `/v2/allocation`
* **Method:** `GET`
* **Access:** Signature API
* **Description:**\
  Fetches details of an allocation by ID using body data.
* **Headers Required:** `AuthHeader`
* **Body:**

```json
{
  "id": "allocation-id"
}
```

* **Response:**

```json
{
  "id": "a1b2c3d4e5f6g7h8i9j0",
  "wallet_id": 12345,
  "name": "My First Allocation",
  "description": "This is my primary storage allocation.",
  "allocation_type": "standard",
  "blobbers_replaced": 0,
  "app_type": "vult",
  "last_update": "2025-06-02T14:30:00",
  "alloc_blobbers_type": "hot"
}
```

#### **Get Allocation List**

* **Path:** `/v2/allocation/list`
* **Method:** `GET`
* **Access:** Signature API
* **Description:**\
  Retrieves all allocations for the authenticated owner.
* **Headers Required:** `AuthHeader`
* **Response:** Array of `AllocResponse` objects.

#### **Check Allocation Name**

* **Path:** `/v2/allocation/exists/name`
* **Method:** `GET`
* **Access:** Signature API
* **Query Parameter:** `allocation_name` (string, required)
* **Headers Required:** `AuthHeader`
* **Response:**

```json
{
  "field": "allocation_name",
  "exists": true
}
```

#### **Check Allocation (by user + app)**

* **Path:** `/v2/allocation/exists`
* **Method:** `GET`
* **Access:** CSRF API
* **Headers Required:** `NonAuthHeader`
* **Response:**

```json
{
  "field": "allocation",
  "exists": true
}
```

#### **Public Smart Contract Allocation Info**

**GetSCAllocation**

* **Path:** `/v2/getAllocation`
* **Method:** `GET`
* **Access:** Public
* **Query Parameter:** `allocation` (string, required)
* **Description:**\
  Returns full SC data and blobber info.
* **Response (simplified):**

```json
{
  "id": "a1b2c3d4e5f6g7h8i9j0",
  "data_shards": 2,
  "parity_shards": 2,
  "size": 1073741824,
  "expiration": 1750000000,
  "owner": "abcdef1234567890",
  "blobbers": [
    {
      "id": "blobberid1",
      "url": "https://blobber1.example.com",
      "terms": {
        "read_price": 100,
        "write_price": 200
      }
    }
  ]
}
```

**GetSCAllocations**

* **Path:** `/v2/geAllocations`
* **Method:** `GET`
* **Access:** Public
* **Query Parameter:** `client` (string, required)
* **Description:**\
  Lists SC allocations for a specific client ID.


# File Sharing and Share Requests

### **File Sharing**

These endpoints supports secure data sharing using auth tickets, share links, and metadata across user wallets.

#### **Insert Share Info**

* **Path:** `/v2/shareinfo`
* **Method:** `POST`
* **Access:** Signature API
* **Description:**\
  Creates a new share record using an auth\_ticket, which encapsulates access rights.
* **Headers Required:** `AuthHeader`
* **Form Data (multipart/form-data):**
  * `auth_ticket` (string, required)
  * `message` (string, optional)
  * `share_info_type` (string, optional, e.g. `public` or `private`)
  * `link` (string, optional)
* **Response:**

```json
{
  "message": "shareinfo added successfully",
  "data": {
    "auth_ticket": "base64ticket...",
    "message": "Here is your file",
    "share_info_type": "private",
    "client_id": "sender_client_id",
    "receiver": "receiver_client_id",
    "lookup_hash": "lookuphash123",
    "sender_name": "Alice",
    "link": "https://share.link",
    "receiver_name": "Bob"
  }
}
```

#### **Get Shared Files (Sent)**

* **Path:** `/v2/shareinfo/shared`
* **Method:** `GET`
* **Access:** Signature API
* **Description:**\
  Retrieves files the user has shared with others.
* **Query Parameters:**
  * `limit` (optional)
  * `offset` (optional)
  * `lookup_hash` (optional)
  * `shareInfoType` (required: e.g. `public`, `private`)
  * `exclude_ai` (optional): `"true"` to exclude AI-related shares
* **Response:**

```json
{
  "message": "Data is present for the given details",
  "data": [
    {
      "id": 1,
      "auth_ticket": "base64ticket...",
      "message": "Shared with you",
      "share_info_type": "private",
      "receiver_client_id": "receiver_client_id",
      "link": "https://share.link",
      "receiver_name": "Bob",
      "lookup_hash": "lookuphash123",
      "created_at": "2025-06-04T12:00:00",
      "updated_at": "2025-06-04T12:00:00"
    }
  ]
}
```

#### **Get Shared Files (Received)**

* **Path:** `/v2/shareinfo/received`
* **Method:** `GET`
* **Access:** Signature API
* **Description:**\
  Retrieves files that others have shared with the user.
* **Query Parameters:**
  * `limit`, `offset`, `lookup_hash` (optional)
  * `shareInfoType` (required)
* **Response:**

```json
{
  "message": "Data is present for the given details",
  "data": [
    {
      "auth_ticket": "base64ticket...",
      "message": "Here is your file",
      "share_info_type": "private",
      "client_id": "sender_client_id",
      "receiver_client_id": "receiver_client_id",
      "lookup_hash": "lookuphash123",
      "sender_name": "Alice",
      "created_at": "2025-06-04T12:00:00",
      "updated_at": "2025-06-04T12:00:00"
    }
  ]
}
```

#### **Delete Share Info**

* **Path:** `/v2/shareinfo`
* **Method:** `DELETE`
* **Access:** Signature API
* **Query Parameters (at least one required):**
  * `auth_ticket` (string)
  * `lookup_hash` (string)
* **Response (Success):**

```json
{
  "message": "deleting shareinfo successful"
}
```

* **If nothing was deleted:**

```json
{
  "message": "no shareinfo was deleted for these details"
}
```

***

### **Share Requests**

These endpoints handles inbound and outbound requests for accessing shared files or permissions.

#### **Create Share Request**

* **Path:** `/v2/sharereq`
* **Method:** `POST`
* **Access:** Signature API
* **Description:**\
  Used to request access to someone else's file. Allows one-time re-request if previously declined.
* **Body:**

```json
{
  "owner_id": "ownerid",
  "auth_ticket": "base64ticket...",
  "lookup_hash": "lookuphash",
  "message": "Please share this file"
}
```

* **Response:**

```json
{
  "message": "New Share Request is created"
}
```

#### **Get Received Share Requests**

* **Path:** `/v2/sharereq/received`
* **Method:** `GET`
* **Access:** Signature API
* **Description:**\
  Lists all incoming share requests for the user.
* **Query Parameters (optional):**\
  `client_id`, `lookup_hash`, `status`, `all`, `offset`, `limit`
* **Response:**

```json
{
  "message": "Data is present for the given details",
  "data": [
    {
      "id": "reqid1",
      "owner_id": "ownerid",
      "client_id": "clientid",
      "lookup_hash": "lookuphash",
      "status": "pending",
      "message": "Please share this file",
      "created_at": "2025-06-04T12:00:00"
    }
  ]
}
```

#### **Get Sent Share Requests**

* **Path:** `/v2/sharereq/requested`
* **Method:** `GET`
* **Access:** Signature API
* **Description:**\
  Lists all share requests sent by the user.
* **Query Parameters (optional):**\
  `owner_id`, `lookup_hash`, `status`, `all`, `offset`, `limit`
* **Response:**{

```json
  "message": "Data is present for the given details",
  "data": [
    {
      "id": "reqid2",
      "owner_id": "ownerid",
      "client_id": "clientid",
      "lookup_hash": "lookuphash",
      "status": "approved",
      "message": "Requesting access",
      "created_at": "2025-06-04T12:00:00"
    }
  ]
}
```

#### **Update Share Request**

* **Path:** `/v2/sharereq`
* **Method:** `PUT`
* **Access:** Signature API
* **Description:**\
  Updates a share request (usually to approve it). Also writes to `ShareInfo` table using the `auth_ticket`.
* **Body:**

```json
{
  "id": "reqid1",
  "status": "approved",
  "link": "https://share.link",
  "auth_ticket": "base64ticket..."
}
```

* **Response:**

```json
{
  "message": "share request updated successfully"
}
```

#### **Delete Share Request**

* **Path:** `/v2/sharereq`
* **Method:** `DELETE`
* **Access:** Signature API
* **Query Parameters:**
  * `id` (string, required)
* **Response:**

```json
{
  "message": "share request deleted successfully"
}
```


# S3 Deployment

### **Blimp – S3 Server Deployment**

These endpoints deploys S3-compatible MinIO servers on Züs, enabling seamless object storage for user allocations.

#### **Deploy S3 Server**

* **Path:** `/v2/blimp/deploy`
* **Method:** `POST`
* **Access:** Signature API
* **Description:**\
  Deploys an S3-compatible MinIO server for the authenticated user and returns the generated domain for access.
* **Body:** `handler.S3ServerDetails` (must include allocation ID, wallet ID, and configuration)
* **Response (201 Created):**

```json
{
  "id": 1,
  "wallet_id": 123,
  "ip": "192.168.1.10",
  "access_key": "AKIAIOSFODNN7EXAMPLE",
  "secret_key": "wJalrXUtnFEMI/K7MDENG/bPxRfiCYEXAMPLEKEY",
  "allocation_id": "a1b2c3d4e5f6g7h8i9j0",
  "block_worker_url": "https://dev.0box.io/dns/",
  "minio_token": "minio-token-xyz",
  "s3_server_deployed": true,
  "domain": "blimp-192-168-1-10.0box.io",
  "last_update": "2025-06-08T12:34:00"
}
```

#### **Get All Blimp Deployments**

* **Path:** `/v2/blimp/deploy`
* **Method:** `GET`
* **Access:** Signature API
* **Description:**\
  Retrieves a list of all S3 server deployments for the authenticated user.
* **Query Parameters (optional):**
  * `limit`, `offset`
* **Response:** Array of `handler.S3ServerDetailsResponse` objects.

#### **Get Blimp Status by Deployment ID**

* **Path:** `/v2/blimp/deploy/:ID`
* **Method:** `GET`
* **Access:** Signature API
* **Description:**\
  Retrieves updated deployment status by ID.
* **Path Param:** `ID` (integer)
* **Response:**\
  Same as deploy response with updated `s3_server_deployed` flag and fields.

#### **Get Blimp Status by Allocation ID**

* **Path:** `/v2/blimp/deploy/allocation/:allocation_id`
* **Method:** `GET`
* **Access:** Signature API
* **Description:**\
  Fetches the S3 deployment tied to a specific allocation.
* **Path Param:** `allocation_id` (string)
* **Response:** Same as above.

#### **Delete Blimp Deployment**

* **Path:** `/v2/blimp/deploy/:ID`
* **Method:** `DELETE`
* **Access:** Signature API
* **Description:**\
  Deletes a specific Blimp deployment by ID.
* **Path Param:** `ID` (integer)
* **Response:**

```json
{
  "message": "blimp deployment deleted successfully"
}
```

***

### **Migration Deployments (S3 Migration)**

Migrates data from existing S3 sources into Züs allocations using dedicated migration microservices.

#### **Deploy S3 Migration Application**

* **Path:** `/v2/migration/deploy`
* **Method:** `POST`
* **Access:** Signature API
* **Description:**\
  Deploys an S3 migration server for a specified allocation. This tool is used to migrate data from external S3-compatible sources into a Züs allocation.
* **Body:** `handler.S3MigrationDetails` (must include wallet ID, IP, allocation ID, etc.)
* **Response (201 Created):**

```json
{
  "id": "1",
  "wallet_id": 123,
  "ip": "192.168.1.10",
  "bucket": "my-bucket",
  "allocation_id": "a1b2c3d4e5f6g7h8i9j0",
  "s3_migration_running": true,
  "domain": "blimp-192-168-1-10.0box.io",
  "block_worker_url": "https://dev.0box.io/dns/",
  "last_update": "2025-06-08T12:34:00"
}
```

#### **Get All Migration Deployments**

* **Path:** `/v2/migration/deploy`
* **Method:** `GET`
* **Access:** Signature API
* **Description:**\
  Retrieves a list of all S3 migration deployments created by the authenticated user.
* **Query Parameters (optional):**\
  `limit`, `offset`
* **Response:**\
  Array of `handler.S3MigrationDetailsResponse` objects.

#### **Get Migration Deployment by ID**

* **Path:** `/v2/migration/deploy/:ID`
* **Method:** `GET`
* **Access:** Signature API
* **Description:**\
  Fetches detailed status of a migration deployment using its numeric ID.
* **Path Param:** `ID` (integer)
* **Response:**\
  A single `handler.S3MigrationDetailsResponse` object, updated with live status fields.

#### **Get Migration Deployment by Allocation ID**

* **Path:** `/v2/migration/deploy/allocation/:allocation_id`
* **Method:** `GET`
* **Access:** Signature API
* **Description:**\
  Retrieves a migration deployment by its linked allocation ID.
* **Path Param:** `allocation_id` (string)
* **Response:**\
  `handler.S3MigrationDetailsResponse`

#### **Delete Migration Deployment**

* **Path:** `/v2/migration/deploy/:ID`
* **Method:** `DELETE`
* **Access:** Signature API
* **Description:**\
  Deletes a specific S3 migration deployment task by its ID.
* **Path Param:** `ID` (integer)
* **Response:**

```json
{
  "message": "migration deployment deleted successfully"
}
```


# DEX State APIs and User Notifications

### **DEX State APIs**

These endpoints manage a user’s participation or workflow stage within a DEX (Decentralized Exchange) lifecycle.

#### **Create DEX State**

* **Path:** `/v2/dex/state`
* **Method:** `POST`
* **Access:** Signature API
* **Description:**\
  Initializes a DEX state record for the authenticated user, typically when beginning a DEX-related process or session.
* **Body:**\
  Follows `handler.DexState` structure.

```json
{
  "wallet_id": 12345,
  "stage": "active",
  "reference": "some-reference-string"
}
```

* **Response (200 OK):**

```json
{
  "wallet_id": 12345,
  "stage": "active",
  "reference": "some-reference-string",
  "last_update": "2025-06-09T12:00:00"
}
```

#### **Update DEX State**

* **Path:** `/v2/dex/state`
* **Method:** `PUT`
* **Access:** Signature API
* **Description:**\
  Updates the current stage or status of the DEX state. Typically used when moving from one process step to another.
* **Body:** `handler.DexState`

```json
{
  "wallet_id": 12345,
  "stage": "completed",
  "reference": "updated-reference"
}
```

* **Response:**

```json
{
  "message": "updating dex state successful"
}
```

* **If no update occurred:**

```json
{
  "message": "no dex state was updated for these details"
}
```

#### **Get DEX State**

* **Path:** `/v2/dex/state`
* **Method:** `GET`
* **Access:** Signature API
* **Description:**\
  Retrieves the current DEX state for the authenticated wallet.
* **Response:**

```json
{
  "wallet_id": "abcdef123456",
  "stage": "active",
  "reference": "",
  "last_update": "2025-06-09T12:00:00"
}
```

#### **Delete DEX State**

* **Path:** `/v2/dex/state`
* **Method:** `DELETE`
* **Access:** Signature API
* **Description:**\
  Deletes the DEX state for the authenticated user. This is typically used to reset or clear participation records.
* **Response (Success):**

```json
{
  "message": "deleting dex state successful"
}
```

* **If nothing was deleted:**

```json
{
  "message": "no dex state was deleted for these details"
}
```

***

### **User Notifications**

These APIs allow users to retrieve and manage system notifications, such as share requests, updates, or alerts. Notifications are typically pushed over WebSocket but can be fetched via API for redundancy or polling.

#### **Fetch Unread Notifications**

* **Path:** `/v2/user/notifications`
* **Method:** `GET`
* **Access:** Signature API
* **Description:**\
  Retrieves all unread notifications for the authenticated user.
* **Response (200 OK):**

```json
[
  {
    "id": 1,
    "entity_id": "abcdef123456",        // The associated entity (e.g., user)
    "entity_type": "user",
    "title": "You have a new share request",
    "body": "body of notification",
    "read": false,
    "created_at": "2025-06-09T12:00:00",
    "updated_at": "2025-06-09T12:00:00",
    "client_id": "client_id_xyz",
    "app_type": "vult"
  }
]
```

#### **Delete Notifications (Mark as Read)**

* **Path:** `/v2/user/notifications`
* **Method:** `DELETE`
* **Access:** Signature API
* **Description:**\
  Deletes all unread notifications (i.e., marks them as read) for the current user.
* **Response (200 OK):**

```json
{
  "message": "notifications deleted successfully"
}
```


# Stripe APIs

### Stripe APIs

These endpoints manage all payment and subscription-related interactions for decentralized storage services, including one-time purchases, subscription-based allocations, AI agents, operational fees, and blobber rental.

#### **Get Stripe Configuration**

**Path:** `/v2/stripe/config`\
**Method:** `GET`\
**Access:** Private API\
**Description:**\
Fetches the available Stripe pricing plans configured for different app types (e.g., `blimp`, `vult`, `chalk`, `chimney`). Each plan includes pricing and metadata like storage size and currency.

**Query Parameters:** *(None)*

**Response:**

```json
[
  {
    "id": "price_1P0abc123xyz",
    "currency": "usd",
    "lookup_key": "blimp:: 100gb",
    "metadata": {
      "AppType": "blimp",
      "Size": "107374182400"
    },
    "unit_amount": 1500,
    "unit_amount_decimal": 1500.0,
    "active": true
  },
  {
    "id": "price_1P0def456uvw",
    "currency": "usd",
    "lookup_key": "blimp:: 200gb",
    "metadata": {
      "AppType": "blimp",
      "Size": "214748364800"
    },
    "unit_amount": 2500,
    "unit_amount_decimal": 2500.0,
    "active": true
  }
]
```

**Logic:**

* Plans are retrieved using Stripe’s pricing list API.
* Filters by `AppType` and ensures only active plans are returned.
* Extracts and returns relevant metadata for each plan:
  * `AppType`
  * `Size` (in bytes)
  * `lookup_key`
  * `unit_amount`
  * `currency`
* Used to populate pricing dropdowns or plan selectors in UI.

#### **Get Stripe Customer**

**Path:** `/v2/stripe/customer`\
**Method:** `GET`\
**Access:** Private API\
**Description:**\
Retrieves the Stripe customer profile associated with the currently authenticated user.

**Query Parameters:** *(None)*

**Response:**

```json
{
  "customer_id": "cus_abc123xyz",
  "email": "user@example.com",
  "phone": "+1234567890",
  "name": "Alice"
}
```

**Logic:**

* The backend maps the authenticated user’s ID to a stored Stripe customer ID.
* If the customer does not exist:
  * Returns a `404` or triggers creation (implementation dependent).
* Returns core details for UI prefill, account linking, and analytics.

#### **Cancel Subscription**

**Path:** `/v2/stripe/cancel-subscription`\
**Method:** `POST`\
**Access:** Private API\
**Description:**\
Cancels a user’s active Stripe subscription by `subscription_id` and updates both Stripe and local DB records.

**Request Body:**

```json
{
  "subscription_id": "sub_1P0abc123xyz"
}
```

**Response:**

```json
{
  "id": 123,
  "subscription_id": "sub_1P0abc123xyz",
  "customer_id": 456,
  "app_type": "blimp",
  "cancel_at": "2025-07-01T12:00:00Z",
  "subscription_start": "2025-06-01T12:00:00Z",
  "subscription_end": "2025-07-01T12:00:00Z",
  "discount": 0,
  "plan_id": "price_1P0abc123xyz",
  "plan_name": "blimp:: 100gb",
  "duration": "month",
  "status": "canceled",
  "stripe_allocation_details": {
    "allocation_id": "alloc_abc123",
    "allocation_size": 107374182400,
    "allocation_expiry": 1750000000
  },
  "stripe_ai_subscription": false
}
```

**Logic:**

* Validates ownership of the subscription.
* Calls Stripe’s subscription cancel API.
* Marks subscription as `canceled` in the local DB.
* Updates any associated allocations or resources to reflect termination.

#### **Get Specific PaymentIntent**

**Path:** `/v2/stripe/payment-intent`\
**Method:** `GET`\
**Access:** Private API\
**Description:**\
Returns full details about a specific PaymentIntent from Stripe, including allocation linkage and payment metadata.

**Query Parameters:**

* `payment_intent` (string, required)

**Example:**\
`GET /v2/stripe/payment-intent?payment_intent=pi_1P0abc123xyz`

**Response:**

```json
{
  "payment_intent": "pi_1P0abc123xyz",
  "amount": 1500,
  "date": "2025-07-01T12:00:00Z",
  "currency": "usd",
  "method": "card",
  "description": "Purchase 100GB storage",
  "status": "succeeded",
  "subscription_id": 12345,
  "checkout_session": "cs_test_12345",
  "app_type": "blimp",
  "stripe_allocation_details": {
    "allocation_id": "alloc_abc123",
    "allocation_size": 107374182400,
    "allocation_expiry": 1750000000
  }
}
```

**Logic:**

* Validates the user owns the `payment_intent`.
* Joins local database records with Stripe payment data.
* Links back to the allocation or subscription triggered by this payment.

#### **Create One-Time Allocation Checkout Session**

**Path:** `/v2/stripe/create-allocation`

**Method:** `POST`

**Access:** Private API

**Description:** Creates a Stripe Checkout session for a **one-time purchase** of a storage allocation (currently supports `blimp` app type only). Returns a session URL for redirecting the user.

**Request Body:**\
(Required fields, full example)

```json
{
  "price_id": "price_1P0abc123xyz",
  "amount": 1500,
  "success_url": "https://yourapp.com/payment-success",
  "cancel_url": "https://yourapp.com/payment-cancel",
  "description": "Purchase 100GB storage",
  "allocation_name": "My Storage",
  "allocation_type": "HotPlus",
  "owner_public_key": "abcdef1234567890",
  "data_shards": 2,
  "parity_shards": 2,
  "size": 107374182400,
  "read_price_min": 0,
  "read_price_max": 0,
  "write_price_min": 0,
  "write_price_max": 0,
  "blobber_ids": "blobber1,blobber2,blobber3,blobber4",
  "is_enterprise": false,
  "alloc_blobbers_type": "HotPlus",
  "round_expiry": 0,
  "owner_signing_public_key": "abcdef1234567890"
}
```

**Response:**

* **Status:** `201 Created`
* **Content-Type:** `application/json`

```json
{
  "id": "cs_test_12345",
  "amount_total": 1500,
  "currency": "usd",
  "url": "https://checkout.stripe.com/pay/cs_test_12345"
}
```

**Logic:**

1. Validates all input fields.
2. Ensures `blobber_ids.length ≥ data_shards + parity_shards`.
3. Checks app type == `"blimp"`.
4. Filters blobbers by allocation type/enterprise.
5. Verifies price on mainnet (match with blobber write price).
6. Saves a `StripeAllocationOptions` task in DB.
7. Builds checkout session with success/cancel URLs and metadata.**Webhook:** `checkout.session.completed` → `case modelV2.CreateAllocation`

* Extracts `TaskID` from metadata.
* Stores payment details in DB.
* Marks the allocation as paid.
* Triggers a worker to finalize allocation on-chain.

#### **Update One-Time Allocation Checkout Session**

**Path:** `/v2/stripe/update-allocation`

**Method:** `POST`\
**Access:** Private API

**Description:** Creates a Stripe Checkout session to **upgrade** or **modify** an existing allocation (increase size, replace blobbers). Applicable for `blimp` and `vult`.

**Request Body:**

```json
{
  "price_id": "price_1P0abc123xyz",
  "amount": 1000,
  "success_url": "https://yourapp.com/payment-success",
  "cancel_url": "https://yourapp.com/payment-cancel",
  "allocation_id": "alloc_abc123",
  "size": 214748364800,
  "description": "Upgrade to 200GB",
  "add_blobber": "blobber5",
  "remove_blobber": "blobber2",
  "update_alloc_ticket": "",
  "round_expiry": 0
}
```

**Response:**

* **Status:** `201 Created`
* **Content-Type:** `application/json`

```json
{
  "id": "cs_test_67890",
  "amount_total": 1000,
  "currency": "usd",
  "url": "https://checkout.stripe.com/pay/cs_test_67890"
}
```

**Logic:**

1. Validates `allocation_id` and presence of `size` or blobber changes.
2. App type must be `blimp` or `vult`.
3. If only `remove_blobber` is provided and `amount == 0`:
   * Skips Stripe session and performs free replacement in DB.
4. Otherwise, creates `StripeAllocationOptions` task.
5. Verifies mainnet cost matches `amount`.

**Webhook:** `checkout.session.completed` → `case modelV2.UpdateAllocation`

* Processes payment.
* Updates allocation task with PaymentIntent ID.
* Triggers background update.

#### **Create Allocation Subscription**

**Path:** `/v2/stripe/create-allocation-subscription`

**Method:** `POST`

**Access:** Private API

**Description:** Creates a **recurring subscription-based** storage allocation (for `vult` or `chalk`). Validates the subscription plan and metadata.

**Request Body:**

```json
{
  "price_id": "price_1P0abc123xyz",
  "amount": 1500,
  "success_url": "https://yourapp.com/payment-success",
  "cancel_url": "https://yourapp.com/payment-cancel",
  "description": "Purchase 100GB storage",
  "allocation_name": "My Storage",
  "allocation_type": "HotPlus",
  "owner_public_key": "abcdef1234567890",
  "data_shards": 2,
  "parity_shards": 2,
  "size": 107374182400,
  "read_price_min": 0,
  "read_price_max": 0,
  "write_price_min": 0,
  "write_price_max": 0,
  "blobber_ids": "blobber1,blobber2,blobber3,blobber4",
  "is_enterprise": false,
  "alloc_blobbers_type": "HotPlus",
  "round_expiry": 0,
  "owner_signing_public_key": "abcdef1234567890"
}
```

**Response:**

* **Status:** `201 Created`
* **Content-Type:** `application/json`

```json
{
  "id": "cs_test_12345",
  "amount_total": 1500,
  "currency": "usd",
  "url": "https://checkout.stripe.com/pay/cs_test_12345"
}
```

**Logic:**

1. Ensures `AppType == vult || chalk`
2. Validates plan metadata using `checkSubscriptionPlanAllocation`
3. Stores allocation config as a `StripeAllocationOptions` task.
4. Builds Stripe Checkout session:
   * Mode: `subscription`
   * Metadata includes: `TaskID`, `ClientID`, `StripeOperation`
   * Billing anchor set \~335 days later for yearly plans
   * Links to existing customer if exists

**Webhook:** `checkout.session.completed` → `case modelV2.CreateAllocation`

* Extracts metadata
* Creates allocation and subscription record
* Processes referral discount (if any)
* Marks allocation task as ready

#### **Update Allocation Subscription**

**Path:** `/v2/stripe/update-allocation-subscription`

**Method:** `POST`

**Access:** Private API

**Description:** Used to upgrade an existing subscription-based allocation. Cancels the old subscription and creates a new one.

**Request Body:**

```json
{
  "price_id": "price_1P0abc123xyz",
  "success_url": "https://yourapp.com/payment-success",
  "cancel_url": "https://yourapp.com/payment-cancel",
  "allocation_id": "alloc_abc123",
  "size": 214748364800,
  "description": "Upgrade to 200GB"
}
```

**Response:**

* **Status:** `201 Created`
* **Content-Type:** `application/json`

```json
{
  "id": "cs_test_67890",
  "amount_total": 2500,
  "currency": "usd",
  "url": "https://checkout.stripe.com/pay/cs_test_67890"
}
```

**Logic:**

1. Validates `price_id`, `allocation_id`, and `size`
2. Matches app type and size with plan metadata
3. Finds existing active subscriptions:
   * Generates upgrade coupons
   * Adds to metadata for Stripe
4. Creates Stripe Checkout session:
   * Mode: `subscription`
   * Applies coupons/discounts
   * Adds `ExistingSubscriptions` metadata
   * Metadata: `TaskID`, `PlanName`, `Duration`, `StripeOperation`

**Webhook:** `checkout.session.completed` → `case modelV2.UpdateAllocationSubscription`

* Fetches metadata
* Cancels old subscriptions
* Saves new subscription
* Links task to updated allocation

#### **Create Chimney Subscription**

**Path:** `/v2/stripe/chimney-subscription`

**Method:** `POST`

**Access:** Private API

**Description:** Sets up a **recurring operational fee** between a blobber and validator using Stripe subscriptions.

**Request Body:**

```json
{
  "price_id": "price_1P0abc123xyz",
  "blobber_client_id": "blobber123",
  "validator_client_id": "validator456",
  "success_url": "https://yourapp.com/payment-success",
  "cancel_url": "https://yourapp.com/payment-cancel",
  "description": "Operational fee for Chimney"
}
```

**Response:**

* **Status:** `201 Created`
* **Content-Type:** `application/json`

```json
{
  "id": "cs_test_12345",
  "amount_total": 500,
  "currency": "usd",
  "url": "https://checkout.stripe.com/pay/cs_test_12345"
}
```

**Logic:**

1. Fetches customer by user ID.
2. Validates `price_id` metadata.
3. Builds metadata:
   * `BlobberClientID`, `ValidatorClientID`, `StripeOperation=ChimneySubscription`
4. Creates checkout session in subscription mode.

**Webhook:** `checkout.session.completed` → `case modelV2.ChimneySubscription`

* Parses metadata
* Creates/updates `StripeSubscriptionDetails` with Chimney info
* Triggers:
  * `fundOperationalWallets()`
  * Delegate wallet funding task
  * Link to subscription ID

#### **Create Rent Blobber Subscription**

**Path:** `/v2/stripe/rent-blobber-subscription`\
**Method:** `POST`\
**Access:** Private API\
**Description:**\
Creates a Stripe Checkout session for a **recurring subscription to rent a blobber** (dedicated storage provider). This allows a user to rent storage capacity directly from a specific blobber.

**Request Body:**

```json
{
  "price_id": "price_1P0abc123xyz",
  "blobber_id": "blobber123",
  "success_url": "https://yourapp.com/payment-success",
  "cancel_url": "https://yourapp.com/payment-cancel",
  "description": "Rent blobber for 1 year"
}
```

**Response:**

* **Status:** `201 Created`
* **Content-Type:** `application/json`

```json
{
  "id": "cs_test_rent_blobber_001",
  "amount_total": 8000,
  "currency": "usd",
  "url": "https://checkout.stripe.com/pay/cs_test_rent_blobber_001"
}
```

**Logic:**

1. Fetch Stripe customer for the authenticated user.
2. Retrieve Stripe plan using `price_id` and extract metadata.
3. Prepare metadata:
   * `StripeOperation`: `"RentBlobberSubscription"`
   * `ClientID`, `AppType`, `BlobberID`, `DelegateWallet`, `PlanName`, `Duration`, `Description`, `PriceID`, etc.
4. Create Stripe Checkout session in subscription mode using metadata.
5. Return Checkout session details to the client.

**Webhook Handler:** `case modelV2.RentBlobberSubscription`

* On `checkout.session.completed`:
  * Extracts metadata (plan, blobber ID, delegate wallet, shift price ID, etc.)
  * Generates split key using ZVault
  * Fetches Portainer API endpoint for blobber host
  * Stops and renames old container, then deploys new one with split key
  * Deletes old container after successful migration
  * Updates `rent_blobber` record and saves delegate wallet and subscription metadata
  * Marks blobber as rented by the user in the database

#### **Create AI Agent Subscription**

**Path:** `/v2/stripe/ai-agent-subscription`

**Method:** `POST`

**Access:** Private API

**Description:** Creates a Stripe Checkout session for subscribing to an **AI Agent** service. This enables a recurring subscription to use AI inference APIs on the platform.

**Request Body:**

```json
{
  "price_id": "price_1P0abc123xyz",
  "success_url": "https://yourapp.com/payment-success",
  "cancel_url": "https://yourapp.com/payment-cancel",
  "description": "AI Agent monthly subscription"
}
```

**Response:**

* **Status:** `201 Created`
* **Content-Type:** `application/json`

```json
{
  "id": "cs_test_ai_agent_001",
  "amount_total": 2500,
  "currency": "usd",
  "url": "https://checkout.stripe.com/pay/cs_test_ai_agent_001"
}
```

**Logic:**

1. Fetch Stripe customer for the authenticated user.
2. Validate `price_id` by fetching associated Stripe plan.
3. Add metadata:
   * `StripeOperation`: `"AiAgentSubscription"`
   * `ClientID`, `PlanName`, `Duration`, `PriceID`, `Description`
4. Create Stripe subscription checkout session with metadata
5. Return session details to client

**Webhook Handler:** `case modelV2.AiAgentSubscription`

* On `checkout.session.completed`:
  * Extract metadata (`PriceID`, `PlanName`, `Duration`, etc.)
  * Fetch subscription details from Stripe using `subscription_id`
  * Save new record in `StripeSubscriptionDetails`
  * Create new entry in `AiSubscriptionEntity` to link user ID and subscription

#### 18. **Get Stripe Subscription**

**Path:** `/v2/stripe/subscription`

**Method:** `GET`

**Access:** Private API

**Description:** Returns the **Stripe subscription details** for a specific allocation or operational wallet (blobber and validator pair).

**Query Parameters:**

* Use either of the following:
  * `allocation_id=alloc_abc123`
  * `blobber_client_id=blobber123&validator_client_id=validator456`

**Response:**

* **Status:** `200 OK`
* **Content-Type:** `application/json`

```json
{
  "subscription_id": "sub_1P0abc123xyz",
  "customer_id": "cus_abc123xyz",
  "stripe_allocation_details": {
    "allocation_id": "alloc_abc123",
    "allocation_size": 107374182400,
    "allocation_expiry": 1750000000
  },
  "stripe_chimney_details": {
    "blobber_client_id": "blobber123",
    "validator_client_id": "validator456"
  },
  "stripe_rent_blobber_details": {
    "blobber_id": "blobber123",
    "delegate_wallet": "wallet_xyz",
    "shift_price_id": "price_1P0def456uvw"
  },
  "app_type": "blimp",
  "cancel_at": "2025-07-01T12:00:00Z",
  "subscription_start": "2025-06-01T12:00:00Z",
  "subscription_end": "2025-07-01T12:00:00Z",
  "discount": 0,
  "plan_id": "price_1P0abc123xyz",
  "plan_meta_data": "blimp:: 100gb",
  "duration": "month",
  "status": "active"
}
```

**Logic:**

* Uses provided `allocation_id` or `(blobber_client_id, validator_client_id)` to query internal DB
* Fetches subscription metadata and links it to the Stripe customer and plan

#### **Get All Stripe Subscriptions**

**Path:** `/v2/stripe/subscriptions`

**Method:** `GET`

**Access:** Private API

**Description:** Returns **all active Stripe subscriptions** for the authenticated user.

**Query Parameters (Optional):**

* `ai_subscription=true` → filters only AI agent subscriptions

**Sample Requests:**

```
GET /v2/stripe/subscriptions
GET /v2/stripe/subscriptions?ai_subscription=true
```

**Response:**

* **Status:** `200 OK`
* **Content-Type:** `application/json`

```json
[
  {
    "subscription_id": "sub_1P0abc123xyz",
    "customer_id": "cus_abc123xyz",
    "plan_id": "price_1P0abc123xyz",
    "app_type": "blimp",
    "plan_meta_data": "blimp:: 100gb",
    "duration": "month",
    "status": "active",
    "subscription_start": "2025-06-01T12:00:00Z",
    "subscription_end": "2025-07-01T12:00:00Z"
  },
  {
    "subscription_id": "sub_1P0ai789xyz",
    "customer_id": "cus_abc123xyz",
    "plan_id": "price_1P0ai789xyz",
    "app_type": "ai",
    "plan_meta_data": "ai:: pro",
    "duration": "month",
    "status": "active",
    "subscription_start": "2025-06-15T12:00:00Z",
    "subscription_end": "2025-07-15T12:00:00Z"
  }
]
```

**Logic:**

* Fetches subscriptions tied to the user’s Stripe customer ID
* Filters based on `app_type` if `ai_subscription=true`

#### 20. **Get Active Rent Blobber Subscriptions**

**Path:** `/v2/stripe/rent-blobber-subscriptions`

**Method:** `GET`

**Access:** Private API

**Description:** Returns all **active rent blobber subscriptions** linked to the authenticated user.

**Response:**

* **Status:** `200 OK`
* **Content-Type:** `application/json`

```json
[
  {
    "subscription_id": "sub_1P0rent001xyz",
    "customer_id": "cus_abc123xyz",
    "blobber_id": "blobber123",
    "delegate_wallet": "wallet_xyz",
    "shift_price_id": "price_1P0rentxyz",
    "plan_id": "price_1P0rentxyz",
    "app_type": "blimp",
    "duration": "year",
    "status": "active",
    "subscription_start": "2025-01-01T00:00:00Z",
    "subscription_end": "2026-01-01T00:00:00Z"
  }
]
```

**Logic:**

* Queries all subscriptions where `stripe_blobber_id IS NOT NULL`
* Filters only active records tied to the authenticated user

#### **Get Stripe Payment Intents**

**Path:** `/v2/stripe/payment-intents`\
**Method:** `GET`\
**Access:** Private API

**Description:**\
Returns all Stripe payment intents (i.e., payment transaction records) for the currently authenticated user. This includes both one-time payments and subscription-related charges. The data is fetched using the user’s Stripe customer ID and includes relevant metadata for each payment.

***

**Response:**\
**Status:** `200 OK`\
**Content-Type:** `application/json`

```json
jsonCopyEdit[
  {
    "payment_intent": "pi_1P0abc123xyz",
    "amount": 1500,
    "currency": "usd",
    "status": "succeeded",
    "date": "2025-07-01T12:00:00Z",
    "description": "Purchase 100GB storage",
    "allocation_id": "alloc_abc123",
    "subscription_id": null
  },
  {
    "payment_intent": "pi_1P0def456uvw",
    "amount": 2500,
    "currency": "usd",
    "status": "pending",
    "date": "2025-07-10T10:00:00Z",
    "description": "Yearly subscription upgrade",
    "allocation_id": null,
    "subscription_id": "sub_1P0xyzsub456"
  }
]
```

```json
    "date": "2025-07-10T12:00:00Z",
    "description": "Upgrade to 200GB",
    "allocation_id": "alloc_def456",
    "subscription_id": "sub_1P0def456uvw"
  }
]
```


# AI APIs

### **AI APIs**

This section includes all endpoints that facilitate AI interactions through various models such as OpenAI, Grok, DeepSeek, and Replicate. These APIs allow users to initiate AI conversations, store memories, submit batch jobs, retrieve results, and generate ephemeral keys for short-lived operations. All endpoints require authentication and operate on a token-based credit system.

#### **1. Post AI Chat**

**Endpoint:** `/v2/ai_chat`

**Method:** POST

**Access:** Private API

**Description:** Handles user chat requests to the AI agent (e.g., OpenAI, Grok, DeepSeek, Replicate). Sends prompt, context, or shared file information and returns AI-generated output (text, image, or PDF).

**Request Body:**

```json
{
  "share_info_urls": ["https://..."],         // Optional: URLs to shared files for context
  "share_info_ids": "abc123,def456",          // Optional: Comma-separated share info IDs
  "prompt": "Explain quantum computing.",      // Required: User’s input question
  "model": "gpt-4o",                           // Required: AI model to use
  "is_file_processing": false,                // Optional: If true, files will be processed
  "master_prompt": "summarize",               // Optional: System-level prompt
  "messages": [                               
    {"role": "user", "content": "Hi!"}         // Optional: Message history
  ],
  "file_type": "text",                         // Optional: File type if uploading
  "is_agent_input": false,                     // Optional: If true, returns a PDF
  "web_search": false                          // Optional: Enables web search context
}
```

**Response:**

Status: `200 OK`

Content-Type: `application/json`

Returns AI-generated content in text, image, or PDF form depending on input.

**Logic:**

* Verifies user’s AI token balance
* Validates model access based on subscription tier
* Applies `master_prompt` if provided
* Loads previous memory/context if model supports it
* Downloads files via GoSDK using `share_info_urls`/`ids`
* Uploads image to S3 if `file_type` is image and prepares for AI processing
* Sends prompt/context to model backend (e.g., OpenAI, Grok)
* Deducts token cost based on operation
* Returns AI-generated result (text/image/PDF)

#### **Create Memory for AI**

**Endpoint:** `/v2/create_memory`

**Method:** POST

**Access:** Private API

**Description:** Stores a memory/context string to personalize future AI interactions. Each operation deducts tokens.

**Request Body:**

```json
{
  "prompt": "Store this context for future reference."   // Required
}
```

**Response:**\
Status: `200 OK`\
Content-Type: `application/json`

```json
{
  "message": "Memory stored successfully."
}
```

**Logic:**

* Verifies AI token balance
* If sufficient:
  * Stores memory via `mem0Client.CreateMemoryWithContent`
  * Deducts token cost
  * Returns success message
* If insufficient:
  * Returns error message indicating low balance

#### **Post OpenAI Batch Request**

**Path:** `/v2/openai_batch_request`

**Method:** POST

**Access:** Private API

**Description:** Queues a batch AI request for asynchronous processing by OpenAI, suitable for large-scale prompt execution or document-based answering.

**Request Body:**

```json
{
  "share_info_urls": ["https://..."],         // Optional
  "share_info_ids": "abc123,def456",          // Optional
  "prompt": "Summarize the following document.", // Required
  "model": "gpt-4o-mini",                     // Required
  "is_file_processing": true,                 // Optional
  "master_prompt": "summarize",               // Optional
  "messages": [],                             // Optional
  "file_type": "text",                        // Optional
  "is_agent_input": false,                    // Optional
  "web_search": false                         // Optional
}
```

**Response:**\
Status: `200 OK`

Content-Type: `application/json`

```json
{
  "batch_id": "batch_abc123xyz",
  "status": "queued"
}
```

**Logic:**

* Verifies user’s AI token balance
* Validates selected model against plan restrictions
* Stores a batch request record in `OpenAiBatchRepository` with metadata
* Returns batch ID and status to user

**Worker Behavior:**

* A background worker named `openai_batch_request` picks up new requests
* Submits the prompts to OpenAI’s batch API
* Monitors for completion
* Stores result and cost in the database
* Deducts tokens accordingly

#### **Get OpenAI Batch Response**

**Path:** `/v2/openai_batch_response`

**Method:** GET

**Access:** Private API

**Query Parameter:**

* `batch_id`: ID of the previously submitted batch job (required)

**Description:**\
Fetches the results of a previously submitted batch AI job from OpenAI, streaming a `.jsonl` file.

**Response:**

Status: `200 OK`

Content-Disposition: `attachment; filename="batch_results.jsonl"`

Content-Type: `application/jsonl`

Response is a streamed file containing one JSON response per line.

**Logic:**

* Uses OpenAI API client to query batch status
* Checks if job is completed
  * If not completed, returns an error
* If completed, finds and downloads the result file
* Streams the `.jsonl` output back to the user

#### **Get Replicate Prediction Response**

**Path:** `/v2/prediction_response`

**Method:** GET

**Access:** Private API

**Query Parameter:**

* `prediction_id`: ID of the prediction job on Replicate (required)

**Description:** Retrieves the output of a previously submitted AI model job from Replicate. Returns as JSON or PDF depending on model type and output.

**Response (Example - Text JSON):**

Status: `200 OK`

Content-Type: `application/json`

```json
{
  "model": "deepseek",
  "status": "succeeded",
  "output": "Here is the predicted response."
}
```

**Logic:**

* Polls Replicate API using `PollPredictionResult(prediction_id)`
* Checks current job status:
  * If `succeeded`:
    * Returns raw result for most models
    * If model is `deepseek` and file type is not chat, generates and streams a PDF
  * If `failed`: returns an error with failure info
  * If `running`: returns a status update

#### Generate Ephemeral Key

**Path:** `/v2/generate_ephemeral_key`

**Method:** `GET`

**Access:** Private API

**Description:**\
Generates a temporary **ephemeral key** for secure, short-lived AI operations (e.g., audio chat using OpenAI). This key provides limited access and expires after a short period, improving security.

**How it works:**

1. Authenticates the user using headers.
2. Checks the user’s AI subscription token balance.
   * If tokens are sufficient, a fixed amount is deducted.
   * If not, an error is returned.
3. Calls OpenAI’s API to generate the ephemeral key.
4. Returns the generated ephemeral key to the client.

**Response:**\
**Status:** `200 OK`\
**Content-Type:** `application/json`

```json
{
  "ephemeral_key": "sk-ephemeral-xyz123456789",
  "expires_in": 3600,
  "created_at": "2025-06-24T12:34:56Z"
}
```

**Error Responses:**

* **Status:** `401 Unauthorized`\
  Returned if authentication fails or token is missing.
* **Status:** `402 Payment Required`\
  Returned if the user’s AI subscription token balance is insufficient.

  ```json
  {
    "error": "Insufficient AI tokens to generate ephemeral key"
  }
  ```
* **Status:** `500 Internal Server Error`\
  If OpenAI API fails or a server error occurs.

  ```json
  {
    "error": "Failed to generate ephemeral key. Please try again later."
  }
  ```


# zVault API

## Deletes existing master key.

> Deletes existing master key, propagating changes to Zauth.

```json
{"openapi":"3.1.1","info":{"version":"0.0.1"},"paths":{"/delete/:client_id":{"post":{"description":"Deletes existing master key, propagating changes to Zauth.","summary":"Deletes existing master key.","parameters":[{"type":"string","description":"0box generated JWT token","name":"X-Jwt-Token","in":"header","required":true}],"responses":{"200":{"description":"OK"},"400":{"description":"Bad Request"},"500":{"description":"Internal Server Error"}}}}}}
```

## Generate new split key.

> Generates new split key using previously stored or generated master key, propagating changes to zauth.

```json
{"openapi":"3.1.1","info":{"version":"0.0.1"},"paths":{"/key/:client_id":{"post":{"description":"Generates new split key using previously stored or generated master key, propagating changes to zauth.","summary":"Generate new split key.","parameters":[{"type":"string","description":"0box generated JWT token","name":"X-Jwt-Token","in":"header","required":true}],"responses":{"201":{"description":"Created"},"400":{"description":"Bad Request"},"500":{"description":"Internal Server Error"}}}}}}
```

## GET /keys/:client\_id

> Retrieves split keys for the given master key.

```json
{"openapi":"3.1.1","info":{"version":"0.0.1"},"paths":{"/keys/:client_id":{"get":{"summary":"Retrieves split keys for the given master key.","parameters":[{"type":"string","description":"0box generated JWT token","name":"X-Jwt-Token","in":"header","required":true}],"responses":{"200":{"description":"OK"},"400":{"description":"Bad Request"},"500":{"description":"Internal Server Error"}}}}}}
```

## GET /restrictions

> Retrieves restrictions for the given split key.

```json
{"openapi":"3.1.1","info":{"version":"0.0.1"},"paths":{"/restrictions":{"get":{"summary":"Retrieves restrictions for the given split key.","parameters":[{"type":"string","description":"0box generated JWT token","name":"X-Jwt-Token","in":"header","required":true},{"type":"string","description":"Peer public key of the split key, which restrictions should be updated","name":"X-Peer-Public-Key","in":"header","required":true}],"responses":{"200":{"description":"OK"},"400":{"description":"Bad Request"},"500":{"description":"Internal Server Error"}}}}}}
```

## Update restrictions for the existing split key.

> Updates restrictions for existing split key, propagating changes to Zauth.

```json
{"openapi":"3.1.1","info":{"version":"0.0.1"},"paths":{"/restrictions/:client_id":{"put":{"description":"Updates restrictions for existing split key, propagating changes to Zauth.","summary":"Update restrictions for the existing split key.","parameters":[{"type":"string","description":"0box generated JWT token","name":"X-Jwt-Token","in":"header","required":true},{"type":"string","description":"Peer public key of the split key, which restrictions should be updated","name":"X-Peer-Public-Key","in":"header","required":true}],"responses":{"200":{"description":"OK"},"400":{"description":"Bad Request"},"500":{"description":"Internal Server Error"}}}}}}
```

## Revoke existing split key.

> Revokes existing split key, propagating changes to Zauth.

```json
{"openapi":"3.1.1","info":{"version":"0.0.1"},"paths":{"/revoke/:client_id":{"post":{"description":"Revokes existing split key, propagating changes to Zauth.","summary":"Revoke existing split key.","parameters":[{"type":"string","description":"0box generated JWT token","name":"X-Jwt-Token","in":"header","required":true}],"responses":{"200":{"description":"OK"},"400":{"description":"Bad Request"},"500":{"description":"Internal Server Error"}},"requestBody":{"content":{"application/x-www-form-urlencoded":{"schema":{"type":"string"}}},"description":"Public key of split key to be removed","required":true}}}}}
```

## Share existing split key to the givens user.

> Shares previously created split key to the given user.

```json
{"openapi":"3.1.1","info":{"version":"0.0.1"},"paths":{"/share":{"post":{"description":"Shares previously created split key to the given user.","summary":"Share existing split key to the givens user.","parameters":[{"type":"string","description":"0box generated JWT token","name":"X-Jwt-Token","in":"header","required":true}],"responses":{"200":{"description":"OK"},"400":{"description":"Bad Request"},"500":{"description":"Internal Server Error"}}}}}}
```

## Store 0box wallet private key.

> Stores external 0box generated wallet private key as master key used to generate new split keys.

```json
{"openapi":"3.1.1","info":{"version":"0.0.1"},"paths":{"/store":{"post":{"description":"Stores external 0box generated wallet private key as master key used to generate new split keys.","summary":"Store 0box wallet private key.","parameters":[{"type":"string","description":"0box generated JWT token","name":"X-Jwt-Token","in":"header","required":true}],"responses":{"201":{"description":"Created"},"400":{"description":"Bad Request"},"500":{"description":"Internal Server Error"}}}}}}
```

## Generate new wallet.

> Generates new wallet used as master key to generate new split keys.

```json
{"openapi":"3.1.1","info":{"version":"0.0.1"},"paths":{"/wallet":{"post":{"description":"Generates new wallet used as master key to generate new split keys.","summary":"Generate new wallet.","parameters":[{"type":"string","description":"0box generated JWT token","name":"X-Jwt-Token","in":"header","required":true}],"responses":{"201":{"description":"Created"},"400":{"description":"Bad Request"},"500":{"description":"Internal Server Error"}}}}}}
```

## GET /wallets

> Retrieves split wallets for the given master key.

```json
{"openapi":"3.1.1","info":{"version":"0.0.1"},"paths":{"/wallets":{"get":{"summary":"Retrieves split wallets for the given master key.","parameters":[{"type":"string","description":"0box generated JWT token","name":"X-Jwt-Token","in":"header","required":true}],"responses":{"200":{"description":"OK"},"400":{"description":"Bad Request"},"500":{"description":"Internal Server Error"}}}}}}
```

## GET /wallets/shared

> Retrieves shared split keys shared with the given user.

```json
{"openapi":"3.1.1","info":{"version":"0.0.1"},"paths":{"/wallets/shared":{"get":{"summary":"Retrieves shared split keys shared with the given user.","parameters":[{"type":"string","description":"0box generated JWT token","name":"X-Jwt-Token","in":"header","required":true}],"responses":{"200":{"description":"OK"},"400":{"description":"Bad Request"},"500":{"description":"Internal Server Error"}}}}}}
```


# CLIs

Interact with Blimp using CLI

Blimp is an AI-ready, distributed on-prem storage solution powered by Züs, the world’s fastest blockchain, offering 400 ms optimistic and 2-second full finality. As the first S3-compatible storage platform that is both ACID-compliant and runs on a zero-knowledge network, Blimp is designed for enterprise-scale storage and AI-driven applications.

In this tutorial, you'll learn how to install and set up essential CLI tools like `zwalletcli` and `zboxcli`. You'll also discover how to use the CLI to upload, download, and update files in your Blimp allocation. An allocation is a contract specifying how your data will be stored, including details like storage size, read/write prices, and data/parity shards.

For more information on Blimp, check out our [docs](https://docs.zus.network/zus-docs/webapps/blimp).

### **Prerequisites**

1. Have not set up a Züs account on Blimp or any other Züs app (e.g., Bolt or Vult)
2. Linux (Ubuntu Preferred) Version: 20.04+ or Mac(Apple Silicon or Intel) Version: Big Sur (v11.0.1+)

> **Note:** If you already have a wallet or allocation with another Züs app, you can follow the instructions [here](https://docs.zus.network/zus-docs/webapps/blimp/getting-started) to create an allocation on Blimp. For more details on different allocation types, refer to [this guide](https://docs.zus.network/zus-docs/webapps/blimp/configure-storage).

### **Step 1 - Get a wallet and a standard Blimp allocation**

1. Go to Blimp.software and "Sign Up For Free" (Figure 1).

<figure><img src="/files/9hCIhjdVAGBBvlNA3yrz" alt=""><figcaption><p>Fig1. Homepage for blimp.software</p></figcaption></figure>

2. Next complete the sign up process by picking a Google/Apple/Okta SSO **or** enter a username + email. Then, complete the one-time password (OTP) check.
3. Record and verify your mnemonic.

{% hint style="warning" %}
**Warning:** If you lose this mnemonic, you will not be able to recover your account or data.
{% endhint %}

4. Blobbers are independent servers that store your data. During setup, you must choose the blobber 'brand' you want to host your allocation data. Select the option that best fits your needs—in this tutorial, we will choose Züs‑Only.

| Option           | Description                                                                          |
| ---------------- | ------------------------------------------------------------------------------------ |
| **Züs‑Only**     | Only Züs‑operated blobbers (max performance & support)                               |
| **All‑Blobbers** | Every available blobber, both company‑owned and independent (decentralization focus) |
| **Unbranded**    | Only third‑party blobbers                                                            |
| **All Brands**   | A mix of Züs‑operated and third‑party blobbers                                       |

5. Once the wallet has been generated, you will be directed to your Blimp web app. If you encounter an error, just click **Create an allocation**—it will still generate the 2 GB allocation.
6. Once created, go to your Manage Allocation page. You can find your allocation ID here.

<figure><img src="/files/iw1RNHKn5lgmVLtdbFXZ" alt=""><figcaption><p>Fig2: Manage Allocations tab in Blimp web app</p></figcaption></figure>

### **Step 2 -Install the CLIs**

In this section, we will be setting up and using two CLIs:

* `zwalletcli`- for your wallet interactions (Github: <https://github.com/0chain/zwalletcli>)
* `zboxcli` - for storage allocation interactions (Github: <https://github.com/0chain/zboxcli>)

Prerequisites:

* Go: Installation instructions for Mac, Linux and Windows can be found [here](https://go.dev/doc/install).

Procedures:

1. Starting with zboxcli installation, clone the `zboxcli` repo and install

   ```bash
   git clone https://github.com/0chain/zboxcli.git
   cd zboxcli
   make install
   ```
2. Add config yaml at \~/.zcn/config.yaml

   ```yaml
   cat > ~/.zcn/config.yaml << EOF
   block_worker: https://mainnet.zus.network/dns
   signature_scheme: bls0chain
   min_submit: 50 # in percentage
   min_confirmation: 50 # in percentage
   confirmation_chain_length: 3
   EOF
   ```
3. Run `zbox` command to display the list of supported command. This will verify your installation was successful.

   ```bash
   ./zbox
   ```
4. Once successful, move back to the parent directory

   ```bash
   cd ..
   ```
5. To install `zwalletcli`, clone the repo and install

   ```bash
   git clone https://github.com/0chain/zwalletcli.git
   cd zwalletcli
   make install
   ```
6. Run `zwallet` command to display the list of supported command. This will verify your installation was successful.

   ```bash
   ./zwallet
   ```

### **Step 3 - Extract your wallet information**

When the CLIs are both properly installed, have your mnemonic available.

With your mnemonic, you will recover your wallet and store the information into a JSON file.

1. Recover your wallet:

   ```bash
   cd zwalletcli
   ./zwallet recoverwallet --wallet zus_wallet.json --mnemonic "your twenty four word mnemonic"
   ```

{% hint style="info" %}
For the wallet flag, you can specify any name for your JSON file. In this case, we have named the JSON file 'zus\_wallet'.
{% endhint %}

2. If successful, it will return "Wallet recovered!!" and the wallet should be saved in your \~/.zcn folder. To verify run the following:

   ```bash
   cat ~/.zcn/zus_wallet.json
   ```

The output of the json should look like this:

```json
{"client_id":"xxxxxxxxxxxxxxxxxxxxxxxxxxxxx",
"client_key":"xxxxxxxxxxxxxxxxxxxxxxxxxxxxxxxxx",
"keys":[{"public_key":"xxxxxxxxxxxxxxxxxxxxxxxxxxxxxxxxxxxxxxxxxx",
"private_key":"xxxxxxxxxxxxxxxxxxxxxxxxxxxxxxxxxxxxxx"}],
"mnemonics":"xxxx xxxx xxxx xxxxx",
"version":"1.0","date_created":"2023-05-03T12:44:46+05:30","nonce":0,"is_split":false}
```

### **Step 4 - Interact with your Blimp allocation**

Once everything has been setup, have your blimp allocation ID and the wallet.json ready .\
As long as you have the allocation ID, these following `zbox` commands apply to any type of allocation you may have.

To start, make sure you are in the zboxcli directory.

```bash
cd ..
cd zboxcli
```

In this example, these will be the main inputs:

* wallet : zus\_wallet.json
* allocation ID: 9e6fad9af55c41f4af0b71b6a4af8e6ec18e24acc3d4d37b22997c297b79a333

#### Uploading a File

We will be using the `upload` command. In this example, we will highlight some common flags:

* \--localpath : Local path of file to upload
* \--remotepath: Path on Blimp allocation you will upload to
* \--allocation: Allocation ID
* \--wallet: Local path to wallet JSON

{% hint style="success" %}
If you want to upload to a folder in your Blimp web app, first add a folder in the app. Then, click the ellipsis on the folder icon and select 'Folder Details.' In the modal, locate the 'Path' field, which you can use for the remotepath flag.
{% endhint %}

This command will upload a single local file into your root path in the Blimp allocation.

```bash
./zbox upload --localpath /My/local/path/cat-headphones.png --remotepath / --allocation 9e6fad9af55c41f4af0b71b6a4af8e6ec18e24acc3d4d37b22997c297b79a333 --wallet zus_wallet.json
```

To check for success, you can read the console output.

<pre><code><strong>Output
</strong>...
<strong>Status completed callback. Type = image/png. Name = cat-headphones.png
</strong><strong>...
</strong></code></pre>

You can also check your blimp allocation (Figure 3). After the page refreshes, you should be able to see your newly uploaded file.

<figure><img src="/files/tHnqmtVFzHwkUeAy6Dak" alt=""><figcaption><p>Fig3: Root Path in Blimp allocation</p></figcaption></figure>

To learn more about the command check here : <https://github.com/0chain/zboxcli?tab=readme-ov-file#upload>

#### Downloading a File

We will be using the `download` command. In this example, we will highlight some common flags:

* \--localpath : Local path to store your downloaded file
* \--remotepath: Path of file on Blimp you would like to download
* \--allocation: Allocation ID
* \--wallet: Local path to wallet JSON

This will download my file from my Blimp root path and store it in my local Downloads folder.

```bash
./zbox download  --remotepath /cat-headphones.png --localpath  /Local/path/to/Downloads --allocation 9e6fad9af55c41f4af0b71b6a4af8e6ec18e24acc3d4d37b22997c297b79a333 --wallet zus_wallet.json
```

{% hint style="info" %}
If you do not know your file's remotepath, you can click the file icon's ellipsis . Click "File Details" and check the path (see Figure 4)
{% endhint %}

<figure><img src="/files/sNqJp0C4TtWdsZtqET5S" alt=""><figcaption><p>Fig4: File Details for uploaded file</p></figcaption></figure>

To check for success, you can read the console output.

<pre><code><strong>Output
</strong>...
<strong>Status completed callback. Type = image/png. Name = cat-headphones.png
</strong></code></pre>

You can also check your local path to see if the file is present in the specified directory.

To learn more about the command check here :<https://github.com/0chain/zboxcli?tab=readme-ov-file#download>

#### Updating a File

We will be using the `update` command. In this example, we will highlight some common flags:

* \--localpath : Local path of the file you would like to update
* \--remotepath: Path of file on Blimp you would like to update
* \--allocation: Allocation ID
* \--wallet: Local path to wallet JSON

This updates the existing .txt file in my Blimp root path with the file of the same name from my local directory.

```bash
./zbox update --localpath /My/local/path/example-data.txt --remotepath /example-data.txt --allocation 9e6fad9af55c41f4af0b71b6a4af8e6ec18e24acc3d4d37b22997c297b79a333 --wallet zus_wallet.json
```

To check for success, you can read the console output.

```
Output
...
Status completed callback. Type = text/plain. Name = example-data.txt
```

To learn more about the command check here : <https://github.com/0chain/zboxcli?tab=readme-ov-file#update>

#### Uploading Multiple Files

We will be using the `upload` command. In this example, we will highlight some common flags:

* \--multiuploadjson : Local path of multiple upload paths in a JSON
* \--remotepath: Path on Blimp allocation you will upload to
* \--allocation: Allocation ID
* \--wallet: Local path to wallet JSON

Example of the JSON used for multiuploadjson:

```json
[
    {
      "remotePath": "/",
      "filePath": "/My/local/path/cat-headphones.png",
      "thumbnailPath": "",
      "fileName": "cat-headphones.png",
      "encrypt": false
    },
    {
      "remotePath": "/",
      "filePath": "/My/local/path/pikachu wallpaper.webp",
      "thumbnailPath": "",
      "fileName": "pikachu wallpaper.webp",
      "encrypt": false
    },
    {
      "remotePath": "/",
      "filePath": "/My/local/path/deku wallpaper3.png",
      "thumbnailPath": "",
      "fileName": "deku wallpaper3.png",
      "encrypt": false
    }
]
```

{% hint style="warning" %}
A maximum of 50 files can be uploaded per command execution
{% endhint %}

This reads the paths in the multi-upload.json file and uploads each file to the root path of the Blimp allocation.

```bash
./zbox upload --multiuploadjson /My/local/path/multi-upload.json --remotepath / --allocation 9e6fad9af55c41f4af0b71b6a4af8e6ec18e24acc3d4d37b22997c297b79a333 --wallet zus_wallet.json
```

To check for success, you can see if the files have been uploaded to your Blimp allocation or check output in the console.

```
Output
...
Status completed callback. Type = image/png. Name = cat-headphones.png
Status completed callback. Type = image/webp. Name = pikachu wallpaper.webp
Status completed callback. Type = image/png. Name = deku wallpaper3.png
...
```

To learn more about the command check here : <https://github.com/0chain/zboxcli?tab=readme-ov-file#upload>


# Zbox CLI

## Overview

The **zbox CLI** is the command-line interface for interacting with **Züs dStorage**.\
It provides developers and DevOps engineers with powerful commands to create allocations, upload and manage files, configure blobbers and validators, and handle token pools — all directly from the terminal.

zbox is built on top of the **Züs GoSDK** and is the primary tool for experimenting with and integrating Züs dStorage into applications.

### Key Capabilities

* **Storage Management**\
  Create and update allocations, list blobbers, transfer ownership, finalize, or cancel allocations.
* **File Operations**\
  Upload, download, update, delete, copy, move, and share files.\
  Support for **encrypted storage**, **public/private shares**, and **live feed uploads**.
* **Network & Configuration**\
  Inspect blobbers and validators, update their settings, and manage network configuration files (`config.yaml`, `network.yaml`).
* **Token Pools & Rewards**\
  Work with read, write, stake, and challenge pools.\
  Lock/unlock tokens, collect staking rewards, and query smart contract configurations.
* **Security Utilities**\
  Sign and decrypt data with wallet credentials, manage wallet keys, and enforce secure operations.

### When to Use zbox

* **Developers** prototyping apps that need secure, decentralized storage.
* **System administrators** managing blobber/validator settings.
* **Enterprise teams** integrating Züs into CI/CD pipelines or storage backends.
* **Power users** wanting full control over allocations, pools, and file-sharing.

***

### Documentation Structure

This CLI section is organized into the following parts:

1. **Installation & Getting Started**\
   How to install zbox, prerequisites, and first-time setup.
2. **Global Flags**\
   Parameters that apply across all commands.
3. **Creating & Managing Allocations**\
   Commands for allocation lifecycle (create, update, transfer, cancel, finalize).
4. **Uploading & Managing Files**\
   Commands for directories, upload/download, sharing, metadata, and repair.
5. **Wallet & Allocation Info**\
   Commands for retrieving wallet details, allocation info, and versioning.
6. **Token Pools & Staking**\
   Commands for read/write/stake/challenge pools and collecting rewards.
7. **Security & Utilities**\
   Commands for signing, decrypting, and managing configs.
8. **Troubleshooting**\
   Common issues, error resolution, and debugging.

***

### 🔗 Additional Resources

* [Züs GoSDK](https://github.com/0chain/gosdk)
* [zbox CLI Repository](https://github.com/0chain/zboxcli)

***


# Installation

The **zbox CLI** can be built and installed on Linux, macOS, and other supported platforms.\
This guide covers prerequisites, system requirements, installation steps, and how to run your first `zbox` command.

### Prerequisites

* **Go**\
  Install Go for [Mac, Linux, or Windows](https://golang.org/doc/install). Then, Verify installation:

  ```bash
  go version
  ```
* **Git**\
  Required to clone the repository (not needed on macOS by default).

  ```bash
  sudo apt install git
  ```
* **Build Tools**

  * Linux/macOS: `make`, `gcc`, or `clang`
  * Recommended: `gcc 11` for compatibility (Ubuntu 22 ships with gcc-11 by default; Ubuntu 20 requires upgrade).

  Upgrade gcc on Ubuntu 20:

  ```bash
  sudo add-apt-repository ppa:ubuntu-toolchain-r/test
  sudo apt update
  sudo apt install build-essential
  sudo apt install gcc-11 g++-11
  ```

### System Requirements

Minimum recommended machine specifications for building and running `zbox`:

* **Linux (Ubuntu preferred):** Version 20.04+
* **macOS:** Big Sur+ (Intel or Apple Silicon)
* **CPU:** 4 vCPU
* **Memory:** 4 GB RAM
* **Storage:** 2 GB free space (build + storage allocation)

### Installation

#### 1. Clone the Repository

```bash
git clone https://github.com/0chain/zboxcli.git
cd zboxcli
```

#### 2. Build and Install

```bash
make install
```

This compiles the binary and installs it into your `$GOPATH/bin` or system path.

### Configuration

zbox requires a config file located at:

```
$HOME/.zcn/config.yaml
```

Create it using the following script:

```bash
mkdir -p ~/.zcn
cat > ~/.zcn/config.yaml << EOF
block_worker: https://mainnet.zus.network/dns
signature_scheme: bls0chain
min_submit: 50 # in percentage
min_confirmation: 50 # in percentage
confirmation_chain_length: 3
EOF
```

This sets the **Züs mainnet** as your default network.

### Running zbox

Navigate to the `zboxcli` directory and run:

```bash
./zbox
```

Running without arguments displays the full list of supported commands and global flags.

Example usage output:

```
Usage:
  zbox [command]

Available Commands:
  add                Adds free storage assigner
  alloc-cancel       Cancel an allocation
  alloc-fini         Finalize an expired allocation
  bl-info            Get blobber info
  bl-update          Update blobber settings by its delegate_wallet owner
  collect-reward     Collect accrued rewards for a stake pool.
  completion         Generate the autocompletion script for the specified shell
  copy               Copy an object(file/folder) to another folder on blobbers
  ...
  wp-unlock          Unlock some expired tokens in a write pool.
```

### Alternative Builds

For non-standard platforms (e.g., **ARM64 Linux, Raspberry Pi 3B+**):

1. Download the build script:

   ```bash
   wget https://raw.githubusercontent.com/0chain/zboxcli/master/pibuild.sh
   ```
2. Run the script:

   ```bash
   bash pibuild.sh
   ```

This builds the MCL/BLS libraries with the required `MCL_USE_GMP=0` flag and installs `zbox`.


# Creating & Managing Allocations

An **allocation** is reserved storage space on blobbers. The `zbox` CLI provides commands to create, update, transfer, forbid, cancel, finalize allocations, and manage blobber/validator settings.

{% hint style="warning" %}
You may see commands written as `./zbox` or `zbox`.

* Use `./zbox` if you are running the binary directly from the folder where it was built (e.g., after `make install` inside the repo).
* Use `zbox` if the binary has been installed into your system’s `$PATH` (e.g., `/usr/local/bin`), which lets you call it from anywhere.

Functionally, both are the same — the difference is whether your system can find the `zbox` command globally or only in the current directory.
{% endhint %}

***

### 1. Create New Allocation

The `newallocation` command reserves hard disk space on blobbers. Later, `upload` can be used to save files to the allocation.

`newallocation` has three modes:

* **Cost mode** (`--cost`) → Returns only the estimated cost.
* **Free storage mode** (`--free_storage`) → Uses a free storage marker JSON.
* **Standard mode** (default) → Creates an allocation with user-specified parameters.

#### Command

```bash
zbox newallocation [flags]
```

#### Parameters

| Parameter                  | Description                                                    | Default        | Values           |
| -------------------------- | -------------------------------------------------------------- | -------------- | ---------------- |
| `--allocationFileName`     | Local file to store allocation info                            | allocation.txt | file path        |
| `--cost`                   | Estimate cost only                                             | –              | flag             |
| `--data`                   | Number of data shards (affects speed)                          | 2              | int              |
| `--parity`                 | Number of parity shards (affects durability)                   | 2              | int (1 < p < 30) |
| `--size`                   | Reserved space (bytes)                                         | 2147483648     | int              |
| `--lock*`                  | Tokens locked in write pool                                    | required       | float            |
| `--free_storage`           | Free storage marker file                                       | –              | path             |
| `--owner`                  | Owner’s ID (create for another user)                           | client         | string           |
| `--owner_public_key`       | Owner’s public key                                             | –              | string           |
| `--read_price`             | Max read price                                                 | 0–inf          | range            |
| `--write_price`            | Max write price                                                | 0–inf          | range            |
| `--usd`                    | Show value in USD                                              | –              | flag             |
| `--third_party_extendable` | Allow extensions by others                                     | false          | bool             |
| `--forbid_*`               | Forbid operations (upload, delete, update, move, copy, rename) | false          | bool             |
| `--blobber_auth_tickets`   | Comma-separated auth tickets                                   | –              | strings          |
| `--preferred_blobbers`     | Comma-separated blobber IDs                                    | auto           | strings          |
| `--force`                  | Force allocation even if insufficient blobbers                 | false          | bool             |
| `--name`                   | Allocation name                                                | –              | string           |

> * `--lock` is required unless `--free_storage` is used.

#### Free Storage Marker Format

```json
{
  "assigner": "my_corporation",
  "recipient": "f174cdda7e24aeac0288afc2e8d8b20eda06b18333efd447725581dc80552977",
  "free_tokens": 2.1,
  "timestamp": 2000000,
  "signature": "9edb86c8710d5e3ee4fde247c638fd6b81af67e7bb3f9d60700aec8e310c1f06"
}
```

#### Examples

**Standard Allocation**

```bash
./zbox newallocation --lock 0.5
```

**Free Storage Allocation**

```bash
./zbox newallocation --lock 0.5 --free_storage markers/my_marker.json
```

**Response**

```
Allocation created : d0939e912851959637257573b08c748474f0dd0ebbc8e191e4f6ad69e4fdc7ac
```

***

### 2. Update Allocation

`updateallocation` modifies allocation settings.

Modes:

* **Free storage update** → Uses `--free_storage` marker.
* **Standard update** → Extends expiry, size, or adds/removes blobbers.

#### Command

```bash
zbox updateallocation --allocation <id> [flags]
```

#### Key Parameters

| Parameter                  | Description                                        |
| -------------------------- | -------------------------------------------------- |
| `--allocation`             | Allocation ID (required)                           |
| `--extend`                 | Extend expiry (duration, e.g. `48h`)               |
| `--size`                   | Increase allocation size (bytes)                   |
| `--lock`                   | Add tokens to write pool                           |
| `--add_blobber`            | Add blobber (requires `--remove_blobber` for swap) |
| `--remove_blobber`         | Remove blobber                                     |
| `--third_party_extendable` | Allow others to extend                             |
| `--forbid_*`               | Forbid operations (upload, delete, etc.)           |

#### Examples

```bash
./zbox updateallocation --allocation <id> --expiry 48h --size 4096
./zbox updateallocation --allocation <id> --free_storage markers/my_marker.json
```

**Response**

```
Allocation updated with txId : fb84185dae620bbba8386286726f1efcd20d2516bcf1a448215434d87be3b30d
```

***

### 3. Transfer Allocation Ownership

Transfer allocation from current owner to another user.

#### Command

```bash
zbox transferallocation --allocation <id> --new_owner <id> --new_owner_key <pubkey>
```

**Response**

```
Transferred ownership of allocation : <id> to <new_owner>
```

### 4. Forbid Allocation Operations

Restrict operations using forbid flags with `updateallocation`.

| Flag              | Effect               |
| ----------------- | -------------------- |
| `--forbid_upload` | Prevent file uploads |
| `--forbid_delete` | Prevent deletions    |
| `--forbid_update` | Prevent updates      |
| `--forbid_move`   | Prevent moves        |
| `--forbid_copy`   | Prevent copies       |
| `--forbid_rename` | Prevent renames      |

**Example**

```bash
./zbox updateallocation --allocation <id> --forbid_upload
```

***

### 5. Cancel Allocation

Immediately cancels allocation and returns tokens (except already distributed to blobbers).

#### Command

```bash
zbox alloc-cancel --allocation <id>
```

**Response**

```
Allocation canceled with txId : 501df5a8e2a6b8ebced1d1e7dc4ed17f653012dd49834801b4413786ec031cd2
```

***

### 6. Finalise Allocation

Finalises an expired allocation. Can be run by owner or blobber.

#### Command

```bash
zbox alloc-fini --allocation <id>
```

**Response**

```
Allocation finalized with txId : 2a6c031ced1d1e7dc4ed17801b4413786ecd2501df5ab8ebf653012dd498348e
```

***

### 7. Listing Allocations & Blobbers

#### List Allocations

```bash
zbox listallocations
```

#### List All Files in Allocation

```bash
zbox list-all --allocation <id>
```

#### List Blobbers

```bash
zbox ls-blobbers
```

#### Blobber Info

```bash
zbox bl-info --blobber_id <id>
```

***

### 8. Blobber & Validator Settings

#### Update Blobber Settings

```bash
zbox bl-update --blobber_id <id> --read_price 0.1
```

#### Update Validator Settings

```bash
zbox validator-update --validator_id <id> --service_charge 0.1
```

#### List Validators

```bash
zbox ls-validators
```

#### Validator Info

```bash
zbox validator-info --validator_id <id>
```

***

### 9. Shutdown / Kill Blobbers & Validators

#### Shutdown Blobber

```bash
zbox shutdown-blobber --id <id> --wallet <chain_owner_wallet>
```

#### Kill Blobber

```bash
zbox kill-blobber --id <id> --wallet <chain_owner_wallet>
```

#### Shutdown Validator

```bash
zbox shutdown-validator --id <id> --wallet <chain_owner_wallet>
```

#### Kill Validator

```bash
zbox kill-validator --id <id> --wallet <chain_owner_wallet>
```

***

### 10. Version

Get CLI & SDK version:

```bash
zbox version
```

**Response**

```
zbox....: v1.4.3
gosdk...: v1.8.14
```


# Uploading & Managing Files

This page documents all file‑management operations in **Züs dStorage** with the `zbox` CLI.

{% hint style="warning" %}
**Note – `./zbox` vs `zbox`:**

* Use `./zbox` when running the binary from the build folder.
* Use `zbox` when the binary is in your `$PATH` (recommended).
* Both forms execute the same CLI.
  {% endhint %}

### 1. Create Directory

Use `createdir` to create a directory in the specified allocation. The user must be the owner of the allocation.

**Parameters**

| Parameter    | Required | Description                                    | Default | Valid values |
| ------------ | -------- | ---------------------------------------------- | ------- | ------------ |
| `allocation` | yes      | allocation id, sender must be allocation owner |         | string       |
| `dirname`    | yes      | path to directory                              |         | string       |

**Sample request**

```bash
./zbox createdir --allocation {ALLOC_ID} --dirname /abcd/
```

**Sample response**

```
/abcd/ directory created
```

***

### 2. Upload

Use `upload` to upload file(s).

* upload a local file
* download segment files from remote live feed, and upload them
* start live streaming from local devices, encode it into segment files with ffmpeg, and upload them.

The user must be the owner of the allocation. You can request the file be encrypted before upload, and can send thumbnails with the file.

**Parameters**

| Parameter                 | Required | Description                                             | Default | Valid values       |
| ------------------------- | -------- | ------------------------------------------------------- | ------- | ------------------ |
| `allocation`              | yes      | allocation id, sender must be allocation owner          |         | string             |
| `encrypt`                 | no       | encrypt file before upload                              | false   | boolean            |
| `web-streaming`           | no       | transcode file before upload to fragmented mp4          | false   | boolean            |
| `localpath`               | yes      | local path of the file to upload                        |         | file path          |
| `remotepath`              | yes      | remote path to upload file to, use to access file later |         | string             |
| `thumbnailpath`           | no       | local path of thumbnail                                 |         | file path          |
| `chunknumber`             | no       | how many chunks should be uploaded in a http request    | 1       | int                |
| `attr-who-pays-for-reads` | no       | Who pays for reads: owner or 3rd\_party                 | owner   | owner / 3rd\_party |
| `multiuploadjson`         | no       | A JSON file containing multiupload options              |         | file path          |

**Examples**

Upload file with no encryption:

```bash
./zbox upload --localpath /absolute-path-to-local-file/hello.txt \
              --remotepath /myfiles/hello.txt \
              --allocation d0939e912851959637257573b08c748474f0dd0ebbc8e191e4f6ad69e4fdc7ac
```

**Response**

```
12390 / 12390 [================================================================================] 100.00% 3s
Status completed callback. Type = application/octet-stream. Name = hello.txt
```

Upload file with encryption:

```bash
./zbox upload --encrypt \
              --localpath <absolute path to file>/sensitivedata.txt \
              --remotepath /myfiles/sensitivedata.txt \
              --allocation d0939e912851959637257573b08c748474f0dd0ebbc8e191e4f6ad69e4fdc7ac
```

**Response**

```
12390 / 12390 [================================================================================] 100.00% 3s
Status completed callback. Type = application/octet-stream. Name = sensitivedata.txt
```

Upload file with web‑streaming:

```bash
./zbox upload --web-streaming \
              --localpath <absolute path to file>/samplevideo.mov \
              --remotepath /myfile/ \
              --allocation d0939e912851959637257573b08c748474f0dd0ebbc8e191e4f6ad69e4fdc7ac
```

**Response**

```
15691733 / 15691733 [=====================================================================================] 100.00% 32s
Status completed callback. Type = video/fmp4. Name = raw.samplevideo.mp4
```

### 3. Feed

Use `feed` to automatically download segment files from a remote live feed with `--downloader-args "-q -f best"`, encode them into new segment files with `--delay` and `--ffmpeg-args`, and upload.

Please use:

```bash
youtube-dl -F https://www.youtube.com/watch?v=pC5mGB5enkw
```

to list formats of video (see below). The user must be the owner of the allocation. You can request the file be encrypted before upload, and can send thumbnails with the file.

**Parameters**

| Parameter                 | Required | Description                                                         | Default             | Valid values       |
| ------------------------- | -------- | ------------------------------------------------------------------- | ------------------- | ------------------ |
| `allocation`              | yes      | allocation id, sender must be allocation owner                      |                     | string             |
| `encrypt`                 | no       | encrypt file before upload                                          | false               | boolean            |
| `localpath`               | yes      | local path of segment files to download, generate and upload        |                     | file path          |
| `remotepath`              | yes      | remote path to upload file to, use to access file later             |                     | string             |
| `thumbnailpath`           | no       | local path of thumbnail                                             |                     | file path          |
| `chunknumber`             | no       | how many chunks should be uploaded in a http request                | 1                   | int                |
| `delay`                   | no       | set segment duration to seconds.                                    | 5                   | int                |
| `feed`                    | no       | set remote live feed to url.                                        | false               | url                |
| `downloader-args`         | no       | pass args to youtube-dl to download video. default is `-q -f best`. | `-q -f best`        | youtube-dl         |
| `ffmpeg-args`             | no       | pass args to ffmpeg to build segments.                              | `-loglevel warning` | ffmpeg             |
| `attr-who-pays-for-reads` | no       | Who pays for reads: owner or 3rd\_party                             | owner               | owner / 3rd\_party |
| `enum`                    |          |                                                                     |                     |                    |

**Available formats sample (from youtube-dl)**

```
[youtube] pC5mGB5enkw: Downloading webpage
[info] Available formats for pC5mGB5enkw:
format code  extension  resolution note
249          webm       audio only tiny   44k , webm_dash container, opus @ 44k (48000Hz), 95.21MiB
250          webm       audio only tiny   59k , webm_dash container, opus @ 59k (48000Hz), 127.05MiB
251          webm       audio only tiny  123k , webm_dash container, opus @123k (48000Hz), 264.98MiB
140          m4a        audio only tiny  129k , m4a_dash container, mp4a.40.2@129k (44100Hz), 277.82MiB
278          webm       256x136    144p   87k , webm_dash container, vp9@  87k, 30fps, video only, 188.78MiB
160          mp4        256x136    144p  118k , mp4_dash container, avc1.4d400c@ 118k, 30fps, video only, 253.62MiB
242          webm       426x224    240p  190k , webm_dash container, vp9@ 190k, 30fps, video only, 409.20MiB
133          mp4        426x224    240p  252k , mp4_dash container, avc1.4d400d@ 252k, 30fps, video only, 541.15MiB
243          webm       640x338    360p  326k , webm_dash container, vp9@ 326k, 30fps, video only, 701.53MiB
134          mp4        640x338    360p  576k , mp4_dash container, avc1.4d401e@ 576k, 30fps, video only, 1.21GiB
244          webm       854x450    480p  649k , webm_dash container, vp9@ 649k, 30fps, video only, 1.36GiB
135          mp4        854x450    480p 1028k , mp4_dash container, avc1.4d401f@1028k, 30fps, video only, 2.16GiB
247          webm       1280x676   720p 1320k , webm_dash container, vp9@1320k, 30fps, video only, 2.77GiB
136          mp4        1280x676   720p 1988k , mp4_dash container, avc1.64001f@1988k, 30fps, video only, 4.17GiB
248          webm       1920x1012  1080p 2527k , webm_dash container, vp9@2527k, 30fps, video only, 5.30GiB
137          mp4        1920x1012  1080p 4125k , mp4_dash container, avc1.640028@4125k, 30fps, video only, 8.64GiB
271          webm       2560x1350  1440p 7083k , webm_dash container, vp9@7083k, 30fps, video only, 14.84GiB
313          webm       3840x2026  2160p 13670k , webm_dash container, vp9@13670k, 30fps, video only, 28.65GiB
18           mp4        640x338    360p  738k , avc1.42001E, 30fps, mp4a.40.2 (44100Hz), 1.55GiB
22           mp4        1280x676   720p 2117k , avc1.64001F, 30fps, mp4a.40.2 (44100Hz) (best)
```

**Tip:** `--downloader-args "-f 22"` downloads the `22` format shown above.

**Example**

```bash
./zbox feed --localpath <absolute path to file>/tvshow.m3u8 \
            --remotepath /videos/tvsho \
            --allocation d0939e912851959637257573b08c748474f0dd0ebbc8e191e4f6ad69e4fdc7ac \
            --delay 10 \
            --downloader-args "-f 22" \
            --feed https://www.youtube.com/watch?v=pC5mGB5enkw
```

***

### 4. Download

Use `download` to download your own or a shared file.

* **owner**: The owner of the allocation can always download files; owner pays.
* **collaborator**: A collaborator can download files; owner pays. (Add collaborators with `add-collab`.)
* **authticket**: To download using `authticket`, get a token via `share`. Use `rx_pay` to indicate who pays (true = you pay; false = owner pays). Use `startblock` and `endblock` to download part of the file.

**Parameters**

| Parameter           | Required | Description                                                                       | Default | Valid values |
| ------------------- | -------- | --------------------------------------------------------------------------------- | ------- | ------------ |
| `allocation`        | yes      | allocation id                                                                     |         | string       |
| `authticket`        | no       | auth ticked if not owner of the allocation, use share to get one                  |         | string       |
| `blockspermarker`   | no       | download multiple blocks per marker                                               | 10      | int          |
| `endblock`          | no       | download until specified block number                                             |         | int          |
| `localpath`         | yes      | local path to which to download the file to                                       |         | file path    |
| `remotepath`        | yes      | remote path to which the file was uploaded                                        |         | string       |
| `startblock`        | no       | start download from specified block                                               |         | int          |
| `thumbail`          | no       | only download the thumbnail                                                       | false   | boolean      |
| `live`              | no       | start m3u8 downloader, and automatically generate media playlist on `--localpath` | false   | boolean      |
| `delay`             | no       | pass segment duration to generate media playlist (works with `--live`)            | 5       | int          |
| `lookuphash`        | no       | The remote lookuphash of the object retrieved from the list                       |         | string       |
| `multidownloadjson` | no       | A JSON file containing multi download options                                     |         | string       |
| `verifydownload`    | no       | pass this option to verify downloaded blocks                                      | false   | boolean      |

**Examples**

Download (owner):

```bash
./zbox download --allocation 3c0d32560ea18d9d0d76808216a9c634f661979d29ba59cc8dafccb3e5b95341 \
                --remotepath /myfiles/horse.jpeg \
                --localpath ../horse.jpeg
```

Download (non‑owner) with `authticket`:

```bash
./zbox download --allocation 3c0d32560ea18d9d0d76808216a9c634f661979d29ba59cc8dafccb3e5b95341 \
                --authticket eyJjbGllbnRfaWQiOiIiLCJvd25lcl9pZCI6IiIsImFsbG9jYXRpb24iOiIzYzBkMzI1NjBlYTE4ZDlkMGQ3NjgwODIxNmE5YzYzNGY2NjE5NzlkMjliYTU5Y2M4ZGFjYmMzZTViOTUzNDEiLCJyZW1vdGVwYXRoIjoiL215ZmlsZXMvaG9yc2UuanBlZyIsImV4cG9ydCI6IjIwMjEtMDctMjFUMDk6MjA6MjAuMDAwWiJ9 \
                --localpath ../horse.jpeg
```

If the `authticket` is for a directory, provide the `lookuphash` of the file you want (get it from `list`).

**Response**

```
4 / 4 [=======================================================================] 100.00% 3s
Status completed callback. Type = application/octet-stream. Name = horse.jpeg
```

**Note:** You can download by using only **1** of the combinations below:

* `--remotepath` + `--allocation`
* `--authticket`

Downloaded file will be in the location specified by the `--localpath` argument.

### 5. Update

Use `update` to update content of an existing file in the remote path. Like `upload`. Only the owner of the allocation or a collaborator can update a file (add collaborators with `add-collab`).

**Parameters**

| Parameter       | Required | Description                      | Default | Valid values |
| --------------- | -------- | -------------------------------- | ------- | ------------ |
| `allocation`    | yes      | allocation id                    |         | string       |
| `encrypt`       | no       | encrypt file before upload       | false   | boolean      |
| `localpath`     | yes      | local file to upload             |         | file path    |
| `remotepath`    | yes      | remote file to upload            |         | string       |
| `thumbnailpath` | no       | local fumbnail file to upload    |         | file path    |
| `chunknumber`   | no       | how many chunks per HTTP request | 1       | int          |

**Sample command**

```bash
./zbox update --allocation {ALLOC_ID} --localpath ./zbox_commands.txt --remotepath /abcd/ --encrypt
```

**Sample response**

```
Status completed callback. Type = application/octet-stream. Name = zbox_commands.txt
```

### 6. Delete

Use `delete` to delete your file on the allocation. Only the owner of the application can delete a file.

**Parameters**

| Parameter    | Required | Description                   | Default | Valid values |
| ------------ | -------- | ----------------------------- | ------- | ------------ |
| `allocation` | yes      | allocation id                 |         | string       |
| `remotepath` | yes      | remote path of file to delete |         | string       |

**Example**

```bash
./zbox delete --allocation 3c0d32560ea18d9d0d76808216a9c634flist661979d29ba59cc8dafccb3e5b95341 \
              --remotepath /myfiles/horse.jpeg
```

**Response**

```
/myfiles/horse.jpeg deleted
```

File successfully deleted (can be verified using `list`).

### 7. Share

Use `share` to generate an authtoken that provides authorization to the holder to the specified file on the `remotepath`.

The auth ticket can be used with `download`, and `list`, `meta` and `get_download_cost`, but only for files in the pre-defined remote path.

**Parameters**

| Parameter             | Required | Description                                                                                            | Valid values |
| --------------------- | -------- | ------------------------------------------------------------------------------------------------------ | ------------ |
| `allocation`          | yes      | allocation id                                                                                          | string       |
| `clientid`            | no       | id of user to share file with (or revoke share from), leave blank for public share (or revoke)         | string       |
| `encryptionpublickey` | no       | public key of the client to share file with, required if `clientid`                                    | string       |
| `expiration-seconds`  | no       | seconds before auth ticket expires                                                                     | int          |
| `remotepath`          | yes      | remote path of file to share                                                                           | string       |
| `revoke`              | no       | revoke share for remote path                                                                           | flag         |
| `available-after`     | no       | timelock making the file available for download at time (+1h30m, +30, 1647858200, 2022-03-21 10:21:38) | string       |

**Public share**

```bash
./zbox share --allocation 3c0d32560ea18d9d0d76808216a9c634f661979d29ba59cc8dafccb3e5b95341 \
             --remotepath /myfiles/hello.txt
```

**Response (encoded token)**

```
Auth token eyJjbGllbnRfaWQiOiIiLCJvd25lcl9pZCI6IjE3ZTExOTQwNmQ4ODg3ZDAyOGIxNDE0YWNmZTQ3ZTg4MDhmNWIzZjk4Njk2OTk4Nzg3YTIwNTVhN2VkYjk3YWYiLCJhbGxvY2F0aW9uX2lkIjoiODlkYjBjZDI5NjE4NWRkOTg2YmEzY2I0ZDBlODE0OTE3NmUxNmIyZGIyMWEwZTVjMDZlMTBmZjBiM2YxNGE3NyIsImZpbGVfcGF0aF9oYXNoIjoiM2NhNzIyNTQwZTY1M2Y3NTQ1NjI5ZjBkYzE5ZGY2ODk5ZTI0MDRjNDI4ZDRiMWZlMmM0NjI3ZGQ3MWY3ZmQ2NCIsImFjdHVhbF9maWxlX2hhc2giOiIyYmM5NWE5Zjg0NDlkZDEyNjFmNmJkNTg3ZjY3ZTA2OWUxMWFhMGJiIiwiZmlsZV9uYW1lIjoidGVzdC5wZGYiLCJyZWZlcmVuY2VfdHlwZSI6ImYiLCJleHBpcmF0aW9uIjoxNjM1ODQ5MzczLCJ0aW1lc3RhbXAiOjE2MjgwNzMzNzMsInJlX2VuY3J5cHRpb25fa2V5IjoiIiwiZW5jcnlwdGVkIjpmYWxzZSwic2lnbmF0dXJlIjoiZDRiOTM4ZTE0MDk0ZmZkOGFiMDcwOWFmN2QyMDAyZTdlMGFmNmU3MWJlNGFmMmRjNmUxMGYxZWJmZTUwOTMxOSJ9
```

**Auth token (decoded)**

```json
{"client_id":"","owner_id":"17e119406d8887d028b1414acfe47e8808f5b3f98696998787a2055a7edb97af","allocation_id":"89db0cd296185dd986ba3cb4d0e8149176e16b2db21a0e5c06e10ff0b3f14a77","file_path_hash":"3ca722540e653f7545629f0dc19df6899e2404c428d4b1fe2c4627dd71f7fd64","actual_file_hash":"2bc95a9f8449dd1261f6bd587f67e069e11aa0bb","file_name":"test.pdf","reference_type":"f","expiration":1635849373,"timestamp":1628073373,"re_encryption_key":"","encrypted":false,"signature":"d4b938e14094ffd8ab0709af7d2002e7e0af6e71be4af2dc6e10f1ebfe509319"}
```

**Encrypted share (private)**

1. Upload file with `--encrypt`.
2. Get `encryptionpublickey` from the recipient:

```bash
./zbox getwallet
```

**Response**

```
PUBLIC KEY | CLIENTID | ENCRYPTION PUBLIC KEY
-----------------------------------------------------------------------------------------------------------------------------------+------------------------------------------------------------------+-----------------------------------------------
  19cd2396df9b8b77358a1110492ff65cbb5b55cae06b8bd204e0969b2454851ca620ae74aebe9ed641166be3bca056a1855610f6154f4f4435a29565a2111282 | b734ef935e2a02892b2fa31e3488b360ef300d3b0b32c03834cea3a83e2453f0 | 1JuT4AbQnmIaOMTuWn07t98xQRsSqXAxZYfwCI1yQLM=
```

3. Share privately:

```bash
./zbox share --allocation 3c0d32560ea18d9d0d76808216a9c634f661979d29ba59cc8dafccb3e5b95341 \
             --remotepath /myfiles/hello.txt \
             --clientid b6de562b57a0b593d0480624f79a55ed46dba544404595bee0273144e01034ae \
             --encryptionpublickey 1JuT4AbQnmIaOMTuWn07t98xQRsSqXAxZYfwCI1yQLM=
```

**Response (encoded token)**

```
Auth token eyJjbGllbnRfaWQiOiIwMGZmODhkY2IxNjQ2Y2RlZjA2OWE4MGE0MGQwMWNlOTYyMmQ3ZmUzYmQ0ZWNjMzIzYTcwZTdkNmVkMWE2YjY3Iiwib3duZXJfaWQiOiIxN2UxMTk0MDZkODg4N2QwMjhiMTQxNGFjZmU0N2U4ODA4ZjViM2Y5ODY5Njk5ODc4N2EyMDU1YTdlZGI5N2FmIiwiYWxsb2NhdGlvbl9pZCI6Ijg5ZGIwY2QyOTYxODVkZDk4NmJhM2NiNGQwZTgxNDkxNzZlMTZiMmRiMjFhMGU1YzA2ZTEwZmYwYjNmMTRhNzciLCJmaWxlX3BhdGhfaGFzaCI6IjM2Mjk0MGMwMTZlOWZlZTQ4ZmI5MTA0OGI4MzJjOGFlNWQ2MGUyYzUzMmQ1OGNlYzdmNGM0YjBmZTRkZjM2MzYiLCJhY3R1YWxfZmlsZV9oYXNoIjoiMmJjOTVhOWY4NDQ5ZGQxMjYxZjZiZDU4N2Y2N2UwNjllMTFhYTBiYiIsImZpbGVfbmFtZSI6InRlc3QyLnBkZiIsInJlZmVyZW5jZV90eXBlIjoiZiIsImV4cGlyYXRpb24iOjE2MzU4NDk4NDMsInRpbWVzdGFtcCI6MTYyODA3Mzg0MywicmVfZW5jcnlwdGlvbl9rZXkiOiIiLCJlbmNyeXB0ZWQiOnRydWUsInNpZ25hdHVyZSI6IjNlNGMwOTAwMzAwN2M5NzUzZjFiNGIwODExMWM4OGRlY2JmZjU2MDRmNTIwZDZjMmYyMTdhMzUyZTFkMmE0MTEifQ==
```

**Auth token (decoded)**

```json
{"client_id":"00ff88dcb1646cdef069a80a40d01ce9622d7fe3bd4ecc323a70e7d6ed1a6b67","owner_id":"17e119406d8887d028b1414acfe47e8808f5b3f98696998787a2055a7edb97af","allocation_id":"89db0cd296185dd986ba3cb4d0e8149176e16b2db21a0e5c06e10ff0b3f14a77","file_path_hash":"362940c016e9fee48fb91048b832c8ae5d60e2c532d58cec7f4c4b0fe4df3636","actual_file_hash":"2bc95a9f8449dd1261f6bd587f67e069e11aa0bb","file_name":"test2.pdf","reference_type":"f","expiration":1635849843,"timestamp":1628073843,"re_encryption_key":"","encrypted":true,"signature":"3e4c09003007c9753f1b4b08111c88decbff5604f520d6c2f217a352e1d2a411"}
```

**Directory share**

* Upload multiple files to a directory with `zbox upload /folder1/file1.z ...`
* Share the directory (use `encryptionpublickey` as above):

```bash
./zbox share --allocation 3c0d32560ea18d9d0d76808216a9c634f661979d29ba59cc8dafccb3e5b95341 \
             --remotepath /folder1 \
             --clientid b6de562b57a0b593d0480624f79a55ed46dba544404595bee0273144e01034ae \
             --encryptionpublickey 1JuT4AbQnmIaOMTuWn07t98xQRsSqXAxZYfwCI1yQLM=
```

**Encoded**

```
eyJjbGllbnRfaWQiOiJiNzM0ZWY5MzVlMmEwMjg5MmIyZmEzMWUzNDg4YjM2MGVmMzAwZDNiMGIzMmMwMzgzNGNlYTNhODNlMjQ1M2YwIiwib3duZXJfaWQiOiI2MzlmMjcxZmU1MTFjZDE4ODBjMmE0ZDhlYTRhNGYyNDBmYWYzMzY1YzYxYjY1YjQyNWZhYjVlMDIzMTcxM2MzIiwiYWxsb2NhdGlvbl9pZCI6IjkzN2FkNjlmYjIwZGMxMTFiY2ZkMDFkZTQyYzc5MmEwYzJiNDQxZGUzZDNjZjRjZGIzZjI1YzIxYzFhYjRiN2IiLCJmaWxlX3BhdGhfaGFzaCI6ImFkMThmMzg1Y2I2MWM4MTNjMzE0NDU2OTM0NWYxYzQ2ODE1ODljNzM0N2JkNzI4NjkyZTg1ZjFiNzM4NmI2OWQiLCJhY3R1YWxfZmlsZV9oYXNoIjoiIiwiZmlsZV9uYW1lIjoiZm9sZGVyMSIsInJlZmVyZW5jZV90eXBlIjoiZCIsImV4cGlyYXRpb24iOjE2MzYyODgwNDMsInRpbWVzdGFtcCI6MTYyODUxMjA0MywicmVfZW5jcnlwdGlvbl9rZXkiOiIiLCJlbmNyeXB0ZWQiOnRydWUsInNpZ25hdHVyZSI6ImNiYTZlMjA2OTBjOGZjZTk5YmFjZTMzYjFjMGY3ODQ5ZDE4YmJlMTdhODkyNjczODg1MjI2MDc3MGQzNzgzMGQifQ==
```

**Decoded**

```json
{"client_id":"b734ef935e2a02892b2fa31e3488b360ef300d3b0b32c03834cea3a83e2453f0","owner_id":"639f271fe511cd1880c2a4d8ea4a4f240faf3365c61b65b425fab5e0231713c3","allocation_id":"937ad69fb20dc111bcfd01de42c792a0c2b441de3d3cf4cdb3f25c21c1ab4b7b","file_path_hash":"ad18f385cb61c813c3144569345f1c4681589c7347bd728692e85f1b7386b69d","actual_file_hash":"","file_name":"folder1","reference_type":"d","expiration":1636288043,"timestamp":1628512043,"re_encryption_key":"","encrypted":true,"signature":"cba6e20690c8fce99bace33b1c0f7849d18bbe17a8926738852260770d37830d"}
```

Make sure `"reference_type":"d"` is `d` (directory).

Now you can download files inside this directory with the same `authticket`. Just point to the exact file in `--remotepath`:

```bash
zbox download --allocation 76ad9fa86f9b6685880553588a250586806ba5d7d20fc229d6905998be55d64a \
              --localpath ~/file1.z \
              --authticket $auth \
              --remotepath /folder1/file1.z
```

This works for both encrypted and non‑encrypted files.

**share-encrypted revoke**

Cancel the share for a particular buyer performed using `zbox share` (works only for files with `--encrypted`).

Use `clientid` of the user that was shared the `remotepath`. Required parameters are `allocation`, `remotepath`, and `clientid`.

**Command**

```bash
./zbox share --revoke \
             --allocation 3c0d32560ea18d9d0d76808216a9c634f661979d29ba59cc8dafccb3e5b95341 \
             --remotepath /myfiles/hello.txt \
             --clientid d52d82133177ec18505145e784bc87a0fb811d7ac82aa84ae6b013f96b93cfaa
```

**Response**\
Returns status message showing whether the operation was successful or not.

### 8. List

Use `list` to list files in a given remote path of dStorage. Provide an `authticket` when not sent by the allocation owner. Using an `authticket` requires a `lookuphash` to indicate the path for which to list contents.

**Parameters**

| Parameter    | Required | Description                                                      | Default | Valid values |
| ------------ | -------- | ---------------------------------------------------------------- | ------- | ------------ |
| `allocation` | yes      | allocation id                                                    |         | string       |
| `authticket` | no       | auth ticket if not owner of the allocation                       |         | string       |
| `json`       | no       | output the response in json format                               | false   | boolean      |
| `lookuphash` | no       | hash of object to list, use with auth ticket                     |         | string       |
| `remotepath` | no       | remote path of objects to list, for auth ticket use `lookuphash` |         | string       |

**Example (owner)**

```bash
./zbox list --allocation 8695b9e7f986d4a447b64de020ba86f53b3b5e2c
```


# Configuration

Configuration for the Züs network by default is stored in `network/config.yaml` file of the zbox github [repo](https://github.com/0chain/zboxcli) which we will copy to a new `config.yaml` file in our local system .

#### Configuration File

1. Make a new .zcn folder in the home directory of your system

```
mkdir $HOME/.zcn
```

**Note:** For windows create a folder named .zcn at \``C:\Users\<windows_username>`\`path.\
\
2\. Copy[ config.yaml ](https://github.com/0chain/zboxcli/blob/staging/network/config.yaml)from zboxcli repo to `.zcn` directory

```
cp network/config.yaml $HOME/.zcn/config.yaml
```

3. Open the `config.yaml` file located at `$HOME/.zcn` path of your system.The contents should be similar to the file below.

```
---
block_worker: https://demo.zus.network/dns
signature_scheme: bls0chain
min_submit: 50
min_confirmation: 50
confirmation_chain_length: 3
max_txn_query: 5
query_sleep_time: 5
# # OPTIONAL - Uncomment to use/ Add more if you want
# preferred_blobbers:
#   - http://one.devnet-0chain.net:31051
#   - http://one.devnet-0chain.net:31052
#   - http://one.devnet-0chain.net:31053
```

| Field                       | Description                                                                                    | Value type |
| --------------------------- | ---------------------------------------------------------------------------------------------- | ---------- |
| `block_worker`              | The URL to chain network DNS that provides the lists of miners and sharders                    | string     |
| `signature_scheme`          | The signature scheme used in the network. This would be `bls0chain` for most networks          | string     |
| `min_submit`                | The desired minimum success ratio (in percent) to meet when submitting transactions to miners  | integer    |
| `min_confirmation`          | The desired minimum success ratio (in percent) to meet when verifying transactions on sharders | integer    |
| `confirmation_chain_length` | The desired chain length to meet when verifying transactions                                   | integer    |

Zbox connects to the Züs network using the `block_worker` field. These network details are automatically fetched from the blockWorker's network API. Preferred Blobbers are also present which you can uncomment for using specified storage providers for handling your files.

#### Overriding the Network

Network nodes are automatically discovered using the `block_worker` provided on [config file](https://github.com/0chain/zwalletcli/blob/staging/network/config.yaml).

To override/limit the nodes used on `zbox`, create `~/.zcn/network.yaml` as shown below.

```
cat > ~/.zcn/network.yaml << EOF
miners:
  - http://demo1.zus.network:31201
  - http://demo1.zus.network:31202
  - http://demo1.zus.network:31203
sharders:
  - http://demo1.zus.network:31101
EOF
```

Overriding the nodes can be useful in local chain setup. In some cases, the block worker might return URLs with IP/alias only accessible within the docker network.


# Zwallet CLI

**ZwalletCLI** is a command-line interface (CLI) that demonstrates the wallet functionalities of the **Züs Network**. Built using the **Züs GoSDK**, it provides a convenient way to interact with the blockchain, the Bridge protocol, and Züs smart contracts.

### Core Features

#### Creating and Managing Your Wallet

* Create a new wallet or recover one from existing mnemonics.
* View wallet information and check balances.

#### Bridge Protocol (ERC-20 DEX)

* Exchange **ZCN tokens** with ERC-20 tokens using the Bridge protocol.
* Mint and burn tokens on both native ZCN smart contracts and Züs ERC-20 smart contracts.

#### Managing Miners and Sharders

* List available miners and sharders in the network.
* Configure or shut down your nodes.
* Node ownership is required to perform administrative actions.

#### Managing Authorizers

* Register a new authorizer.
* List all registered authorizers.
* Update authorizer configurations.

#### Staking

* Stake tokens on miners or sharders.
* Earn rewards for supporting network security and consensus.

***

### Architecture

ZwalletCLI operates as a thin client that interacts with the Züs Network through configuration and wallet files stored locally.

<figure><img src="/files/MZukwD9rirkZOTiXqxtj" alt=""><figcaption></figcaption></figure>

1. **Local Context**
   * Wallet and configuration files are stored under `~/.zcn/`.
   * Private keys remain local; transactions are signed client-side.
2. **Network Discovery**
   * Uses the **block worker (0dns)** to discover miners and sharders.
   * Optional: a custom `network.yaml` can override default discovery.
3. **Transaction Flow**
   * Transactions are signed locally and submitted to **miners**.
   * **Miners** validate and propose blocks.
   * **Sharders** confirm and finalize transactions on chain.
4. **Smart Contracts in Use**
   * **Wallet & Token SCs**: Manage balances, transfers, and faucet operations.
   * **Miner SC**: Handles staking, node lifecycle, and rewards.
   * **Storage SC**: Manages blobbers and allocation parameters.
   * **Bridge SC**: Enables cross-chain operations with Ethereum/ERC-20 tokens.


# Installation

Quick start using Zwallet (pre-config - build - run)

### Pre-requisites

Before you start, make sure the following is installed on your machine:

* Golang (1.21+)
* Make (the `make` command)

### Clone the repo

You need to clone the zwalletcli repo:

```
git clone https://github.com/0chain/zwalletcli.git
```

This will clone the repo on your local machine in `zwalletcli` in your working directory.

### Install dependencies

Move to the `zwalletcli` directory and run the install command

```
cd zwalletcli
make install
```

This installs the dependencies for the zwalletcli tool and then builds the tool binary.

### Run the binary

Now the binary is in your zwalletcli directory, you can run it like this:

```
❯ ./zwallet                     
Use Zwallet to store, send and execute smart contract on 0Chain platform.
                        Complete documentation is available at https://docs.zus.network/guides/zwallet-cli

Usage:
  zwallet [command]

Available Commands:
  bridge-burn-bnt           burn bnt tokens
  bridge-burn-eth           burn eth tokens
  bridge-burn-eurc          burn eurc tokens
  bridge-burn-usdc          burn usdc tokens
  bridge-burn-wzcn          burn wzcn tokens
  bridge-burn-zcn           burn zcn tokens
  bridge-get-wzcn-burn      get confirmed burn ticket for ethereum burn transaction
  bridge-get-zcn-burn       get the confirmed burn ticket for zcn burn transaction
  bridge-import-account     Import Ethereum account to local key storage (default $HOME/.zcn/wallets)
  bridge-list-accounts      List Ethereum account registered in local key chain
  bridge-list-auth          List authorizers
  bridge-mint-wzcn          mint WZCN tokens using the hash of ZCN burn transaction
  bridge-mint-zcn           mint zcn tokens using the hash of Ethereum burn transaction
  bridge-verify             verify ethereum transaction 
  collect-reward            Pay accrued rewards for a stake pool.
  completion                Generate the autocompletion script for the specified shell
  create-wallet             Create wallet and logs it into stdout (pass --register to register wallet to blockchain)
  getbalance                Get balance from sharders
  getblobbers               Get registered blobbers from sharders
  getid                     Get Miner or Sharder ID from its URL
  getnonce                  Get nonce from sharders
  global-config             Show global configurations.
  help                      Help about any command
  ls-miners                 Get miners from Miner SC
  ls-sharders               Get sharders from Miner SC
  mn-info                   Get miner/sharder info from Miner SC.
  mn-kill                   kill miner
  mn-lock                   Add miner/sharder stake.
  mn-pool-info              Get miner/sharder pool info from Miner SC.
  mn-unlock                 Unlock miner/sharder stake.
  mn-update-settings        Change miner/sharder settings in Miner SC.
  mn-user-info              Get miner/sharder user pools info from Miner SC.
  recoverwallet             Recover wallet
  reset-user-nonce          Reset user minted nonce
  sc-config                 Show storage SC configuration.
  send                      Send ZCN tokens to another wallet
  sh-kill                   kill sharder
  verify                    verify transaction
  version                   Prints version information

Flags:
      --config string      config file (default is config.yaml)
      --configDir string   configuration directory (default is $HOME/.zcn)
      --fee float          transaction fee for the given transaction (if unset, it will be set to blockchain min fee)
  -h, --help               help for zwallet
      --network string     network file to overwrite the network details (if required, default is network.yaml)
      --silent             Do not print sdk logs in stderr (prints by default)
      --wallet string      wallet file (default is wallet.json)
      --withNonce int      nonce that will be used in transaction (default is 0)

Use "zwallet [command] --help" for more information about a command.
```

This output means the tool is installed successfully. It also shows the help text for the tools with the available commands and the global flags (flags applied with any command).

{% hint style="info" %}
To show the help of any command, run the following:

`./zwallet <command> --help`
{% endhint %}

### Running some basic commands

Let's try two of the simplest commands in zwalletcli:

#### 1. Listing miners command `ls-miners`

This command lists the information of all the miners:

```
./zwallet ls-miners
```

Output:

```
0chain-core-sdk [INFO]   2024/06/03 21:27:05.935222 wallet_base.go:331: ******* Wallet SDK Version:v1.12.1-3-gbc68f654 ******* (SetLogFile)
0box-sdk [INFO]   2024/06/03 21:27:05.935429 sdk.go:99: ******* Storage SDK Version: v1.12.1-3-gbc68f654 *******
0chain-core-sdk [INFO]   2024/06/03 21:27:06.457046 transaction_base.go:143: ******* Wallet SDK Version:v1.12.1-3-gbc68f654 ******* (InitZCNSDK)
0chain-core-sdk [DEBUG]  2024/06/03 21:27:06.824472 transaction_query.go:268: https://dev3.zus.network/sharder01/v1/screst/6dba10422e368813802877a85039d3985d96760ed844092319743fb3a76712d9/getMinerList?active=true&limit=20&offset=0&stakable=false 200 OK
0chain-core-sdk [DEBUG]  2024/06/03 21:27:06.824525 transaction_query.go:269: {"Nodes":[{"simple_miner":{"id":"8f9a15b9551f8552a19cf4750ef14bff3bbac83bc1decd4d5a013a7f36f7ef71","n2n_host":"dev2.zus.network","host":"dev2.zus.network","port":7071,"path":"miner01","public_key":"a93743137c318274bf375e32c00b91439c18c0c0432eac550b2c1a54d909fa0f6669408c3208e5f68fab5aa6c36c91e1978670f17118d3fb75b854d68c1c740f","short_name":"dev2@gmail.com","build_tag":"fd7bd5317876c4064120948bf2355369e8331b8c","total_stake":0,"delete":false,"node_type":"miner","last_health_check":1717436961,"last_setting_update_round":0,"round_service_charge_last_updated":0,"is_killed":false},"stake_pool":{"pools":null,"rewards":0,"settings":{"delegate_wallet":"","num_delegates":10,"min_stake":0,"service_charge":0.1},"minter":0},"total_reward":0},{"simple_miner":{"id":"96b96df7631e00d339f9a25131927c43cba9f130b075f4af09e8934c21173341","n2n_host":"dev3.zus.network","host":"dev3.zus.network","port":7071,"path":"miner01","public_key":"171fbdcbd536fc64f4bcf7f2730731a1c9468210a377e4efcc83f0e3a072560231ea028c56ae6e956f74463ab6438bd375ab4d8f877dadd42914c6488cb9621b","short_name":"dev3@gmail.com","build_tag":"fd7bd5317876c4064120948bf2355369e8331b8c","total_stake":0,"delete":false,"node_type":"miner","last_health_check":1717436967,"last_setting_update_round":0,"round_service_charge_last_updated":0,"is_killed":false},"stake_pool":{"pools":null,"rewards":0,"settings":{"delegate_wallet":"","num_delegates":10,"min_stake":0,"service_charge":0.1},"minter":0},"total_reward":0},{"simple_miner":{"id":"c3227e496fdf3c9aa604f3470a2bbd1249f00142150bc067996cd0d6ffcd77ea","n2n_host":"dev1.zus.network","host":"dev1.zus.network","port":7071,"path":"miner01","public_key":"0e33db4984e356e7cf5963d3b83fbf6273c5d309f68f95f5dc985c7d4368bc182d6be685dd3eefdbfc3652b1c914b4a862d07ac2c0197ae68fac62c2ed4a7093","short_name":"dev1@gmail.com","build_tag":"fd7bd5317876c4064120948bf2355369e8331b8c","total_stake":0,"delete":false,"node_type":"miner","last_health_check":1717431572,"last_setting_update_round":0,"round_service_charge_last_updated":0,"is_killed":false},"stake_pool":{"pools":null,"rewards":0,"settings":{"delegate_wallet":"","num_delegates":10,"min_stake":0,"service_charge":0.1},"minter":0},"total_reward":0}]}
0chain-core-sdk [DEBUG]  2024/06/03 21:27:06.824651 transaction_query.go:268: https://dev1.zus.network/sharder01/v1/screst/6dba10422e368813802877a85039d3985d96760ed844092319743fb3a76712d9/getMinerList?active=true&limit=20&offset=0&stakable=false 200 OK
0chain-core-sdk [DEBUG]  2024/06/03 21:27:06.824667 transaction_query.go:269: {"Nodes":[{"simple_miner":{"id":"8f9a15b9551f8552a19cf4750ef14bff3bbac83bc1decd4d5a013a7f36f7ef71","n2n_host":"dev2.zus.network","host":"dev2.zus.network","port":7071,"path":"miner01","public_key":"a93743137c318274bf375e32c00b91439c18c0c0432eac550b2c1a54d909fa0f6669408c3208e5f68fab5aa6c36c91e1978670f17118d3fb75b854d68c1c740f","short_name":"dev2@gmail.com","build_tag":"fd7bd5317876c4064120948bf2355369e8331b8c","total_stake":0,"delete":false,"node_type":"miner","last_health_check":1717436961,"last_setting_update_round":0,"round_service_charge_last_updated":0,"is_killed":false},"stake_pool":{"pools":null,"rewards":0,"settings":{"delegate_wallet":"","num_delegates":10,"min_stake":0,"service_charge":0.1},"minter":0},"total_reward":0},{"simple_miner":{"id":"96b96df7631e00d339f9a25131927c43cba9f130b075f4af09e8934c21173341","n2n_host":"dev3.zus.network","host":"dev3.zus.network","port":7071,"path":"miner01","public_key":"171fbdcbd536fc64f4bcf7f2730731a1c9468210a377e4efcc83f0e3a072560231ea028c56ae6e956f74463ab6438bd375ab4d8f877dadd42914c6488cb9621b","short_name":"dev3@gmail.com","build_tag":"fd7bd5317876c4064120948bf2355369e8331b8c","total_stake":0,"delete":false,"node_type":"miner","last_health_check":1717436967,"last_setting_update_round":0,"round_service_charge_last_updated":0,"is_killed":false},"stake_pool":{"pools":null,"rewards":0,"settings":{"delegate_wallet":"","num_delegates":10,"min_stake":0,"service_charge":0.1},"minter":0},"total_reward":0},{"simple_miner":{"id":"c3227e496fdf3c9aa604f3470a2bbd1249f00142150bc067996cd0d6ffcd77ea","n2n_host":"dev1.zus.network","host":"dev1.zus.network","port":7071,"path":"miner01","public_key":"0e33db4984e356e7cf5963d3b83fbf6273c5d309f68f95f5dc985c7d4368bc182d6be685dd3eefdbfc3652b1c914b4a862d07ac2c0197ae68fac62c2ed4a7093","short_name":"dev1@gmail.com","build_tag":"fd7bd5317876c4064120948bf2355369e8331b8c","total_stake":0,"delete":false,"node_type":"miner","last_health_check":1717431572,"last_setting_update_round":0,"round_service_charge_last_updated":0,"is_killed":false},"stake_pool":{"pools":null,"rewards":0,"settings":{"delegate_wallet":"","num_delegates":10,"min_stake":0,"service_charge":0.1},"minter":0},"total_reward":0}]}
0chain-core-sdk [DEBUG]  2024/06/03 21:27:06.864411 transaction_query.go:268: https://dev2.zus.network/sharder01/v1/screst/6dba10422e368813802877a85039d3985d96760ed844092319743fb3a76712d9/getMinerList?active=true&limit=20&offset=0&stakable=false 200 OK
0chain-core-sdk [DEBUG]  2024/06/03 21:27:06.864480 transaction_query.go:269: {"Nodes":[{"simple_miner":{"id":"8f9a15b9551f8552a19cf4750ef14bff3bbac83bc1decd4d5a013a7f36f7ef71","n2n_host":"dev2.zus.network","host":"dev2.zus.network","port":7071,"path":"miner01","public_key":"a93743137c318274bf375e32c00b91439c18c0c0432eac550b2c1a54d909fa0f6669408c3208e5f68fab5aa6c36c91e1978670f17118d3fb75b854d68c1c740f","short_name":"dev2@gmail.com","build_tag":"fd7bd5317876c4064120948bf2355369e8331b8c","total_stake":0,"delete":false,"node_type":"miner","last_health_check":1717436961,"last_setting_update_round":0,"round_service_charge_last_updated":0,"is_killed":false},"stake_pool":{"pools":null,"rewards":0,"settings":{"delegate_wallet":"","num_delegates":10,"min_stake":0,"service_charge":0.1},"minter":0},"total_reward":0},{"simple_miner":{"id":"96b96df7631e00d339f9a25131927c43cba9f130b075f4af09e8934c21173341","n2n_host":"dev3.zus.network","host":"dev3.zus.network","port":7071,"path":"miner01","public_key":"171fbdcbd536fc64f4bcf7f2730731a1c9468210a377e4efcc83f0e3a072560231ea028c56ae6e956f74463ab6438bd375ab4d8f877dadd42914c6488cb9621b","short_name":"dev3@gmail.com","build_tag":"fd7bd5317876c4064120948bf2355369e8331b8c","total_stake":0,"delete":false,"node_type":"miner","last_health_check":1717436967,"last_setting_update_round":0,"round_service_charge_last_updated":0,"is_killed":false},"stake_pool":{"pools":null,"rewards":0,"settings":{"delegate_wallet":"","num_delegates":10,"min_stake":0,"service_charge":0.1},"minter":0},"total_reward":0},{"simple_miner":{"id":"c3227e496fdf3c9aa604f3470a2bbd1249f00142150bc067996cd0d6ffcd77ea","n2n_host":"dev1.zus.network","host":"dev1.zus.network","port":7071,"path":"miner01","public_key":"0e33db4984e356e7cf5963d3b83fbf6273c5d309f68f95f5dc985c7d4368bc182d6be685dd3eefdbfc3652b1c914b4a862d07ac2c0197ae68fac62c2ed4a7093","short_name":"dev1@gmail.com","build_tag":"fd7bd5317876c4064120948bf2355369e8331b8c","total_stake":0,"delete":false,"node_type":"miner","last_health_check":1717431572,"last_setting_update_round":0,"round_service_charge_last_updated":0,"is_killed":false},"stake_pool":{"pools":null,"rewards":0,"settings":{"delegate_wallet":"","num_delegates":10,"min_stake":0,"service_charge":0.1},"minter":0},"total_reward":0}]}
- ID:         8f9a15b9551f8552a19cf4750ef14bff3bbac83bc1decd4d5a013a7f36f7ef71
- Host:       dev2.zus.network
- Port:       7071
- ID:         96b96df7631e00d339f9a25131927c43cba9f130b075f4af09e8934c21173341
- Host:       dev3.zus.network
- Port:       7071
- ID:         c3227e496fdf3c9aa604f3470a2bbd1249f00142150bc067996cd0d6ffcd77ea
- Host:       dev1.zus.network
- Port:       7071

```

As you can see, the output shows all the miners, each with the id, Host and Port.

#### 2. Listing sharders command `ls-sharders`

This command lists all the sharders registered in the network

```
./zwallet ls-sharders
```

Output:

```
0chain-core-sdk [INFO]   2024/06/03 21:28:24.672113 wallet_base.go:331: ******* Wallet SDK Version:v1.12.1-3-gbc68f654 ******* (SetLogFile)
0box-sdk [INFO]   2024/06/03 21:28:24.672311 sdk.go:99: ******* Storage SDK Version: v1.12.1-3-gbc68f654 *******
0chain-core-sdk [INFO]   2024/06/03 21:28:24.995260 transaction_base.go:143: ******* Wallet SDK Version:v1.12.1-3-gbc68f654 ******* (InitZCNSDK)
0box-sdk [INFO]   2024/06/03 21:28:24.997096 node.go:194: Query from https://dev3.zus.network/sharder01/v1/block/get/latest_finalized_magic_block
0box-sdk [INFO]   2024/06/03 21:28:24.997111 node.go:194: Query from https://dev2.zus.network/sharder01/v1/block/get/latest_finalized_magic_block
0box-sdk [INFO]   2024/06/03 21:28:24.997130 node.go:194: Query from https://dev1.zus.network/sharder01/v1/block/get/latest_finalized_magic_block
0chain-core-sdk [DEBUG]  2024/06/03 21:28:25.384780 transaction.go:1136: https://dev2.zus.network/sharder01/v1/block/get/latest_finalized_magic_block200 OK
0chain-core-sdk [DEBUG]  2024/06/03 21:28:25.397079 transaction.go:1136: https://dev1.zus.network/sharder01/v1/block/get/latest_finalized_magic_block200 OK
0chain-core-sdk [DEBUG]  2024/06/03 21:28:25.425058 transaction.go:1136: https://dev3.zus.network/sharder01/v1/block/get/latest_finalized_magic_block200 OK
MagicBlock Sharders
ID: afa396409ef1a78dff132f586c1f55e4725ccdc8554a727a525fcab44b3bcb16
  - N2NHost: dev3.zus.network
  - Host: dev3.zus.network
  - Port: 7171
ID: e3cc90b550e7c5e906583897648dea5bc0cd61ae2127edb044892203384a1f33
  - N2NHost: dev1.zus.network
  - Host: dev1.zus.network
  - Port: 7171
ID: 371a09c9eec259d9d3ba794ecccdd392ecdeec4c35565ccc5977fba44e20217d
  - N2NHost: dev2.zus.network
  - Host: dev2.zus.network
  - Port: 7171
```

As you can see, the output shows all the sharders, each with the id, host and port.

{% hint style="info" %}
All the commands related to your own data will require a wallet. Use the "[Configure your wallet](/zus-docs/clis/zwalletcli/wallet-configuration)" guide to create or specify a wallet to the command.
{% endhint %}

### Next steps

Here are some useful guides and references for Zwalletcli:

* [Configuring the tool](/zus-docs/clis/zwalletcli/configuring-the-tool)
* [Configuring your wallet](/zus-docs/clis/zwalletcli/wallet-configuration)
* Commands Reference in the [Github README](https://github.com/0chain/zwalletcli/blob/staging/README.md).


# Wallet Configuration

Configuring the wallet you use to run transactions via the CLI tools.

Before you can use the CLIs to manage your data on the network, you need to have a wallet. A wallet is simply a file (in JSON format) that contains your keys, by which you can access your account on the network.

The wallet has:

* Your client ID.
* You Public Key,
* Your Private Key.
* Your Mnemonics.
* Your initial nonce.

Example for a wallet:

```json
{
  "client_id": "ba6ab426644f2b326b1da3dd426229fed19eed85387deaf72e05cb0fa4c5abbb",
  "client_key": "f6ac7fa910e56ac605f99707455b2a07a8230de8efe34cb1f40d80568c3fcc0e955c899624514216523c8a9e8e8db294e69ed81912fecdadc1544f0ea580b01e",
  "keys": [
    {
      "public_key": "f6ac7fa910e56ac605f99707455b2a07a8230de8efe34cb1f40d80568c3fcc0e955c899624514216523c8a9e8e8db294e69ed81912fecdadc1544f0ea580b01e",
      "private_key": "02f3a1ad1514c520542527d91d0aaf43af8fbfa92437b44c85d1e55f35b86a01"
    }
  ],
  "mnemonics": "arctic sunny beef human powder cool jungle shift cabin ginger license mixture onion elevator render inspire morning limb square crater limb forest consider virus",
  "version": "1.0",
  "date_created": "2024-04-25T17:38:24+02:00",
  "nonce": 0
}
```

All the commands of the CLI tools expect the wallet file (named `wallet.json`) to be saved in the `configDir` (which is by default \~/.zcn).

### Creating a new wallet

If you don't have a wallet already, you can create a new wallet using `zwalletcli`

```
./zwallet create-wallet
```

This will create you a new wallet and store it as: `~/.zcn/wallet.json`

You can also specify different name for your wallet:

```
./zwallet create-wallet --name my-custom-wallet
```

### Getting tokens to your wallet

Now that you created your tokens, you need to fund it with some tokens to be able to pay transaction fees and storage cost, or even to stake providers for reward. There are a couple of different ways by which you can achieve this:

#### Getting tokens using Bolt Webapp

Once you generated the wallet, you can use Bolt app to fund some tokens to it, as follows:

1. Login to Bolt using your wallet, check the [Export Wallet](/zus-docs/webapps/bolt/sign-in-with-external-wallet) feature documentation in Bolt for more details.
2. Connect your Metamask wallet as prompted.
3. Use bolt to deposit tokens to your exported wallet using the ERC-20 tokens in your Metamask wallet. Check the [DEX flow](broken://pages/4kCRin2NHtqgxds4NSlY) documentation for more information.

#### Sending tokens from an existing wallet

If you have an existing wallet which has tokens, you can send tokens from it to your newly created wallet. You can do this either using the [`send`](https://github.com/0chain/zwalletcli?tab=readme-ov-file#sending-tokens-to-another-wallet---send) command of Zwallet CLI, or using Bolt (check [Send/Receive](/zus-docs/webapps/bolt/send-receive-zcn) feature documentation of Bolt).

{% hint style="info" %}
Note that in order to use `send` command to send tokens from your existing wallet, you'll need to have the wallet in JSON format in a file on your system and provide its path to the CLI, as defined in the next section.
{% endhint %}

### Using the wallet in your commands

All CLI commands use the wallet stored in your `~/.zcn` directory and named `wallet.json` by default. To specify a different wallet name and path:

```
./zwallet <some-command> --wallet my-custom-wallet
```

This will make the command use `~/.zcn/my-custom-wallet.json` as your wallet. Also to change the default path where it gets the wallet file:

```
./zwallet <some-command> --wallet my-custom-wallet --configDir myzus
```

This will make the command use the wallet stored in `./myzus/my-custom-wallet` but will also use the `config.yaml` file stored in the same directory.


# Configuration

Configuration for the Züs network by default is stored in `network/config.yaml` file of the zwallet github [repo](https://github.com/0chain/zboxcli) which we will copy to a new `config.yaml` file in our local system .

#### Configuration File

1. Make a new .zcn folder in the home directory of your system

```
mkdir $HOME/.zcn
```

**Note:** For windows create a folder named .zcn at \``C:\Users\<windows_username>`\`path.\
\
2\. Copy[ config.yaml ](https://github.com/0chain/zboxcli/blob/staging/network/config.yaml)from zwalletcli repo to `.zcn` directory

```
cp network/config.yaml $HOME/.zcn/config.yaml
```

3. Open the `config.yaml` file located at `$HOME/.zcn` path of your system.The contents should be similar to the file below.

```
---
block_worker: https://demo.zus.network/dns
signature_scheme: bls0chain
min_submit: 50
min_confirmation: 50
confirmation_chain_length: 3
max_txn_query: 5
query_sleep_time: 5
# # OPTIONAL - Uncomment to use/ Add more if you want
# preferred_blobbers:
#   - http://one.devnet-0chain.net:31051
#   - http://one.devnet-0chain.net:31052
#   - http://one.devnet-0chain.net:31053
```

| Field                       | Description                                                                                    | Value type |
| --------------------------- | ---------------------------------------------------------------------------------------------- | ---------- |
| `block_worker`              | The URL to chain network DNS that provides the lists of miners and sharders                    | string     |
| `signature_scheme`          | The signature scheme used in the network. This would be `bls0chain` for most networks          | string     |
| `min_submit`                | The desired minimum success ratio (in percent) to meet when submitting transactions to miners  | integer    |
| `min_confirmation`          | The desired minimum success ratio (in percent) to meet when verifying transactions on sharders | integer    |
| `confirmation_chain_length` | The desired chain length to meet when verifying transactions                                   | integer    |

Zwallet connects to the Züs network using the `block_worker` field. These network details are automatically fetched from the blockWorker's network API. Preferred Blobbers are also present which you can uncomment for using specified storage providers for handling your files.

#### Overriding the Network

Network nodes are automatically discovered using the `block_worker` provided on [config file](https://github.com/0chain/zwalletcli/blob/staging/network/config.yaml).

To override/limit the nodes used on `zwallet`, create `~/.zcn/network.yaml` as shown below.

```
cat > ~/.zcn/network.yaml << EOF
miners:
  - http://demo1.zus.network:31201
  - http://demo1.zus.network:31202
  - http://demo1.zus.network:31203
sharders:
  - http://demo1.zus.network:31101
EOF
```

Overriding the nodes can be useful in local chain setup. In some cases, the block worker might return URLs with IP/alias only accessible within the docker network.


# zwallet Commands

The following assumes your terminal’s working directory is inside the **`zwalletcli`** repo.

### Global parameters

`zwallet` accepts global flags that override defaults and can be used with any command.

| Parameter      | Description                                  | Default              |
| -------------- | -------------------------------------------- | -------------------- |
| `-h`, `--help` | Show help/parameters for the invoked command | —                    |
| `--config`     | Config file name                             | `config.yaml`        |
| `--configDir`  | Config directory                             | `~/.zcn`             |
| `--network`    | Network override file name                   | `network.yaml`       |
| `--silent`     | Do not print detailed logs                   | `false`              |
| `--wallet`     | Wallet file name                             | `wallet.json`        |
| `--withNonce`  | Nonce to use for the transaction             | `0`                  |
| `--fee`        | Transaction fee to use                       | chain min if not set |

> Tip: add `--json` on commands that support it, and `--verbose` to see transaction hashes and diagnostic details.

***

### Shell autocompletion

**Command:** `zwallet completion [bash|zsh|fish|powershell]`\
Generates completion scripts and prints enablement instructions for your shell.

Example:

```bash
zwallet completion bash    # or zsh / fish / powershell
```

See the sub‑command’s help for the exact enablement steps per shell.

***

### Creating and restoring wallets

#### Create a wallet — `create-wallet`

Creates a wallet at the default location if none exists (`~/.zcn/wallet.json`).

```bash
./zwallet create-wallet
```

**Sample output**

```
wallet saved in /home/ubuntu/.zcn/wallet.json
{"client_id":"xxxxxxxx...","client_key":"xxxxxxxx...","keys":[{"public_key":"xxxxxxxx...","private_key":"xxxxxxxx..."}],"mnemonics":"xxxx xxxx ...","version":"1.0","date_created":"2023-05-03T12:44:46+05:30","nonce":0}
```

#### Recover a wallet — `recoverwallet`

Restore a wallet from its mnemonics. Useful when moving to a new machine or after loss.

**Parameters**

| Flag         | Required | Description                                        | Default |
| ------------ | -------- | -------------------------------------------------- | ------- |
| `--mnemonic` | Yes      | The full mnemonic phrase for the wallet to recover | —       |
| `--offline`  | No       | Recover without registering on chain               | `false` |

**Example**

```bash
./zwallet recoverwallet \
  --wallet recovered_wallet.json \
  --mnemonic "pull floor crop best weasel suit solid gown filter kitten loan absent noodle nation potato planet demise online ten affair rich panel rent sell"
```

**Verify recovered file**

```bash
cat ~/.zcn/recovered_wallet.json
```

***

### Exploring network nodes

#### List miners — `ls-miners`

Lists miners using the Miner smart contract.

**Parameters**

| Flag         | Required | Description                                       | Default | Values  |
| ------------ | -------- | ------------------------------------------------- | ------- | ------- |
| `--json`     | No       | Print as JSON                                     | —       | —       |
| `--active`   | No       | Only active miners                                | `true`  | boolean |
| `--all`      | No       | Include all registered miners (page 1 by default) | —       | —       |
| `--limit`    | No       | Limit number returned                             | `20`    | integer |
| `--offset`   | No       | Skip first N                                      | —       | integer |
| `--stakable` | No       | Only miners accepting new delegates               | `false` | boolean |

**Example**

```bash
./zwallet ls-miners
```

**Sample output**

```
- ID:   cdb9b5a2...77a68bad2
- Host: demo1.zus.network
- Port: 31203
...
```

#### List sharders — `ls-sharders`

Lists sharders from the latest finalized Magic Block; use `--all` for all registered.

**Parameters** (same shape as miners)

| Flag         | Required | Description                           | Default | Values  |
| ------------ | -------- | ------------------------------------- | ------- | ------- |
| `--json`     | No       | Print as JSON                         | —       | —       |
| `--active`   | No       | Only active sharders                  | `true`  | boolean |
| `--all`      | No       | Include all registered sharders       | —       | —       |
| `--limit`    | No       | Limit number returned                 | `20`    | integer |
| `--offset`   | No       | Skip first N                          | —       | integer |
| `--stakable` | No       | Only sharders accepting new delegates | `false` | boolean |

**Example**

```bash
./zwallet ls-sharders --all
```

**Sample output (abridged)**

```
MagicBlock Sharders
ID: 12e317e5...
  - N2NHost: demo1.zus.network
  - Host:    demo1.zus.network
  - Port:    31102
...

Registered Sharders
ID: 675502b6...
  - N2NHost: demo1.zus.network
  - Host:    demo1.zus.network
  - Port:    31101
...
```

#### List blobbers — `getblobbers`

Lists blobbers via the Storage smart contract.

**Parameters**

| Flag    | Required | Description                        |
| ------- | -------- | ---------------------------------- |
| `--all` | No       | Include inactive blobbers (if any) |

**Example**

```bash
./zwallet getblobbers
```

**Sample output (abridged)**

```
Blobbers:
 URL                              | ID                                  | CAP                 | R / W PRICE     | DEMAND
 http://demo1.zus.network:31305   | 011a5444...                         | 271.5/1000.0 GiB    | 0.010/0.010     | 0.1
...
```

***

#### List authorizers — `bridge-list-auth`

Lists authorizers that validate client transactions.

```bash
./zwallet bridge-list-auth
```

**Sample response**

```json
[
  {"id":"2f945f73...","url":"https://demo.zus.network/authorizer01/"},
  {"id":"7b07c048...","url":"https://demo.zus.network/authorizer02/"},
  {"id":"896c1716...","url":"https://demo.zus.network/authorizer03/"}
]
```

#### Get node ID by URL — `getid`

Prints a node’s ID from its URL (miner/sharder/blobber).

**Parameter**: `--url <NODE_URL>`

**Example**

```bash
./zwallet getid --url http://demo1.zus.network:31101
# URL: http://demo1.zus.network:31101
# ID:  675502b613ba1c59...
```

#### Storage SC config — `sc-config`

Displays current **Storage** smart contract configuration.

**Parameter**: `--json` (optional)

```bash
./zwallet sc-config
```

**Sample output** (abridged)

```
.blobber_slash 0.1
cost.new_allocation_request 3000
free_allocation_settings.data_shards 4
...
validators_per_challenge 2
writepool.min_lock 0.1
```

#### Version — `version`

Prints `zwallet` and GoSDK versions.

**Parameter**: `--json` (optional)

```bash
./zwallet version
```

**Sample**

```
Version info:
  zwallet...: v1.2.3-21-gb10c459
  gosdk.....: v1.8.17-0.20230522160233-570f983a6283
```

#### Global chain configuration — `global-config`

Shows chain‑wide configuration (server\_chain, tx, SC toggles, etc.).

```bash
./zwallet global-config
```

**Sample output** (abridged)

```
server_chain.block.consensus.threshold_by_count 66
server_chain.client.signature_scheme bls0chain
server_chain.smart_contract.storage true
server_chain.transaction.max_fee 0.01
server_chain.transaction.timeout 600
...
```

***

### Getting and sending tokens

#### Faucet — `faucet`

(Where enabled) requests tokens from the Faucet smart contract.

```bash
./zwallet faucet
```

#### Check balance — `getbalance`

Retrieves wallet balances from sharders. (Locked tokens are not included.)

**Parameter**: `--json` (optional)

```bash
./zwallet getbalance
# Balance: 3 (4.2299999999999995 USD)
```

Use another wallet file:

```bash
./zwallet getbalance --wallet another_wallet.json
```

> If the wallet has no tokens yet, the command will output **Get balance failed**.

#### Send tokens — `send`

Transfers tokens to another wallet.

**Parameters**

| Flag             | Required | Description                         |
| ---------------- | -------- | ----------------------------------- |
| `--json`         | No       | Print as JSON                       |
| `--to_client_id` | Yes      | Recipient’s client ID               |
| `--tokens`       | Yes      | Amount to send                      |
| `--desc`         | Yes      | Transfer description                |
| `--fee`          | No       | Optional tx fee (defaults to chain) |

**Example**

```bash
./zwallet send \
  --to_client_id e7ebb698213b6bda097c0a14ccbe574356e99e9b666e4baeae540da1d9b51e7e \
  --tokens 0.2 \
  --desc "gift"
# Send tokens success
```

Use a different sender wallet:

```bash
./zwallet send --to_client_id <ID> --tokens 0.2 --desc "gift" --wallet another_wallet.json
```

#### Verify a transaction — `verify`

Checks whether a transaction hash is confirmed on chain.

**Parameter**

| Flag     | Required | Description                |
| -------- | -------- | -------------------------- |
| `--hash` | Yes      | Transaction hash to verify |

> Not all commands print the transaction hash. Re‑run with `--verbose` to see hashes.

**Example**

```bash
./zwallet verify --hash 867c240b640e3d128643330af383cb3a0a229ebce08cae667edd7766c7ccc850
# Transaction verification success
```

Verbose:

```bash
./zwallet verify --hash 867c24... --verbose
```

#### Collect rewards — `collect-reward`

Transfers accrued stake‑pool rewards to your wallet. Rewards accrue for **miners** and **sharders** (and authorizers where applicable).

**Parameters**

| Flag              | Required | Description      | Values                             |
| ----------------- | -------- | ---------------- | ---------------------------------- |
| `--provider_type` | Yes      | Provider type    | `miner` / `sharder` / `authorizer` |
| `--provider_id`   | Yes      | Provider node ID | string                             |

**Example**

```bash
./zwallet collect-reward --provider_type miner --provider_id <MINER_OR_SHARDER_ID>
# locked with: b4887385... (stake pool id)
```

#### Get nonce — `getnonce`

Shows the current nonce of the default wallet.

```bash
./zwallet getnonce
# Nonce: 58
```

***

### Staking on miners and sharders

The **Miner smart contract** allows staking on miner and sharder nodes.\
The maximum number of stake pools per node is limited by the node’s **delegates** setting. Use `mn-config` to discover limits (min/max stake, delegates, etc.).

#### Staking config — `mn-config`

Displays global staking parameters of the Miner SC.

```bash
./zwallet mn-config
```

**Sample output (abridged)**

```
max_n: 8   min_n: 2   max_s: 3   min_s: 1
max_stake: 100  min_stake: 0  max_delegates: 200
interest_rate: 5.55e-07  reward_rate: 1  share_ratio: 0.8
...
```

#### Node info for staking — `mn-info`

Shows staking‑related stats for a miner or sharder.

**Parameter**

| Flag   | Required | Description                               |
| ------ | -------- | ----------------------------------------- |
| `--id` | Yes      | Node ID (see `ls-miners` / `ls-sharders`) |

**Example**

```bash
./zwallet mn-info --id 68ed8f16e1d50e32...
```

(See your output for JSON fields like `service_charge`, `number_of_delegates`, `total_stake`, `pending` pools, etc.)

#### Lock stake — `mn-lock`

Stake tokens on a node to earn rewards. If a node goes offline, stake pools are auto‑unlocked and funds are returned.

**Parameters**

| Flag           | Required | Description                                     |
| -------------- | -------- | ----------------------------------------------- |
| `--miner_id`   | Yes\*    | Miner node ID (alternative to `--sharder_id`)   |
| `--sharder_id` | Yes\*    | Sharder node ID (alternative to `--miner_id`)   |
| `--tokens`     | Yes      | Amount to stake (must meet min/max constraints) |

\*Pass **either** `--miner_id` or `--sharder_id`.

> Some builds also accept `--id <NODE_ID>` as shown below.

**Example**

```bash
./zwallet mn-lock --id dc8c6c93fb42e7f6... --tokens 1
# locked with: b4887385... (stake pool id)
```

**If locking fails, check:**

* Wallet has sufficient tokens
* Node ID is valid
* Node has delegate capacity available

#### Your stake pools — `mn-user-info`

Shows the wallet’s stake pools.

**Parameters**

| Flag          | Required | Description        | Default                        |
| ------------- | -------- | ------------------ | ------------------------------ |
| `--client_id` | No       | Client ID to query | wallet at `~/.zcn/wallet.json` |
| `--json`      | No       | Print as JSON      | —                              |

**Example**

```bash
./zwallet mn-user-info
```

**Sample output (text)**

```
- node: dc8c6c93... (sharder)
  - pool_id: b4887385...
    balance: 1
    interests paid: 0
    rewards paid: 0
    status: pending
    stake %: 100 %
```

**Sample (JSON)**

```json
{
  "pools": {
    "sharder": {
      "dc8c6c93...": [
        {
          "id":"b4887385...",
          "balance":10000000000,
          "interest_paid":0,
          "reward_paid":0,
          "status":"PENDING",
          "high":0,
          "low":-1
        }
      ]
    }
  }
}
```

#### Stake pool info — `mn-pool-info`

Shows stake pool info for a given node. Without a pool flag, returns the list.

**Parameter**

| Flag   | Required | Description                |
| ------ | -------- | -------------------------- |
| `--id` | Yes      | Node ID (miner or sharder) |

**Example**

```bash
./zwallet mn-pool-info --id dc8c6c93fb42e7f6...
```

**Sample (single)**

```json
{"pool_id":"4db8e916...","balance":1000000000,"reward":152712000000,"status":0,"round_created":632,"delegate_id":"c542815b...","staked_at":1658695083}
```

**Sample (list)**

```json
[{"pool_id":"4db8e916...","balance":1000000000,"reward":12096000000,"status":1,"round_created":632,"delegate_id":"c542815b...","staked_at":1658695083}]
```

#### Unlock stake — `mn-unlock`

Requests unlock of a stake from a node; tokens are released at the next **view change** or **reward** round.

**Parameters**

| Flag           | Required | Description     |
| -------------- | -------- | --------------- |
| `--miner_id`   | Yes\*    | Miner node ID   |
| `--sharder_id` | Yes\*    | Sharder node ID |

\*Pass **either** `--miner_id` or `--sharder_id`.

**Example**

```bash
./zwallet mn-unlock --id dc8c6c93fb42e7f6...
# tokens will be unlocked next VC
```

***

### Killing / deleting nodes

> Requires the node’s delegate wallet / owner.

#### Kill a miner — `mn-kill`

```bash
./zwallet mn-kill --id 860498ec586ef5122efb...
```

#### Kill a sharder — `sh-kill`

```bash
./zwallet sh-kill --id 860498ec586ef5122efb...
```

***

#### Notes & tips

* For **transaction hashes**, use `--verbose` if a command doesn’t print the hash by default.
* Staking unlocks occur at the next **view change** or **reward** round—tokens won’t be immediately liquid.
* Some staking commands accept `--id <NODE_ID>` interchangeably with `--miner_id` / `--sharder_id` as shown above.
* When using Faucet or Bridge, ensure the target **network** supports those smart contracts in `global-config` / `sc-config`.


# Guides and Workflows


# Using CLI with Blimp

**Blimp** is an AI-ready, distributed on-prem storage solution powered by Züs, the world’s fastest blockchain, offering 400 ms optimistic and 2-second full finality. It is the first S3-compatible storage platform that is both ACID-compliant and runs on a zero-knowledge network.

Designed for enterprise-scale storage and AI-driven applications, Blimp ensures high security, redundancy, and data sovereignty.

**ZS3 Server** is an S3-compatible object storage gateway that connects traditional cloud tools like AWS CLI and MinIO CLI with the decentralized Züs network using the GoSDK. It enables users to manage files via familiar S3 APIs while benefitting from decentralized storage.

This guide includes:

* CLI-based wallet recovery and allocation creation
* Deploying ZS3Server through Blimp UI and verifying endpoint
* File uploads/downloads using zboxcli, AWS CLI, and MinIO CLI
* Using encrypted folders and verifying storage
* Backup configuration using Restic and Veeam

**Referenced Pages:**

* CLI Setup: <https://docs.zus.network/zus-docs/clis>
* ZS3 Server Concept & Usage: <https://docs.zus.network/zus-docs/system-overview/storage/zs3-server>

### Prerequisites

Before proceeding, ensure that you have:

#### System Requirements:

* Linux (Ubuntu 20.04+) or macOS (Big Sur 11.0.1+)
* Admin access to a terminal environment with `bash`, `make`, and package installation permissions

#### Tools:

* [zwalletcli](https://github.com/0chain/zwalletcli) — for wallet creation, funding, and recovery
* [zboxcli](https://github.com/0chain/zboxcli) — for managing allocations and performing file operations
* [aws-cli](https://docs.aws.amazon.com/cli/latest/userguide/install-cliv2.html) — for interacting with ZS3 using S3 API
* [mc (MinIO client)](https://min.io/docs/minio/linux/reference/minio-mc.html) — CLI for file management on S3-compatible endpoints
* [Restic](https://restic.readthedocs.io/) — secure, deduplicating backup CLI tool
* Veeam Backup & Replication — enterprise backup and disaster recovery solution with S3 support

#### Account Setup:

* Blimp account created via [blimp.software](https://blimp.software)
* Mnemonic phrase (24-word seed phrase) securely backed up
* Wallet recovered using zwalletcli with a local JSON wallet file (e.g., `zus_wallet.json`)
* Wallet funded with ZCN tokens through the Blimp UI or supported wallet integrations (e.g., MetaMask)

### Setting Up Blimp Allocation via CLI

This section guides users through creating a Züs wallet, installing CLI tools, and performing basic file operations on their Blimp allocation.

#### Step 1: Sign Up on Blimp

1. Navigate to [blimp.software](https://blimp.software). Click **Sign Up for Free** and choose an authentication method:
   1. Google, Apple, or Okta SSO
   2. Email and one-time password (OTP)
2. Enter your mobile number and verify it with a second OTP
3. You will now receive your wallet mnemonics — a 24-word seed phrase
4. Write down this mnemonic phrase. It will not be shown again and is essential for wallet recovery.

#### Step 2: Select Blobber Brand

When creating your allocation, select the brand based on your performance and decentralization preference:

* **Züs‑Only**: Operated directly by Züs (high performance)
* **All‑Blobbers**: All available providers (max decentralization)
* **Unbranded**: Only third-party blobbers
* **All Brands**: Mixed strategy

#### Step 3: Install CLI Tools

Use Git to clone and install `zboxcli` and `zwalletcli`.

**Install `zboxcli`**

```bash
git clone https://github.com/0chain/zboxcli.git
cd zboxcli
make install
```

**Install `zwalletcli`**

```bash
git clone https://github.com/0chain/zwalletcli.git
cd zwalletcli
make install
```

#### Step 4: Add CLI Configuration

Create the required config file at `~/.zcn/config.yaml`:

```yaml
block_worker: https://mainnet.zus.network/dns
signature_scheme: bls0chain
min_submit: 50
min_confirmation: 50
confirmation_chain_length: 3
```

This file allows the CLI tools to communicate with the Züs blockchain.

#### Step 5: Recover Wallet from Mnemonics

Use the 24-word mnemonic to regenerate your wallet keys and store them in a JSON file:

```bash
./zwallet recoverwallet --wallet zus_wallet.json --mnemonic "your twenty four word mnemonic"
```

Verify wallet creation:

```bash
cat ~/.zcn/zus_wallet.json
```

You should see:

```bash
{"client_id":"<id>","client_key":"<key>","keys":[{"public_key":"<pub>","private_key":"<priv>"}],"mnemonics":"word list","version":"1.0"}
```

#### Step 6: Create a New Allocation (Optional)

If you haven’t created a default 2 GB allocation on the Blimp UI, you can create one via CLI as follows:

```bash
./zbox newallocation --size 2147483648 --lock 1.0 --data 2 --parity 2 --wallet zus_wallet.json
```

This will reserve 2 GB of storage with 2 data and 2 parity shards.

#### Step 7: Uploading Files to Blimp Allocation

Ensure you are in the `zboxcli` directory before using these commands.

**Upload Single File**

```bash
./zbox upload --localpath /My/path/file.png --remotepath / --allocation <allocation_id> --wallet zus_wallet.json
```

**Download a File**

```bash
./zbox download --remotepath /file.png --localpath /Downloads --allocation <allocation_id> --wallet zus_wallet.json
```

**Update a File**

```bash
./zbox update --localpath /My/path/newdata.txt --remotepath /data.txt --allocation <allocation_id> --wallet zus_wallet.json
```

**Upload Multiple Files via JSON**

Create a JSON file (e.g., `multi-upload.json`) with this format:

```json
[
  {
    "remotePath": "/",
    "filePath": "/My/local/cat.png",
    "fileName": "cat.png",
    "encrypt": false
  },
  {
    "remotePath": "/",
    "filePath": "/My/local/pikachu.webp",
    "fileName": "pikachu.webp",
    "encrypt": false
  }
]
```

Upload with:

```bash
./zbox upload --multiuploadjson /My/local/multi-upload.json --remotepath / --allocation <allocation_id> --wallet zus_wallet.json
```

Each upload will be confirmed via terminal output indicating upload status and content type.

To verify uploads, you can use:

```bash
./zbox listrefs --allocation <allocation_id> --wallet zus_wallet.json
```

You may also check file presence and metadata in the Blimp web UI by navigating to your allocation dashboard.

{% content-ref url="/pages/xrFyLiQzPBChg5OCEFJW" %}
[CLIs](/zus-docs/clis)
{% endcontent-ref %}

### Deploying ZS3 Server

This section covers how to set up and fully understand the ZS3 Server infrastructure, the bridge that makes your Blimp allocation accessible using traditional S3-compatible tools like AWS CLI and MinIO CLI.

ZS3 (Zus S3) is a decentralized, S3-compatible object storage solution that operates on the Züs blockchain network. It ensures:

* Full data sovereignty and ownership
* Redundancy and geographic distribution across blobbers
* Blockchain-verified audit trails through Write Markers
* Optimized security with optional data encryption and compression

ZS3 Server acts as a **gateway**, translating standard S3 requests into operations that are compatible with Züs decentralized storage via GoSDK.

**Important**: Each Blimp allocation should have its own ZS3Server deployment to guarantee isolation, performance, and security.

#### Core Components of ZS3 Server

| Component         | Description                                                                                   |
| ----------------- | --------------------------------------------------------------------------------------------- |
| **MinIO Gateway** | Receives and interprets standard S3 REST API calls.                                           |
| **ZS3 Cache**     | Buffers incoming operations (uploads, deletions) to optimize blockchain transactions.         |
| **GoSDK Adapter** | Bridges the operations to the Züs network, committing updates using blockchain write markers. |
| **Blobbers**      | Actual decentralized storage nodes storing encrypted data shards.                             |
| **LogSearch API** | Collects operational and audit logs from ZS3 for monitoring and recovery.                     |

#### Step-by-Step ZS3 Server Deployment via Blimp UI

**Step 1: Sign Up and Fund Wallet (Pre-requisite)**

Ensure your wallet is active, funded with ZCN, and associated with a valid mnemonic.

**Step 2: Create a New S3-Compatible Allocation**

* Log in to the [Blimp UI](https://blimp.software). Navigate to the **S3 tab**
* Click **Create New Allocation**
* Fill in allocation details:
  * Size (e.g., 10 GB, 100 GB)
  * Preferred blobbers (automatic or manual selection)
* Confirm and complete payment via ZCN or linked MetaMask wallet.

**Step 3: Generate ZS3 Deployment Script**

After allocation creation:

* Click **Deploy S3 Server**
* Provide your public IP address if prompted (important if behind firewall/NAT)
* Click **Generate Script**

The output script will:

* Set environment variables (access key, secret key, wallet ID)
* Download and configure the MinIO gateway linked to your allocation
* Configure the ZS3 server to use your allocation ID

**Step 4: Execute the Deployment Script**

On your target server (Linux preferred):

```bash
curl -fsSL https://raw.githubusercontent.com/0chain/zcnwebappscripts/main/blimp.sh | sed 's/parameters/replacements/' | bash
```

Upon success, you’ll receive an endpoint such as:

```bash
zs3server url ---> blimp7fyct.zus.network
```

This is your live S3-compatible endpoint.

**Step 5: Secure and Monitor Deployment**

* Confirm ports (443/80) are open
* Save your access key and secret key securely
* (Optional) Enable SSL certificates if required for production
* Check deployment status using provided logs or via the Blimp UI "Conduct Operations" tab

#### Understanding the ZS3 Data Flow

1. Client issues standard S3 API call (upload/download)
2. MinIO Gateway parses the request
3. ZS3 Cache batches changes
4. GoSDK validates, signs, and submits changes to the Züs network
5. Blobbers store shards redundantly and securely
6. Blockchain records every change through Write Markers ensuring immutability

#### Encryption and Compression Settings (Highly Recommended)

Modify your ZS3 configuration file located at `~/.zcn/zs3server.json`:

```json
{
  "encrypt": true,
  "compress": true
}
```

* **Encrypt**: Ensures that files are encrypted client-side before hitting any storage blobber.
* **Compress**: Reduces data size to optimize storage cost and network usage.

#### Admin Functions and Disaster Recovery

* **Logsearch API**: Running on port 8080 by default. Query operational logs using WebSockets or simple HTTP GET.
* **Disaster Recovery**: Configure secondary ZS3 Server. Use MinIO's `mc mirror` command to sync primary to secondary instances:

```bash
./mc mirror secondary/<bucket_name>/ primary/<bucket_name>/ --summary
```

This protects your data if the primary server fails or needs replacement.

{% content-ref url="/pages/K3yu6G7GUvjwIM8Ezusn" %}
[Broken mention](broken://pages/K3yu6G7GUvjwIM8Ezusn)
{% endcontent-ref %}

### Using AWS CLI with ZS3

The AWS Command Line Interface (AWS CLI) can be easily configured to interact with your ZS3 Server endpoint, allowing you to perform traditional S3 operations such as creating buckets, uploading files, downloading objects, listing contents, and more.

This section walks through configuring AWS CLI and demonstrates essential operations using ZS3.

AWS CLI is a widely adopted tool for cloud storage interactions. Using it with ZS3 ensures developers and sysadmins can leverage familiar workflows while benefiting from decentralized storage.

No custom clients or SDKs needed; just point the CLI to your ZS3 endpoint.

#### Prerequisites

* **AWS CLI** installed ([Install Guide](https://docs.aws.amazon.com/cli/latest/userguide/install-cliv2.html))
* **Access Key** and **Secret Key** from your deployed ZS3 server (available under "Using CLI" in Blimp S3 allocation)
* **ZS3 Server endpoint** (e.g., `https://blimp7fyct.zus.network`)

Ensure you have access to the CLI credentials before proceeding.

#### Configuring AWS CLI for ZS3

Run:

```bash
aws configure
```

You will be prompted:

* **AWS Access Key ID \[None]:** `<your-access-key>`
* **AWS Secret Access Key \[None]:** `<your-secret-key>`
* **Default region name \[None]:** `us-east-1`
* **Default output format \[None]:** `<press ENTER>`

**Note:**

* The "region" field is mandatory but irrelevant for ZS3 operations. Use any valid region like `us-east-1`.
* Default output format can be left blank or set to `json`.

#### Important: Using the `--endpoint-url` Parameter

When operating with ZS3, **you must always specify your custom endpoint**.

Example Base Format:

```bash
aws --endpoint-url https://<your-zs3-endpoint> s3 <operation>
```

If omitted, AWS CLI will default to Amazon S3 and fail the request.

#### Performing File Operations with AWS CLI

**Create a New Bucket**

```bash
aws --endpoint-url https://blimp7fyct.zus.network s3 mb s3://mybucketname
```

Expected Output:

```bash
make_bucket: mybucketname
```

**Upload a File**

```bash
aws --endpoint-url https://blimp7fyct.zus.network s3 cp ./localfile.txt s3://mybucketname
```

Expected Output:

```bash
upload: ./localfile.txt to s3://mybucketname/localfile.txt
```

**Download a File**

```bash
aws --endpoint-url https://blimp7fyct.zus.network s3 cp s3://mybucketname/localfile.txt ./downloadedfile.txt
```

**List Buckets**

```bash
aws --endpoint-url https://blimp7fyct.zus.network s3 ls
```

**List Objects in a Bucket**

```bash
aws --endpoint-url https://blimp7fyct.zus.network s3 ls s3://mybucketname
```

**Delete a File**

```bash
aws --endpoint-url https://blimp7fyct.zus.network s3 rm s3://mybucketname/localfile.txt
```

#### Authorizing New Users (Advanced)

In addition to the admin credentials, you may want to create additional users for your ZS3 server. This can be accomplished via the Admin API.

**Add a New User Command:**

```bash
curl -X POST "https://blimp7fyct.zus.network/minioclient/admin?action=addUser&userAccessKey=newuser&userSecretKey=NewStrongPass123&accessKey=adminuser&secretAccessKey=AdminSecret"
```

* Replace placeholders accordingly.
* Successful response:

```bash
{"Success":true,"AccessKey":"newuser"}
```

Once the new user is added, you can reconfigure your AWS CLI profile using their credentials to access the S3-compatible bucket.

| Error                   | Cause                               | Solution                                                    |
| ----------------------- | ----------------------------------- | ----------------------------------------------------------- |
| `InvalidAccessKeyId`    | Wrong Access Key used               | Verify the Access Key ID matches what's generated in Blimp. |
| `SignatureDoesNotMatch` | Incorrect Secret Key                | Re-check the Secret Key and reconfigure.                    |
| `NoSuchBucket`          | Bucket doesn't exist                | Confirm spelling or list existing buckets first.            |
| `AccessDenied`          | Incorrect permissions or wrong keys | Check if user is authorized.                                |

### Using MinIO CLI (mc) with ZS3

The MinIO Client (`mc`) is a powerful tool that offers an advanced S3-compatible command-line experience. It supports operations such as uploading files, downloading objects, creating buckets, listing buckets, copying, mirroring, and managing S3-compatible storage endpoints.

In this section, you will learn how to install and configure `mc` to work seamlessly with your ZS3 server and perform everyday file operations.

#### Prerequisites

* **MinIO CLI** (`mc`) installed on your machine (Official Download Guide).
* **Access Key**, **Secret Key**, and **Endpoint URL** from your ZS3 deployment.

#### Installing MinIO CLI

For Linux:

```bash
wget https://dl.min.io/client/mc/release/linux-amd64/mc
chmod +x mc
sudo mv mc /usr/local/bin/mc
```

For macOS using Homebrew:

```bash
brew install minio/stable/mc
```

#### Configuring mc with ZS3 Server

Set an alias to your ZS3 endpoint:

```bash
mc alias set zcn https://blimp7fyct.zus.network <access-key> <secret-key> --api S3v2
```

Where:

* `zcn` = the shortcut name you assign to your ZS3 server
* Replace `<access-key>`, `<secret-key>`, and endpoint URL appropriately.

Successful setup will output:

```
Added `zcn` successfully.
```

You can list all configured aliases:

```bash
mc alias list
```

#### Performing File Operations with mc

**Create a New Bucket**

```bash
mc mb zcn/mybucket
```

Output:

```bash
Bucket created successfully `zcn/mybucket`
```

**Upload a File**

```bash
mc cp /path/to/myfile.txt zcn/mybucket
```

**Upload a Directory Recursively**

```bash
mc mirror /path/to/myfolder zcn/mybucket
```

Useful for uploading a full directory structure in one shot.

**List Buckets**

```bash
mc ls zcn
```

**List Objects inside a Bucket**

```bash
mc ls zcn/mybucket
```

**Download a File**

```bash
mc cp zcn/mybucket/myfile.txt ./localcopy.txt
```

**Remove a File**

```bash
mc rm zcn/mybucket/myfile.txt
```

**Remove a Bucket**

```bash
mc rb --force zcn/mybucket
```

The `--force` flag is needed to remove a non-empty bucket.

#### Advanced Operations

**Sync/Mirror Data**

Sync local directory to ZS3:

```bash
mc mirror /local/dir zcn/mybucket
```

Sync ZS3 bucket to another local directory:

```bash
mc mirror zcn/mybucket /local/dir
```

**View Object Metadata**

```bash
mc stat zcn/mybucket/myfile.txt
```

This shows object size, last modified time, ETag, and content type.

#### Verifying Uploads on Blimp UI

1. Go to the Blimp Dashboard.
2. Select your allocation.
3. Use the "Conduct Operations" menu.
4. List buckets and verify object presence.
5. Objects uploaded via `mc` should appear immediately.

#### Handling Common Errors with mc

| Error                | Cause                                    | Solution                                        |
| -------------------- | ---------------------------------------- | ----------------------------------------------- |
| `Access Denied`      | Wrong credentials or missing permissions | Verify Access/Secret keys and user permissions. |
| `NoSuchBucket`       | Bucket not created yet                   | Ensure the bucket exists before uploading.      |
| `Signature Mismatch` | Incorrect API version used               | Always set `--api S3v2` during alias creation.  |

Always encrypt sensitive uploads using ZS3 encryption settings. Use `mc mirror` for efficient large-scale backup and disaster recovery setups.

Monitor network bandwidth during large `mirror` operations to optimize scheduling. Script repetitive tasks with bash scripts using `mc` for automation.

### Backup Tool Integrations with Restic and Veeam

This section explains how to integrate your ZS3 server-backed storage with powerful backup tools like Restic (open-source backup utility) and Veeam (enterprise-grade backup platform). This ensures secure, decentralized, and redundant data protection strategies.

#### Using Restic with ZS3

Restic is an efficient, secure, and easy-to-use backup tool that supports S3-compatible storage backends.

**Prerequisites**

* Restic installed ([Restic Installation Guide](https://restic.readthedocs.io/en/stable/020_installation.html))
* AWS\_ACCESS\_KEY\_ID and AWS\_SECRET\_ACCESS\_KEY from your ZS3 deployment
* ZS3 endpoint URL (e.g., `https://blimp7fyct.zus.network`)

**Installing Restic**

For Ubuntu:

```bash
sudo apt update -y
sudo apt install restic -y
sudo restic self-update
```

For macOS using Homebrew:

```bash
brew install restic
```

**Configuring Environment Variables**

Set the necessary environment variables for Restic to authenticate with ZS3:

```bash
export AWS_ACCESS_KEY_ID=<your-access-key>
export AWS_SECRET_ACCESS_KEY=<your-secret-key>
export RESTIC_REPOSITORY="s3:https://blimp7fyct.zus.network"
```

You can add these exports to your `~/.bashrc` or `~/.zshrc` file to load them automatically.

**Initializing the Restic Repository**

```bash
restic init
```

Expected Output:

```bash
created restic repository 12345678 at s3:https://blimp7fyct.zus.network
```

**Performing Backups**

Backup a local directory:

```bash
restic backup /path/to/important/data
```

Output example:

```
Files: 50 new, 0 changed, 0 unmodified
Added to the repo: 12.547 MiB
...

Snapshot 12345678 saved
```

**Listing Backup Snapshots**

```
restic snapshots
```

Example Output:

```
ID        Time                 Host        Tags        Directory
-------------------------------------------------------------------
12345678  2024-04-01 14:00:00  myserver                /important/data
```

**Restoring from Backup**

Restore the latest snapshot:

```
restic restore latest --target /path/to/restore
```

**Scheduling Restic Backups**

You can automate regular backups with a cron job:

```
crontab -e
```

Example entry (daily at midnight):

```
0 0 * * * export AWS_ACCESS_KEY_ID=... && export AWS_SECRET_ACCESS_KEY=... && export RESTIC_REPOSITORY=s3:https://blimp7fyct.zus.network && restic backup /path/to/data
```

#### Using Veeam with ZS3

Veeam is a widely trusted enterprise backup solution, compatible with S3 object storage like ZS3.

**Prerequisites**

* Veeam Backup & Replication installed (v11 or later recommended)
* Access to your ZS3 credentials and endpoint

**Adding ZS3 as an Object Storage Repository**

**Step 1: Launch Veeam**

* Open Veeam Backup & Replication console.
* Navigate to **Backup Infrastructure > Backup Repositories > Add Repository**.
* Select **Object Storage > S3 Compatible**.

**Step 2: Enter ZS3 Endpoint and Region**

* **Service Point**: `https://blimp7fyct.zus.network`
* **Region**: `us-east-1` (or any other placeholder; ZS3 does not enforce regions)

**Step 3: Add Access Key and Secret Key**

* Click "Add" next to Credentials.
* Input the Access Key and Secret Key from your Blimp deployment.

**Step 4: Select the Bucket**

* Choose your allocated bucket.
* Optionally create a new folder inside the bucket (e.g., `/VeeamBackups`).

**Step 5: Enable Immutability (Optional)**

* Check the "Make recent backups immutable" box to prevent accidental deletion or ransomware attacks.

**Step 6: Finalize Setup**

* Name your object storage repository (e.g., `Blimp ZS3 Backup`)
* Finish the setup wizard.

Your ZS3 repository will now appear under Veeam's **Object Storage Repositories** list.

**Creating Backup Jobs Targeting ZS3**

* Set up standard backup jobs.
* Use your ZS3 object repository as the target.
* Configure retention, backup frequency, and application-aware options as needed.

### Troubleshooting & Logs

Even with the best setup, users may occasionally encounter issues. This section highlights common troubleshooting scenarios, log access methods, and diagnostic tips to ensure smooth operation of your Blimp allocation and ZS3 server.

#### Common Issues and Resolutions

| Problem                         | Cause                                                  | Solution                                                                                      |
| ------------------------------- | ------------------------------------------------------ | --------------------------------------------------------------------------------------------- |
| **InvalidAccessKeyId**          | Incorrect Access Key or missing configuration          | Reconfigure your CLI settings; verify the key in Blimp UI.                                    |
| **SignatureDoesNotMatch**       | Incorrect Secret Key, wrong API version, or time drift | Ensure you set `--api S3v2` for MinIO. Check system clock (NTP sync).                         |
| **NoSuchBucket**                | Referencing a non-existent bucket                      | List existing buckets with `mc ls zcn/` or `aws s3 ls` and verify names.                      |
| **AccessDenied**                | Invalid user permissions or expired credentials        | Use correct keys. Refresh credentials if expired.                                             |
| **Slow Uploads/Timeouts**       | Large files, network instability, small cache size     | Enable compression, use multipart uploads, optimize cache settings.                           |
| **Unable to Deploy ZS3 Server** | Wrong IP address or firewall blocking ports            | Ensure port 443 and 80 are open. Provide correct public IP when generating deployment script. |
| **API Connection Refused**      | Deployment not completed properly or wrong endpoint    | Recheck script execution and confirm endpoint URL matches deployment output.                  |

#### CLI-Specific Issues

**AWS CLI**

* Always append `--endpoint-url https://your-zs3-endpoint` to each command.
* Ensure `us-east-1` (or dummy region) is provided during configuration.
* Credentials should match those visible in Blimp's "Using CLI" section.

**MinIO CLI (mc)**

* Confirm `--api S3v2` is specified when setting aliases.
* Use exact bucket/object names respecting case sensitivity.
* Use `mc alias list` to verify endpoint configuration.

**Restic**

* Ensure environment variables (AWS\_ACCESS\_KEY\_ID, AWS\_SECRET\_ACCESS\_KEY, RESTIC\_REPOSITORY) are exported.
* Initialize repository once before running backups.
* Use `restic forget` to prune old snapshots if needed.

#### Accessing ZS3 Server Logs

The ZS3 Server automatically deploys a **Logsearch API** service to help monitor storage operations and troubleshoot problems.

**Where to Find Logs**

* Default on **port 8080** of the ZS3 server.
* If the server IP is `192.168.1.50`, access:

```
http://192.168.1.50:8080/logs
```

**Types of Logs Available**

* **MinIO Audit Logs**: Track every API request made to the ZS3 gateway.
* **Allocation Write Markers**: Confirm successful blockchain commits.
* **Upload/Download Errors**: View recent errors related to storage transactions.

**Sample API Query to Fetch Logs**

```
curl http://192.168.1.50:8080/logs
```

Response will return JSON format logs for easy parsing or export.

#### Logsearch API Parameters (Optional Advanced Use)

You can query logs with additional filters:

* `?type=error` → Fetch only error logs
* `?bucket=mybucket` → Filter by bucket name
* `?operation=PUT` → Filter by upload events

Example filtered query:

```
curl http://192.168.1.50:8080/logs?type=error&bucket=mybucket
```

#### Diagnosing Slow Performance

If you experience slow uploads or downloads:

* Check network latency and bandwidth to ZS3 server.
* Enable compression in `.zcn/zs3server.json` to reduce upload size.
* Increase local cache size settings in the server config.
* Use multipart uploads (`mc mirror` and `aws s3 sync` auto-handle this).
* Split large file uploads into smaller batches.


# rclone Züs Integration

## **Overview**

**rclone\_zus** is a custom integration of the rclone command-line tool with the Züs decentralized cloud. It enables users to interact with Züs storage using familiar rclone commands like `copy, move, sync, and ls`.

This backend implementation allows developers, DevOps teams, and cloud users to:

* Use rclone’s powerful CLI and scripting capabilities with Züs
* Perform efficient, **server-side batch operations** (copy, delete, move)
* Use Züs as an S3-compatible remote via rclone without vendor lock-in

<figure><img src="/files/raaUS1uGhnjGmBWQ7Btz" alt="" width="563"><figcaption></figcaption></figure>

The Züs backend is now available via -type züs in your rclone.conf file and supports advanced Züs features including:

* `Sync & batch mode` uploads
* Server-side copy & move
* Native delete, purge, and stat support
* Directory listings and recursive operations

#### Why Use rclone\_zus?

* Scripting Ready: Automate uploads/downloads via shell scripts
* Dev & CI Friendly: Plug into CI/CD pipelines with secure Züs backend
* Zero Lock-in: Maintain open architecture with CLI-driven usage
* Use [Blimp UI](https://blimp.network) to manage and render files in a carousel view
* Share both public and encrypted files or folders with anyone instantly
* Seamlessly scale by managing multiple allocations via Blimp and organizing data into multiple data rooms
* Fast Sync: Avoid redundant uploads with batch commit

{% embed url="<https://youtu.be/AJ-zgmhSgGE>" %}

## **Prerequisites**

* **Blimp account**: If you do not have one, navigate to [blimp.software](https://blimp.software). Click **Sign Up for Free** and you'll receive a free 2GB allocation.
* **Operating Systems**: Linux, macOS, Windows (recent versions supported)
* **Go Toolchain** \[Optional] : Go ≥1.20; only required if building from source

## Install rclone\_zus

This section guides you through cloning, building, and configuring rclone\_zus with the Züs backend. There are two ways of installing the rclone\_zus plugin: download a pre-built binary or build the binary.

### Download Pre-Built Binary

1. Go to the [releases page](https://github.com/0chain/rclone_zus/releases/tag/v1.0.4) and download the pre-built binary for your OS.
2. Place rclone.exe in your desired directory
3. Run ./rclone in that directory. If it shows the help description, you're ready to start using rclone with Züs storage

💡 This is the preferred method for Windows users

### Build the Binary

#### 1. Clone the Repository

```
git clone https://github.com/0chain/rclone_zus.git
cd rclone_zus
```

#### 2. Build the Rclone Binary

Use the provided Makefile to build the project:

```
make
```

This will compile the rclone binary into the project root (./rclone), including the Züs backend.

💡 Troubleshooting: If make fails (e.g., missing make command or incompatible system), you can build manually:

```
go build -o rclone ./rclone.go
```

Ensure you have Go ≥1.20 installed (suggested go 1.23.4)and your GOPATH properly configured.

This will build a local ./rclone binary with the Züs backend integrated.

Note: If you're modifying backend code (e.g. backend/zus/zus.go), you can recompile by running the go build command again.

#### 3. (Optional) Install as Global Command rclone\_zus

To use your custom Rclone binary without the ./ prefix, install it globally by copying it to a directory in your system's $PATH, such as /usr/local/bin:

```
sudo cp ./rclone /usr/local/bin/rclone_zus
```

After this, you can run it from anywhere as a normal command:

```
rclone_zus move TestZus:/source TestZus:/dest
```

Renaming it to rclone\_zus helps avoid conflicts with the system-installed rclone, if present.

## Retrieve Wallet Files for Config Directory

Before using `rclone_zus`, you must have a wallet, allocation, and configuration files in place. There are two methods to retrieving these files: download wallet files via Blimp or CLI

### Download Wallet via Blimp

The standard way to retrieve your Züs wallet is by downloading it through the **Blimp** user interface. This requires no command-line setup and ensures all required files are prepared for you.

1. Visit [**Blimp**](https://blimp.zus.network)
2. Navigate to **Manage Allocation**
3. Select your allocation
4. Click the **ellipsis (⋯)** button
5. Choose **“Download Wallet”**
6. Enter your **mnemonic** or **wallet password**
7. You’ll receive a `.zip` file containing:
   * `wallet.json` – Your Züs wallet credentials
   * `allocation.txt` – The Allocation ID
   * `config.yaml` – Züs network configuration (block worker, signature scheme, etc.)

{% hint style="info" %}
Make sure your `wallet.json` file contains `"is_split": false`. This is required for compatibility with `rclone_zus`.
{% endhint %}

8. Extract the ZIP and move **all three files** to your system’s default config directory:

* **Windows**: `C:\Users\<your-username>\.zcn`
* **Linux/macOS**: `~/.zcn/`

> 📝 If the `.zcn` folder does not exist, create it manually.

By default, `rclone_zus` looks for your configuration files (`wallet.json`, `allocation.txt`, and optionally `config.yaml`) in the `.zcn` folder located at:

* `~/.zcn/` on Linux/macOS
* `C:\Users\<YourName>\.zcn\` on Windows

However, if you want to avoid overwriting your default wallet files — for example, if you're working with **multiple wallets**, **different environments** (testnet vs mainnet), or shared systems — you can specify a **custom configuration directory**.

When running `rclone config`, you will be prompted with:

```
Config Directory - directory to read config files (defaults to ~/.zcn)
(config_dir)
```

Here, you can enter the full path to a custom folder that contains:

* `wallet.json` — your wallet credentials
* `allocation.txt` — your allocation ID
* `config.yaml` — your network settings (optional, but recommended)

This allows you to isolate configs per project, user, or use case.

For example:

```
(config_dir)> /home/yourname/zcn-wallets/clientA
```

Once saved, this remote will always use that folder to locate its wallet and allocation files, regardless of what’s in your global `.zcn` directory.

#### Allocation Performance

**For reliable performance:**

* Züs blobbers provide better stability and performance

### CLI Method

Alternatively, you can create your wallet and allocation using the CLI.

1. Create a wallet and allocation via [Züs CLI tools](https://docs.zus.network/zus-docs/clis?utm_source=chatgpt.com)
2. Place the following files in your `~/.zcn` (or Windows equivalent):

* `wallet.json`

```json
{
  "client_id": "xxxxxxxxxxxxxxxxxxxxxxxxxxxxx",
  "client_key": "xxxxxxxxxxxxxxxxxxxxxxxxxxxxxxxxx",
  "keys": [
    {
      "public_key": "xxxxxxxxxxxxxxxxxxxxxxxxxxxxxxxxxxxxxxxxxx",
      "private_key": "xxxxxxxxxxxxxxxxxxxxxxxxxxxxxxxxxxxxxx"
    }
  ],
  "mnemonics": "xxxx xxxx xxxx xxxx xxxx xxxx",
  "version": "1.0",
  "date_created": "2023-05-03T12:44:46+05:30",
  "nonce": 0,
  "is_split": false
}
```

{% hint style="info" %}
Make sure your `wallet.json` file contains `"is_split": false`. This is required for compatibility with `rclone_zus`.
{% endhint %}

* `config.yaml`

```yaml
block_worker: https://mainnet.zus.network/dns
signature_scheme: bls0chain
min_submit: 50
min_confirmation: 50
confirmation_chain_length: 3
```

* `allocation.txt`

```
<your allocation ID>
```

{% hint style="warning" %}
Ensure the CLI-generated wallet matches the allocation you're trying to access. This method is more error-prone for beginners and should only be used if you're familiar with the Züs CLI ecosystem.
{% endhint %}

## Setup Remote

**Remote Configuration**

Here is an example of how to make a `zus` remote called `myZus`.

First run

```
rclone config
```

This will guide you through an interactive setup process:

```bash
No remotes found, make a new one?
n) New remote
s) Set configuration password
q) Quit config
n/s/q> n
name> myZus
Type of storage to configure.
Enter a string value. Press Enter for the default ("").
Choose a number from below, or type in your own value
...
59 / Zus Decentralized Storage
   \ "zus"
...
Storage> zus
Zus Allocation ID - allocation ID.
allocation_id>
Config Directory - directory to read config files (defaults to ~/.zcn; make sure to use the correct windows path for  `C:\Users\Username\.zcn`).
config_dir>
Work Directory - directory to read/write files.
work_dir>
Encrypt - encrypt the data before uploading.
y) Yes
n) No (default)
y/n> n
Edit advanced config?
y) Yes
n) No (default)
y/n> n
Configuration complete.
Options:
- type: zus
- allocation_id: allocation_id
Keep this "myZus" remote?
y) Yes this is OK (default)
e) Edit this remote
d) Delete this remote
y/e/d> y
```

Make sure your **rclone.conf** file is created. **Finding rclone.conf:**

* To locate your rclone configuration file (`rclone.conf`) via command line, use the command `rclone config file`

Example rclone.conf :

```ini
[myZus]
type = zus
allocation_id = <allocation_id>
```

Once configured, you can start using the remote `myZus` .

## Run Key Commands for File Operations

This section will cover basic commands to manage your files and folders. For more options, check out the other rclone commands [here](https://rclone.org/commands/).

### List All Directories in Path

```
rclone lsd <remote name>:<absolute path>
```

Example to list all the files and directories inside the root directory of the remote "myZus"

```
rclone lsd myZus:/
```

Output example:

```
    -1 2025-05-14 15:27:59        -1 Encrypted
    -1 2025-07-12 17:25:15        -1 10MbFiles100
    -1 2025-07-12 17:44:35        -1 10MbFiles100M
    -1 2025-07-12 17:46:51        -1 project-zus
    -1 2025-07-14 22:45:57        -1 10MbFiles50
```

### **Make a New Directory**

```
rclone mkdir myZus:<path>/<new_directory_name>
```

Example: create new directory in the root (This example shows new directory name as "newDirectory")

```
rclone mkdir myZus:/newDirectory
```

**List** the contents of a directory

```
rclone ls myZus:/<directory_path>
```

### File Operations

**Copy** from source to destination `(Local to Remote, Remote to Remote, Remote to Local)`

```
rclone copy <source_remote>:<source_path> <target_remote>:<target_path> 
```

**Move** from source to destination `(Local to Remote, Remote to Remote, Remote to Local)`

```
rclone move <source_remote>:<source_path> <target_remote>:<target_path> 
```

**Sync** from source to destination `(Local to Remote, Remote to Remote, Remote to Local)`

* Makes source and destination identical, modifying destination only.
* \--interactive flag is optional. Allows users to review each change before committing

<pre><code><strong>rclone sync --interactive &#x3C;source_remote>:&#x3C;source_path> &#x3C;target_remote>:&#x3C;target_path> 
</strong></code></pre>

{% hint style="warning" %}
Copy/move/sync commands only work within the same remote (same allocation). You cannot copy/move/sync across two different allocations (even if they have different remotes).
{% endhint %}

**Local to Züs Examples:**

```bash
# Windows example - copying from local Windows path to Züs remote
rclone copy "C:\Users\<username>\OneDrive\Desktop\New folder" myZus:/testDirectory

# Linux/macOS example - copying from local Unix path to Züs remote  
rclone copy /home/user/documents myZus:/backup
```

**Züs to Local Examples:**

```bash
# Windows example - copying from Züs remote to local Windows path
rclone copy myZus:/testDirectory "C:\Users\<username>\OneDrive\Desktop\New folder"

# Linux/macOS example - Copying from Züs remote to local directory
rclone copy myZus:/documents /home/user/downloads
```

## **Same Remote Operations (within the same allocation):**

Using the same remote, you can copy/move files from one directory to another within the same allocation.

```bash
# Copying within the same Züs remote (source: myZus, target: myZus)
rclone copy myZus:/sourcefilesDir/ myZus:/destinationDir/
```

{% hint style="warning" %}
**Cross-Remote Limitation**: only works within the same remote/allocations. Does not work across different Züs allocations
{% endhint %}

## **Cross-Cloud Backup Examples (Google Drive ↔ Züs):**

You can use `rclone_zus` to copy or sync files between your Züs storage allocation and other cloud providers such as **Google Drive**, **Dropbox**, **S3**, etc.

**Step 1: Create a Remote for the Other Cloud Provider**

To connect to another cloud provider, you must first **create a remote** for that service using the `rclone config` wizard.

Run:

```
rclone config
```

Follow the interactive prompts:

* Choose n for a new remote
* Name your remote (e.g., gdrive)
* Select the desired provider from the list (e.g., Google Drive, Dropbox, S3, etc.)
* Follow the provider-specific instructions, such as:
* Logging in via OAuth (for Google Drive)
* Providing access tokens or keys (for Dropbox, S3, etc.)
* Save your remote
* Once created, you can use that remote name in any command.

Refer to rclone's official documentation for full setup guides for each provider: <https://rclone.org/docs/>

**Step 2: Run Copy/Move Commands**

You can now run standard rclone commands to transfer data between Züs (myZus) and the cloud remote you just created (gdrive, for example).

**Google Drive to Züs**

```
# Google Drive to Züs backup (source: gdrive, target: myZus)
rclone copy gdrive:important-files myZus:/backup
```

**Züs to Google Drive**

```
# Züs to Google Drive backup (source: myZus, target: gdrive)
rclone copy myZus:/documents gdrive:zus-backup

```

You can also use `rclone move` or `rclone sync` for the same remotes:

```
rclone move gdrive:/myFiles myZus:/archive
rclone sync myZus:/photos gdrive:/mirror/photos
```

## Sync Mode Configuration

#### Use sync mode in rclone\_zus for bulk operations

use `--transfers=number of operations | --transfers=50` with the commands.

```bash
Edit advanced config?
y) Yes
n) No (default)
y/n> y

Option sdk_log_level.
Log level for the SDK
Enter a signed integer. Press Enter for the default (0).
sdk_log_level> leave empty

Option batch_mode.
Upload file batching sync|async|off.
This sets the batch mode used by rclone.
This has 3 possible values
- off - no batching
- sync - batch uploads and check completion (default)
- async - batch upload and don't check completion
Rclone will close any outstanding batches when it exits which may make
a delay on quit.
Enter a value of type string. Press Enter for the default (sync).
batch_mode> leave empty

Option batch_size.
Max number of files in upload batch.
This sets the batch size of files to upload. It has to be less than 50.
By default this is 0 which means rclone will calculate the batch size
depending on the setting of batch_mode.
- batch_mode: async - default batch_size is 100
- batch_mode: sync - default batch_size is the same as --transfers
- batch_mode: off - not in use
Rclone will close any outstanding batches when it exits which may make
a delay on quit.
Setting this is a great idea if you are uploading lots of small files
as it will make them a lot quicker. You can use --transfers 32 to
maximise throughput.
Enter a signed integer. Press Enter for the default (0).
batch_size> 50

Option batch_timeout.
Max time to allow an idle upload batch before uploading.
If an upload batch is idle for more than this long then it will be
uploaded.
The default for this is 0 which means rclone will choose a sensible
default based on the batch_mode in use.
- batch_mode: async - default batch_timeout is 5s
- batch_mode: sync - default batch_timeout is 500ms
- batch_mode: off - not in use
Enter a duration s,m,h,d,w,M,y. Press Enter for the default (0s).
batch_timeout> leave empty

Option batch_commit_timeout.
Max time to wait for a batch to finish committing
Enter a duration s,m,h,d,w,M,y. Press Enter for the default (10m0s).
batch_commit_timeout> leave empty

Option description.
Description of the remote.
Enter a value. Press Enter to leave empty.
description> leave empty

Edit advanced config?
y) Yes
n) No (default)
y/n> n

Configuration complete.
```

**Bulk Copy** from source to destination `(Local to Remote, Remote to Remote, Remote to Local)`

```
rclone copy <remote name>:<source path> <remote name>:<destination path>  --transfers=50
```

**Bulk Move** from source to destination `(Local to Remote, Remote to Remote, Remote to Local)`

```
rclone move <remote name>:<source path> <remote name>:<destination path>  --transfers=50
```

## Using rclone\_zus with Vult (Optional)

If you're a Vult user, you can also use rclone\_zus to interact with your Züs allocation by following similar steps:

{% embed url="<https://www.youtube.com/watch?feature=youtu.be&v=aBw3_-Bwiqw>" %}

1. Go to **Profile & Wallet** via the user icon in the top right corner.
2. Scroll down and click **Download Wallet**.
3. This will download a `.zip` file with:
   * `wallet.json`
   * `allocation.txt`
   * `config.yaml`
4. Move these files to your `.zcn` directory (e.g. `~/.zcn` on Linux/macOS or `C:\Users\<YourName>\.zcn` on Windows).

{% hint style="info" %}
Make sure your `wallet.json` file contains `"is_split": false`. This is required for compatibility with `rclone_zus`.
{% endhint %}

🔄 You may switch between Vult and Blimp wallets by replacing these files.

{% hint style="info" %}
If using multiple wallets, consider using `rclone config` to point to a **custom config directory** instead of overwriting `.zcn`.
{% endhint %}


# SDKs

The **Züs SDK** allows developers to integrate decentralized storage into their applications seamlessly. By using Züs’s robust, high-performance cloud storage, developers can enable secure, private, and efficient data storage, distribution, and management.

### **Key Features:**

* **Multi-Platform Support:**\
  Züs SDK is available for multiple platforms, including desktop, mobile, and web, offering developers the flexibility to build solutions across environments.
* **End-to-End Encryption:**\
  Züs SDK ensures that all data stored on the network is encrypted end-to-end, providing full privacy and security to users.
* **Decentralized Storage:**\
  Züs’s decentralized architecture splits and distributes data across different servers, enhancing data availability, security, and performance.
* **Blockchain-Based Transactions:**\
  Through Züs SDK, developers can use blockchain functionality for immutable transactions, audit trails, and transparent storage operations.
* **Customizable Storage Options:**\
  The SDK allows developers to choose specific servers, locations, and redundancy levels for data storage, providing flexibility for performance optimization and regulatory compliance.

### **Supported Platforms**

Züs SDK is compatible with the following platforms:

* **macOS:**\
  Supports macOS Mojave (10.14.5) and above.
* **Linux (Ubuntu-based systems):**\
  Compatible with all Ubuntu 18+ distributions (including Linux Mint).
* **Linux (RHEL/CentOS 7+ based systems):**\
  Suitable for RHEL 7+, CentOS 7+, Fedora 30+ distributions.
* **Windows:**\
  Not directly supported by default, but compatible through Docker or a Linux subsystem.

### **Mobile Platforms**

* **iOS & Android:**\
  Züs SDK can be built for mobile platforms using GoMobile. Xcode is required for iOS builds, and Android Studio with NDK for Android builds. Follow the mobile build instructions to integrate Züs with mobile applications.

### **WebAssembly (WASM)**

* Züs SDK supports exporting functions for WASM, allowing web applications to interact with decentralized storage solutions in the browser.

### **SDK Components**

The Züs SDK consists of several core components that are essential for developers to interact with the decentralized storage network. These include:

* **ZCNCore:**\
  The core component to interact with the Züs blockchain and manage transactions, tokens, and authentication.
* **ZboxCore:**\
  The primary component for interacting with the decentralized storage layer. It provides functions to upload, download, share, and manage files stored on the Züs network.
* **Encryption Module:**\
  Provides end-to-end encryption to ensure data privacy and security, allowing secure data sharing with trusted parties.
* **Proxy Re-encryption:**\
  Enables users to securely share encrypted files by re-encrypting them for designated recipients without revealing the original encryption key.

Züs SDK allows developers to integrate high-performance decentralized cloud storage solutions across multiple platforms and programming environments. Below are the supported languages and platforms and key instructions for each.

### **Programming Languages**

Currently, the Züs SDK is officially written and supported in Go. However, through WebAssembly and mobile SDK exports, the core SDK functions can be accessed in other environments such as web apps and mobile apps built in different languages (e.g., Swift, Kotlin, JavaScript).


# Go SDK

Functions to manage your allocations

{% hint style="warning" %}
**Please Note:** This SDK is subject to tremendous changes in the next releases that can be backward incompatible. Please pay close attention to our announcements [on Discord](https://discord.gg/tSrXGqDy).
{% endhint %}

## **GoSDK - Züs Client SDK for Go**

GoSDK is the official Go-based Software Development Kit (SDK) for the **Züs decentralized storage network**. It enables developers to integrate Züs storage functionalities into their applications while providing tools for wallet management, file operations, staking, and smart contract interactions.

The SDK supports various platforms, including **Linux**, **macOS**, and **Windows**. Additionally, GoSDK can be built for **mobile (iOS/Android)** and **WebAssembly (WASM)** to provide broader compatibility across different environments.

{% embed url="<https://github.com/0chain/gosdk/blob/staging/zboxcore/sdk/allocation.go>" %}

### **Installation**

#### **Supported Platforms**

GoSDK is compatible with the following operating systems:

* **MacOS** (10.14.5 or later)
* **Linux** (Ubuntu 18+, CentOS 7+, Fedora 30+)
* **Windows** (via WSL or native support)

#### **Prerequisites**

Before installing GoSDK, ensure you have:

* **Go (Golang) installed**: [Install Go](https://golang.org/doc/install)
* **Go Modules enabled**: Run `export GO111MODULE=on` in your terminal

#### **Setup Instructions**

**Step 1: Create a New Project Folder**

Open your terminal and run:

```bash
mkdir zus-go-demo
cd zus-go-demo
```

This creates and enters a new folder named `zus-go-demo`.

**Step 2: Initialize a Go Module**

Run:

```bash
go mod init zus-go-demo
```

This creates a `go.mod` file that declares this folder as a Go module.

{% hint style="info" %}
You'll use this file to track dependencies like the Züs SDK.
{% endhint %}

If you are using VS code, you can use `code` CLI installed command to open the folder.

```bash
code .
```

If not, open VS Code manually and open the `zus-go-demo` folder from the File menu.

**Step 3: Install Züs SDK from `staging` Branch**

In your terminal:

```bash
go get github.com/0chain/gosdk@staging
```

This tells Go to pull the latest code from the **`staging` branch** of the SDK repo.

Expected output:

```bash
go: added github.com/0chain/gosdk v1.8.18-0.20230901213317-53d640a9b7f9
```

This is a pseudo-version that references a specific commit on the `staging` branch.

**Step 4: Create Your `main.go` File**

In the root of `zus-go-demo`, create a file named `main.go` and paste this:

```go
package main

import (
	"fmt"

	"github.com/0chain/gosdk/zcncore"
)

func main() {
	fmt.Println("Züs Go SDK is ready!")
	fmt.Println("SDK Version:", zcncore.GetVersion())
}
```

This imports the SDK and prints its version.

**Step 5: Tidy Up Your Dependencies**

Run:

```bash
go mod tidy
```

This cleans up the `go.mod` and `go.sum` files by removing unused and downloading used dependencies.

> If you hadn’t imported anything yet, you might see a warning like:\
> `go: warning: "all" matched no packages`

If you see a `missing go.sum entry` error (e.g., after importing packages), and `go mod tidy` does not fetch dependencies, try:

```
go mod tidy -e
```

The `-e` flag tells Go to continue downloading even if errors are detected.

**Step 6: Run Your Project**

Run the Go file:

```bash
go run main.go
```

This confirms that the SDK is installed, imported, and running.

Alternatively you can also build the sample application:

```sh
go build -o main main.go
```

Run the executable:

```sh
./main
```

If the GoSDK version is printed successfully, the installation is complete.

### **Mobile SDK (iOS & Android)**

#### **Building GoSDK for Mobile**

GoSDK supports **mobile app development** through `gomobile`, allowing integration with **iOS** and **Android** apps.

**Prerequisites**

* **iOS**: Requires **Xcode Command Line Tools**
* **Android**: Requires **Android Studio** with **NDK**

**Verify Xcode Setup (macOS users)**

To ensure Xcode is correctly referenced:

```bash
xcode-select -p
```

If it shows `/Library/Developer/CommandLineTools`, run:

```bash
sudo xcode-select --switch /Applications/Xcode.app/Contents/Developer
```

This ensures full Xcode paths are used.

**Steps to Build for Mobile**

1. **Setup the Go Mobile environment:**

   ```sh
   make setup-gomobile
   ```

   (If `golang.org/x/mobile/bind` is missing, install it using `go get golang.org/x/mobile/bind`)
2. **Build the SDK:**
   * For **iOS**:

     ```sh
     make build-ios
     ```
   * For **Android**:

     ```sh
     make build-android
     ```

### **Exporting GoSDK Functions**

#### **Expose a GoSDK Function to Mobile SDK**

To expose GoSDK functions in **Mobile SDK**, follow these steps:

1. **For an existing file function** (e.g., `zboxcore/sdk/allocation.go`):
   * Add a wrapper function inside `mobilesdk/sdk/zbox/allocation.go`
2. **For a new function:**
   * Create a new Go file in `mobilesdk/sdk/zbox/`
   * Implement the function to call the respective GoSDK method.
3. **Build the SDK again** (`make build-ios` or `make build-android`).

#### **Exporting GoSDK Functions to WebAssembly (WASM)**

GoSDK can be compiled into **WASM** for **web applications**. Example functions that have been exported include:

* `wasmsdk/ethwallet.go` (exports Ethereum wallet functions)
* `wasmsdk/wallet.go` (exports core wallet functionalities)

**Steps to Export a GoSDK Function to WASM**

1. **Modify `wasmsdk/wallet.go`** or create a new file.
2. **Register the function in WebAssembly (`proxy.go`):**

```go
js.Global().Set("YOUR_FUNCTION", js.FuncOf(YOUR_FUNCTION))
```

3. **Compile the WebAssembly binary:**

```sh
GOOS=js CGO_ENABLED=0 GOARCH=wasm go build -o proxy.wasm github.com/0chain/gosdk/wasmsdk
```

4. **Test the WASM function:**
   1. Replace `proxy.wasm` in the test client.
   2. Run a local server (`php -S localhost:82 test/server.php`).
   3. Execute the exported function via JavaScript.

### **Running Unit Tests**

GoSDK includes a **test suite** to validate functionality.

#### **Running General Unit Tests**

```sh
go test github.com/0chain/gosdk/zboxcore/sdk -v
```

#### **Running Specific Tests**

* **Run all unit tests in `bls0chain_test.go`**:

  ```sh
  go test github.com/0chain/gosdk/core/zcncrypto -v
  ```
* **Run a single test (e.g., `TestSignatureScheme`)**:

  ```sh
  go test github.com/0chain/gosdk/core/zcncrypto -v -run TestSignatureScheme
  ```

#### **Running Coverage Tests**

```sh
go test <path_to_folder> -coverprofile=coverage.out
go tool cover -html=coverage.out
```

### **WebAssembly Testing**

#### **Using `go test` for WASM**

1. **Install Node.js** (Required for testing)
2. **Set environment variables for WASM testing:**

   ```sh
   export PATH=$PATH:/usr/local/go/misc/wasm/
   ```
3. **Run the WASM test suite:**

   ```sh
   GOOS=js CGO_ENABLED=0 GOARCH=wasm go test -tags test -v github.com/0chain/gosdk/wasmsdk
   ```

### **Other Dependencies**

#### **Installing FFmpeg (for media processing)**

```sh
sudo apt-get install ffmpeg
sudo apt-get install v4l-utils
```

***


# GO SDK Microservices

This guide provides a complete walkthrough for setting up and running a Go-based microservice that interacts with the Züs decentralized storage network.

### 1. Prerequisites Setup

Before you begin:

#### Install Go

install [Go (version 1.20+ recommended)](https://golang.org/dl/). Verify installation:

```bash
go version
```

#### Get a Züs Wallet

You’ll need a `.json` wallet file.

It is typically located at:

```bash
~/.zcn/wallet.json
```

Alternatively, you can store the wallet JSON file in any location of your choice. To retrieve your wallet information, you can use the **recover wallet** command from [`zwalletcli`](https://github.com/0chain/zwalletcli?tab=readme-ov-file#recovering-wallet---recoverwallet).

Or you can use any location to create the json file. You can retrieve your wallet info by using [recover wallet](https://github.com/0chain/zwalletcli?tab=readme-ov-file#recovering-wallet---recoverwallet) from the zwalletcli.

Below is sample wallet structure:

```
{
  "client_id": "xxxxxxxxxxxxxxxxxxxxxxxxxxxxx",
  "client_key": "xxxxxxxxxxxxxxxxxxxxxxxxxxxxxxxxx",
  "keys": [
    {
      "public_key": "xxxxxxxxxxxxxxxxxxxxxxxxxxxxxxxxxxxxxxxxxx",
      "private_key": "xxxxxxxxxxxxxxxxxxxxxxxxxxxxxxxxxxxxxx"
    }
  ],
  "mnemonics": "xxxx xxxx xxxx xxxxx",
  "version": "1.0",
  "date_created": "2023-05-03T12:44:46+05:30",
  "nonce": 0
}
```

#### Create `config.json`

Create a file named `config.json` in your project root with the following structure:

```json
{
  "wallet_json": "/Users/yourusername/.zcn/wallet.json",
  "block_worker": "https://mainnet.zus.network/dns",
  "chain_id": "0af33bc5402b5f13e349347db8b88b6543157baadb7c9265ef0a8f87429e4a44",
  "signature_scheme": "bls0chain",
  "min_submit": 50,
  "min_confirmation": 50,
  "confirmation_chain_length": 3,
  "sharder_consensous": 3
}
```

### 2. Project File Structure

Your project should be structured as follows:

```
/project-root
├── config.json
├── main.go
└── handlers/
    ├── download_handler.go
    ├── memfile_handler.go
    ├── sdk_handler.go
    └── upload_handler.go
```

### 3. Code Your `main.go`

```go
package main

import (
	"log"
	"net/http"

	"go_zus_blog/handlers" // Replace with your module name if different
	"github.com/gorilla/mux"
)

func main() {
	router := mux.NewRouter()

	router.HandleFunc("/init-sdk", handlers.InitSDKHandler).Methods("POST")
	router.HandleFunc("/upload-file", handlers.UploadFileHandler).Methods("POST")
	router.HandleFunc("/download-file", handlers.DownloadFileHandler).Methods("POST")

	log.Println("Go microservice running on port 8080")
	log.Fatal(http.ListenAndServe(":8080", router))
}
```

Install Gorilla Mux:

```
go get -u github.com/gorilla/mux
```

In case you see an error while importing go\_zus\_handlers, run this command:

```bash
go mod init go_zus_blog
```

### 4. Build Your Handlers

#### `sdk_handler.go`

```go
package handlers

import (
	"encoding/json"
	"log"
	"net/http"
	"os"

	"github.com/0chain/gosdk/core/client"
)

type Config struct {
	WalletJSON              string `json:"wallet_json"`
	BlockWorker             string `json:"block_worker"`
	ChainID                 string `json:"chain_id"`
	SignatureScheme         string `json:"signature_scheme"`
	MinSubmit               int    `json:"min_submit"`
	MinConfirmation         int    `json:"min_confirmation"`
	ConfirmationChainLength int    `json:"confirmation_chain_length"`
	SharderConsensous       int    `json:"sharder_consensous"`
}

func InitSDKHandler(w http.ResponseWriter, r *http.Request) {
	w.Header().Set("Content-Type", "application/json")

	file, err := os.ReadFile("./config.json")
	if err != nil {
		http.Error(w, "Failed to read config.json: "+err.Error(), http.StatusInternalServerError)
		return
	}

	var config Config
	err = json.Unmarshal(file, &config)
	if err != nil {
		http.Error(w, "Invalid config.json: "+err.Error(), http.StatusInternalServerError)
		return
	}

	if config.WalletJSON == "" {
		http.Error(w, "Missing wallet JSON path", http.StatusBadRequest)
		return
	}

	if _, err := os.Stat(config.WalletJSON); os.IsNotExist(err) {
		http.Error(w, "Wallet JSON file not found: "+config.WalletJSON, http.StatusBadRequest)
		return
	}

	walletContent, err := os.ReadFile(config.WalletJSON)
	if err != nil {
		http.Error(w, "Failed to read wallet JSON: "+err.Error(), http.StatusInternalServerError)
		return
	}

	err = client.InitSDK(
		string(walletContent),
		config.BlockWorker,
		config.ChainID,
		config.SignatureScheme,
		0,
		true,
		0,
		config.MinSubmit,
		config.MinConfirmation,
		config.ConfirmationChainLength,
		config.SharderConsensous,
	)
	if err != nil {
		http.Error(w, "SDK initialization failed: "+err.Error(), http.StatusInternalServerError)
		return
	}

	w.WriteHeader(http.StatusOK)
	w.Write([]byte(`{"message": "SDK initialized successfully"}`))
}
```

#### `memfile_handler.go`

```go
package handlers

import (
	"bytes"
	"errors"
	"io"
	"os"
	"sync"
	"time"
)

type MemFile struct {
	buffer  *bytes.Buffer
	mu      sync.Mutex
	name    string
	modTime time.Time
	mode    os.FileMode
}

func NewMemFile(name string) *MemFile {
	return &MemFile{
		buffer:  new(bytes.Buffer),
		name:    name,
		modTime: time.Now(),
		mode:    0644,
	}
}

func (m *MemFile) Read(p []byte) (int, error) {
	m.mu.Lock()
	defer m.mu.Unlock()
	return m.buffer.Read(p)
}

func (m *MemFile) Write(p []byte) (int, error) {
	m.mu.Lock()
	defer m.mu.Unlock()
	return m.buffer.Write(p)
}

func (m *MemFile) Seek(offset int64, whence int) (int64, error) {
	m.mu.Lock()
	defer m.mu.Unlock()
	switch whence {
	case io.SeekStart:
		m.buffer = bytes.NewBuffer(m.buffer.Bytes()[offset:])
		return offset, nil
	case io.SeekEnd:
		m.buffer = bytes.NewBuffer(m.buffer.Bytes()[len(m.buffer.Bytes())+int(offset):])
		return int64(len(m.buffer.Bytes())), nil
	case io.SeekCurrent:
		return 0, errors.New("unsupported seek method")
	}
	return 0, errors.New("invalid seek whence")
}

func (m *MemFile) Close() error {
	m.mu.Lock()
	defer m.mu.Unlock()
	m.buffer.Reset()
	return nil
}

func (m *MemFile) Stat() (os.FileInfo, error) {
	return &memFileInfo{
		name:    m.name,
		size:    int64(m.buffer.Len()),
		modTime: m.modTime,
		mode:    m.mode,
	}, nil
}

func (m *MemFile) Sync() error {
	return nil
}

func (m *MemFile) ToBytes() []byte {
	return m.buffer.Bytes()
}

type memFileInfo struct {
	name    string
	size    int64
	modTime time.Time
	mode    os.FileMode
}

func (fi *memFileInfo) Name() string       { return fi.name }
func (fi *memFileInfo) Size() int64        { return fi.size }
func (fi *memFileInfo) Mode() os.FileMode  { return fi.mode }
func (fi *memFileInfo) ModTime() time.Time { return fi.modTime }
func (fi *memFileInfo) IsDir() bool        { return false }
func (fi *memFileInfo) Sys() interface{}   { return nil }
```

#### `upload_handler.go`

```go
package handlers

import (
	"encoding/json"
	"log"
	"net/http"
	"os"
	"path/filepath"

	"github.com/0chain/gosdk/constants"
	"github.com/0chain/gosdk/zboxcore/fileref"
	"github.com/0chain/gosdk/zboxcore/sdk"
)

type ShortURLResponse struct {
	AuthTicket string `json:"auth_ticket"`
}

type UploadRequest struct {
	AllocationID     string `json:"allocation_id"`
	LocalPath        string `json:"local_path"`
	Encrypt          bool   `json:"encrypt"`
	WebStreaming     bool   `json:"web_streaming"`
	IsMemoryDownload bool   `json:"download_file"`
}

func UploadFileHandler(w http.ResponseWriter, r *http.Request) {
	var req UploadRequest

	// Decode the incoming JSON payload
	err := json.NewDecoder(r.Body).Decode(&req)
	if err != nil {
		log.Printf("Invalid request payload: %v", err)
		http.Error(w, "Invalid request payload", http.StatusBadRequest)
		return
	}

	log.Printf("Received upload request: %+v", req)

	// Validate required fields
	if req.AllocationID == "" || req.LocalPath == "" {
		log.Printf("Missing required fields: %+v", req)
		http.Error(w, "AllocationID and LocalPath are required", http.StatusBadRequest)
		return
	}

	// Check if the file exists locally
	if _, err := os.Stat(req.LocalPath); os.IsNotExist(err) {
		log.Printf("File not found at: %s", req.LocalPath)
		http.Error(w, "File not found at "+req.LocalPath, http.StatusBadRequest)
		return
	}

	// Generate the remote path using the file name
	fileName := filepath.Base(req.LocalPath)
	remotePath := "/" + fileName
	log.Printf("Generated remote path: %s", remotePath)

	// Get the allocation object using the provided AllocationID
	allocation, err := sdk.GetAllocation(req.AllocationID)
	if err != nil {
		log.Printf("Failed to get allocation: %v", err)
		http.Error(w, "Failed to get allocation: "+err.Error(), http.StatusInternalServerError)
		return
	}

	// Open the local file
	fileReader, err := os.Open(req.LocalPath)
	if err != nil {
		log.Printf("Failed to open file: %v", err)
		http.Error(w, "Failed to open file: "+err.Error(), http.StatusInternalServerError)
		return
	}
	defer fileReader.Close()

	// Get file size
	fileInfo, err := fileReader.Stat()
	if err != nil {
		log.Printf("Failed to get file info: %v", err)
		http.Error(w, "Failed to get file info: "+err.Error(), http.StatusInternalServerError)
		return
	}

	// Set up the operation for the upload
	operations := []sdk.OperationRequest{
		{
			OperationType: constants.FileOperationInsert,
			FileMeta: sdk.FileMeta{
				Path:       req.LocalPath,
				RemotePath: remotePath,
				RemoteName: fileName,
				ActualSize: fileInfo.Size(),
			},
			FileReader:     fileReader,
			IsWebstreaming: req.WebStreaming,
			IsRepair:       false,
			Opts: func() []sdk.ChunkedUploadOption {
				// Include encryption option only if Encrypt is true
				if req.Encrypt {
					return []sdk.ChunkedUploadOption{
						sdk.WithEncrypt(req.Encrypt),
					}
				}
				return nil
			}(),
		},
	}

	// Perform the multi-operation
	log.Println("Starting DoMultiOperation...")
	err = allocation.DoMultiOperation(operations)
	if err != nil {
		log.Printf("Multi-operation failed: %v", err)
		http.Error(w, "Upload failed: "+err.Error(), http.StatusInternalServerError)
		return
	}

	log.Println("File uploaded successfully to Züs network")

	// Generate Auth Ticket
	//authTicket, err := allocation.GetAuthTicketForShare(remotePath, req.FileName, fileref.FILE, "")
	authTicket, err := allocation.GetAuthTicketForShare(remotePath, fileName, fileref.FILE, "")
	if err != nil {
		log.Printf("Failed to generate auth ticket: %v", err)
		http.Error(w, "Failed to generate auth ticket", http.StatusInternalServerError)
		return
	}
	log.Printf("Auth Ticket: %+v", authTicket)

	// Return short URL
	w.Header().Set("Content-Type", "application/json")
	json.NewEncoder(w).Encode(ShortURLResponse{
		AuthTicket: authTicket,
	})
}

```

#### `download_handler.go`

```go
package handlers

import (
"encoding/json"
"log"
"net/http"

//"path/filepath"
//"strings"

"github.com/0chain/gosdk/zboxcore/fileref"
"github.com/0chain/gosdk/zboxcore/sdk"
)

type DownloadRequest struct {
AllocationID string `json:"allocation_id"`
FileName     string `json:"filename"`
AuthTicket   string `json:"auth_ticket"`
LocalPath    string `json:"local_path"`
}

func DownloadFileHandler(w http.ResponseWriter, r *http.Request) {
var req DownloadRequest

// Decode the incoming JSON payload
err := json.NewDecoder(r.Body).Decode(&req)
if err != nil {
log.Printf("Invalid request payload: %v", err)
http.Error(w, "Invalid request payload", http.StatusBadRequest)
return
}
log.Printf("Received download request: %+v", req)

allocation, err := sdk.GetAllocation(req.AllocationID)
if err != nil {
http.Error(w, "Failed to get allocation", http.StatusInternalServerError)
return
}

// Generate the remote path using the file name
remotePath := "/" + req.FileName
log.Printf("Generated remote path: %s", remotePath)

remoteLookupHash := fileref.GetReferenceLookup(req.AllocationID, remotePath)
log.Printf("Generated remoteLookupHash: %s", remoteLookupHash)

// Create in-memory file
//memFile := NewMemFile(remotePath)

// Download file
err = allocation.DownloadFromAuthTicket(
req.LocalPath, req.AuthTicket, remoteLookupHash, remotePath, false, nil, true,
)
if err != nil {
http.Error(w, "File download failed", http.StatusInternalServerError)
return
}
```

### 5. Run Your Server

```
go run main.go
```

Expected output:

```
Go microservice running on port 8080
```

### 6. Test With `curl`

#### Initialize SDK

```bash
curl -X POST http://localhost:8080/init-sdk
```

#### Upload a File

```bash
curl -X POST http://localhost:8080/upload-file \
  -H "Content-Type: application/json" \
  -d '{
    "allocation_id": "your_allocation_id",
    "local_path": "/Users/you/Downloads/file.txt",
    "encrypt": false,
    "web_streaming": false,
    "download_file": false
  }'
```

#### Download a File

```bash
curl -X POST http://localhost:8080/download-file \
  -H "Content-Type: application/json" \
  -d '{
    "allocation_id": "allocation-id",
    "filename": "filename of file you would like to download from allocation",
    "auth_ticket": "auth-ticket-string",
  "local_path": "/path/to/local/download"
  }' 
```


# JS SDK

This page will specifically guide you through setting up a project using the Züs JS SDK. For detailed API documentation, please refer to the API Reference.

### Install Züs JS SDK

The Züs JS SDK is available as a package on NPM for use with a module bundler:

{% tabs %}
{% tab title="NPM" %}

```javascript
npm install @zerochain/sdk
```

{% endtab %}

{% tab title="Yarn" %}

```javascript
yarn add @zerochain/sdk 
```

{% endtab %}
{% endtabs %}

### Initialize the SDK

Before using the SDK, it must be initialized. This process involves loading the required scripts, fetching the appropriate WASM file, and then initializing the WASM.

#### Adding Required Scripts

Include the following scripts in the `<head>` of your HTML:

```html
<script
  defer
  src="https://cdn.jsdelivr.net/gh/herumi/bls-wasm@v1.1.1/browser/bls.js"
/>
<script
  defer
  src="https://cdn.jsdelivr.net/gh/golang/go@go1.22.5/misc/wasm/wasm_exec.js"
/>
```

{% hint style="info" %}
The WASM relies on the scripts above and requires specific versions to function correctly. Make sure to use the exact versions listed. These may be updated periodically based on the latest WASM `v1.x.x` release requirements.
{% endhint %}

#### Fetching the WASM

There are two WASM file types available, `standard` and `enterprise`.

1. Download the appropriate WASM file(s):
   * **Standard WASM** is for interacting with a Standard Allocation:
     * Download `zcn.wasm` from the "Assets" section of any GoSDK Release [here](https://github.com/0chain/gosdk/releases)
   * **Enterprise WASM** is for interacting with an Enterprise Allocation:
     * Download `enterprise-zcn.wasm` from the "Assets" section of any eGoSDK Release [here](https://github.com/0chain/egosdk/releases)
2. Upload your WASM file for `wasmBaseUrl` config:
   * You can place it in your website’s static assets folder.
     * ```sh
         public/
           |--wasm/
           |   |--zcn.wasm
           |   |--enterprise-zcn.wasm
       ```
     * In this case, set the `wasmBaseUrl` config to `/wasm`.
   * Alternatively, you can upload it to a web server or CDN.
     * For example, if `wasmBaseUrl` is set to `https://example.com/wasm`, the WASM files should be located at:
       * `https://example.com/wasm/enterprise-zcn.wasm` for the Enterprise WASM
       * `https://example.com/wasm/zcn.wasm` for the Standard WASM
3. Upload the [`md5worker.js` file](https://cdn.zus.network/public/md5worker.js) for the `md5WorkerUrl` config:
   * This is optional if you are not using upload features of the SDK. This includes using SDK methods like `multiUpload` and `bulkUpload`. {/\* DOTODO: update link to multiUpload and bulkUpload \*/}
   * Place it in your website’s static assets folder:

     ```sh
     public/
       |--md5worker.js
     ```

     * In this case, set the `md5WorkerUrl` config to `md5worker.js`.
   * Alternatively, use the [CDN URL](https://cdn.zus.network/public/md5worker.js) for the `md5WorkerUrl` config. :::warning

{% hint style="info" %}
This is strongly not recommended as it is used only in Zus apps like Vult, Blimp & Chalk and may change in the future, potentially breaking your app.
{% endhint %}

{% tabs %}
{% tab title="JavaScript" %}

````javascript
import { useWasmLoader } from '@zerochain/sdk/dist/react'
export const App = () => {
  const [isWasmLoaded, setIsWasmLoaded] = useState(false)

   // highlight-start
  const loadWasm = useWasmLoader({
    onLog: (type, log) => console[type]('WASM LOG:', log.message),
    setIsWasmLoaded,
  })
  // highlight-end

  // Using useEffect to ensure the `window` object is accessible
  useEffect(() => {
    // highlight-start
    loadWasm({
      md5WorkerUrl: 'md5worker.js',
      wasmBaseUrl: '/wasm', // Or, 'https://example.com/wasm'
    })
    // highlight-end
  }, [loadWasm])

  // ...
}
```
````

{% endtab %}

{% tab title="Vanilla" %}

```javascript
import { wasmLoader } from '@zerochain/sdk'

const loadWasm = wasmLoader({
  onLog: (type, log) => console[type]('WASM LOG:', log.message),
  setIsWasmLoaded: isWasmLoaded => updateMyUI(isWasmLoaded),
})

loadWasm({
  md5WorkerUrl: 'md5worker.js',
  wasmBaseUrl: '/wasm', // Or, 'https://example.com/wasm'
})
```

{% endtab %}
{% endtabs %}

### Fetching WASM with Caching Support

The SDK supports caching the WASM file for faster access. This is **not** enabled by default, but you can modify the `loadWasm` config to enable it.

* Set `useCachedWasm` to `true`.
* Configure `cacheConfig` based on your WASM file type:
  * For **Enterprise WASM**, set `enterpriseGosdkVersion` and `enterpriseWasmUrl`.
  * For **Standard WASM**, set `standardGosdkVersion` and `standardWasmUrl`.
* Optionally, set `wasmBaseUrl` as a fallback. (Reference)

```js
loadWasm({
  // highlight-start
  useCachedWasm: true,
  cacheConfig: {
    enterpriseGosdkVersion: process.env.EGOSDK_VERSION, // Example: '1.18.5'
    enterpriseWasmUrl: process.env.EGOSDK_WASM_URL, // Example: 'https://example.com/wasm/enterprise-zcn.wasm'
    standardGosdkVersion: process.env.GOSDK_VERSION, // Example: '1.18.17'
    standardWasmUrl: process.env.GOSDK_WASM_URL, // Example: 'https://example.com/wasm/zcn.wasm'
  },
  // highlight-end

  // Set other options as needed
  md5WorkerUrl: 'md5worker.js',
  wasmBaseUrl: '/wasm', // Or, 'https://example.com/wasm'
});
```

#### Switching between WASM modes

The SDK provides `updateWasmMode` for switching between WASM modes.

* First call `updateWasmMode` with the desired WASM mode.
* Then call `loadWasm` with the proper config.

{% tabs %}
{% tab title="React (TSX)" %}

```javascript
import { useWasmLoader } from '@zerochain/sdk/dist/react'
import { updateWasmMode } from '@zerochain/sdk'

export const SwitchWasmMode = () => {
  const loadWasm = useWasmLoader({ /** ... */})

  const switchWasmMode = (newWasmMode: "normal" | "enterprise") => {
    updateWasmMode(newWasmMode)
    loadWasm({ /** Your loadWasm config */})
  }

  // ...
}
```

{% endtab %}

{% tab title="TypeScript" %}

```typescript
import { wasmLoader } from '@zerochain/sdk'
import { updateWasmMode } from '@zerochain/sdk'

const loadWasm = wasmLoader({ /** ... */})

const switchWasmMode = (newWasmMode: "normal" | "enterprise") => {
  updateWasmMode(newWasmMode)
  loadWasm({ /** Your loadWasm config */})
}
```

{% endtab %}
{% endtabs %}

### Next Steps

Now that the SDK is initialized, you can start using its methods in your application. Check out the API Reference.

#### Example: Logging the WASM version

```js
import sdk from '@zerochain/sdk'

async function logWasmVersion() {
  const version = await sdk.getGosdkVersion(domain)
  console.log('WASM Version:', version)
}
```


# Tokenomics

The Züs Network is designed as a decentralized storage ecosystem that incentivizes both clients and storage providers (blobbers) through a token-based economy.

This document details the reward mechanisms, storage pricing models, staking dynamics, and overall economic structure governing the Züs Network.

### Economic Model

The Züs Network employs a Proof of Stake (PoS) consensus mechanism, enabling blobbers to earn rewards by providing storage services and staking tokens. The economic model is structured around the following key elements:

* **Blobber Rewards:** Based on data storage, retrieval, and staking capacity.
* **Client Costs:** Determined by storage duration, read/write operations, and allocation selection.
* **Staking and Delegation:** Allows third parties to stake on blobbers for a share of rewards.
* **Challenge Mechanism:** Ensures data integrity through random validation.

### Storage Provider (Blobber) Rewards

Blobbers earn revenue from multiple sources, ensuring that economic incentives align with storage performance and reliability.

Blobbers earn revenue from four sources:

1. **Proceeds from writes (V\_write)**: Fees collected from clients for data storage.
2. **Proceeds from reads (V\_read)**: Fees collected for data retrieval.
3. **Annual block rewards (V\_block)**: Distributed rewards based on stake and service quality.
4. **Challenge validation rewards (V\_validation)**: Earned by proving stored data integrity.

The total revenue for a blobber is calculated as:

```
V_blobber = V_write + V_read + V_block + V_validation
```

Blobbers with high performance, low failure rates, and competitive pricing receive higher rewards over time.

### Client Storage & Cost Model

Clients interact with the Züs Network to store and retrieve data. The cost structure includes:

#### a. Allocations

When storing data, clients create an allocation by selecting N blobbers, where:

* ***k*****&#x20;blobbers** store actual data.
* ***m*****&#x20;blobbers** store parity for redundancy (Erasure Coding).

The higher the m/k ratio, the better the durability and availability.

#### b. Reading & Writing Costs

Clients pay upfront for storage and retrieval fees are calculated dynamically.

* The write cost is prepaid for the storage duration (typically one year).
* The read cost depends on blobbers' pricing models and the presence of free reads.

#### c. Write Pool & Read Pool

* **Write Pool:** Clients deposit tokens upfront for write operations.
* **Read Pool:** Clients deposit tokens if blobbers charge for reads.
* Unused write pool tokens are returned at the end of the allocation period.

### Staking & Delegation

The Züs Network allows delegation to blobbers. Delegators can stake tokens, and rewards are distributed proportionally. The service provider's total earnings are:

```
I_blobber = Commission + (Stake proportion × Total rewards)
```

#### **a. Blobber Staking Model**

Blobbers must stake tokens before providing storage. A higher stake means:

* Better reputation
* Higher rewards
* More allocation requests from clients

#### **b. Delegated Staking**

Third-party users (delegators) can stake tokens on blobbers and earn a share of rewards.

**Stake Lockup Period**

* Staked tokens remain locked until allocation expiration.
* Delegators can withdraw unstaked tokens anytime.

### 5. Challenge Mechanism & Security

Blobbers are periodically challenged to prove they store data correctly. If they fail:

* Challenge rewards are returned to the client.
* A portion of the blobber’s stake is slashed and burned.
* This ensures data reliability and discourages dishonest storage providers.

```
Challenge Success Rate= Total Challenges Issued / Valid Responses
```

### 6. Storage Provider Weight Calculation

Blobber rewards are based on **read/write pricing and service quality**. The weight formula:

```
Weight (w) = β × Stake (S)
```

Where β is influenced by:

* Read price to write price ratio (p)
* Data egress ratio (z)
* Stake and performance history

### Token Circulation & Demand

#### **a. Demand Drivers**

* **Storage Demand**: Clients **must lock tokens** to store data.
* **Read Fees**: Users pay for retrieving data.
* **Governance & Staking**: Tokens are used for voting and securing the network.

#### **b. Supply Control**

* Failing blobbers lose staked tokens, reducing circulation.
* Token burns from slashing reduce supply over time.

#### **c. Economic Balance**

The Züs Network fosters competition where blobbers optimize pricing based on demand, leading to fair and stable storage costs.

```
Equilibrium Price = (Storage Demand / Storage Supply) x Base Price
```

where:

* **Storage Demand** = Total active allocations
* **Storage Supply** = Available capacity from blobbers

The Züs Network provides an incentive-driven, decentralized storage economy with competitive pricing, transparent rewards, and secure data integrity mechanisms. The tokenomics model ensures fair compensation for service providers while keeping storage affordable for users.


# Staking

Staking in Züs Network involves **locking tokens** into a **stake pool** to support various network participants.

The **primary objectives** of staking are:

* **Security**: Ensures only reliable and well-funded providers operate in the network.
* **Incentives**: Rewards participants for providing services.
* **Decentralization**: Enables users to participate in governance and network operation.

There are **five main types** of **staking providers** in Züs:

1. **Blobbers** - Storage providers who store and maintain user data.
2. **Validators** - Verify storage challenges and ensure data integrity.
3. **Miners** - Participate in transaction validation and block production.
4. **Sharders** - Store blockchain metadata and help retrieve historical data.
5. **Authorizers** - Manage token bridging between blockchains.

Each provider type has **unique staking requirements** and rewards based on network contribution.

### **Staking Mechanism**

Users can **stake tokens** into **stake pools** of different providers, where tokens are **locked** and used to determine rewards and penalties.

#### **Stake Pools**

Each provider has a **stake pool** where staked tokens accumulate. The total stake affects:

* The **weight** of the provider in earning rewards.
* Their **ability to participate** in network operations.
* The **penalty mechanism** for failing to meet obligations.

#### **Stake Delegation**

Users who do not run a provider node can still **delegate their tokens** to existing providers and earn a **share of the rewards**.

* **Higher stake → More rewards.**
* **Stake remains locked** for a defined period.
* **Providers take a commission** before distributing rewards.

### Staking Process

The Züs Network allows **staking** to different service providers, including **blobbers, validators, miners, sharders, and authorizers**.

Users can lock their tokens in **stake pools** to earn rewards based on the provider’s performance and stake weight. Here are key Stake-Related Functions in Go SDK

1. **`StakePoolLock`** - Locks tokens into a stake pool.
2. **`StakePoolUnlock`** - Unlocks staked tokens when eligible.
3. **`WritePoolLock`** - Locks tokens in a **write pool** for storage payments.
4. **`WritePoolUnlock`** - Unlocks tokens from the **write pool**.

#### **1. Locking Tokens in a Stake Pool**

The **`StakePoolLock`** function locks tokens into a stake pool, allowing users to delegate their stake to providers and earn rewards.

```go
func StakePoolLock(providerType ProviderType, providerID string, value, fee uint64) (hash string, nonce int64, err error)
```

Here is how it works:

1. The function **validates** that the SDK is initialized.
2. Ensures a **valid provider type and ID**.
3. Constructs a **stake pool request** and identifies the correct **smart contract**:
   * **Blobber/Validator:** `STORAGESC_STAKE_POOL_LOCK`
   * **Miner/Sharder:** `MINERSC_LOCK`
   * **Authorizer:** `ZCNSC_LOCK`
4. Calls `transaction.SmartContractTxnValueFeeWithRetry` to **execute the staking transaction**.

#### **Example Usage**

```go
hash, nonce, err := StakePoolLock(ProviderBlobber, "blobber-123", 1000, 10)
if err != nil {
    fmt.Println("Error staking:", err)
} else {
    fmt.Println("Stake transaction successful! Hash:", hash)
}
```

#### **Unlocking Tokens from a Stake Pool**

The **`StakePoolUnlock`** function allows users to withdraw their staked tokens when eligible.

```go
func StakePoolUnlock(providerType ProviderType, providerID, clientID string, fee uint64) (unstake int64, nonce int64, err error)
```

Here is how it works:

1. The function **validates** that the SDK is initialized.
2. Ensures the **provider type and ID** are valid.
3. Calls the correct **smart contract method**:
   * **Blobber/Validator:** `STORAGESC_STAKE_POOL_UNLOCK`
   * **Miner/Sharder:** `MINERSC_UNLOCK`
   * **Authorizer:** `ZCNSC_UNLOCK`
4. Executes the **transaction** and returns the amount unstaked.

#### **Example Usage**

```go
goCopyEditunstake, nonce, err := StakePoolUnlock(ProviderBlobber, "blobber-123", "client-id", 10)
if err != nil {
    fmt.Println("Error unlocking stake:", err)
} else {
    fmt.Println("Stake unlocked:", unstake)
}
```

#### **Locking Tokens in the Write Pool**

The **`WritePoolLock`** function allows users to lock tokens into a **write pool**, which is used for **storage payments**.

```go
func WritePoolLock(allocID string, tokens, fee uint64) (hash string, nonce int64, err error)
```

Here is how it works:

1. Ensures the SDK is initialized.
2. Locks tokens for a **specific allocation** (`allocID`).
3. Calls the **`STORAGESC_WRITE_POOL_LOCK`** smart contract.

#### **Example Usage**

```go
hash, nonce, err := WritePoolLock("allocation-456", 500, 5)
if err != nil {
    fmt.Println("Error locking write pool:", err)
} else {
    fmt.Println("Write pool locked successfully! Hash:", hash)
}
```

### **4. Unlocking Tokens from the Write Pool**

The **`WritePoolUnlock`** function allows users to unlock **all tokens** from the write pool.

```go
func WritePoolUnlock(allocID string, fee uint64) (hash string, nonce int64, err error)
```

Here is how it works:

1. Ensures SDK is initialized.
2. Unlocks all **unused tokens** from the **write pool** for a given **allocation** (`allocID`).
3. Calls the **`STORAGESC_WRITE_POOL_UNLOCK`** smart contract.

#### **Example Usage**

```go
hash, nonce, err := WritePoolUnlock("allocation-456", 5)
if err != nil {
    fmt.Println("Error unlocking write pool:", err)
} else {
    fmt.Println("Write pool unlocked successfully! Hash:", hash)
}
```


# Reward & Penalty

### Rewards

To keep track of challenge pool fraction related to a particular blobber-allocation pair integral value was introduce. It behaves exactly the same way and should be always in sync with corresponding challenge pool. It means, that the summary of integral values for every blobber for a current allocation is exactly the challenge pool balance for any moment in time.

#### Partition management

Blobber is added to the partition for block rewards calculation on every first challenge passed this rewards period. All the fields in BlobberRewardNode except ChallengesPassed are fixed for that moment, only ChallengesPassed will be updated next time challenge is passed.

#### Reward amount calculation

Reward is calculated based on time unit values. All the available for reward values are stored in blobber allocation itself in `ChallengePoolIntegralValue` field. It is reduced every time reward is calculated

```go
            rdtu = (allocation.Expiration - PreviousCompletedChallenge.Created) / timeunit
            dtu  = (CurrentCompletedChallenge.Created - PreviousCompletedChallenge.Created) / timeunit
	    reward = (dtu / rdtu) * float64(d.ChallengePoolIntegralValue)
	    d.ChallengePoolIntegralValue -= reward
```

If intervals `dtu` are even, then rewards will be split evenly between the intervals for constant ChallengePoolIntegralValue (it will be spent evenly in the intervals).

Reward then is split in two part, blobberReward and validatorReward using provided in config ratio.

```go
        validatorsReward = reward * config.validator_reward
        blobberReward = reward * (1 - config.validator_reward)
```

Reward value is also adjusted to the success rate of a blobber. If rewards are adjusted, difference is taken from challenge pool and burnt.

```go
        partial = float64(challenge.SuccessfulTickets) / float64(challenge.TotalValidators / 2)
        blobberReward = blobberReward * partial
```

#### Reward distribution

Reward amount is distributed among all the blobbers evenly. Every blobber distributes its fraction of rewards according to standard algorithm among all the delegates.

* If provider doesn't have any delegates, then all the rewards go to provider's stake pool
* If service charge is set, then provider will be guaranteed to receive service charge
* Then value left is split among all the delegates of a provider proportionally with their weight

```go
		stakePool.Reward = stakePool.Reward + value
		sp.Reward = stakePool.Reward + serviceCharge
		valueLeft = value - serviceCharge
	        for id, pool := range sp.Pools {
		    ratio := pool.Balance / totalStake
		    reward := valueLeft * ratio
                    delegate.Reward = delegate.Reward, reward
                    valueLeft = valueLeft - reward
                }
```

#### Validator rewards

* Validators get rewards when a challenge response is computed, whatever the status of the challenge is.
* All the validators of the challenge get an equal share of the total share of the validators from the challenge rewards.
* This reward is calculated as follows:

```go
     validatorsReward = challenge_reward * config.validator_reward
```

where config.validator\_reward is a constant value set in the configuration file sc.yaml. Refer to Blobber Rewards section for more details on the challenge reward.

### Penalty

#### Blobber Penalty

* Penalty is incurred on a blobber for all the challenges that this blobber failed to verify.
* Penalty is slashed from **the blobber's stake pool** when the blobber tries to redeem a successful challenge, where the smart contract checks whether the last challenge (before the one being processed) was accepted or not, if not, the slashing process is executed over this blobber.
* The blobber is penalized for the time period between the latest successful challenge and the latest finalized challenge (described in the system's `time_unit`) w\.r.t the time remaining until the expiration of the allocation as follows:

```go
rdtu := time.Duration(alloc.Expiration - latestSuccessfulChallenge) / conf.TimeUnit
dtu := time.Duration(latestFinalizedChallenge - latestSuccessfulChallenge) / conf.TimeUnit
move := (dtu / rdtu) * ChallengePoolIntegralValue // ChallengePoolIntegralValue total token value in the challenge pool
move = move - validatorRewards // refer to rewards page for the calculation of validatorRewards
penalty = move * conf.BlobberSlash // BlobberSlash is mentioned down in the config variables
```

<figure><img src="/files/PrNwLXdHJ7I3aalxx5ej" alt=""><figcaption><p>time points related to penalty calculation</p></figcaption></figure>

* This penalty amount will be slashed from the blobber's stake pool, and the `move` amount will be moved back from the challenge pool to the allocation write pool.
* Penalty calculation depends on a couple of configuration variables:
  * `storagesc.time_unit` in sc.yaml: a duration that it's considered the unit of time for the time calculations for challenges, allocations and other operations related to the storage smart contract. For example, If the expiration of the allocation is `3` this means it's `3 * time_unit.`Used in the calculation of `rdtu` and `dtu`
  * `storagesc.validator_reward` in sc.yaml: defines the ratio of the challenge reward that goes to all the validators of the challenge. This is deducted from the challenge reward before the slashing happens.
  * `storagesc.blobber_slash` in sc.yaml: defines the ratio of the challenge reward that will be slashed from the blobber's stake pool as a penalty for the failed challenge.


# Züs Apps

Documentation for all the end-user applications that are part of Züs Ecosystem

As an interface for Züs System, we offer 6 major applications that users can use to view, use and interact with the network and all its nodes.

In these pages, we'll discuss those apps and the functionality they provide, so you can use them as an expert and maximize your gains.


# Vult

The Only Drive Built for Privacy, Security, and Control

Züs Vult offers a secure, private drive that gives users complete control over your data. With distributed storage, Züs Vult makes your files invisible to unauthorized access, including government agencies.

Unlike other platforms, Vult fragments your data across multiple locations, safeguarding it from hacks, breaches, and ransomware attacks. Vult integrates proxy re-encryption technology, allowing users to encrypt and share files with friends and family easily.

### **Key Features of Vult**

* **Secure Data Sharing**: Vult stands out as the only app that allows you to share encrypted files using a public link. Share sensitive files with friends, family, partners, HR, legal teams, and other trusted parties. Users can send files to specific individuals by using their network ID, ensuring that only authorized individuals have access to the data.
* **Distributed Storage Security**: Vult distributes data across multiple servers in different locations. This fragmentation process ensures that no single server contains complete file data, protecting it from hackers and unauthorized access.
* **High-Quality Media Experience:** Allows users to download and view images and videos in their original high-resolution quality. Stores files without compression, preserving the original quality of your digital content.
* **Open Source Transparency**: Fully transparent and open-source, providing confidence in the system's security and reliability.
* **Global Accessibility:** Access your data from anywhere in the world thanks to Vult's decentralized setup. Gives users precise control over data sharing, supporting both security and privacy.

### Getting Started with Vult

#### Step 1: Uploading Files

* **Login to Vult**: Access your private drive by logging into your Vult account.
* **Upload Files**: On the Vult home screen, click "Upload File" to select files for upload. You can also create folders to organize files.
* **File Details**: Once uploaded, you can view the original size of each file in thumbnail view. Click on a file to preview it in full resolution within the Vult UI.

#### Step 2: Viewing File Details

* **Detailed File Transparency**: Navigate to "File Details" to see exactly where your files are stored. Under the "Blobber Details" section, you can view the servers and locations where your data fragments reside, giving you full control and transparency over your data.

### **Security and Privacy**

We distribute data across servers so your data is inherently private. In addition, you can encrypt data and use Züs proxy re-encryption protocol to share your private data with anyone with a simple click.

### **Storage Details and Management**

* **Paid Storage**: Vult storage is paid — each account buys the storage it needs, and there is no free tier. Plans start at a **$1/year Starter** (8.33 GB) and scale up to **2 TB**, billed annually. See [Storage Management Dashboard](/zus-docs/webapps/vult/storage-management-dashboard) for plans and payment options.
* **Upgrade Options**: Open **Settings → Storage** and click **Upgrade** (or use the **Upgrade Storage** button in the bottom-left of the app) to extend your allocation at any time.
* **Storage Expiry**: Allocations are valid for a year and can be renewed or upgraded at any time to continue service.
* **Supported File Types**: Vult supports a wide range of file formats, including common media files (.mp4, .jpg, .png) and document formats (.doc, .pdf, .xlsx).

### Vult vs Google Drive

Below table highlights the difference between Vult and Google Driv&#x65;**.**

| Feature                        | Vult                                                                                | Google Drive                                                             |
| ------------------------------ | ----------------------------------------------------------------------------------- | ------------------------------------------------------------------------ |
| **Privacy**                    | Full privacy with end-to-end encryption, no data analysis or ads                    | Google has access to user data, used for targeted ads                    |
| **Security**                   | Decentralized network, proxy re-encryption                                          | Centralized storage, more prone to breaches, lacks end-to-end encryption |
| **Censorship**                 | No content censorship due to decentralized network                                  | Risk of content censorship by Google                                     |
| **Server Control**             | Users can choose specific servers and locations                                     | No control over server or data location                                  |
| **Data Location Transparency** | Detailed information about data storage locations                                   | No detailed information about data storage locations                     |
| **Eco-Friendliness**           | Optimized space and energy usage, lower carbon footprint                            | Higher carbon footprint due to centralized servers                       |
| **File Integrity**             | Original quality of files maintained                                                | Files may be compressed or altered                                       |
| **Server Breach Impact**       | Single server breach impacts only one fragment                                      | Higher risk if a server is compromised                                   |
| **Server Ownership & Control** | Mix of providers, including user-owned servers, public/private/hybrid cloud options | All servers owned and operated by Google, no private cloud option        |
| **End-to-End Encryption**      | Fully encrypted file sharing                                                        | Lacks true end-to-end encryption                                         |

For a more detailed analysis of Züs Vult vs Google Drive, check [this page](https://zus.network/zus-vs-gdrive/).

{% content-ref url="/pages/oiZvBFmqImoSPfyZXOys" %}
[Getting Started](/zus-docs/webapps/vult/getting-started)
{% endcontent-ref %}


# Getting Started

This section provides a high-level overview of how to start using Vult on both web and mobile platforms. It introduces the core features and functionality that users will explore in more detail in the subpages.

### Web/Desktop App

{% content-ref url="/pages/39bigcwnMmI0tYIoz6SB" %}
[Web](/zus-docs/webapps/vult/getting-started/web)
{% endcontent-ref %}

#### Allocations and Blobbers

Learn how your storage is managed through allocations and distributed securely across blobbers on the Zus network.

#### Uploading Files and Viewing Details

Understand the basic process of uploading files and how to access detailed information about where and how your data is stored.

#### Folders and Multi-File Uploads

Discover how to organize your files by creating folders and uploading multiple files at once for improved file management.

#### Sharing Folders with Highlighted Files

Explore how to share folders and highlight specific files to enhance collaboration and visibility.

#### Replace Blobbers

Get an overview of how to manage and replace blobbers based on your performance, cost, or location preferences.

#### Refer Friends

See how the referral program works and how you can earn rewards by inviting others to use Vult.

#### Upload and Share Encrypted Files

Learn how to store and share sensitive files securely using encryption.

#### Stream Video Files

Find out how to upload and stream video files directly from your storage without needing to download them.

***

### Mobile App

{% content-ref url="/pages/fipdMTjfVCr4xyCCc166" %}
[Mobile](/zus-docs/webapps/vult/getting-started/mobile)
{% endcontent-ref %}

#### Upload and Analyze Files

Overview of how to upload files using the mobile app and view storage details.

#### Create Folders and Upload Multiple Files

Organize your content and upload multiple files efficiently from your mobile device.

#### Referral Program

Get started with referring friends directly from the mobile app and claiming your rewards.

#### Automatic Uploads

Enable automatic backup of your files with configurable options for regular and encrypted uploads.

#### Encrypted Upload and Private Share

Use the encrypted folder on mobile to upload files and privately share them with designated users.

### Next Steps

Each topic listed above is covered in more detail in its dedicated subpage. Continue exploring to learn how to perform each task step by step.


# Web

## **Introduction to Allocations and Blobbers**

When you begin using Vult, your data storage needs are automatically configured into what we call an "allocation." An allocation represents the total space and resources dedicated to storing your files on the decentralized Zus network. This allocation is managed and facilitated through entities known as blobbers.

**Blobbers** are independent storage providers within the Zus network. Each blobber contributes a portion of their disk space to the network and, in return, earns ZCN (Züs Coin), the native cryptocurrency of the Zus network. Blobbers ensure that your data is not only stored but also distributed across multiple geographic locations and systems to enhance security and availability.

### **Initial Allocation with Zus Brand Blobbers**

Your first allocation is automatically set up with "Zus brand blobbers." These blobbers are directly managed and maintained by the Zus team to ensure they meet high standards of reliability, security, and performance. This default setup helps new users quickly start using the service without having to navigate the complexities of selecting blobbers.

While the default blobbers are optimized for general use, you may have specific needs or preferences that require a different setup. Reasons to customize your blobber selection include:

* **Geographic Proximity**: Choosing blobbers closer to your physical location or your primary user base can reduce access times and improve download and upload speeds.
* **Cost Optimization**: Different blobbers may offer different pricing structures based on their operational costs, storage technologies, and other factors.
* **Enhanced Performance**: Some blobbers may use more advanced hardware or have better network connections, providing faster data access and higher throughput.

## How to Upload a File and Examine Its Details

Vult provides a secure and transparent way to manage your digital files. By using Vult, you can store your data and gain insight into where and how your data is fragmented and stored across multiple servers. This guide will walk you through how to upload a file to Vult and examine its file details for complete transparency and ownership of your data.

**Step 1: Uploading a File**

* Once you're logged in, you'll be at the Vult home screen.

<figure><img src="/files/Zs7txPNTY4wijRfuj4g4" alt=""><figcaption><p>Fig1: Vult Home Page</p></figcaption></figure>

* Directly drag and drop your files into the home window. Alternatively, click on the **Upload File** button, which allows you to select files from your computer.

<figure><img src="/files/NlLFLG5iygDrQbZ2Lr4a" alt=""><figcaption><p>Fig2: Upload File</p></figcaption></figure>

**Step 2: Accessing File Details:**

* After uploading your file, locate it in your file list or the new folder you created.
* Click on the file to open the file menu, then select **File Details**. This opens a window providing comprehensive information about the file.

<figure><img src="/files/2sAJLjd39GQGwciXqrPm" alt=""><figcaption><p>Fig3: File Details</p></figcaption></figure>

**Step 3: Examining Blobber Details**

* In the **File Details** window, scroll to the **Blobber Details** section.

<figure><img src="/files/69mSlnZWRd5KcVcS2ISL" alt=""><figcaption><p>Fig4: Blobber Details</p></figcaption></figure>

* Here, you will find detailed information about each blobber that holds a fragment of your file. The information includes:
  * **URL**: A link to the blobber's dashboard.
  * **Size**: The size of the fragment stored by the blobber.
  * **Updates**: How many times the fragment has been updated.
  * **Downloads**: Number of downloads for the fragment.
  * **Geo**: Geographic location of the blobber, such as city and country.

Each entry gives you insights into:

* **Data Distribution**: Seeing multiple geographic locations confirms the diversity of your data storage, enhancing fault tolerance and reducing risks of data loss.
* **Fragmentation Insight**: Knowing how your file is fragmented and spread across different servers helps you understand the robustness of your data security.
* **Activity Monitoring**: Updates and download counts provide a usage report of your file, which can be critical for auditing and security purposes.

## How to Create a Folder and Upload Multiple Files in Vult

Managing files efficiently often involves organizing them into folders and uploading them in batches. Vult provides a user-friendly interface to streamline this process, allowing you to create folders, upload multiple files simultaneously, and adjust upload settings to match your internet connection speed. This guide will walk you through each step.

**Step 1: Creating a Folder**

* Log into your Vult account and navigate to the homepage. Click on the **Create Folder** or **New Folder** option available in the home window.

<figure><img src="/files/0fJUNJeMy2Ez48CKRg4c" alt=""><figcaption><p>Fig5: Vult Home Page</p></figcaption></figure>

* Enter a name for your folder and confirm the creation. This folder will now appear in your file list.

<figure><img src="/files/Yq9xLLL9l9bsdVT9nAHS" alt=""><figcaption><p>Fig6: Create Folder</p></figcaption></figure>

**Step 2: Uploading Multiple Files**

* Navigate to the newly created folder and open the folder where you wish to upload files.

<figure><img src="/files/JOkzqKUjwQ5eF4lbUasS" alt=""><figcaption><p>Fig7: Newly created folder</p></figcaption></figure>

* Click on the **Upload File(s)** button. This will open your device’s file explorer.
* Select multiple files by holding down `Ctrl` (or `Cmd` on Mac) and clicking on each file you wish to upload.
* Confirm the selection and start the upload process.

<figure><img src="/files/Xcpaqq2N6T64doch8SPk" alt=""><figcaption><p>Fig8: Upload Multiple Files</p></figcaption></figure>

**Step 3: Managing Upload Settings**

* **Adjust Upload Settings for Internet Speed**:
  * Click on **Change Upload Settings** before or during the upload process. Choose from three preset options based on your internet connection:
    * **High Mode**: For high-speed internet connections.
    * **Medium Mode**: For average internet speeds.
    * **Low Mode**: Suitable for slower or unstable connections.

<figure><img src="/files/qEB3ov5qIvSbPnQsYyhn" alt=""><figcaption><p>Fig9: <strong>Managing Upload Settings</strong></p></figcaption></figure>

**Step 4: Pausing or Cancelling the Upload**

* **Control the Upload Process**:
  * During the upload, you will see a progress bar for each file. If necessary, you can **Pause** the upload of any file by clicking the pause button next to the progress bar.
  * To **Cancel** an upload, click the cancel button. This will immediately stop the upload and remove any partially uploaded data from the queue.

<figure><img src="/files/zCLEyNSaZNd7a4Os9IkA" alt=""><figcaption><p>Fig10: <strong>Resume and Cancel</strong></p></figcaption></figure>

## How to Share a Folder with a Specific File Highlighted in Vult

Sharing folders and files effectively and securely is crucial in maintaining productivity and collaboration. Vult offers a streamlined process to share a folder with a specific file highlighted, allowing recipients to view the highlighted file in carousel mode immediately upon accessing the link. This feature is particularly useful when you want to draw attention to a specific item within a folder. Here’s how to do it:

**Step 1: Preparing Your Folder or File**

* Go to the folder that contains the files you wish to share. Click on the **three dots** beneath the file or folder to open the file options menu.
* From the menu, choose the **Share** option. This will open a new sharing window.

<figure><img src="/files/bIkOZk0mTkT55U9kXq7q" alt=""><figcaption><p>Fig11: <strong>Share</strong></p></figcaption></figure>

**Step 2: Creating the Share Link**

* Choose how to share the link: You can use an **auth ticket**, send it via **email**, or share directly on **social media platforms** like Facebook or Twitter.
* For a direct link, simply **copy the URL** provided. For example: `https://zuspublicdev.page.link/bQwowPLSWp6KPE1h7`.

<figure><img src="/files/X4Axzgq93uFBNNOxSI4L" alt=""><figcaption><p>Fig12: <strong>Share Link</strong></p></figcaption></figure>

**Step 3: Sharing the Link In Preview Mode (Optional)**

To enhance the browsing experience for recipients, you can configure the shared link to open a specific file in carousel view immediately.

1. **Share the Folder**: Begin by clicking on share the folder normally.
2. **Highlight a File**: After sharing, navigate within the folder and select the file you want to highlight.
3. **Open in Preview Mode**: Right-click on the file and choose the option to open in preview mode, if available.
4. **Copy Link for Specific File**: Click on "Copy Link" for the selected file. This creates a direct link that, when accessed, will open this file in carousel mode.

<figure><img src="/files/Du1WVnKv2vU3YZ5DiQPI" alt=""><figcaption><p>Fig13: <strong>Share Link in Preview Mode</strong></p></figcaption></figure>

Share the copied link with your intended recipients. When they open the link, the Vult interface will display the specified folder with the selected file highlighted and open in carousel mode, allowing them to scroll through other files seamlessly.

**Additional Tips**

* **Privacy and Security**: For private sharing, use the encrypted folder to ensure that only authorized users can access the shared content.
* **Highlighting Important Files**: Utilize the highlight feature to direct users' attention to key documents or images as soon as they access the shared link.

## How to Replace a Blobber in Vult

Replacing a blobber in your Vult storage allocation allows you to customize where your data is stored based on your specific needs such as cost, performance, or geographic location. Here’s how you can efficiently manage and replace blobbers in your Vult allocation.

### **Step-by-Step Guide to Replacing a Blobber**

**Step 1: Access Settings**

* Open the Vult application. Navigate to the settings icon.

<figure><img src="/files/G8UBJcw63QnO6V8itH4L" alt=""><figcaption><p>Fig17: Settings</p></figcaption></figure>

**Step 2: Navigate to Storage Settings**

* Within the settings menu, select the `Storage` option to proceed to storage-related configurations.
* In the storage menu, click on `Manage Storage`. This section provides a comprehensive view of your current storage configuration including your allocation ID, the expiration of your allocation, and how much data you have used.

<figure><img src="/files/WggGxMySlluzxQlP5raW" alt=""><figcaption><p>Fig18: Storage Settings</p></figcaption></figure>

**Step 3: View Blobber Options**

* Within the manage storage view, you will find several options such as upgrading your storage capacity, viewing your current storage providers, replacing a blobber, and cancelling your allocation if necessary.
* Click on `Replace Blobber` to modify the blobbers assigned to your storage.

**Step 5: Choose a Blobber to Replace**

* Upon selecting `Replace Blobber`, a new window will open displaying a list of available blobbers.

<figure><img src="/files/wPiLb5PpymnYSN0Yrho8" alt=""><figcaption><p>Fig19: Replace Blobber</p></figcaption></figure>

**Step 6: Selecting and Confirming New Blobber**

* Choose the blobber you wish to remove from your allocation and select a new blobber you prefer from the list of available options. You will see options to filter blobbers by brand (e.g., Zus brand or any) and whether to show restricted blobbers only.

<figure><img src="/files/1pyIlXh1HfjU04kjsUsQ" alt=""><figcaption><p>Fig20: Confirm Blobber</p></figcaption></figure>

**Step 7: Finalize the Replacement**

* Confirm your selection to finalize the replacement of the blobber. The system will update your allocation to include the new blobber, and remove the old one from your configuration.

Following these steps will help you customize your data storage in Vult to better suit your specific needs, whether they are related to performance, cost-efficiency, or compliance with geographic data storage regulations.

## How to Refer a Friend

Use your unique referral link to invite friends. When they Sign up, you get rewarded with 1 ZCN.

1. Navigate to "Refer a Friend" on the main menu of Vult App.

<figure><img src="/files/ZcnBKxtesJ6lEYkdmQw9" alt=""><figcaption><p>Fig21: Refer Friend</p></figcaption></figure>

2. Share your unique referral link with friends.

<figure><img src="/files/0Gg01JnOwTTGGBvq7VcN" alt="" width="377"><figcaption><p>Fig22: Refer a friend popup</p></figcaption></figure>

**Tip**: Share directly via Telegram, Twitter, WhatsApp, or Email.

3. Once they Sign-Up, you will see your referrals.

<figure><img src="/files/ZKPY4rOriMRXlgTpfnyK" alt="" width="374"><figcaption><p>Fig23: Refererals Count</p></figcaption></figure>

4. Click on "Redeem Rewards" to collect your referral ZCN earnings.

<figure><img src="/files/OALT4MYS0hIXZ9mZDOv5" alt=""><figcaption><p>Fig24: Reedem Rewards</p></figcaption></figure>

Congratulations! You have claimed your Referral rewards. These will appear on your available balance.

<figure><img src="/files/DnVqwRXGfdtPCkjla7ba" alt=""><figcaption><p>Fig25: Rewards Collected</p></figcaption></figure>

6. Click on "Show My Ranking" to track the Referral Leaderboard. The more you refer, the higher the ranking.

{% hint style="info" %}
Add your referral link to your social media profile whenever you write about Züs or create any content.
{% endhint %}

## How to Upload an Encrypted File and Privately Share It with a Referral Friend in Vult

Uploading and sharing encrypted files securely is a fundamental aspect of maintaining privacy in digital communications. Vult provides a straightforward process to ensure your sensitive files are both stored securely and shared privately with designated individuals, such as a referral friend. Follow these steps to upload an encrypted file and share it privately.

**Step 1: Navigate to the Encrypted Folder**

* Log in to your Vult account. On the dashboard, you will find the Encrypted Folder. This folder is preset for the storage of encrypted files to enhance security.

<figure><img src="/files/59fjDSqLmQWLxJu5xCgY" alt=""><figcaption><p>Fig26: Encrypted Folder</p></figcaption></figure>

**Step 2: Upload Your File**

* Click on the Encrypted Folder to open it. Drag and drop your file into the folder, or use the upload button typically found within the folder’s interface.

<figure><img src="/files/vFB2ufLxQwn8qkqy5qwy" alt=""><figcaption><p>Fig27: Upload File</p></figcaption></figure>

**Step 3: Share the File Privately**

* Select the file you wish to share, then click on the 'Share' option available in the file options menu.
* You will be prompted to enter the username of your referral friend. The system ensures that encrypted files can only be shared by specifying the username of the person you are sharing with, enhancing the privacy of the transaction.
* Once you have entered the username, confirm the action to share the file.

<figure><img src="/files/lO51UjyV0qHn9n4DcSg7" alt=""><figcaption></figcaption></figure>

**Important Notes:**

{% hint style="info" %}
Files in the Encrypted Folder are automatically encrypted, ensuring that only authorized users with the decryption key can access them. Also, ensure that the username you enter is correct.
{% endhint %}

## How to Use Private Share Feature

This feature enables creators to securely share exclusive content such as concerts, livestreams, or online courses privately, while allowing them to promote access to a broader audience through shareable links.

#### As the Content Owner

#### Step 1: Upload and Encrypt the File

* Log in to your **Vult** account.
* Upload your file. Ensure it in **encrypted folder**.
* After upload, click the **“Private Share”** button next to the file.

<figure><img src="/files/8sxl3lJCTrSwLqmCw9rG" alt="Upload and Encrypt the File"><figcaption></figcaption></figure>

#### Step 2: Share Privately with a User

* To generate a private share link, you must first **share the file privately** with at least one user.
* Example: Share it with user `Test222`.

<figure><img src="/files/z6Sel2DQFRejHeVzw3ne" alt=""><figcaption></figcaption></figure>

#### Step 3: Generate and Promote the Share Link

* Once shared, go to the **“Granted Users”** section.
* From the row of the granted user (e.g., Test222):
  * Click **“Copy Private Share Link”**, or
  * Click **“Share”** to promote the link directly via social media.

<figure><img src="/files/m594pbFRm6FScGkCrlRu" alt=""><figcaption></figcaption></figure>

This link can now be used by others to discover your content and request access.

#### As a Requesting User

#### Step 1: Access the Private Share Link

* Ensure you're **logged into your Vult account** (e.g., as `rikachet`).
* Open the **private share link** shared by the owner.

#### Step 2: Request Access

* Upon visiting the link, you’ll see an option to **request access**.
* Submit the request. The owner will be notified.

<figure><img src="/files/0vbpTO12p1kLB9K8Hitg" alt=""><figcaption></figcaption></figure>

#### Step 3: Manage Your Requests

* Click the **“Private Sharing Request”** with the **Lock** icon on your dashboard.
* You’ll be able to:
  * View pending and approved requests.
  * Withdraw a pending request at any time.

<figure><img src="/files/B7YgJzeODAj976uHcgT3" alt=""><figcaption></figcaption></figure>

#### As the Owner: Manage Access Requests

* Click the **“Request Private Sharing”** icon in your account.
* You’ll see a list of all incoming access requests.

<figure><img src="/files/OaGV08zaAWUnQmpBJcba" alt=""><figcaption></figcaption></figure>

For each request, you can choose to:

* **Approve**
* **Reject**

## How to Stream a Video File on Vult

Vult allows users to store and manage files and stream video files directly from the platform. This eliminates the need to download large video files before playback, making it an ideal solution for users who prioritize speed, convenience, and flexibility.

Vult ensures a smooth streaming experience with customizable upload settings and integrated video preview options. This guide walks you through the simple steps to upload, configure, and stream video files on Vult, empowering you to make the most of this innovative cloud storage platform.

#### **Step 1: Login and Navigate to the Home Page**

* Open the Vult application or website and log in using your credentials. Once logged in, navigate to the **Home** page.

<figure><img src="/files/BncAU2GPvwUrDbUwcI6h" alt=""><figcaption><p>Fig29: Vult Homepage</p></figcaption></figure>

#### **Step 2: Upload a Video File**

* Click the **Upload File(s)** button available on the Home page. Select the video file you want to upload from your local device.

<figure><img src="/files/PyZWDVpsWFmbrGQRN0YM" alt=""><figcaption><p>Fig30: Upload video file</p></figcaption></figure>

* After selecting the file, you will be prompted with an option to rename it if desired. Confirm your selection by clicking the **Upload** button.

<figure><img src="/files/VNfqY7iYMXBHFSAx2S0T" alt=""><figcaption><p>Fig31: Add video file details</p></figcaption></figure>

#### **Step 3: Monitor Upload Progress**

* After confirming the upload, the progress of your video upload can be monitored through the **Upload Manager** located at the bottom-right corner of the screen.

<figure><img src="/files/zv7llUztIWoyigZmimmT" alt=""><figcaption><p>Fig32: Monitor upload progress</p></figcaption></figure>

#### **Step 4: Enable Streaming (First-Time Users)**

* For first-time video uploads, a popup will appear asking you to enable **Audio and Video Streaming** preview generation. Click **Yes** to enable streaming previews, as shown in the screenshot.

<figure><img src="/files/uBjdAXT0zTtc12BrlvW8" alt=""><figcaption><p>Fig33: Enable streaming</p></figcaption></figure>

* Alternatively, you can enable this feature later:
  * Click the **Settings** icon in the Upload Manager.

<figure><img src="/files/otap1prRhC42tK5AbZAO" alt=""><figcaption><p>Fig34: Upload Settings</p></figcaption></figure>

* Check the **Streaming preview for audios & videos is Enabled** option in the **Settings** popup.

<figure><img src="/files/x5UBFcYYVcd27ZE9vRMD" alt=""><figcaption><p>Fig 35: Streaming Preview</p></figcaption></figure>

#### **Step 5: Playback and Streaming**

* Once the upload is complete, the video will appear in your file list under the Home page. Hover over the uploaded file, click the three-dot menu (`...`), and select **Play**.

<figure><img src="/files/FWV9wHACNfuaOcDplZJZ" alt=""><figcaption><p>Fig36: Playback and Streaming</p></figcaption></figure>

* The video will open in the built-in Vult player, allowing you to stream it seamlessly.

<figure><img src="/files/AhkrecQt9SKdxqHS9J85" alt=""><figcaption><p>Fig37: Sream the Video</p></figcaption></figure>

This process ensures that your video files are uploaded and streamed efficiently on Vult.


# Mobile

## **How to Upload a File and Analyze Details**

The Vult app allows you to manage your files with complete transparency, giving you insight into where your data is stored and how it's managed.

This section walks you through the process of uploading a file, accessing its detailed information, and analyzing the distribution of your data across the network.

Here's how you can get started:

#### **Step 1: Uploading a File**

Log in to the Vult app on your iOS device. On the home screen, click on + icon an tap the "Upload File" button.

<figure><img src="/files/oNapDsTWdLMoi2LmROmc" alt="" width="375"><figcaption><p>Fig1: <strong>Uploading a File</strong></p></figcaption></figure>

#### **Step 2: Accessing File Details**

After uploading, find the file in your list or folder.Tap three dots on the file, then select "File Details" from the menu to open a detailed view.

<figure><img src="/files/BJWrDsENL11kP545ti0G" alt="" width="375"><figcaption><p>Fig2: <strong>Access File Details</strong></p></figcaption></figure>

#### **Step 3: Examining Blobber Details**

* Scroll down in the File Details view to see Blobber Details.
  * **URL:** Link to the blobber's dashboard.
  * **Size:** Size of the file fragment stored by the blobber.
  * **Geo:** The geographic location of the blobber.
  * **Updates and Downloads:** Track how many times the file has been updated or downloaded.

<figure><img src="/files/5Mu3pPV8J05hOgrAZawc" alt="" width="375"><figcaption><p>Fig3: See <strong>Blobber Details</strong></p></figcaption></figure>

This view helps you understand how your data is distributed across different servers, ensuring transparency and security.

***

## **How to Create a Folder and Upload Multiple Files in Vult**

Organizing your files in the Vult app is made simple with the ability to create folders and upload multiple files at once.

This section guides you through the steps to create a new folder and efficiently upload multiple files to your Vult storage.

Here's how you can get started:

#### **Step 1: Creating a Folder**

Open the Vult app and navigate to the homepage. Tap the "Create Folder" or "New Folder" button. Name your folder and confirm to create it.

<figure><img src="/files/ZHSe4uoo1tqQsol7u5qm" alt="" width="375"><figcaption><p>Fig4: <strong>Creating a Folder</strong></p></figcaption></figure>

**Step 2: Uploading Multiple Files**

Open the folder you just created. Tap "Upload File(s)" and select multiple files from your device by holding down the selection. Confirm the selection to start the upload.

<figure><img src="/files/1yewZiWH8r50zeHl4UV9" alt="" width="375"><figcaption><p>Fig5: <strong>Uploading Multiple Files</strong></p></figcaption></figure>

***

## **How to Refer a Friend**

The Vult app offers you the opportunity to earn ZCN tokens by referring your friends. Each time a friend signs up using your unique referral link, you will receive rewards that can be redeemed directly within the app.

Here's how you can get started:

#### **Step 1: Access the Referral Feature**

Go to "Refer a Friend" from the main menu of the Vult app.

<figure><img src="/files/M0Z9I8W4p2DrtsgKOhdN" alt="" width="270"><figcaption><p><strong>Fig6: Access the Referral Feature</strong></p></figcaption></figure>

#### **Step 2: Share Your Referral Link**

On the **Referral Rewards** page, you will see an option to invite friends. Tap on the **"Invite"** button. You will have the option to share your referral link directly via popular platforms like Telegram, Twitter, WhatsApp, or Email.

Alternatively, you can copy the referral link displayed on the screen and share it manually through any platform of your choice.

<figure><img src="/files/SJqaDeTzBcPxe3K5AfZt" alt="" width="270"><figcaption><p><strong>Fig7: Share your Referal Link</strong></p></figcaption></figure>

**Step 3: Claim Your Rewards**

Once you have referred at least one user, the **"Redeem Rewards"** button will become active. Tap on **"Redeem Rewards"** to claim your ZCN earnings. Your rewards will be added to your available balance in the app.

{% hint style="info" %}
Tap "Show My Ranking" to track your position on the Referral Leaderboard.
{% endhint %}

***

## How to Enable Automatic Uploads in Mobile App

The **Automatic Uploads** feature in the Vult mobile app allows users to enable automatic backup of their files to the Vult cloud. This feature is particularly useful for ensuring that your important files are consistently backed up without requiring manual uploads.

Here’s how to configure and use this feature:

#### **Step 1: Access Automatic Uploads Settings**

In the settings menu, find and tap on the "Automatic Uploads" option. This will bring you to the configuration screen for automatic uploads.

<figure><img src="/files/mze7cp6eTxZPw4GgsXWQ" alt="" width="304"><figcaption><p><strong>Fig8: Choose Automatic Updates</strong></p></figcaption></figure>

**Step 2: Configure Automatic Uploads**

You will see three options: `Off`, `Regular`, and `Encrypted`.

<figure><img src="/files/D8HNLEtiTMKvBdO3yNsc" alt="" width="360"><figcaption><p><strong>Fig9: Select Enable Upload Options</strong></p></figcaption></figure>

Choose `Regular` if you want to automatically upload files without encryption. Choose `Encrypted` if you want the files to be automatically uploaded with encryption for added security.

<figure><img src="/files/8TTNmJdrxGnFFCAzhBDB" alt="" width="375"><figcaption><p><strong>Fig10: Configure Intervals</strong></p></figcaption></figure>

Choose between `From past 24 hrs` or `From past 7 days` to decide how far back you want the app to upload files automatically.

Once you have made your selections, tap the `Done` button to save your settings.

**Step 3: Review Automatic Uploads**

After setting up automatic uploads, the app will continuously monitor your selected folders or files based on the chosen configuration.

To verify which files have been uploaded, you can review your uploads by navigating to the relevant folders within the Vult app.

***

## **How to Upload an Encrypted File and Privately Share It**

Maintaining the privacy of your sensitive files is crucial, and the Vult app makes it easy to securely upload and share encrypted files.

Here’s how to use this feature:

#### **Step 1: Navigate to the Encrypted Folder**

From the **Home** screen, scroll to locate the **Encrypted Folder**. This folder is easily identifiable by its lock icon (as highlighted in the screenshot).

<figure><img src="/files/tC7vIOWrRNvxeHdXApnn" alt="" width="221"><figcaption><p><strong>Fig11: Encrypted Folder</strong></p></figcaption></figure>

#### **Step 2: Select the files**

In the **Encrypted Folder** view, tap on the "+" (plus) icon located at the bottom of the screen to reveal options for file management.

**Choose an option**:

* **Upload File**: Select this to upload files from your device.
* **Create Folder**: Create a new folder within the Encrypted Folder to organize your files.
* **Upload from Gallery**: Upload images directly from your gallery.

<figure><img src="/files/qBXJMaXjH00baHH4j1u6" alt="" width="375"><figcaption><p>Fig12: Select the files</p></figcaption></figure>

#### **Step 3: Upload the file**

After selecting your files, the upload process will begin, and your files will be securely stored in the Encrypted Folder.

<figure><img src="/files/ZagT1Ax54XnkoqkFByzF" alt="" width="375"><figcaption><p>Fig13: Upload the files</p></figcaption></figure>

#### **Step 4: Share the File Privately**

To share a file securely, **navigate to the file** you wish to share within the **Encrypted Folder**. Tap on the **three dots** next to the file name to open the file options menu. Select **Private Share** from the list of options.

In the **Share** screen, enter the username of the person you want to share the file with. Tap **Share** to securely share the file.

<figure><img src="/files/S7ebBYxNOyuX4V9BvQ0y" alt="" width="375"><figcaption><p>Fig14: Private Share</p></figcaption></figure>

The selected user will be the only one who can access the shared file, ensuring complete privacy and security. This ensures that your sensitive files are securely shared with the intended recipient only.


# Vult AI

Vult AI is an advanced AI-powered system integrated into the Vult App that enables users to interact with AI models for real-time conversations, file analysis, image and text processing, and batch processing. It offers a variety of AI models, each optimized for different tasks, and provides users with a secure and privacy-focused experience.

### **1. AI Chat (Home Section)**

<figure><img src="/files/qpYFmHQrz6UCq039NBdZ" alt=""><figcaption></figcaption></figure>

Vult AI’s **Home Section** includes a **Chat Interface** where users can:

* Interact with AI in real-time using text or voice commands.
* Attach files to be processed by AI models.
* Choose from multiple AI models optimized for different use cases.
* Search the web for information.
* Access stored chat history in the AI Chat Folder.

#### **Available AI Models**

For **free-tier users**, the following models are available:

* **GPT-4o-mini** – Fast and lightweight.
* **GPT-4o** – High-quality text processing.
* **Grok** – General knowledge queries.
* **DeepSeek** – Specialized AI assistant.
* **BFL** – Image generation.
* **Minimax**: AI Art Generator that converts text descriptions into images

For **paid-tier users**, additional advanced models are unlocked. Located on the **left sidebar**, it displays:

* **Usage percentage** based on available AI credits.
* Helps users manage their AI model consumption.

#### **Chat History and Sessions**

On the **right panel**, the UI displays **session history**, allowing users to revisit past AI interactions. Each chat session is automatically saved under **AI Chat** in the user's storage. Users can open previous sessions, continue conversations, or delete unwanted chats.

#### **Response Handling and Output**

AI-generated responses appear instantly in the chat window. If a file is attached, the AI processes the file and returns insights based on the document type (text extraction, summarization, etc.).

For **image-based** tasks, AI can enhance, modify, or generate new visuals from existing images.

#### **Storage & Retrieval**

* Chats from the AI Home Section are saved in the **AI Chat** Folder.
* Files processed via AI Agent are stored in the **AI Agent** Folder.

### **2. AI Agent (File-Based AI Processing)**

The **AI Agent**, accessible in the **All Files** section, allows users to analyze and process files using AI models.

#### **How to Use AI Agent**

1. Navigate to the **All Files** section. **Right-click on a file** and select **AI Agent**.

<figure><img src="/files/nRC8SzGxx4UAkjGGRSQD" alt=""><figcaption></figcaption></figure>

2. The AI Agent interface opens, where the user can input a **single prompt.**

<figure><img src="/files/s5unW6Ho435LBVvpbI2l" alt=""><figcaption></figcaption></figure>

3. The AI Agent processes the file and provides **a single response**.

<figure><img src="/files/FVolnxBVLk3CHnnIWern" alt=""><figcaption></figcaption></figure>

3. The response is stored in the **AI Agent Folder**.

<figure><img src="/files/iceui1DQRm8GlioN9wvP" alt=""><figcaption></figcaption></figure>

<figure><img src="/files/RJyUYM8odfO1Z8AkwBxU" alt=""><figcaption></figcaption></figure>

#### **Supported File Types**

* **Text Files** (`.txt`, `.json`, `.md`)
* **Code Files** (`.py`, `.js`, `.go`, `.java`, etc.)
* **Document Files** (`.pdf`, `.docx`, `.ppt`)
* **Image Files** (`.png`, `.jpg`, `.jpeg`)

#### **Processing Time**

* **Single file requests**: AI generates an instant response.
* **Batch processing**: Large-scale processing may take up to **24 hours**.

The **AI Agent** feature is accessible from the **All Files** section. It allows users to perform **AI-powered processing on specific files** instead of general chat. Unlike AI Chat, which focuses on real-time conversations, **AI Agent is designed for single-action requests** that process files individually.

#### **AI Agent Features and Limitations**

* AI Agent is ideal for **code analysis, document summarization, image processing, and batch file operations**.
* It supports **one-time responses** only, meaning users **cannot engage in follow-up queries** within the same session.
* Files processed using AI Agent are stored in the **AI Agent folder**, separate from AI Chat sessions.

#### **Batch Processing with AI Agent**

Vult AI Agent also supports **batch processing**, which allows users to process multiple files in a folder. When batch processing is enabled:

* The system downloads all files from the selected folder.
* It generates a **JSONL file** containing the file data and user prompt.
* The batch request is sent to OpenAI’s **Batch API**, which processes the request and returns results as text.
* Batch processing takes up to **24 hours**, making it suitable for large-scale document analysis, OCR tasks, and file-based AI automation.


# Batch Processing

Batch processing in Vult AI allows users to process multiple files simultaneously using AI-powered automation. This feature is particularly useful for users dealing with large datasets, bulk document analysis, text extraction, or AI-assisted content modification.

Unlike single-file processing in AI Agent, batch processing submits a group of files to the AI system and returns structured results after processing.

Batch processing is primarily handled through OpenAI’s Batch API, ensuring high efficiency and cost optimization when working with multiple files.

### **How Batch Processing Works**

<figure><img src="/files/dsKSmRjXCAxJNKWJ5ll8" alt=""><figcaption></figcaption></figure>

#### **Step 1: Preparing Files for Batch Processing**

Users can initiate batch processing by placing multiple files inside a **designated folder** within the **Vult AI All Files section**. Supported file types include:

* **Text Files** (.txt, .json, .md)
* **Code Files** (.py, .js, .go, .java, etc.)
* **Document Files** (.pdf, .docx, .ppt)
* **Image Files** (.png, .jpg, .jpeg)

Each batch request is **limited to 200MB in total file size**.

#### **Step 2: Submitting a Batch Request**

To start batch processing, the user must:

1. Navigate to the "All Files" section. Right-click on the folder containing multiple files.
2. Select "AI Agent" to initiate batch processing. Enter a processing prompt—this tells the AI what to do with the files (e.g., "Summarize all PDF documents" or "Extract key points from text files").
3. Submit the request.

#### **Step 3: File Upload and Processing**

Once the batch request is submitted:

* The system **downloads all files** from the selected folder.
* A **JSONL file** (JSON Lines format) is **generated**, containing file metadata, prompt text, and structured content for processing.
* The request is then **sent to OpenAI’s Batch API**, which processes all files in parallel.

The batch processing system **does not combine** all files into a single response; instead, **each file is processed independently** and returns **individual results**.

#### **Step 4: Receiving Processed Results**

Single-file processing results are typically available instantly in the AI Agent Folder. Batch processing results take longer, usually up to 24 hours, depending on the request size and complexity.

Users receive notifications once processing is complete. Processed files and AI-generated responses are saved automatically in a **dedicated Batch API folder** within **All Files**.

### **Batch Processing Features**

Batch processing features include scalability and efficiency, supporting hundreds of files within a single batch request. The AI optimally processes multiple requests, significantly reducing manual effort.

It is also cost-effective, as batch processing is optimized for bulk processing, making it more economical compared to real-time AI queries.

Automated processing with AI models uses OpenAI’s Batch API to automatically analyze, summarize, or extract data from files, and works with different AI models, both text-based and image-based.

Additionally, session tracking and storage ensure that batch results are stored in the AI Agent Folder or Batch API Folder, allowing users to track processing progress and easily retrieve past batch results.

### **Use Cases for Batch Processing**

Batch processing can be used for large-scale text analysis, such as summarizing multiple research papers and extracting key information from contracts or legal documents.

It is also useful for bulk document formatting and grammar correction, improving grammar and structure in multiple text-based files like emails and reports, with AI-assisted proofreading for large document sets.

Additionally, batch processing can be applied to code review and analysis, running AI-powered code explanation or debugging on multiple scripts simultaneously, and optimizing and refactoring code across different programming languages.

For image processing, batch processing can enhance or modify multiple images using AI models and convert multiple images into videos or animations using Lightricks AI.

### **Limitations of Batch Processing**

Batch requests take significantly longer to process compared to single-file AI Agent requests, with processing times extending up to 24 hours.

This is due to the limited model availability, as only OpenAI models support batch processing, while other models like Grok, DeepSeek, or Lightricks are not available for such requests.

Additionally, there is a fixed file size limit, with the maximum allowed file size for batch processing being 200MB per request. Unlike interactive AI chat, users do not receive step-by-step responses; instead, all files are processed at once, and the results are returned after the completion of the batch processing.

**Batch-processed files and responses** are **automatically stored** in a **dedicated Batch API folder**.

Each file's result can be **reviewed, downloaded, or shared** via **Vult AI’s file management system**. Users can **access past batch processing results** under their file history.


# Memory Retention

Vult AI incorporates memory retention to enhance user interactions by allowing AI to remember past conversations and user preferences. This feature ensures a more context-aware experience by maintaining a record of previous discussions, user queries, and attached files.

Vult AI uses Mem0 AI, a dedicated memory storage API, to handle user memory. This enables the AI to recall details from previous interactions, making conversations smarter and more personalized over time.

### **How Memory Retention Works**

<figure><img src="/files/YjoWN29cuJcTYYxJN08U" alt=""><figcaption></figcaption></figure>

#### **1. Memory Storage with Mem0 AI**

* Every AI interaction in Vult AI Chat is stored using Mem0 AI, which acts as a retrieval-based memory system.
* The AI retains important details such as:
  * User queries.
  * AI-generated responses.
  * Any relevant metadata like timestamps

#### **2. Memory Retrieval in Conversations**

* When a user asks a follow-up question, Vult AI **searches the stored memory** for relevant past conversations.
* If a match is found, the AI retrieves previous responses and **contextually enhances the new response**.
* Example:
  * User: *"My name is Jack."*
  * AI: *"Nice to meet you, Jack."*
  * User (later): *"What’s my name?"*
  * AI: *"Your name is Jack."*

#### **3. Memory Integration in AI Chat and AI Agent**

* **AI Chat:**. Unlike traditional AI platforms, VultAI does not store any conversation data on its servers. Instead, when you interact with AI Chat, any essential information is temporarily captured to support more natural, continuous conversations. This session history is stored securely on your own allocation within the Züs decentralized storage network. It does **not** maintain context across different files.
* **AI Agent:** Uses stored memory **only within a single processing request** and does **not** maintain context across different files.
* **Batch Processing:** Does not leverage memory retention, as each file is processed independently.

### **Session-Based Memory vs Long-Term Memory**

<table><thead><tr><th>Feature</th><th width="171">AI Chat (Home)</th><th>AI Agent (All Files)</th><th>Batch Processing</th></tr></thead><tbody><tr><td><strong>Memory Retention</strong></td><td>Yes, via Mem0 AI</td><td>Yes, Via Mem0 AI</td><td>No, processes each request independently</td></tr><tr><td><strong>Stored Interactions</strong></td><td>Yes, saved in AI Chat Folder</td><td>Yes, saved in AI Agent Folder</td><td>Batch Folder Within AI Agent</td></tr><tr><td><strong>Contextual Awareness</strong></td><td>Yes, recalls previous prompts</td><td>No, processes only current file</td><td>No contextual linking</td></tr></tbody></table>

### **Benefits of Memory Retention in Vult AI**

#### **1. Personalized AI Conversations**

* The AI remembers **important user details** (e.g., name, project details, or past requests).
* Follow-up questions feel **more natural**, as the AI recalls previous responses.

#### **2. Faster and More Relevant Responses**

* Instead of **repeating context**, users can **build upon past interactions**, improving efficiency.
* AI can reference previous discussions instead of starting from scratch.

***

### **Limitations of Memory Retention**

#### **1. Limited to AI Chat Only**

* The AI retains memory **only in conversations** and does **not** remember previous file-based AI Agent interactions.

#### **2. No Cross-Session Memory Sharing**

* If a user starts a **new chat session**, past memory is **not carried over** unless explicitly recalled.

#### **3. File Attachments Are Not Memorized**

* While the AI can process attached files, it **does not** store the file itself in memory.
* Users must **re-upload** the file in future sessions if they want the AI to reference it again.


# Technical Implementation

The AI integration in Vult is structured to provide real-time AI chat, file-based AI processing, memory retention, and batch processing. The technical implementation consists of frontend components, backend APIs, database interactions, and AI model processing pipelines.

This section details how chat requests, file processing, batch execution, and memory retention are handled within Vult AI.

### **1. AI Chat Request Handling**

<figure><img src="/files/0XwRSpmEQWBg5YiZBMfd" alt=""><figcaption></figcaption></figure>

#### **Step 1: User Submits a Chat Request**

Users interact with the Vult AI Chat Interface by entering a text prompt, selecting an AI model. and optionally attaching a file.

#### **Step 2: File Processing (If Applicable)**

If the user attaches a file:

* The file is **privately shared** using **AuthTicket & LookupHash**.
* AI **downloads the file** securely.
* The **file content is analyzed** using the selected AI model.

#### **Step 3: AI Model Processing**

The request is sent to the **backend API** for processing and the **selected AI model** generates a response.

#### **Step 4: Response Storage**

Chat responses are saved in AI Chat Folder and File-based responses are stored in AI Agent Folder.

### **2. Backend API Endpoints**

#### **1. Create Chat API**

Handles **real-time AI chat interactions**.

**Endpoint:**

```bash
POST /api/chat/create
```

**Request Payload:**

```json
{
  "shareInfoUrls": "string",
  "prompt": "string",
  "model": "string",
  "isFileProcessing": "bool",
  "fileType": "string"
}
```

**Response:**

```json
{
  "status": "success",
  "data": {
    "response": "AI generated response",
    "fileUrl": "https://vult.ai/file/response.pdf"
  }
}
```

#### **2. Batch Processing API**

Processes **multiple files in one request** for AI-based batch execution.

**Endpoint:**

```bash
POST /api/batch/process
```

#### **3. Memory API (Mem0 AI)**

Retrieves **past user interactions** to maintain context across sessions.

**Endpoint:**

```bash
POST /api/memory/search
```

### **3. Backend Implementation Details**

#### **File Upload & Secure Sharing**

Files are not uploaded to third-party AI models. Instead, a secure private share is created using an AuthTicket, which is a unique Base64-encoded authentication token, and a LookupHash, which serves as a reference hash to identify the file.

The AI model then downloads and processes the file.

#### **AI Model Processing Pipeline**

The process begins with the user prompt and any attached file being sent to the Backend API. The backend determines the selected AI model. If a file is attached, it is downloaded from Vult Storage.

The AI model then generates a response, which can be text, image, or document-based. This response is stored and displayed in the user interface.

#### **Memory Retention (Mem0 AI Integration)**

The Mem0 AI API stores previous chat sessions. When a user starts a new conversation, the AI retrieves contextually relevant past interactions.

The retrieved memory is appended to the current prompt before the AI processes it.

### **4. Batch Processing Implementation**

#### **Step 1: User Initiates a Batch Request**

The user begins by selecting a folder containing multiple files. The AI Agent then creates a batch request for processing these files.

#### **Step 2: Backend Processing**

All selected files are securely downloaded. These files, along with any user-defined instructions, are packaged into a JSONL file. This JSONL file is then sent to the OpenAI Batch API for processing.

#### **Step 3: Response Handling**

The batch API processes each file independently. The AI responses are stored as individual text files in the AI Agent Folder. For large batches, processing can take up to 24 hours.

### **5. Database & Storage Design**

#### **AI Chat Storage (NoSQL Database Schema)**

Chat interactions between users and the AI agent are stored in a NoSQL database. The schema is designed to be flexible, allowing for variable message formats, timestamps, metadata, and session grouping.

```json
{
  "user_id": "123456",
  "session_id": "abc789",
  "messages": [
    {
      "timestamp": "2025-03-17T12:34:56Z",
      "user_input": "What is my name?",
      "ai_response": "Your name is Jack."
    }
  ]
}
```

#### **AI Agent Storage (File System-Based)**

While conversations are stored in the database, media assets and outputs generated by the AI agent are saved on the file system for efficient retrieval, archival, and offline access.

* Responses are stored in the **AI Agent Folder** for future retrieval.
* Text responses are stored as **.txt or .pdf files**.
* Image-based responses are **processed and saved** in the **AI Image Directory**.


# Architecture Overview

### **High-Level System Components**

The memory retention system consists of the following components:

<figure><img src="/files/muhOJOHp8JXpdJbaJL5w" alt="" width="563"><figcaption></figcaption></figure>

* **Frontend (Vult AI Chat UI)**
  * Users interact with AI via the chat interface.
  * Prompts and responses are stored in the AI Chat Folder.
* **Backend (AI Processing & Memory Storage)**
  * Handles user queries and processes AI-generated responses.
  * Uses Mem0 AI API for memory storage and retrieval.
  * Stores structured chat logs in a database or file system.
* **Memory Storage Layer (Mem0 AI API)**
  * Stores chat histories and user data.
  * Retrieves relevant memories based on user input and prompt context.
  * Ensures quick access to stored interactions for seamless responses.

### **Backend Implementation**

#### **1. Data Structures (Go Structs for Memory Storage)**

```go
type Chat struct {
    ShareInfoUrls       []string                `json:"share_info_urls"`
    ShareInfoIds        string                  `json:"share_info_ids"`
    Prompt             string                  `json:"prompt"`
    Model              string                  `json:"model"`
    IsFileProcessing   bool                    `json:"is_file_processing"`
    MasterPrompt       string                  `json:"master_prompt"`
    OpenAiMessages     []map[string]interface{} `json:"open_ai_messages"`
    DeepSeekMessages   []map[string]interface{} `json:"deep_seek_messages"`
    FileType           string                  `json:"file_type"`
    IsAgentInput       bool                    `json:"is_agent_input"`
    WebSearch          bool                    `json:"web_search"`
}
```

This struct represents a **chat session** in Vult AI. The key fields are:

* `Prompt`: Stores the user’s **latest query**.
* `Model`: The **AI model** used for processing.
* `OpenAiMessages`: Stores **previous interactions** with OpenAI models.
* `DeepSeekMessages`: Stores **previous interactions** with DeepSeek models.
* `IsAgentInput`: Indicates if the request is from **AI Agent** (file-based processing).

#### **2. Memory Retrieval via Mem0 AI**

```go
func retrieveMemory(userID string, prompt string) (string, error) {
    memoryClient := memory.NewMem0Client(config.Configuration.Mem0ApiKey)

    memoryResponse, err := memoryClient.SearchMemory(userID, prompt)
    if err != nil {
        logger.LogError("AI Chat: Failed to search memory", zap.Error(err))
        return "", err
    }

    if memoryResponse != nil {
        return memoryResponse.Memories, nil
    }
    return "", nil
}
```

This function:

1. **Initializes the Mem0 API client**.
2. Calls `SearchMemory()` to fetch **previously stored interactions**.
3. If memory exists, it returns **retrieved context** to be appended to the user prompt.

#### **3. AI Model Processing with Memory Context**

```go
func processChatRequest(ctx context.Context, chatInput Chat) (Response, error) {
    memoryContext, _ := retrieveMemory(chatInput.UserID, chatInput.Prompt)

    chatInput.Prompt = memoryContext + "\nUser Question: " + chatInput.Prompt

    res, err := aiAgentService.CreateChat(ctx, authHeaders, chatInput)
    if err != nil {
        ctx.AbortWithStatusJSON(http.StatusBadRequest, gin.H{"error": err.Error()})
        return nil, err
    }

    return res, nil
}
```

This function:

1. Calls `retrieveMemory()` to fetch **relevant past interactions**.
2. Appends retrieved memory to the **current user prompt**.
3. Passes the enriched prompt to the **AI model** for response generation.
4. Returns the processed response to the **Vult AI UI**.


# Login / Register

Create your Züs account or log in — with Google, your Züs wallet, or MetaMask.

Your Züs account is a **blockchain wallet** — there is **no email/phone sign-up and no one-time passwords (OTP)**. You create or access it with **Google**, your **Züs wallet (Wallet ID)**, or **MetaMask**. The same account works across every Züs app.

### Registration (Account Creation)

#### Step 1: Choose how to create your account

Go to [vult.network](https://vult.network) and click **Sign Up** in the top-right corner.

<figure><img src="/files/8CxGXfeC22lK99DgvUnE" alt="Vult landing page with Login and Sign Up buttons in the top-right corner"><figcaption><p>The Sign Up button is in the top-right corner</p></figcaption></figure>

On the sign-up screen, pick one of three options:

<figure><img src="/files/CpXCdLrKlbNz0stwjcJS" alt="Vult sign-up page: Continue with Google, or Private (Continue with Zus / MetaMask)"><figcaption><p>The Vult sign-up page</p></figcaption></figure>

* **Continue with Google** — the quickest option. Züs creates and manages a wallet for you, secured with **split-key** technology, and takes you straight into the app.
* **Continue with Zus** (under **Private**) — create a brand-new Züs wallet directly.
* **MetaMask** (under **Private**) — sign up with your existing MetaMask wallet. If the extension isn't installed, Vult shows an install prompt.

{% hint style="info" %}
Already have an account? Click **Login** instead — see the [Login Flow](#login-flow).
{% endhint %}

#### Step 2: Save your recovery phrase

If you chose **Continue with Zus** or **MetaMask** and a new wallet is created, Vult shows you a **recovery phrase (mnemonic)** — 24 words that generate your wallet's private key. Write them down, store them safely **offline**, then click **I have saved my key**.

<figure><img src="/files/PhXqvd7xlFS5YvaQfNJw" alt="The 24-word recovery phrase with an &#x27;I have saved my key&#x27; button"><figcaption><p>Fig: Signup – recovery-phrase viewer</p></figcaption></figure>

{% hint style="danger" %}
Your recovery phrase is the **only** way to recover your account, and **no one at Züs can recover it for you**. Keep it offline, in physical form if you can, and never share it. Losing it puts your data and earnings on the Züs System in severe danger.
{% endhint %}

#### Step 3: Confirm the phrase (and optionally save your wallet)

Vult then asks you to **confirm a few of those words** to prove you saved them. Optionally name the wallet and set a **password** to save it (encrypted) to the Züs cloud — then you can log in with that password instead of typing the full phrase. Click **Continue**.

<figure><img src="/files/m8ztwQzxSsSSOpQDZBPS" alt="Verify your Master Key screen asking you to select specific words"><figcaption><p>Fig: Signup – confirm recovery phrase</p></figcaption></figure>

That's it — you're registered, and your account works across all Züs apps.

### Login Flow

Log back in with the **same method you signed up with**. As with sign-up, there is no email/phone login and no OTP.

#### Step 1: Choose your method

Go to [vult.network](https://vult.network) and click **Login** in the top-right corner.

<figure><img src="/files/aCVJbx8MNHc9K0VqZKiz" alt="Vult login page: Continue with Google, or Private (Continue with Zus / MetaMask)"><figcaption><p>The Vult login page</p></figcaption></figure>

* **Continue with Google** — log in with the Google account you used to sign up.
* **Continue with Zus** (under **Private**) — log in with your **Wallet ID (Client ID)** and passcode.
* **MetaMask** (under **Private**) — connect your MetaMask wallet.

{% hint style="info" %}
New to Züs? Click **Sign Up** to [register](#registration-account-creation).
{% endhint %}

#### Step 2: Wallet ID sign-in (if you chose Continue with Zus)

Enter your **Wallet ID (Client ID)** and your **passcode**, then click **Sign In**.

<figure><img src="/files/HjLF7uvkD0BPLgboVrnY" alt="Sign in with Wallet ID form"><figcaption><p>Fig: Login – sign in with your Wallet ID</p></figcaption></figure>

{% hint style="info" %}
Lost access? On the Wallet ID screen use **Recover with Master Key**, or **Create New Wallet** to start over. Recovery uses your mnemonic / master key — there is no email or OTP reset.
{% endhint %}

That's it! You're now logged in and land on your dashboard.


---

[Next Page](/zus-docs/llms-full.txt/1)